1999 Durango 136a Alternator upgrade (Pictures!)
 09-26-2013, 10:23 PM
#1
CF Veteran
Thread Starter
Join Date: Jul 2012
Location: Andover, VT
Posts: 2,972
Received 226 Likes
on
176 Posts
Year: 1999
Model: Cherokee (XJ)
Engine: 4.0 L
I decided to rewrite this thread today (03/19/17) because my previous write-up was not up to par.
So you need a new alternator? Might as well upgrade! This is a very easy swap that requires only minor modifications. This was one of the first mods I ever did to my Jeep. Before this I had never done an alternator and was very green to working on vehicles. Its very straight forward.
This write-up will be a walk-through of how to outfit 1999+ XJ's with a 136 amp alternator from a 1999 5.2L Dodge Durango. Alternatively, 1998- XJ's can swap in a 136 amp alternator from a 1998 5.2L Jeep ZJ.
Another common alternator upgrade is a 160 amp from Durangos/ZJs. I would actually recommend you look into this swap because I believe it does not require more work than the 136 amp, just different sized wires. If I were to do it again I would do the 160 amp.
Also, many people (especially some of the old timers ) will bring alternators to shops who can rebuild them to get more amperage out of an older alternator. I've never done this but apparently it can be done cheap.
NOTE: I am unsure of the exact date of the break between the two different alternators. It will be best to look at your current alternator and compare with the pictures below. Also, I am unaware of what year this swap goes down to. I know later model alternators have external voltage regulators whereas the earlier models are internally regulated. I believe this will work for 1992+ but I encourage anybody with an older model to do more research outside of this thread.
Before considering upgrading to a higher output alternator, you first must upgrade your main wires in your engine bay. The factory wiring is not sufficient to handle the extra amperage. These connections must be replaced:
- Battery+ to starter motor
- Battery+ to PDC
- Alternator to PDC
- Engine to firewall
- Engine to battery-
- Inner fender to battery-
- ANL fuse
So what size wire and where to get the replacements?
For the 136 amp upgrade the next size ANL fuse is 150 amps. The wires you install should be good for up to the size of the fuse. For the 150 amp fuse you should be installing 4awg wires.
For the 160 amp alternator, the next size up fuse would be 175 amp, which would correlate to 2awg wire. If a 175 amp fuse cannot be sourced and 200 amp is the only option then 1/0awg should be used.
Many will argue the wire sizes I'm recommending are overkill for the rated amperage output of the alternator but it is important to remember that the starter and winches can momentarily pull much more amperage than the alternator is rated for (up to 300 amps). Overkill is better in this situation.
When I did my upgrade I bought the kit from 5-90 here on the forum but unfortunately he no longer makes these kits. There are others who sell similar kits, or you can make your own. I don't have a good source off the top of my head. Perhaps somebody can chime in with a more current vendor.
Onto the actual swap:
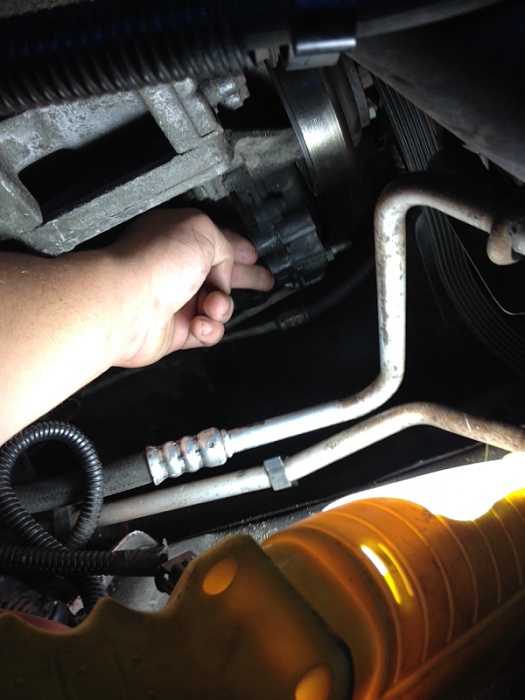
Step one is remove your alternator and mounts. You'll need to remove your battery tray and loosen the belt. From there its just two 15mm bolts and maneuvering it around the AC lines to get the alternator out. Then a few 9/16" bolts to remove the mounts.
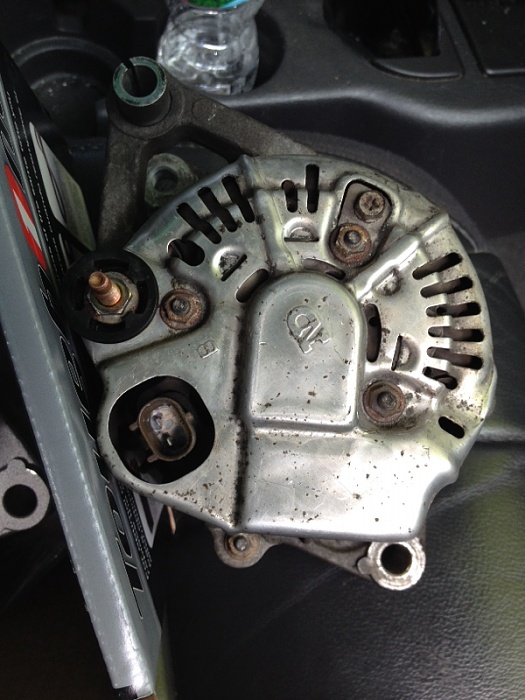
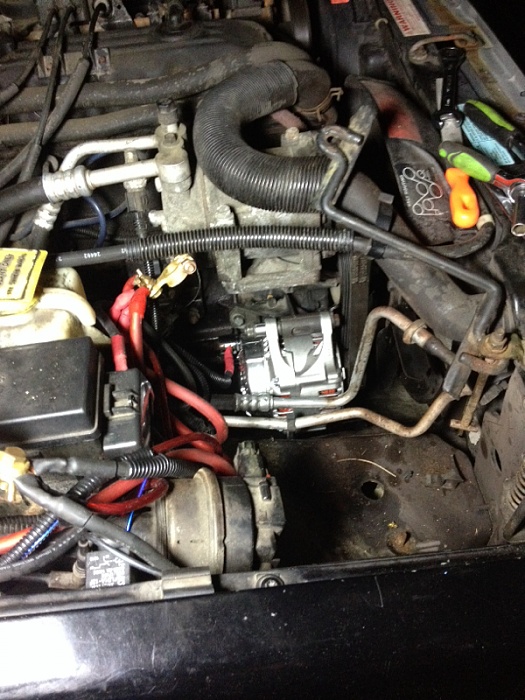
The picture below is the alternator I removed from my 1999. Notice the connections it has. A stud for the positive and a plug for the negative. The newer generation (1999+) has the plug whereas the older generation (1998-) has two smaller studs.
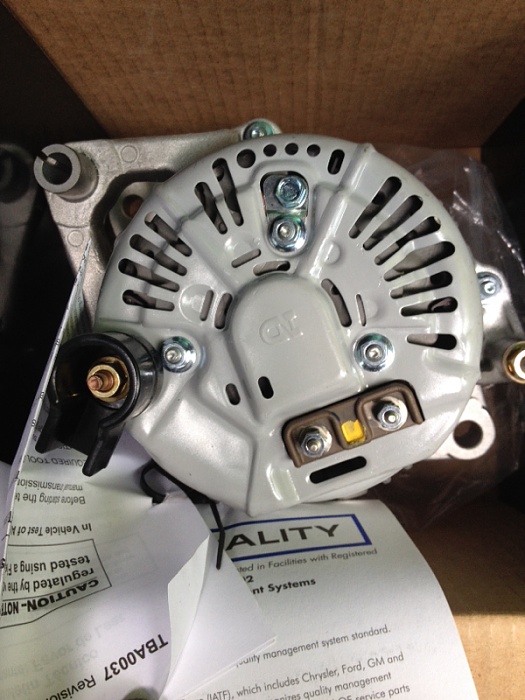
The next two pictures are the different alternators. Take note of the connections.
First one is the 136 amp 1998 5.2L Jeep ZJ which has the two stud connectors.
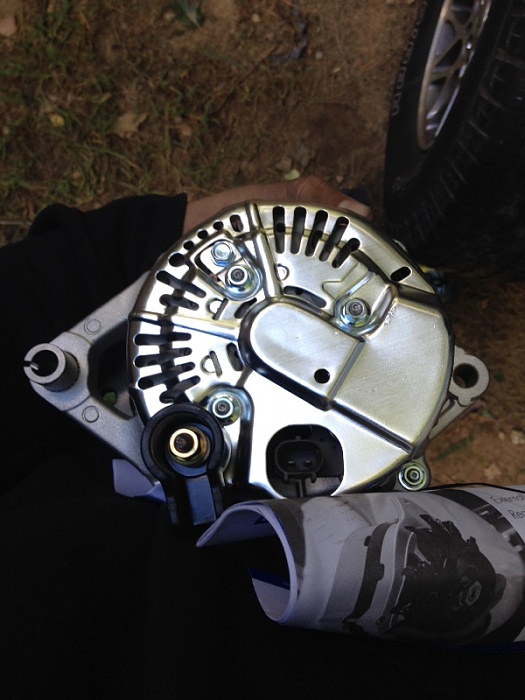
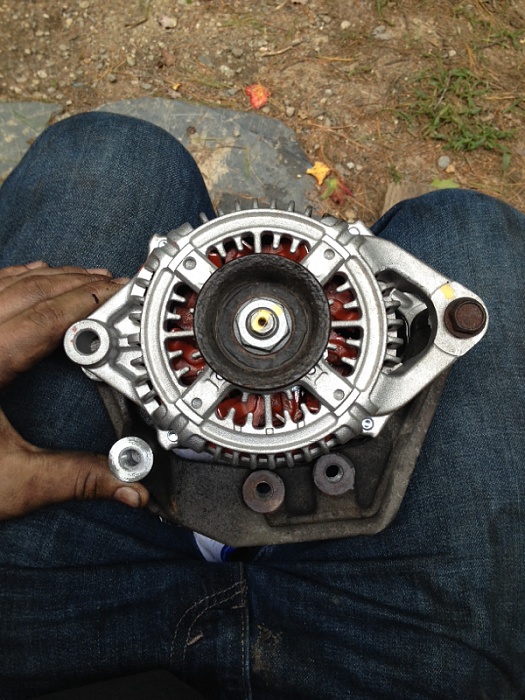
This next picture is the 136 amp 1999 5.2L Dodge Durango alternator. Has the same plug as my XJ alternator.
A few things to note about these new alternators:
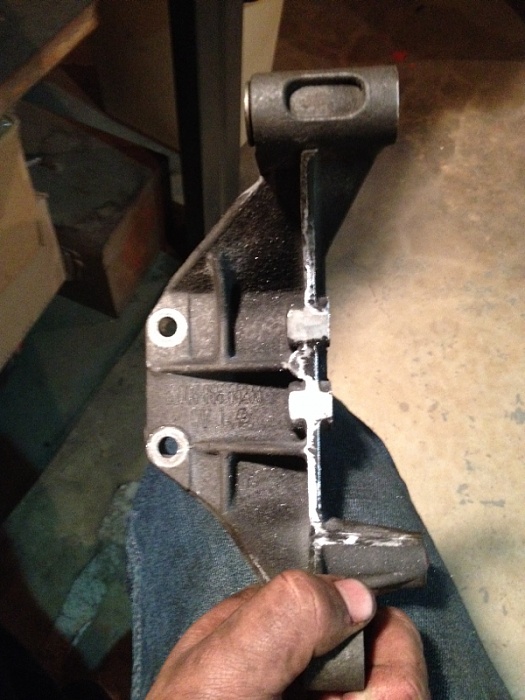
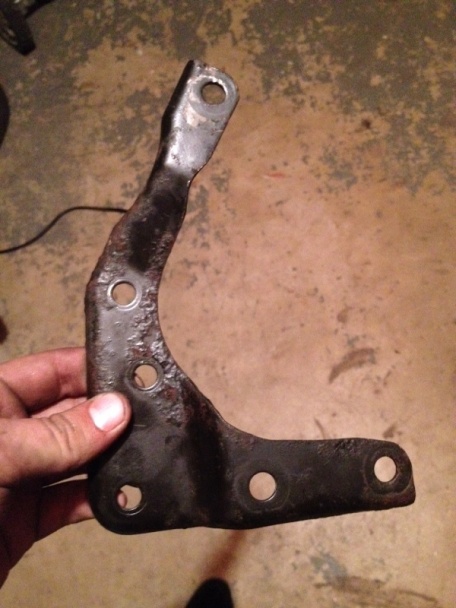
1) The cases are larger and will require grinding the mount(s) to make them fit. My 1999 XJ has a two piece mount whereas the older ones have a one piece mount.
2) The pulley on the Durango alternator is larger and has an extra groove. I swapped my XJ pulley onto the new alternator. This ensures that the belt fits properly but also will spin the alternator faster at the same rpm. That could be seen as a good or a bad thing. If you choose to use the larger pulley just be sure that your belt is routed straight because the pulley is one groove wider. I do not know if the ZJ has a different sized pulley but the same logic applies.
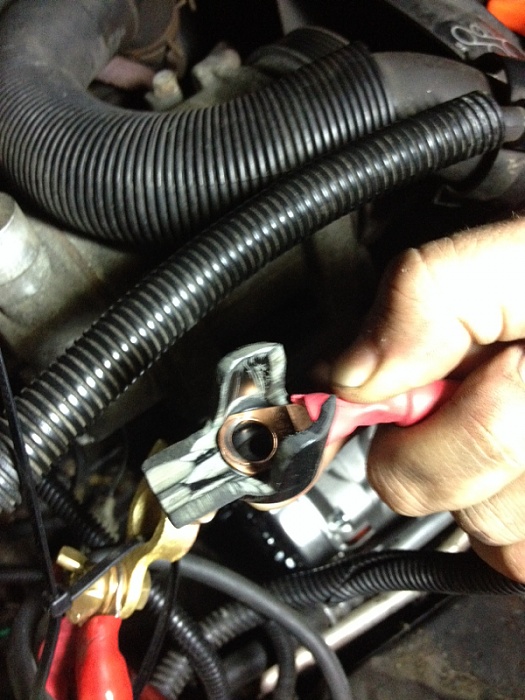
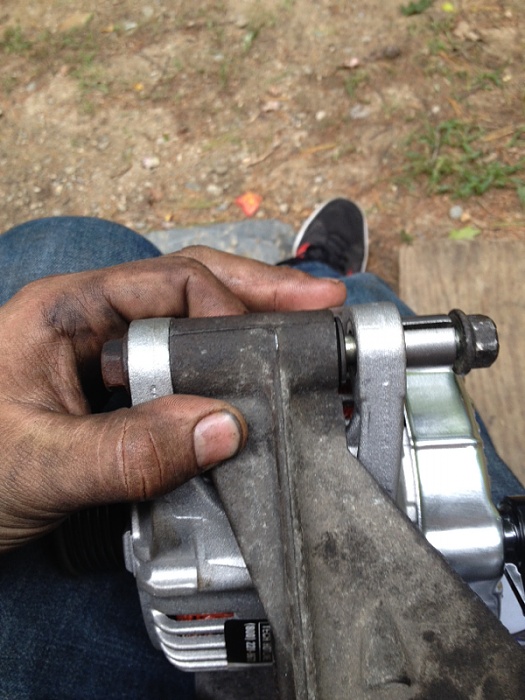
3) The black plastic guard around the positive stud on the Durango alternator faces the wrong way. I read that the XJ one can be used in its place, which I would recommend, but I modified mine to make it work. See picture below. Again, not sure about the ZJ.
The next step is to get the alternator in the mounts while everything is out of the Jeep.
The first thing you'll notice is the top mount on the alternator is over-sized. That sleeve can easily be pressed/tapped in to make up for the difference.
Now try to get the alternator into the mounts. Place one bolt through and note where the case of the alternator contacts the mount, not allowing the other bolt to line up.
This is where you're going to be grinding. Not much material needs to be removed. Just trial and error until you can get that bolt hole lined up.

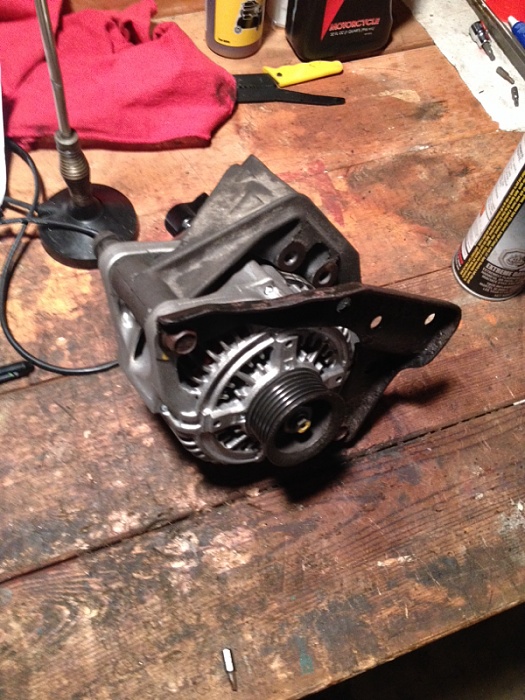
At this point you'll be able to get the alternator bolted onto the mounts.
The block/timing cover also needs to be clearanced a bit. Just a little grinding right here, it lines up where you have to grind on the mount. It bulges out where the two studs come through. There's plenty of meat there and not much needs to be removed.
And with that you should be able to bolt up your new alternator, connect the wires and put everything back in place. If everything went well you should have 14 volts at the end.
Woo! You're done, go grab a(nother) beer.
So you need a new alternator? Might as well upgrade! This is a very easy swap that requires only minor modifications. This was one of the first mods I ever did to my Jeep. Before this I had never done an alternator and was very green to working on vehicles. Its very straight forward.
This write-up will be a walk-through of how to outfit 1999+ XJ's with a 136 amp alternator from a 1999 5.2L Dodge Durango. Alternatively, 1998- XJ's can swap in a 136 amp alternator from a 1998 5.2L Jeep ZJ.
Another common alternator upgrade is a 160 amp from Durangos/ZJs. I would actually recommend you look into this swap because I believe it does not require more work than the 136 amp, just different sized wires. If I were to do it again I would do the 160 amp.
Also, many people (especially some of the old timers
) will bring alternators to shops who can rebuild them to get more amperage out of an older alternator. I've never done this but apparently it can be done cheap.NOTE: I am unsure of the exact date of the break between the two different alternators. It will be best to look at your current alternator and compare with the pictures below. Also, I am unaware of what year this swap goes down to. I know later model alternators have external voltage regulators whereas the earlier models are internally regulated. I believe this will work for 1992+ but I encourage anybody with an older model to do more research outside of this thread.
Before considering upgrading to a higher output alternator, you first must upgrade your main wires in your engine bay. The factory wiring is not sufficient to handle the extra amperage. These connections must be replaced:
- Battery+ to starter motor
- Battery+ to PDC
- Alternator to PDC
- Engine to firewall
- Engine to battery-
- Inner fender to battery-
- ANL fuse
So what size wire and where to get the replacements?
For the 136 amp upgrade the next size ANL fuse is 150 amps. The wires you install should be good for up to the size of the fuse. For the 150 amp fuse you should be installing 4awg wires.
For the 160 amp alternator, the next size up fuse would be 175 amp, which would correlate to 2awg wire. If a 175 amp fuse cannot be sourced and 200 amp is the only option then 1/0awg should be used.
Many will argue the wire sizes I'm recommending are overkill for the rated amperage output of the alternator but it is important to remember that the starter and winches can momentarily pull much more amperage than the alternator is rated for (up to 300 amps). Overkill is better in this situation.
When I did my upgrade I bought the kit from 5-90 here on the forum but unfortunately he no longer makes these kits. There are others who sell similar kits, or you can make your own. I don't have a good source off the top of my head. Perhaps somebody can chime in with a more current vendor.
Onto the actual swap:
Step one is remove your alternator and mounts. You'll need to remove your battery tray and loosen the belt. From there its just two 15mm bolts and maneuvering it around the AC lines to get the alternator out. Then a few 9/16" bolts to remove the mounts.
The picture below is the alternator I removed from my 1999. Notice the connections it has. A stud for the positive and a plug for the negative. The newer generation (1999+) has the plug whereas the older generation (1998-) has two smaller studs.

The next two pictures are the different alternators. Take note of the connections.
First one is the 136 amp 1998 5.2L Jeep ZJ which has the two stud connectors.

This next picture is the 136 amp 1999 5.2L Dodge Durango alternator. Has the same plug as my XJ alternator.

A few things to note about these new alternators:
1) The cases are larger and will require grinding the mount(s) to make them fit. My 1999 XJ has a two piece mount whereas the older ones have a one piece mount.
2) The pulley on the Durango alternator is larger and has an extra groove. I swapped my XJ pulley onto the new alternator. This ensures that the belt fits properly but also will spin the alternator faster at the same rpm. That could be seen as a good or a bad thing. If you choose to use the larger pulley just be sure that your belt is routed straight because the pulley is one groove wider. I do not know if the ZJ has a different sized pulley but the same logic applies.
3) The black plastic guard around the positive stud on the Durango alternator faces the wrong way. I read that the XJ one can be used in its place, which I would recommend, but I modified mine to make it work. See picture below. Again, not sure about the ZJ.

The next step is to get the alternator in the mounts while everything is out of the Jeep.
The first thing you'll notice is the top mount on the alternator is over-sized. That sleeve can easily be pressed/tapped in to make up for the difference.

Now try to get the alternator into the mounts. Place one bolt through and note where the case of the alternator contacts the mount, not allowing the other bolt to line up.

This is where you're going to be grinding. Not much material needs to be removed. Just trial and error until you can get that bolt hole lined up.

At this point you'll be able to get the alternator bolted onto the mounts.

The block/timing cover also needs to be clearanced a bit. Just a little grinding right here, it lines up where you have to grind on the mount. It bulges out where the two studs come through. There's plenty of meat there and not much needs to be removed.

And with that you should be able to bolt up your new alternator, connect the wires and put everything back in place. If everything went well you should have 14 volts at the end.

Woo! You're done, go grab a(nother) beer.
Last edited by XJlimitedx99; 03-19-2017 at 12:05 PM.

The following 2 users liked this post by XJlimitedx99:
318SixPack (11-25-2019),
AudioFreq (08-20-2020)
09-27-2013, 02:44 AM
#2
Member
Join Date: Mar 2013
Location: McMinnville Oregon
Posts: 115
Likes: 0
Received 0 Likes
on
0 Posts
Year: 2000
Model: Cherokee
Engine: 4.0
Very nice. When my Alt goes out. I'll be doing this mod.
So the plastic piece that goes around the positive terminal that you used a grinder on, could this have been avoided by saving the old one off your factory alternator? And I cant see exactly where the block had to be ground down but I imagine it will be apparent when I get in there and look? thanks for the write-up.
So the plastic piece that goes around the positive terminal that you used a grinder on, could this have been avoided by saving the old one off your factory alternator? And I cant see exactly where the block had to be ground down but I imagine it will be apparent when I get in there and look? thanks for the write-up.
 09-27-2013, 08:53 AM
#3
CF Veteran
Thread Starter
Join Date: Jul 2012
Location: Andover, VT
Posts: 2,972
Received 226 Likes
on
176 Posts
Year: 1999
Model: Cherokee (XJ)
Engine: 4.0 L
Very nice. When my Alt goes out. I'll be doing this mod. So the plastic piece that goes around the positive terminal that you used a grinder on, could this have been avoided by saving the old one off your factory alternator? And I cant see exactly where the block had to be ground down but I imagine it will be apparent when I get in there and look? thanks for the write-up.
09-29-2013, 04:46 PM
#4
Junior Member
Join Date: Jun 2010
Location: Pennsylvania
Posts: 40
Likes: 0
Received 0 Likes
on
0 Posts
Year: 1996
Model: Cherokee
Engine: 4.0
i did this same thing to my Jeep a little bit ago but never got around to upgrading the wires. it looks like u upgraded them. what all did u do for them?
09-29-2013, 05:54 PM
#6
Seasoned Member

Join Date: May 2012
Location: Ware Shoals, SC
Posts: 436
Likes: 0
Received 0 Likes
on
0 Posts
Year: 1993
Model: Cherokee
Engine: 4.0L
When I did mine, I didn't need to grind the block at all. Just the mounts.
Plus, I did use the plastic piece off old alt. It fits fine.
Plus, I did use the plastic piece off old alt. It fits fine.
09-29-2013, 06:35 PM
#7
CF Veteran
Join Date: Oct 2011
Location: Seal Beach, CA
Posts: 4,440
Likes: 0
Received 2 Likes
on
1 Post
Year: 1996
Model: Cherokee
Engine: 4.0 HO Straight Six
I had to grind the old bracket like crazy. Also had to grind the block/timing cover a good amount. I used the 136a from a V8 ZJ
Trending Topics
09-29-2013, 09:34 PM
#8
CF Veteran
Thread Starter
Join Date: Jul 2012
Location: Andover, VT
Posts: 2,972
Received 226 Likes
on
176 Posts
Year: 1999
Model: Cherokee (XJ)
Engine: 4.0 L
I ordered the xj kit from Kelley's Works in Progress. Definitely a worth while upgrade. My advice there is just buy his 1awg kit! I bought the 4awg, which is rated at 150 amps, but if I bought the 1awg then I could've done a 160 amp durango alternator, which supposedly is the same size case as the 136 amp
09-30-2013, 07:48 AM
#9
Junior Member
Join Date: Jun 2010
Location: Pennsylvania
Posts: 40
Likes: 0
Received 0 Likes
on
0 Posts
Year: 1996
Model: Cherokee
Engine: 4.0
I ordered the xj kit from Kelley's Works in Progress. Definitely a worth while upgrade. My advice there is just buy his 1awg kit! I bought the 4awg, which is rated at 150 amps, but if I bought the 1awg then I could've done a 160 amp durango alternator, which supposedly is the same size case as the 136 amp
 03-30-2016, 09:43 AM
#13
CF Veteran
Join Date: Jul 2013
Location: Monett, MO.
Posts: 7,554
Likes: 0
Received 14 Likes
on
14 Posts
Year: 1999
Model: Cherokee
Engine: 4.0
I bought an 136 amp from the JY for $25 then took it to an Alt. Shop and had it rebuilt and rewound to 160 amps for $78 so for $103 a 160 amp alt.
Did take almost half an hour to install it though because of the grinding with my air/die grinders of the bracket and manifold on my 99. Longer to upgrade my wiring to the kellyswipe full kit for 200 amp.
Did take almost half an hour to install it though because of the grinding with my air/die grinders of the bracket and manifold on my 99. Longer to upgrade my wiring to the kellyswipe full kit for 200 amp.
04-03-2016, 11:00 AM
#14
CF Veteran
Join Date: Aug 2010
Location: Carlisle, PA
Posts: 1,678
Likes: 0
Received 0 Likes
on
0 Posts
Year: 2000
Model: Cherokee
Engine: Inline 6
i got a dodge durango 360 160a alt for $100. it was an easy install, grinding didnt take long. did you guys upgrade any wiring?
04-03-2016, 01:54 PM
#15
CF Veteran
Join Date: Jul 2013
Location: Monett, MO.
Posts: 7,554
Likes: 0
Received 14 Likes
on
14 Posts
Year: 1999
Model: Cherokee
Engine: 4.0
Yes it has to all be upgraded the stock wiring was not really up to par with a 117 amp alt. Look up the member here that sells the kits kellyswipe.com