Tube Bumper/Air Tank
 03-20-2010, 04:55 PM
#1
Junior Member
Thread Starter
Join Date: Dec 2009
Location: Slapout, AL
Posts: 45
Likes: 0
Received 0 Likes
on
0 Posts
Year: 1992
Model: Cherokee
Engine: 4.0L high output
I had an idea to make a tube bumber with caps on each end and add a air hose chuck for compressed air. That way I have air at all times even on trails. I was wondering if anyone had any ideas what to use or if anyone has ever done this...
 03-20-2010, 05:26 PM
#2
CF Veteran
Join Date: Mar 2009
Location: Tenn. and Mich.
Posts: 28,068
Likes: 0
Received 6 Likes
on
6 Posts
Year: 2004
Model: Grand Cherokee
Engine: 4.7L V8
I've seen it done before with a 6" or 8" pipe. Trouble is it doesn't hold enough air to inflate 2 tires back up to proper pressure, and without an on-board compressor it's really only good for emergency use. Nice idea though.
Dan
Dan
03-20-2010, 05:39 PM
#3
Junior Member
Thread Starter
Join Date: Dec 2009
Location: Slapout, AL
Posts: 45
Likes: 0
Received 0 Likes
on
0 Posts
Year: 1992
Model: Cherokee
Engine: 4.0L high output
Yeah true...what if I had a conpressor ran to the bumper and let it pump when i needed it too. Like maybe ran through an electric switch. Wouldnt it be like air bag suspension works?
03-21-2010, 07:43 PM
#7
Member
Join Date: Feb 2010
Location: Southeast Ohio
Posts: 141
Likes: 0
Received 0 Likes
on
0 Posts
Year: 1995
Model: Cherokee
Engine: 4.0L I6 Power Tech Engine
Again, this is from another guys own XJ site, but this might work for ya. 
Some time back, and for reasons that I can no longer quite recall... I was removing my rear bumper and snapped off a bolt inside the bracket's tack welded nut and then ripped a couple of the tack welded nuts right out of the unibody completely.
*insert 5 minutes of cussin' here*
Time to climb over the neighbor's fence, retrieve that breaker bar thrown there after snapping off those bolts, sit down and pop the top on a cold one! Catastrophe? Nah... What better excuse do ya need to upgrade your rig and dump the old rear bumper than this?!

Official Tech Tip #1 - Remember! Any possible excuse to buy tools or upgrade your rig is good!... and buying tools or upgrading your rig while telling your ol' lady that 'It needed to be fixed... and it's cheaper if I do it myself' is even better!(Especially if ya get away with it!)
Since I had already snapped some of the nuts & bolts in my oem bumper brackets off I went ahead and broke the rest of them off and knocked out the remaining welded in nuts out from the unibody. Now there was little choice but to either get another bumper or remount my original bumper using a complex and time wasting method like having someone reweld the original style nuts back inside the frame (Ha ha ha ha.... yeah, right! That worked out so well the first time!.... And "inside" the frame?) In fact - the only thing left to do is replace this obvious factory defect with a completely new bumper! Right?
A word from our sponsors...
For the ladies reading this: That last paragraph was 'guy logic'. It's the same thing that causes us to leave the seat up one night so you get a 'butt-bath' when you don't cut the bathroom light on... Then the next night we're too lazy to cut the bathroom light on and we pee all over that fantastic new faux leopard fur toilet seat cover your mom gave you. The one we pretended to like so much. Go figure. (Hey - it'll make a great shop rag once the pee is washed out!)
For the guys reading this: Ok - so all of that b.s. from the paragraph above was just a pre-fabricated excuse for you married guys to try out on your wives. Sure, we all know they aren't gonna buy that crock of manure for one second but it might give you a running start ahead of that skillet aimed towards your head when you start trying to explain why you and your drunk buddies wasted the day removing "her" Jeep's bumper for no apparent reason. It's the best I can do. I'm single. For a reason.
Back to the Tech...
After removing the rear bumper and brackets; I used a box wrench and a breaker bar to twist off the remaining tack welded nuts from the rear of the uniframe. I cleaned up the holes with a very large drill bit as needed to remove burrs. NOTE! - If your bumper comes off without breaking those you'll be able to use those to mount up a bumper. (If ya ONLY use the stock mounting points, go with thin wall tubing! Not the heavy stuff I used!) I did some basic measuring at this point to get a rough idea of what would be needed to cover the now bumper-less rear end and decided that naturally, an air tank bumper would be in order!

With a general plan in mind to pick up some lightweight 2" x 4" box tubing and odd bits of steel, I took a trip to our local steel salvage yard. After a bit of poking around, I stumbled across a stack of 4" x 6" 1/4" thick box tubing already pre-cut to 45" lengths. Wow! Talk about heavy! This stuff is wayyyyy too thick, weighs a ton and wasn't quite wide enough to go across the entire rear of the XJ exactly like I wanted... so naturally, I bought some and redesigned the rear bumper to fit the new materials!
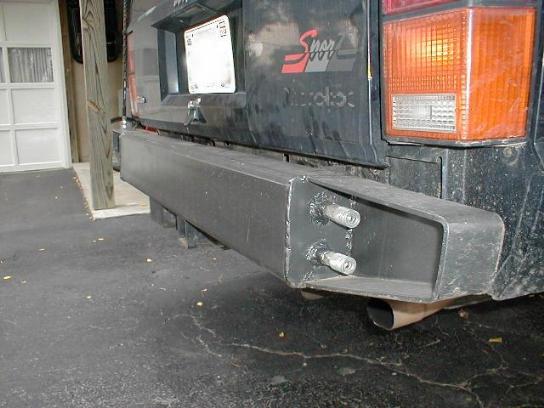
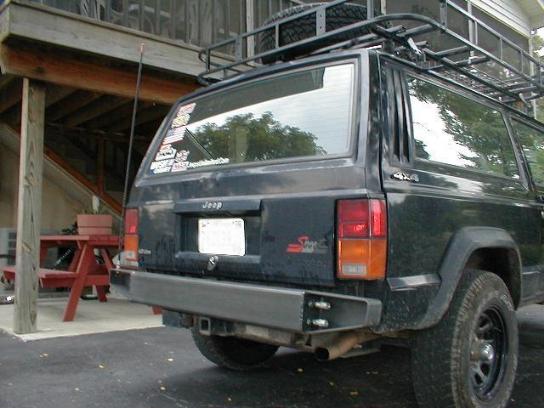
My plan at this point became to use the box tubing as the air tank, locate the tank on center with the XJ's body, add 'ears' to both ends of the tank and extend those ears out to both sides. As shown in the pics, I had two air chuck ports installed, both protected inside the passenger side 'ear'. I plan to add doors over both 'ears' and use the driver side one for storage or for a pressure gauge. As for the brackets to mount the bumper; There are several ways to do this, none of which my welder could comprehend. Best idea: Cut out the rear cover over the uniframe and slip in some box tubing to carry the bumper and reinforce the uniframe in the process. Weld the box tubing to your air tank bumper so that you can slip it in/pull it out as needed & then bolt it up using the receiver hitch holes predrilled in the uniframe. If you actually have a rear receiver hitch, you'll have to do something a bit different or get a bit creative... it can be done but what I ended up with was this: 2 plates cut to fit over the 4 now exposed bumper mounting holes with tabs welded to those to bolt the bumper on to. The bumper also has tabs welded to it and the two tabs are bolted together. This is a royal pain but allows some flexibility during mounting... especially, if your welder is an idiot.
Here's a view of stock bumper's mounting location with oem mounting nuts intact.

 Tech Tip #2 - Learn to weld. That way you'll only be pissed off at yourself if it doesn't turn out EXACTLY like ya wanted it to. Plus, having used this repair as an excuse to buy a welder, you'll also discover how entertained the cat will be when ya strike an arc right behind him when he's snoozin' on that sun-warmed sheet of steel.
Not shown is a 'bleeder valve' located under the passenger side of the tank to drain out any moisture from inside the tank. To hook things up, I carry a few air chuck fittings with me so that I can feed air in from either a male or female air chuck hose but will run a 'hard line' from a compressor when one gets installed. The fittings and air hose can all be found at Harbour Freight for a good price. Air chucks are cheaper when bought in packs of 5, rather than individually. 50' of air hose is about $12 and can be cut to length or just left 'as is'. Just make sure ya have a few different chucks so ya can hook male to male, or male to female if you don't have a hard line feeding the tank from an onboard compressor.
Back to the bumper!... And what you should do differently...
First off, use thinner tubing than 1/4" wall steel! The stuff I used is unbelievably heavy and eats up gas milage and probably my rear springs as well. (On the other hand... anyone rear ending me is in for a helluva surprise!) This thick wall tubing is not needed, it just happened to be in my path at the scrap yard. Another thought; you can probably find an old length of smaller/thinner tubing and stash it underneath alongside your frame rail if ya don't want to fab up a new rear bumper. Keep in mind too that if you're on a budget that pipe tubing is much less expensive than box tubing! Ya probably can't beat the scrap yard prices for either one but one advantage pipe tubing has is that it's available at most hardware outlets. Even cheaper is a portable air tank from WalMart, Northern or Harbour Freight. If you go with a port-a-tank, be sure to mount it out of harms way... who needs more crap flying around inside the rig during a rollover?
Secondly, I have a receiver hitch to hook a line to so while it wasn't critical, I did want to install some d-rings on my tank where the tank is capped off and the ears are attached. Unfortunately, this simple detail was way beyond the comprehension of the welding shop so it didn't happen... If ya do add d-rings, use some extra plating welded to the side, or bracketed around the back of the bumper tubing. Don't have the ring mounts welded to the face of your tank where it break and hurt someone or pull chunks out of thinner wall tubing!
Third... the brackets were a ***** to access when bolting the bumper on. The welder I went to didn't quite understand what I wanted, no matter how many times he nodded his head in 'understanding'. My brackets ended up being plate steel cut to fit flush against the back where the stock brackets went. Flat backing plates were cut to go behind these where the old welded in nuts once were and bolts with lock nuts were used to attach through those. The bumper was then bolted to the mounted brackets using tabs welded onto the back of the air tank. Not the easiest method of attaching this thing.
 Finally, regarding having this done at a welding shop... Be sure the welding shop knows EXACTLY what you want and CAN DO THE JOB!!! Look at work they've done for someone else... someone who's not their friend/relative/lackey/etc. Then, grab a big cardboard box and make a full size mock up of your bumper, or at least make templates and sketch it out on paper with some vague idea of how to explain what you want. Then go see your welder and show him your rig, drawings, templates and thenget (and listen to!) his advice!!! Get the final details down on paper and make sure, once again, that the shop knows EXACTLY what you want! Talk to your local 4wd club... someone around town will be known for their welding skills and being 4wd friendly.
Safety Notes! Drain the tank of moisture periodically and DON'T EXCEED SAFE AIR TANK OPERATING PRESSURES!!! Also, If you run a towing hitch, be sure to allow enough room to have FULL ACCESS and safe towing clearance from it to the bumper! Make sure ya can get the safety pins in & out easily. Mine is a bit tighter than it should be and can be a bit of a pain to remove at times.
Update!
FINALLY got around to rigging the rear bumper up for a compressor.
I used common brass & galvanized pipe fittings from Home Depot to plumb things with. A trip to Harbour Freight netted a cheap regulator, air pressure guage and a 25' roll of air hose. It took a bit of head scratching to make things fit... better to design your system from the ground up & PLAN for your fittings, etc.

This was how I initially hooked it all up. Hose was coiled up and stuffed inside bumper ear.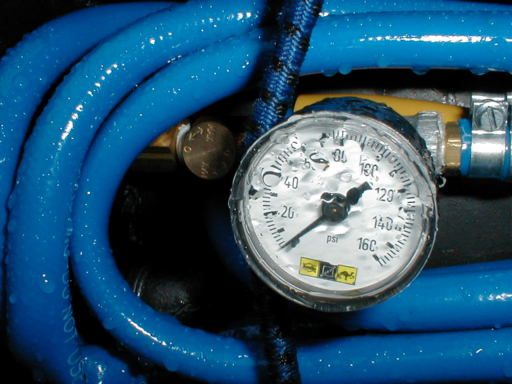
Hose, regulator and guage combined set me back less than $20 from Harbour Freight.
Final layout uses 'stubby' air-chuck hose on a swivel out elbow. No more bungie cords. Soak the chuck with WD-40 from time to time & keep it wrapped with aluminum foil or a rubber cap to keep the muck and dirt out. This set up means keeping your air hose inside but also means it doesn't get pulled off when it snags on a tree.
Some time back, and for reasons that I can no longer quite recall... I was removing my rear bumper and snapped off a bolt inside the bracket's tack welded nut and then ripped a couple of the tack welded nuts right out of the unibody completely.
*insert 5 minutes of cussin' here*
Time to climb over the neighbor's fence, retrieve that breaker bar thrown there after snapping off those bolts, sit down and pop the top on a cold one! Catastrophe? Nah... What better excuse do ya need to upgrade your rig and dump the old rear bumper than this?!
Official Tech Tip #1 - Remember! Any possible excuse to buy tools or upgrade your rig is good!... and buying tools or upgrading your rig while telling your ol' lady that 'It needed to be fixed... and it's cheaper if I do it myself' is even better!(Especially if ya get away with it!)
Since I had already snapped some of the nuts & bolts in my oem bumper brackets off I went ahead and broke the rest of them off and knocked out the remaining welded in nuts out from the unibody. Now there was little choice but to either get another bumper or remount my original bumper using a complex and time wasting method like having someone reweld the original style nuts back inside the frame (Ha ha ha ha.... yeah, right! That worked out so well the first time!.... And "inside" the frame?) In fact - the only thing left to do is replace this obvious factory defect with a completely new bumper! Right?
A word from our sponsors...
For the ladies reading this: That last paragraph was 'guy logic'. It's the same thing that causes us to leave the seat up one night so you get a 'butt-bath' when you don't cut the bathroom light on... Then the next night we're too lazy to cut the bathroom light on and we pee all over that fantastic new faux leopard fur toilet seat cover your mom gave you. The one we pretended to like so much. Go figure. (Hey - it'll make a great shop rag once the pee is washed out!)
For the guys reading this: Ok - so all of that b.s. from the paragraph above was just a pre-fabricated excuse for you married guys to try out on your wives. Sure, we all know they aren't gonna buy that crock of manure for one second but it might give you a running start ahead of that skillet aimed towards your head when you start trying to explain why you and your drunk buddies wasted the day removing "her" Jeep's bumper for no apparent reason. It's the best I can do. I'm single. For a reason.
Back to the Tech...
After removing the rear bumper and brackets; I used a box wrench and a breaker bar to twist off the remaining tack welded nuts from the rear of the uniframe. I cleaned up the holes with a very large drill bit as needed to remove burrs. NOTE! - If your bumper comes off without breaking those you'll be able to use those to mount up a bumper. (If ya ONLY use the stock mounting points, go with thin wall tubing! Not the heavy stuff I used!) I did some basic measuring at this point to get a rough idea of what would be needed to cover the now bumper-less rear end and decided that naturally, an air tank bumper would be in order!
With a general plan in mind to pick up some lightweight 2" x 4" box tubing and odd bits of steel, I took a trip to our local steel salvage yard. After a bit of poking around, I stumbled across a stack of 4" x 6" 1/4" thick box tubing already pre-cut to 45" lengths. Wow! Talk about heavy! This stuff is wayyyyy too thick, weighs a ton and wasn't quite wide enough to go across the entire rear of the XJ exactly like I wanted... so naturally, I bought some and redesigned the rear bumper to fit the new materials!
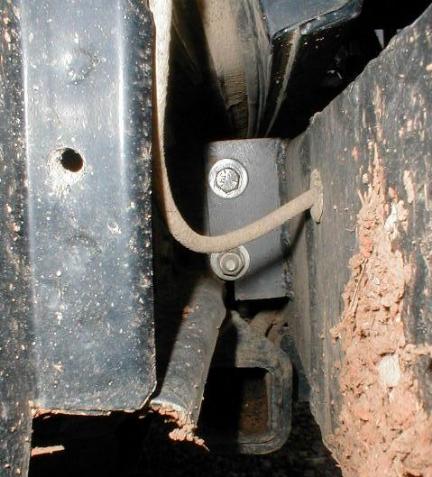
My plan at this point became to use the box tubing as the air tank, locate the tank on center with the XJ's body, add 'ears' to both ends of the tank and extend those ears out to both sides. As shown in the pics, I had two air chuck ports installed, both protected inside the passenger side 'ear'. I plan to add doors over both 'ears' and use the driver side one for storage or for a pressure gauge. As for the brackets to mount the bumper; There are several ways to do this, none of which my welder could comprehend. Best idea: Cut out the rear cover over the uniframe and slip in some box tubing to carry the bumper and reinforce the uniframe in the process. Weld the box tubing to your air tank bumper so that you can slip it in/pull it out as needed & then bolt it up using the receiver hitch holes predrilled in the uniframe. If you actually have a rear receiver hitch, you'll have to do something a bit different or get a bit creative... it can be done but what I ended up with was this: 2 plates cut to fit over the 4 now exposed bumper mounting holes with tabs welded to those to bolt the bumper on to. The bumper also has tabs welded to it and the two tabs are bolted together. This is a royal pain but allows some flexibility during mounting... especially, if your welder is an idiot.
Here's a view of stock bumper's mounting location with oem mounting nuts intact.
If the nuts stay in the frame (as seen above) you can reuse them to mount a lightwieght version of my bumper, otherwise you should reinforce the mounting with some thin, flat steel or fender washers to help spread the load on the steel.
Here's a view of the mounting bracket the welder concocted.
View is from driver side looking between the bumper and the rear of the XJ. BillaVista had an excellent pic of a better bracket at RightCoastCrawlers but they've shut down their site to non-members so not sure if that pic is even in existence any more.
Not shown is a 'bleeder valve' located under the passenger side of the tank to drain out any moisture from inside the tank. To hook things up, I carry a few air chuck fittings with me so that I can feed air in from either a male or female air chuck hose but will run a 'hard line' from a compressor when one gets installed. The fittings and air hose can all be found at Harbour Freight for a good price. Air chucks are cheaper when bought in packs of 5, rather than individually. 50' of air hose is about $12 and can be cut to length or just left 'as is'. Just make sure ya have a few different chucks so ya can hook male to male, or male to female if you don't have a hard line feeding the tank from an onboard compressor.
Back to the bumper!... And what you should do differently...
First off, use thinner tubing than 1/4" wall steel! The stuff I used is unbelievably heavy and eats up gas milage and probably my rear springs as well. (On the other hand... anyone rear ending me is in for a helluva surprise!) This thick wall tubing is not needed, it just happened to be in my path at the scrap yard. Another thought; you can probably find an old length of smaller/thinner tubing and stash it underneath alongside your frame rail if ya don't want to fab up a new rear bumper. Keep in mind too that if you're on a budget that pipe tubing is much less expensive than box tubing! Ya probably can't beat the scrap yard prices for either one but one advantage pipe tubing has is that it's available at most hardware outlets. Even cheaper is a portable air tank from WalMart, Northern or Harbour Freight. If you go with a port-a-tank, be sure to mount it out of harms way... who needs more crap flying around inside the rig during a rollover?
Secondly, I have a receiver hitch to hook a line to so while it wasn't critical, I did want to install some d-rings on my tank where the tank is capped off and the ears are attached. Unfortunately, this simple detail was way beyond the comprehension of the welding shop so it didn't happen... If ya do add d-rings, use some extra plating welded to the side, or bracketed around the back of the bumper tubing. Don't have the ring mounts welded to the face of your tank where it break and hurt someone or pull chunks out of thinner wall tubing!
Third... the brackets were a ***** to access when bolting the bumper on. The welder I went to didn't quite understand what I wanted, no matter how many times he nodded his head in 'understanding'. My brackets ended up being plate steel cut to fit flush against the back where the stock brackets went. Flat backing plates were cut to go behind these where the old welded in nuts once were and bolts with lock nuts were used to attach through those. The bumper was then bolted to the mounted brackets using tabs welded onto the back of the air tank. Not the easiest method of attaching this thing.
View looking down at the brackets from above showing how the two pieces bolt together.
Safety Notes! Drain the tank of moisture periodically and DON'T EXCEED SAFE AIR TANK OPERATING PRESSURES!!! Also, If you run a towing hitch, be sure to allow enough room to have FULL ACCESS and safe towing clearance from it to the bumper! Make sure ya can get the safety pins in & out easily. Mine is a bit tighter than it should be and can be a bit of a pain to remove at times.
Update!
FINALLY got around to rigging the rear bumper up for a compressor.
I used common brass & galvanized pipe fittings from Home Depot to plumb things with. A trip to Harbour Freight netted a cheap regulator, air pressure guage and a 25' roll of air hose. It took a bit of head scratching to make things fit... better to design your system from the ground up & PLAN for your fittings, etc.
This was how I initially hooked it all up. Hose was coiled up and stuffed inside bumper ear.
Hose, regulator and guage combined set me back less than $20 from Harbour Freight.
Final layout uses 'stubby' air-chuck hose on a swivel out elbow. No more bungie cords. Soak the chuck with WD-40 from time to time & keep it wrapped with aluminum foil or a rubber cap to keep the muck and dirt out. This set up means keeping your air hose inside but also means it doesn't get pulled off when it snags on a tree.
Trending Topics
03-21-2010, 08:29 PM
#8
Senior Member
Join Date: Mar 2010
Location: Hampton, Virginia
Posts: 660
Likes: 0
Received 0 Likes
on
0 Posts
Model: Cherokee
Engine: none other
that is why people put CO2 in them holds alot more air per volume. kind of like how a small CO2 tank will air up 4 42s and still run the impact to put them on
 03-21-2010, 09:09 PM
#9
CF Veteran
Join Date: Feb 2010
Location: Soddy Daisy TN
Posts: 5,420
Likes: 0
Received 0 Likes
on
0 Posts
Year: 97
Model: Cherokee
Engine: 4.0L
Don't know may people who have the ability to fill a tank with CO2. I have to have my tank certified every couple of years and don't see anyone getting a bumper certified since CO2 is usually filled to 500-2500 psi. Oh and my 20lb bottle fills roughly 35-40 35" tires from single digits but air tools will drain one quick. I think it would be tons easier to just mount a store bought tank somewhere on the jeep and run lines from the compressor and output to it. Like someone already said your weld better be good. I also wonder about what an impact would do to a bumper full of compressed air.
03-21-2010, 09:47 PM
#10
MJ>XJ
Join Date: Mar 2009
Location: Griffin, G.A.
Posts: 17,836
Likes: 0
Received 4 Likes
on
3 Posts
Year: 1990
Model: Comanche
Engine: 4.0 I6
i built both my bumpers front and rear to be tanks... i planned to convert my AC compressor over AND connect a single line from the front bumper to back bumper... this way the compressor fills the rear by filling the front... a gauge in the cab and a toggle switch... of course dont forget the safety valve for to much pressure...
03-22-2010, 08:37 PM
#11
Member

Join Date: Feb 2010
Location: Strongsville, Ohio
Posts: 118
Likes: 0
Received 0 Likes
on
0 Posts
Year: 1992
Model: Cherokee
Engine: 4.0 l
I was going to make my rock sliders into air tanks. My sliders are out of 3"x6"x3/16" steel. When I pressure tested them my welds were fine but the tube started to bow out and now is not flat. I tested it to only 250psi so not much of a safty factor.
I going to buy a tank when I convert my ac over to air compress.
I going to buy a tank when I convert my ac over to air compress.
07-27-2010, 07:36 PM
#14
Junior Member
Join Date: Jun 2010
Location: Fairport Harbor, Ohio
Posts: 63
Likes: 0
Received 0 Likes
on
0 Posts
Year: 1999
Model: Cherokee
Engine: 4.0L 242 CI 6Cyl
I'm planning on doing this to my bumper, but I wasn't sure how big of a compressor I would need. I'm installing an ARB in the rear that I bought used this weekend and I will be installing one in the front soon. I would like to be able to run both of them and use an impact or air gun if needed. Any suggestions on what cfm I should shoot for?
07-27-2010, 07:53 PM
#15
MJ>XJ
Join Date: Mar 2009
Location: Griffin, G.A.
Posts: 17,836
Likes: 0
Received 4 Likes
on
3 Posts
Year: 1990
Model: Comanche
Engine: 4.0 I6
120cfm i think... i think thats what my little roll around compressor is and it runs everything ive stuck to it... although a ziz wheel slows down a bit after a few minutes and keeps the compressor running always... guns and body saw and all that dont bother it...