New rear bumper build
 08-15-2011, 12:59 PM
#1
Seasoned Member
Thread Starter
Join Date: Jun 2010
Location: Charleston, SC
Posts: 448
Likes: 0
Received 0 Likes
on
0 Posts
Year: 1990 - 2000
Model: Cherokee
Engine: 4.0
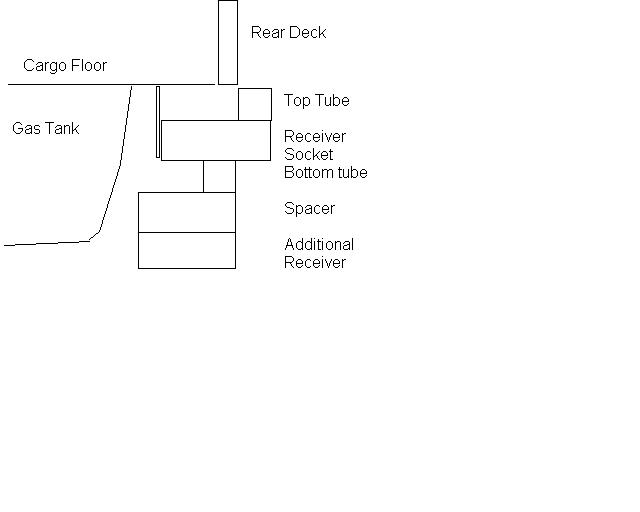
I started getting serious about fabricating a new rear bumper and wanted to get some input from the experts here.
The majority of the material is 2” square tubing with 1/8” walls. There are stacked two pieces per side that extend into the frame rails. The lower tube houses the clevis mount and has the 6 holes per side for the nut strip to attach to. It also has tight holes for the upper shackle bolt to pass through. The upper bumper tube will sit on top of this tube. The upper tube in the frame will be welded to the lower and will be staggered back 2” so that the upper bumper tube will sit against it. I also am using the 8 original bumper mounts attached to angle formed from a slit tube.
I fabricated up the clevis mounts from 2” solid square stock. I cut it down to slip into the 2”: tubing and made it long enough to replace the last 2 nuts on the nut strip. This is also bolted to the side brackets. It will be welded into the 2 “ tubing at several spot weld holes, at the outer end, and to the top tube which is resting on it.
The lower bumper tube will be 2.5” below and 2” forward of the upper bumper tube to increase the approach angle. This tube will be welded to the frame mount tubes. It will also be bolted through the frame mount tubes into the clevis mounts.
Between the upper and lower bumper tubes will be 3 receiver sockets made out of 2.5” square Ľ” wall tubing. The center one is for towing, cargo rack, bike rack… The left and right are for additional supports for the cargo rack or for the spare tire carrier I plan on building.
I want to add an additional receiver, but am concerned about permanently hanging it from the bumper due to clearance concerns. I am thinking about adding some angle and bolting the lower receiver by four ľ” bolts. Let me know what you think and any suggestions for improvement. Thank you.
 08-16-2011, 06:36 AM
#2
Member
Join Date: May 2010
Location: Concord, NH
Posts: 182
Likes: 0
Received 0 Likes
on
0 Posts
Year: 1998
Model: Cherokee
Engine: 4.0L
from what your saying and what i see,and the 2" square .25" wall being tough stuff, you'll be fine, I would look into getting rid of the reese hitch already there in picture... and why are the two width tubes 2.5" apart?
maybe just to over do it you could weld some angle along the back of the upper width tube for pull strengh and not have it bend out...

like this, or backed right against tube and welded on, advantage of picture is you could bolt in to unibody (cargo floor) at back edge from the underside
maybe just to over do it you could weld some angle along the back of the upper width tube for pull strengh and not have it bend out...
like this, or backed right against tube and welded on, advantage of picture is you could bolt in to unibody (cargo floor) at back edge from the underside
08-16-2011, 11:11 AM
#3
Seasoned Member
Thread Starter
Join Date: Jun 2010
Location: Charleston, SC
Posts: 448
Likes: 0
Received 0 Likes
on
0 Posts
Year: 1990 - 2000
Model: Cherokee
Engine: 4.0
from what your saying and what i see,and the 2" square .25" wall being tough stuff, you'll be fine, I would look into getting rid of the reese hitch already there in picture... and why are the two width tubes 2.5" apart?
maybe just to over do it you could weld some angle along the back of the upper width tube for pull strengh and not have it bend out...
like this, or backed right against tube and welded on, advantage of picture is you could bolt in to unibody (cargo floor) at back edge from the underside
maybe just to over do it you could weld some angle along the back of the upper width tube for pull strengh and not have it bend out...
like this, or backed right against tube and welded on, advantage of picture is you could bolt in to unibody (cargo floor) at back edge from the underside
The tubes are 2.5" apart so that the three receiver sockets can fit between them without notching the tubes. All of the tubes are all 1/8" wall except the four reciever sockets. The fourth socket (lower one in the center currently holding the Reese 2" ball) is the one in question. I am concerned that it could be a snag point in some situations and since I do not need it every day, I may make it a bolt on. The bottom of it is going to hang 4.5"-5" below the lower tube with the aftmost edge being directly below the back edge of the lower tube.
I am a bit confused about bolting it to the cargo floor. I have the gas tank and skid plate in front of the low center receiver. The back edge is going to be under the rear hatch.
My last bumpers (front and rear) have the receivers sticking out like steel phalices. I'd rather have them tucked in between the tubes for a cleaner look.
 08-16-2011, 03:11 PM
#5
Member
Join Date: May 2010
Location: Concord, NH
Posts: 182
Likes: 0
Received 0 Likes
on
0 Posts
Year: 1998
Model: Cherokee
Engine: 4.0L
Here is a section view from the side of what it will look like:
Attachment 61772
Attachment 61772
With the tube just held at the bumper brackets the center will want to bend out when you go to pull from the center...
 08-17-2011, 05:41 AM
#7
Seasoned Member
Thread Starter
Join Date: Jun 2010
Location: Charleston, SC
Posts: 448
Likes: 0
Received 0 Likes
on
0 Posts
Year: 1990 - 2000
Model: Cherokee
Engine: 4.0
The upper center one is for my cargo rack, bike rack, speed clevis, roof rack step, and plug in winch… I may use this one if I am towing a heavy load or a trailer with a high hitch. The left and right are for additional supports for the cargo rack or for the spare tire carrier I plan on building.
The additional one I am worried about is the lower one in the center. I want it to be at least 6" below the upper center so that I can tow a trailer and have a bike rack on the upper. The lower height will also help when towing trailers with low tounge height, when I want the trailer deck lower in the front (moving), or when I use my plug in winch to drag a load up onto the trailer (dead car onto trailer). The issue is how low it will hang and the effect it will have on ground clearance.
I may end up making it a bolt on, so I can take it off when not in use. Any suggestion are appreciated.
Last edited by notop46; 08-17-2011 at 07:25 AM.
Trending Topics
08-17-2011, 07:23 AM
#8
Seasoned Member
Thread Starter
Join Date: Jun 2010
Location: Charleston, SC
Posts: 448
Likes: 0
Received 0 Likes
on
0 Posts
Year: 1990 - 2000
Model: Cherokee
Engine: 4.0
Here is a couple of pictures of my swivel speed clevis (patent pending). It consists of a 3/8 chain hook, a section of 2" square tubing 1/4" wall, a section of 3/8" chain, a chain coupler, and a 3/8" bolt (grade 8) and nut. The tubing is cut to allow the hook to swivel and bored for the receiver pin and hook. The chain is in a loop coupled end to end by the coupler. The bolt is inserted through the tubing, hook, coupler, hook, and tubing. The nut is tightened and welded on the end to prevent removal.
It can be used in several ways: 1) a chain can be hooked onto the chain loop 2) a chain without hook can be attached to the clevis hook 3) a strap with a loop end can be attached by slipping the chain loop through the strap loop and hooked on the clevis hook.
Feel free to reproduce for your personal use. I plan to market these in the near future and reserve licensing rights.
08-30-2011, 11:00 AM
#9
Seasoned Member
Thread Starter
Join Date: Jun 2010
Location: Charleston, SC
Posts: 448
Likes: 0
Received 0 Likes
on
0 Posts
Year: 1990 - 2000
Model: Cherokee
Engine: 4.0
I have made a bit more progress on the bumper. I have all of my mount nutstrips welded into the unibody insert tubes. I have also welded the solid clevis mounts into the tubes as well. I mounted the tubes into the unibody and then bolted the angle brackets to the body and tube. All these parts are welded up.
Next, I will be forming up the corners of the top tube and the mounts for the low center receiver socket.
Next, I will be forming up the corners of the top tube and the mounts for the low center receiver socket.
09-15-2011, 10:48 AM
#10
Seasoned Member
Thread Starter
Join Date: Jun 2010
Location: Charleston, SC
Posts: 448
Likes: 0
Received 0 Likes
on
0 Posts
Year: 1990 - 2000
Model: Cherokee
Engine: 4.0
I finally got all of the pieces fabricated, welded together and painted up. I put two ľ” stainless steel nuts on a nut strip and put it inside the lower tube. I did the same for the stubby tube supporting the center receiver. Behind the center receiver, I added a piece of 1-1/2” angle to mount my safety chain loops to and also an additional two bolt holes to support for the drop receiver.
The wrap around, mitered corners have 1-3/4” square tube inserted inside for additional support. The forward extension tapers down to 5/8” where a piece of SS tubing is inserted in the opening and welded in place.
I ended up putting a port with a Ľ” NPT pipe plug in the underside of the top tube. This along with the four ľ” holes in the lower tubes allowed me to fill the tubes with paint after final welding. I hung the bumper from the kid’s swing set, funneled the paint into the tubes, plug the holes, and then rolled and twisted to let the paint coat all of the internal surfaces. Once done, I removed the plugs one by one and drained the paint out. I also filled the open ended support tubes and drained them. This should prevent any internal rust issues with the tubes, the pin holes in the welds, or the lap joints within the splices and nut strips. I let everything dry and drain for a day before coating the exposed surfaces in black.
Next up, I’ll start working on the removable swing out tire carrier supported by the outer receiver sockets.
10-16-2011, 12:46 PM
#12
Seasoned Member
Thread Starter
Join Date: Jun 2010
Location: Charleston, SC
Posts: 448
Likes: 0
Received 0 Likes
on
0 Posts
Year: 1990 - 2000
Model: Cherokee
Engine: 4.0
Thank you. I have seen man good looking bumpers that have been my inspiration.
After I took the old bumper off and heard the water swirling inside, I thought that painting the inside would be a good idea. The paint port for the upper tube is shown on the left side in the attached photo.
After I took the old bumper off and heard the water swirling inside, I thought that painting the inside would be a good idea. The paint port for the upper tube is shown on the left side in the attached photo.
10-16-2011, 01:07 PM
#13
CF Veteran
Join Date: Jan 2011
Location: Littleton, CO
Posts: 2,765
Likes: 0
Received 0 Likes
on
0 Posts
Year: 1991
Model: Cherokee
Engine: 2001 4.0L
i like your frame tie-ins. def the way to do it!!
i didnt do that on my bumper because it will be tied into the cage and unibody in 6 places.
i didnt do that on my bumper because it will be tied into the cage and unibody in 6 places.
10-17-2011, 06:04 AM
#14
Seasoned Member
Thread Starter
Join Date: Jun 2010
Location: Charleston, SC
Posts: 448
Likes: 0
Received 0 Likes
on
0 Posts
Year: 1990 - 2000
Model: Cherokee
Engine: 4.0
Thank you. The concepts came from this site. The only things I can take credit for trying is using two pieces of 2" sqare tubing stacked and putting a hole for the leaf spring shackle bolt to go into rather than using a slot. I also added a M16 nut on my nut-strip to attach a M16 lifting eye. The brackets are simply sliced and diced 2" square tubing.

Thread
Thread Starter
Forum
Replies
Last Post
southfloridajeeps
Modified XJ Cherokee Tech
32
03-04-2023 01:10 PM
RickJames Bish
Modified XJ Cherokee Tech
5
09-02-2015 03:22 PM
Currently Active Users Viewing This Thread: 1 (0 members and 1 guests)