Putco headlight wire harness install
 08-25-2012, 11:50 AM
#1
Junior Member
Thread Starter
Join Date: Apr 2010
Location: Denver, CO
Posts: 33
Likes: 0
Received 0 Likes
on
0 Posts
Year: 1998
Model: Cherokee
Engine: 4.0l 6
Putco headlight wire harness. Hopefully this will encourage those of you not sure about it to do it, the whole thing only took about an hour. I won't go into detail about how good it is, because so many others have already done that. Let's just say it is worth twice as much as you pay for it.
I am installing this on my 1998 Cherokee Sport.
This is where I got the harness:
Tools needed: pliers, 13&15 mm socket with extension, 13mm wrench, hammer,drill,phillips head screw driver, needle nose pliers.
This is what it looks like open.

DSCN0450 by carlover77, on Flickr
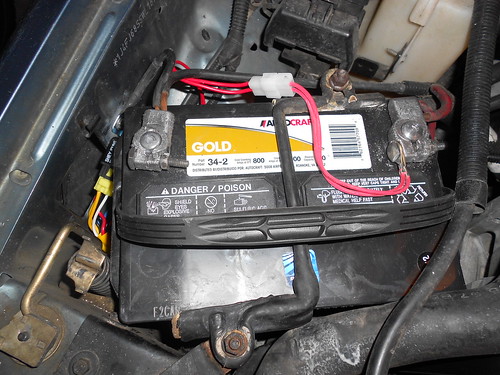
I started by removing the battery and battery tray. I removed the battery tray as it gave me a bit more room and I was going to replace it with a junkyard find. The battery hold downs were 13mm, the battery tray nuts were 15mm.

DSCN0454 by carlover77, on Flickr
I then removed the headlight surrounds, headlights and the grill. 4 screws for the grill, 2 for each headlight surround and 4 for each headlight bracket. All Phillips head screws.

DSCN0452 by carlover77, on Flickr
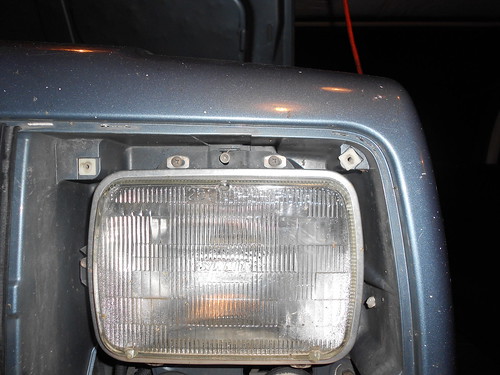
DSCN0453 by carlover77, on Flickr
I then fed the wire harness, with the headlight plug first, in through a hole behind the passenger side headlight and fed it through to the space in front of the radiator. I had to feed it in and then use a pair of needle nose pliers to grab the wire so I could pull it through.

DSCN0456 by carlover77, on Flickr

DSCN0457 by carlover77, on Flickr
DSCN0460 by carlover77, on Flickr
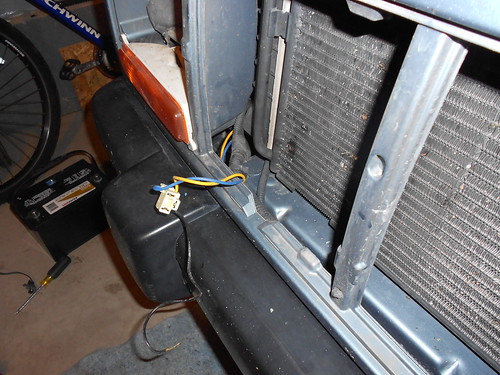
I then ran the end behind the other headlight bucket and brought the connector and ground wire through the headlight bucket. The drivers side was a bit more difficult as there is no access to it from the engine bay.
DSCN0462 by carlover77, on Flickr
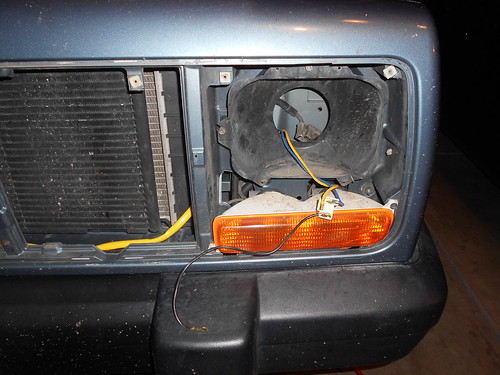
The passenger side harness includes a female and male plug, the female is for your headlight, the male plugs into your stock headlight harness. I then tucked it in behind the headlight bucket.
DSCN0461 by carlover77, on Flickr
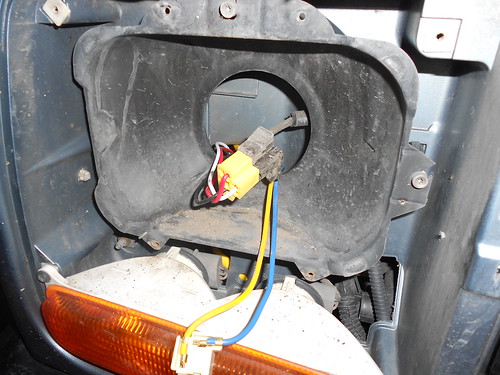
It should look like this now.
DSCN0466 by carlover77, on Flickr
I used a drill and self tapping screws with a large head to attach the ground wires. The drivers side was attached to the sheet metal directly behind the headlight bucket off to one side. The passenger side was run back into the engine bay and attached there.
DSCN0469 by carlover77, on Flickr
DSCN0471 by carlover77, on Flickr
I used the existing ground from the battery to attached the two relays and bracket to the engine bay. Be sure to mount the relays with the pins facing down to prevent water from getting into them. Then I reinstalled the battery tray and battery. You may have to adjust the position of the relays depending on the size of your battery.

DSCN0472 by carlover77, on Flickr
DSCN0475 by carlover77, on Flickr
The red wires with the eyelets were then attached to the positive side of the battery. I tested the lights before buttoning everything back up.Then use the provided zip ties to tie the new harness to the stock harness.
DSCN0474 by carlover77, on Flickr
Just make sure you put your headlights back in right side up, the bracket to hold them in can only go on one way due to the space between the holes. Also make sure you do not attempt to tighten down your battery too tight as the plastic battery tray will snap where the rods attach. And if you take out the battery tray, make sure you put the rods back through the tray before you install it as there is no way to do it once the tray has been installed.
The kit says to install fuses between the harness and the battery, but includes no fuse holders. As soon as I get some more free time I will be splicing in some fuses.
Over all this was an easy install and the change in light output is unbelievable.
I am installing this on my 1998 Cherokee Sport.
This is where I got the harness:
Tools needed: pliers, 13&15 mm socket with extension, 13mm wrench, hammer,drill,phillips head screw driver, needle nose pliers.
This is what it looks like open.
DSCN0450 by carlover77, on Flickr
I started by removing the battery and battery tray. I removed the battery tray as it gave me a bit more room and I was going to replace it with a junkyard find. The battery hold downs were 13mm, the battery tray nuts were 15mm.
DSCN0454 by carlover77, on Flickr
I then removed the headlight surrounds, headlights and the grill. 4 screws for the grill, 2 for each headlight surround and 4 for each headlight bracket. All Phillips head screws.
DSCN0452 by carlover77, on Flickr
DSCN0453 by carlover77, on Flickr
I then fed the wire harness, with the headlight plug first, in through a hole behind the passenger side headlight and fed it through to the space in front of the radiator. I had to feed it in and then use a pair of needle nose pliers to grab the wire so I could pull it through.
DSCN0456 by carlover77, on Flickr
DSCN0457 by carlover77, on Flickr
DSCN0460 by carlover77, on Flickr
I then ran the end behind the other headlight bucket and brought the connector and ground wire through the headlight bucket. The drivers side was a bit more difficult as there is no access to it from the engine bay.
DSCN0462 by carlover77, on Flickr
The passenger side harness includes a female and male plug, the female is for your headlight, the male plugs into your stock headlight harness. I then tucked it in behind the headlight bucket.
DSCN0461 by carlover77, on Flickr
It should look like this now.
DSCN0466 by carlover77, on Flickr
I used a drill and self tapping screws with a large head to attach the ground wires. The drivers side was attached to the sheet metal directly behind the headlight bucket off to one side. The passenger side was run back into the engine bay and attached there.
DSCN0469 by carlover77, on Flickr
DSCN0471 by carlover77, on Flickr
I used the existing ground from the battery to attached the two relays and bracket to the engine bay. Be sure to mount the relays with the pins facing down to prevent water from getting into them. Then I reinstalled the battery tray and battery. You may have to adjust the position of the relays depending on the size of your battery.
DSCN0472 by carlover77, on Flickr
DSCN0475 by carlover77, on Flickr
The red wires with the eyelets were then attached to the positive side of the battery. I tested the lights before buttoning everything back up.Then use the provided zip ties to tie the new harness to the stock harness.
DSCN0474 by carlover77, on Flickr
Just make sure you put your headlights back in right side up, the bracket to hold them in can only go on one way due to the space between the holes. Also make sure you do not attempt to tighten down your battery too tight as the plastic battery tray will snap where the rods attach. And if you take out the battery tray, make sure you put the rods back through the tray before you install it as there is no way to do it once the tray has been installed.
The kit says to install fuses between the harness and the battery, but includes no fuse holders. As soon as I get some more free time I will be splicing in some fuses.
Over all this was an easy install and the change in light output is unbelievable.
Last edited by carlover77; 02-17-2013 at 09:02 AM. Reason: add info


Thread
Thread Starter
Forum
Replies
Last Post
BayArea93xj
Stock XJ Cherokee Tech. All XJ Non-modified/stock questions go here
8
06-11-2016 10:43 AM
ammonllewis1
Stock XJ Cherokee Tech. All XJ Non-modified/stock questions go here
9
08-31-2015 11:27 AM
xjallseasons
Stock XJ Cherokee Tech. All XJ Non-modified/stock questions go here
7
08-29-2015 08:31 PM
Currently Active Users Viewing This Thread: 1 (0 members and 1 guests)