Jeep Cherokee Exhaust Manifold Replacement (91-98)
 03-07-2011, 09:36 PM
#1
CF Veteran
Thread Starter
Join Date: Oct 2009
Location: Fauquier County, Virginia
Posts: 2,867
Likes: 0
Received 15 Likes
on
13 Posts
Year: 1991
Model: Cherokee
Engine: I-6 4.0 HO
Intro
Everyone has heard about it: the dreaded exhaust manifold crack that plagues the Jeep 4.0 engine. It is not a matter of if it will happen, but rather when it will happen. Well, my '91 XJ developed a crack about a month after I bought it back in October of 09. It wasn't anything major; just a bad smell outside if I sat in one spot for a few minutes idling and the louder exhaust noise. Then, just last week, the crack became much worse. The noise it gave off would make you think there was a rock under your valve cover, and even worse was the fact that fumes we're getting in the cab, making me sick. So, I decided the time came to replace it. At first, I was terrified of the idea of ripping so much off of my engine, and searched everywhere for a good write-up. I had to piece 2 or 3 write-ups together to get a full picture, so I figured I would make one with lots of pictures and exact step-by-step instructions and tricks I used when I did mine. Keep in mind that mine was a 91 XJ, and that the exhaust manifolds on the 91-98 (maybe early 99) XJ's are different than those on the Renix (90- back) and 99-01 XJ's.
Everyone has heard about it: the dreaded exhaust manifold crack that plagues the Jeep 4.0 engine. It is not a matter of if it will happen, but rather when it will happen. Well, my '91 XJ developed a crack about a month after I bought it back in October of 09. It wasn't anything major; just a bad smell outside if I sat in one spot for a few minutes idling and the louder exhaust noise. Then, just last week, the crack became much worse. The noise it gave off would make you think there was a rock under your valve cover, and even worse was the fact that fumes we're getting in the cab, making me sick. So, I decided the time came to replace it. At first, I was terrified of the idea of ripping so much off of my engine, and searched everywhere for a good write-up. I had to piece 2 or 3 write-ups together to get a full picture, so I figured I would make one with lots of pictures and exact step-by-step instructions and tricks I used when I did mine. Keep in mind that mine was a 91 XJ, and that the exhaust manifolds on the 91-98 (maybe early 99) XJ's are different than those on the Renix (90- back) and 99-01 XJ's.

The following users liked this post:
kenf15 (03-28-2020)
03-07-2011, 10:25 PM
#2
CF Veteran
Thread Starter
Join Date: Oct 2009
Location: Fauquier County, Virginia
Posts: 2,867
Likes: 0
Received 15 Likes
on
13 Posts
Year: 1991
Model: Cherokee
Engine: I-6 4.0 HO
First thing is first: have a replacement manifold ready to go. I myself ordered an APN header from ineedparts.com. Here is the link:
http://www.ineedparts.com/auto-parts...-manifold.html
Very beefy construction, very solid, lifetime warranty, and stainless steel. You will notice that the APN header is of a different design than the OEM replacement. No worries; everything lines up the same. Also, be sure to have some High Temp thread sealer and High Temp Copper Gasket spray with you. Both can be bought at Autozone.
Tools you will need are:
-Usual assortment of sockets, socket wrenches, extensions
-Torque Wrench
-Swivel-head Gear Wrenches (if possible...they help a lot) or just regular gear wrenches
-Jack and jackstands or ramps
**Be sure to spray as many of the manifold bolts as possible with PB Blaster a couple of nights before the job to get them all out. I did mine, and all came out easy.**
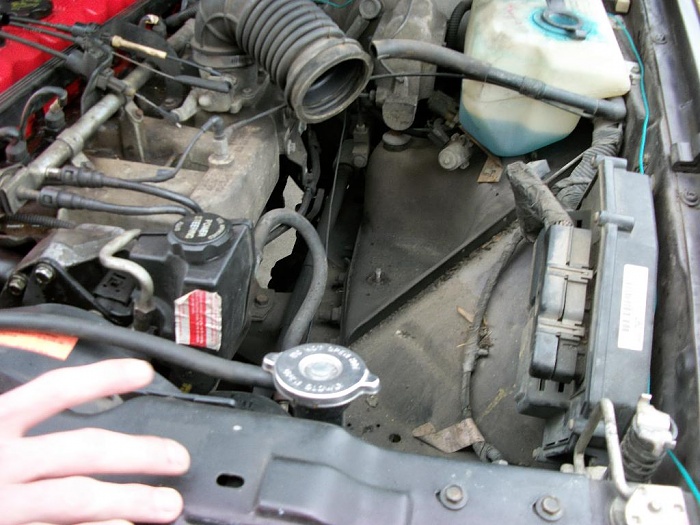
Now it's time to git'r'done. If you're XJ doesn't have much or any lift (like mine), drive it up on some ramps or jack it up a good ways and support it on jack stands. Disconnect the negative battery cable, and string it up out of the way to make sure it doesn't connect with any metal. Also, you need to relieve the fuel pressure. To do this, simply unscrew the little tire-valve like cap in the center of the fuel rail, and use a small screw-driver or punch to press in the valve. Have rags ready to catch the fuel.
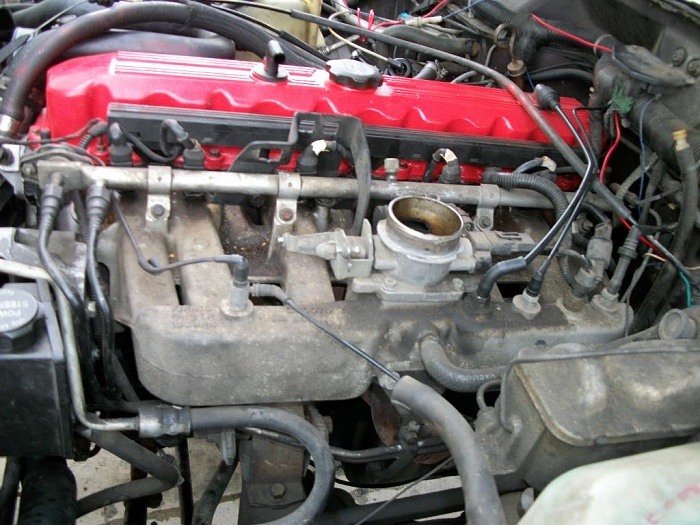
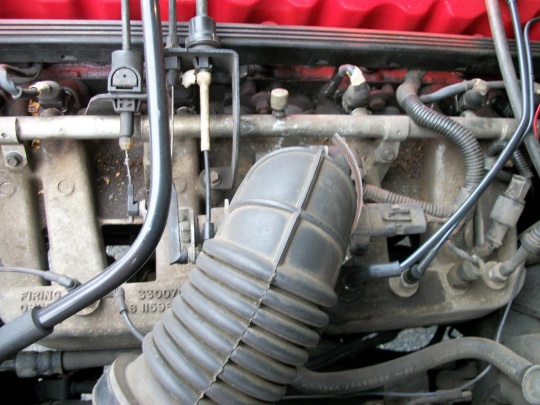
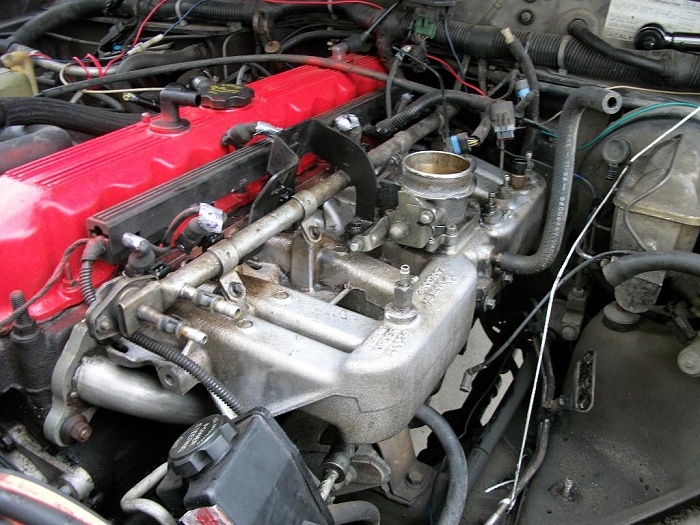
Take a picture of your intake manifold before you do anything. This will provide a base for when you hook everything back up should you forget where something goes.

Next, label all connections. Label EVERYTHING. Be sure to label all the injector connections in the proper order (closest to the front of the engine is #1, furthest and last is #6). Label the connections to the throttle body. Label the hoses to the manifold. EVERYTHING. This will make your life MUCH easier when reassembly comes.
Next, remove the air cleaner assembly. To do this, remove the first CCV hose running from the front of the valve cover to the air box, and then disconnect the rear hose from the fender-side of the airbox that runs around towards the fire wall. Next, loosen the clamp around the throttle body. You can also loosen the connection to the air box lid, but it isn't really neccesary. Remove the air box lid by unhooking the little connections on each side of the lid. Take it off and set it aside with the hose that connects to the TB. Take out the air filter, and then proceed to remove the bolts and nuts from the bottom of the air box. The air box will then lift right out; be sure to keep all the bolts and nuts you removed with the air box.
Next, remove the throttle, cruise control, and transmission valve control cables from the throttle body. The ends of the cruise control and TV cables release by simply pushing forward on them to release the ball-shaped wedge in the throttle linkage. To remove the throttle cable, simply pull off the socket-like joint at the end. Now, you can either remove the three bolts holding the cable bracket and move the whole assembly aside or you can just pop out the 3 cables themselves. I just popped out the cables for the sake of less removal.
Now, disconnect all the hoses and electrical connections from the intake manifold. MAKE SURE THEY'RE LABELED FIRST! To remove the injector connectors, take a small flat-head screw driver and pry the little metal clip away from the connection. Keep these little metal connectors, and be patient as they can be very annoying to get off. Pull the plugs from the injectors. Most of the vacuum hoses remove by simply pulling them off. Unhook the connections to the TB by lifting on the little tab and pulling back on the connector. Now is the fun one. The hose that connects the intake manifold to the brake booster. I found it easier to simply pull the hoses from the booster fitting rather than the intake. Just careful pull and twist the hose until it breaks free. You will be rewarded with a slight "whooosh" sounds as the vacuum fills. You also need to remove the fuel lines running to the fuel rail. I'm not sure mine are like all years, but my XJ just had quick-disconnect tabs that pushed in and allowed the hoses to be pulled off. If yours lacks these tabs, you will need a fuel line quick-disconnect tool. Be prepared for some slight spillage. Have something read to cap the open ends on the fuel rail.
Now time to remove the belt and the power steering pump and its bracket. This actually was nowhere near as hard as I though it'd be. First thing you need to do is loosen the two bolts that sit in front of the pump at the top and bottom. Then, loosen 2 bolts on the rear of the pump. Next, loosen the two adjuster nuts (can't miss them, because they sit in a slot along the bracket). Finally, start to loosen the long bolt that runs horizontal underneath the P/S pump. This will loosen the belt tension. (Sorry I didn't get pics of where the bolts are to do this... had a brain fart and forgot to snap them). When the belt is loose enough, simply unloop it from the P/S pump pulley. No need to take it completely off. Then, simply remove all the bolts holding the P/S pump to its bracket. With it free, hang the pump vertically so it doesn't spill, and be sure to keep the lines from bending too much so they don't break. Next, just remove the bolts holding the bracket to the intake and the water pump. THESE WILL MAKE A HORRIBLE SCREECH WHEN THEY FINALLY LOOSEN. Just be careful and patient, and this is normal because the P/S bracket is made of aluminum. Remove the bracket.
http://www.ineedparts.com/auto-parts...-manifold.html
Very beefy construction, very solid, lifetime warranty, and stainless steel. You will notice that the APN header is of a different design than the OEM replacement. No worries; everything lines up the same. Also, be sure to have some High Temp thread sealer and High Temp Copper Gasket spray with you. Both can be bought at Autozone.
Tools you will need are:
-Usual assortment of sockets, socket wrenches, extensions
-Torque Wrench
-Swivel-head Gear Wrenches (if possible...they help a lot) or just regular gear wrenches
-Jack and jackstands or ramps
**Be sure to spray as many of the manifold bolts as possible with PB Blaster a couple of nights before the job to get them all out. I did mine, and all came out easy.**
Now it's time to git'r'done. If you're XJ doesn't have much or any lift (like mine), drive it up on some ramps or jack it up a good ways and support it on jack stands. Disconnect the negative battery cable, and string it up out of the way to make sure it doesn't connect with any metal. Also, you need to relieve the fuel pressure. To do this, simply unscrew the little tire-valve like cap in the center of the fuel rail, and use a small screw-driver or punch to press in the valve. Have rags ready to catch the fuel.
Take a picture of your intake manifold before you do anything. This will provide a base for when you hook everything back up should you forget where something goes.
Next, label all connections. Label EVERYTHING. Be sure to label all the injector connections in the proper order (closest to the front of the engine is #1, furthest and last is #6). Label the connections to the throttle body. Label the hoses to the manifold. EVERYTHING. This will make your life MUCH easier when reassembly comes.
Next, remove the air cleaner assembly. To do this, remove the first CCV hose running from the front of the valve cover to the air box, and then disconnect the rear hose from the fender-side of the airbox that runs around towards the fire wall. Next, loosen the clamp around the throttle body. You can also loosen the connection to the air box lid, but it isn't really neccesary. Remove the air box lid by unhooking the little connections on each side of the lid. Take it off and set it aside with the hose that connects to the TB. Take out the air filter, and then proceed to remove the bolts and nuts from the bottom of the air box. The air box will then lift right out; be sure to keep all the bolts and nuts you removed with the air box.

Next, remove the throttle, cruise control, and transmission valve control cables from the throttle body. The ends of the cruise control and TV cables release by simply pushing forward on them to release the ball-shaped wedge in the throttle linkage. To remove the throttle cable, simply pull off the socket-like joint at the end. Now, you can either remove the three bolts holding the cable bracket and move the whole assembly aside or you can just pop out the 3 cables themselves. I just popped out the cables for the sake of less removal.
Now, disconnect all the hoses and electrical connections from the intake manifold. MAKE SURE THEY'RE LABELED FIRST! To remove the injector connectors, take a small flat-head screw driver and pry the little metal clip away from the connection. Keep these little metal connectors, and be patient as they can be very annoying to get off. Pull the plugs from the injectors. Most of the vacuum hoses remove by simply pulling them off. Unhook the connections to the TB by lifting on the little tab and pulling back on the connector. Now is the fun one. The hose that connects the intake manifold to the brake booster. I found it easier to simply pull the hoses from the booster fitting rather than the intake. Just careful pull and twist the hose until it breaks free. You will be rewarded with a slight "whooosh" sounds as the vacuum fills. You also need to remove the fuel lines running to the fuel rail. I'm not sure mine are like all years, but my XJ just had quick-disconnect tabs that pushed in and allowed the hoses to be pulled off. If yours lacks these tabs, you will need a fuel line quick-disconnect tool. Be prepared for some slight spillage. Have something read to cap the open ends on the fuel rail.
Now time to remove the belt and the power steering pump and its bracket. This actually was nowhere near as hard as I though it'd be. First thing you need to do is loosen the two bolts that sit in front of the pump at the top and bottom. Then, loosen 2 bolts on the rear of the pump. Next, loosen the two adjuster nuts (can't miss them, because they sit in a slot along the bracket). Finally, start to loosen the long bolt that runs horizontal underneath the P/S pump. This will loosen the belt tension. (Sorry I didn't get pics of where the bolts are to do this... had a brain fart and forgot to snap them). When the belt is loose enough, simply unloop it from the P/S pump pulley. No need to take it completely off. Then, simply remove all the bolts holding the P/S pump to its bracket. With it free, hang the pump vertically so it doesn't spill, and be sure to keep the lines from bending too much so they don't break. Next, just remove the bolts holding the bracket to the intake and the water pump. THESE WILL MAKE A HORRIBLE SCREECH WHEN THEY FINALLY LOOSEN. Just be careful and patient, and this is normal because the P/S bracket is made of aluminum. Remove the bracket.
 03-07-2011, 10:43 PM
#3
CF Veteran
Thread Starter
Join Date: Oct 2009
Location: Fauquier County, Virginia
Posts: 2,867
Likes: 0
Received 15 Likes
on
13 Posts
Year: 1991
Model: Cherokee
Engine: I-6 4.0 HO
After the Power Steering Pump and its bracket are removed, put them aside (keeping the pump verticle and its lines not bent). Remove the 2 bolts on the rear of the intake manifold that are holding the 2 fuel lines via a small bracket, then use some Nylon string to keep the fuel lines out of your way. DONT BEND THESE FUEL LINES. They are flexible, but bending too much can cause them to crimp or break. Also, be sure to remove the first nut on the last stud of the fuel rail. The CPS harness runs here, and there is a little holder that holds the wire off the manifold. You can see it near the rear of the fuel rail.
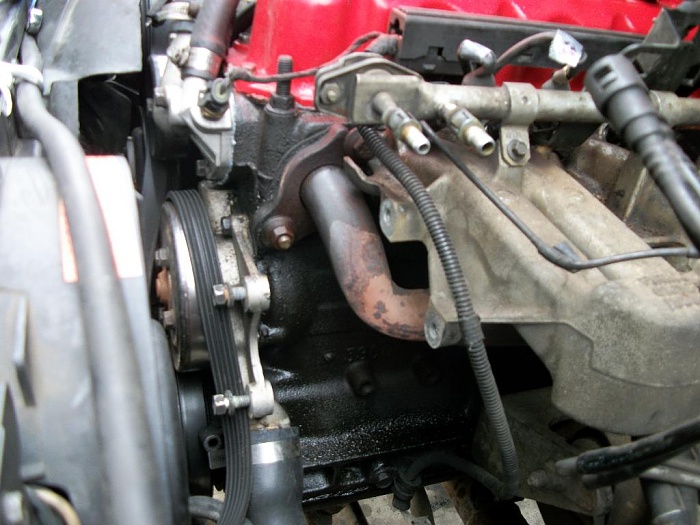
Now it's time to remove the intake manifold. Start by removing the upper bolts first. Be careful and patient with their removal, as to make sure they don't break. However, when I PB Blasted my bolts they came out easily. Do not remove the center nut that sits on the exhaust manifold connections. Next, remove the lower bolts. You will need a good extension and u-joints for these. Just snake your hands under and feel for the bolts. A friend really comes in handy here. When the bolts are removed, be prepared to hold the intake. To remove it, gently slide it backwards to disengage it from the cylinderhead dowels. It should lift right out. Be sure that the center nut and the 2 end nuts on the exhaust manifold are left alone.

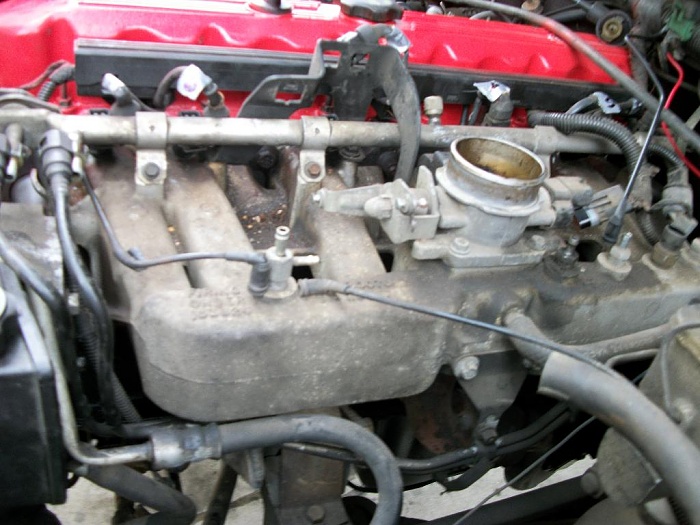
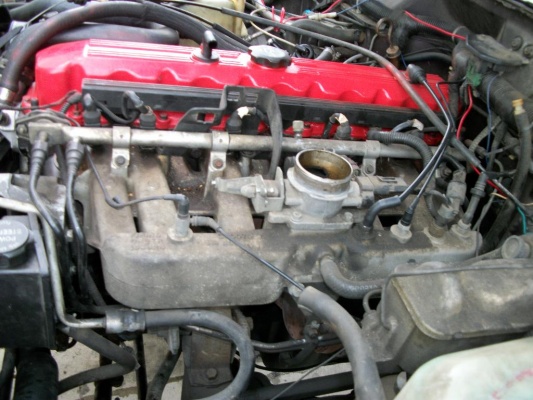
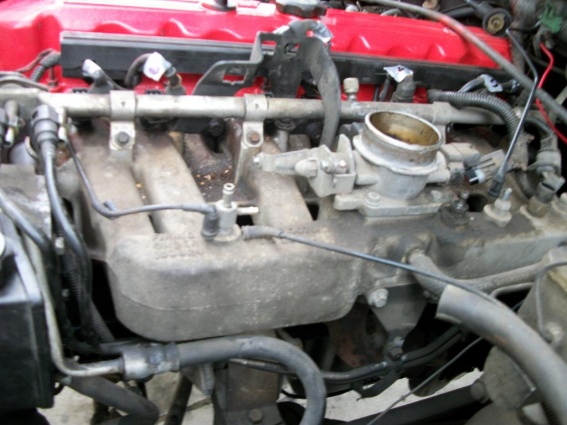
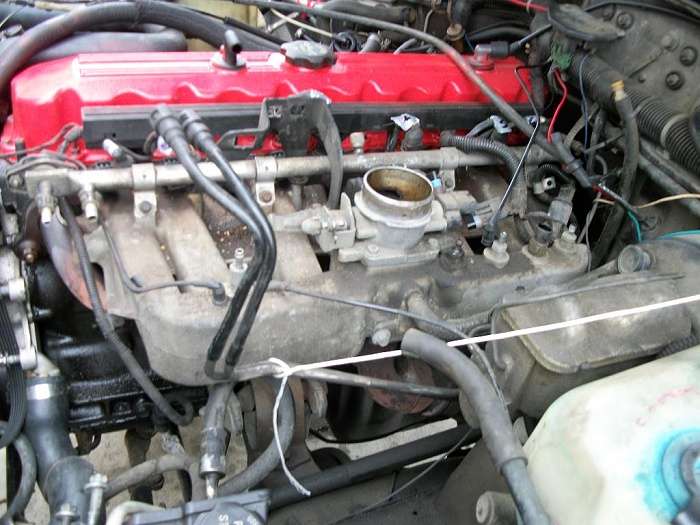
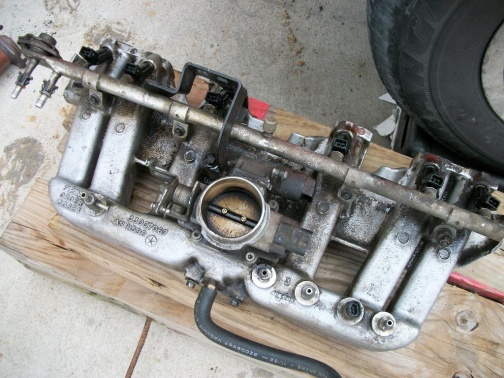
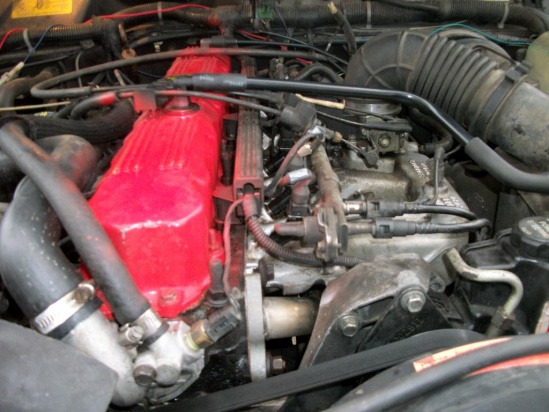
Crawl under the XJ, or reach if you can, and loosen the flange connection bolts. The will probably be locked on tight, as I found out very quickly. Use some PB Blaster on them, and give them about 5 mins to soak. Meanwhile, I took the time to spray my intake manifold with some engine degreaser. If you decide to do this, be sure to the plug the throttle body inlet and not allow anything into the hose or electrical connections. Let the degreaser sit for a minute and then scrub the crap out of it.
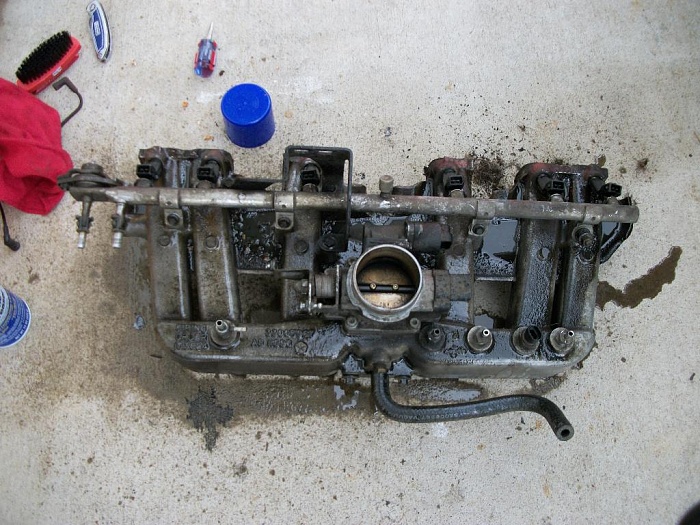
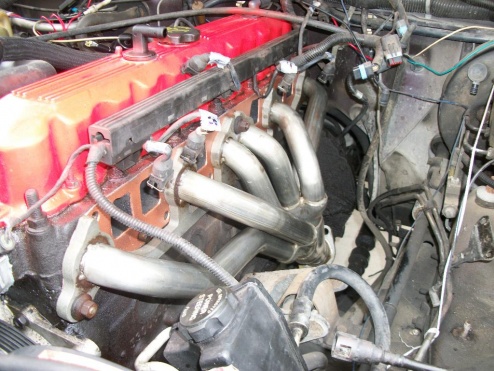
This is what I ended up with. I prob coulda done a lot better if I had remove the injectors, rails, etc., but time was short, and the weather was looking like rain.

After a good cleaning and allowing time for the PB Blaster to take effect, remove the flange connecter bolts and nuts, and then disconnect the header from the front exhaust pipe. Remove the old flange gasket ring. Now, go back up and remove the center and end nuts from the cylinder head studs to free the exhaust manifold. It should now simply slide off like the intake manifold, and lift out.

Now it's time to remove the intake manifold. Start by removing the upper bolts first. Be careful and patient with their removal, as to make sure they don't break. However, when I PB Blasted my bolts they came out easily. Do not remove the center nut that sits on the exhaust manifold connections. Next, remove the lower bolts. You will need a good extension and u-joints for these. Just snake your hands under and feel for the bolts. A friend really comes in handy here. When the bolts are removed, be prepared to hold the intake. To remove it, gently slide it backwards to disengage it from the cylinderhead dowels. It should lift right out. Be sure that the center nut and the 2 end nuts on the exhaust manifold are left alone.
Crawl under the XJ, or reach if you can, and loosen the flange connection bolts. The will probably be locked on tight, as I found out very quickly. Use some PB Blaster on them, and give them about 5 mins to soak. Meanwhile, I took the time to spray my intake manifold with some engine degreaser. If you decide to do this, be sure to the plug the throttle body inlet and not allow anything into the hose or electrical connections. Let the degreaser sit for a minute and then scrub the crap out of it.
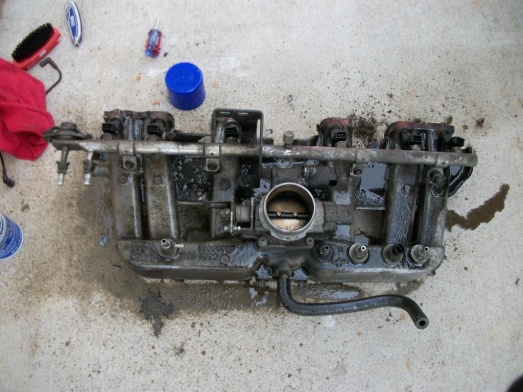
This is what I ended up with. I prob coulda done a lot better if I had remove the injectors, rails, etc., but time was short, and the weather was looking like rain.
After a good cleaning and allowing time for the PB Blaster to take effect, remove the flange connecter bolts and nuts, and then disconnect the header from the front exhaust pipe. Remove the old flange gasket ring. Now, go back up and remove the center and end nuts from the cylinder head studs to free the exhaust manifold. It should now simply slide off like the intake manifold, and lift out.
 03-07-2011, 11:07 PM
#4
CF Veteran
Thread Starter
Join Date: Oct 2009
Location: Fauquier County, Virginia
Posts: 2,867
Likes: 0
Received 15 Likes
on
13 Posts
Year: 1991
Model: Cherokee
Engine: I-6 4.0 HO
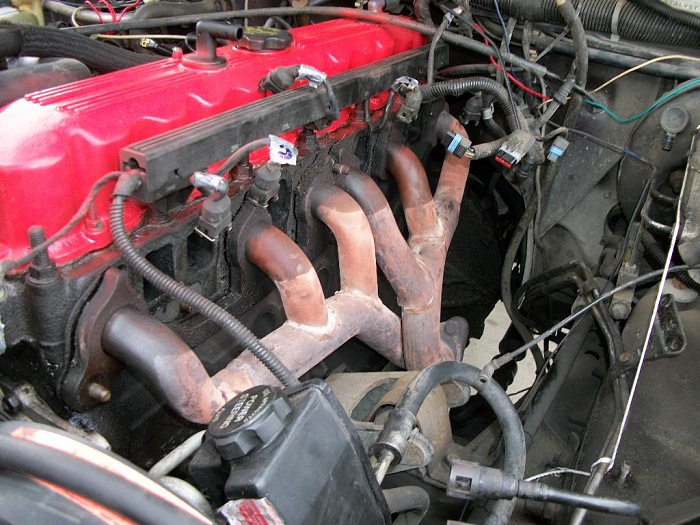
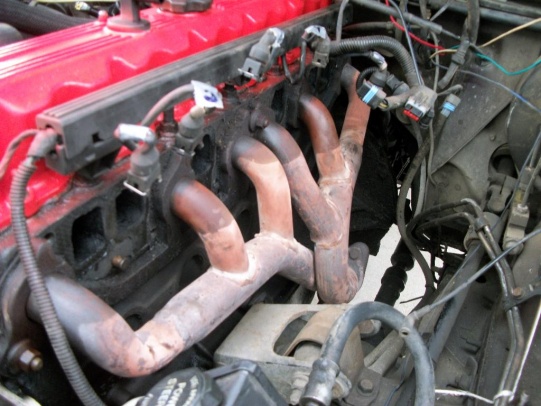
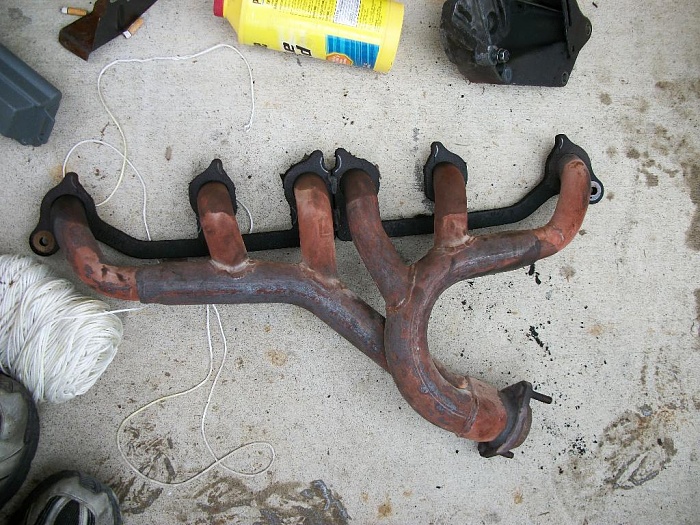
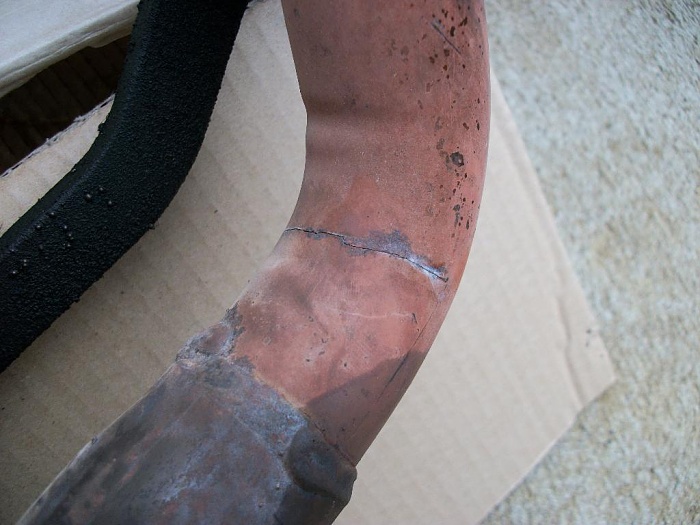
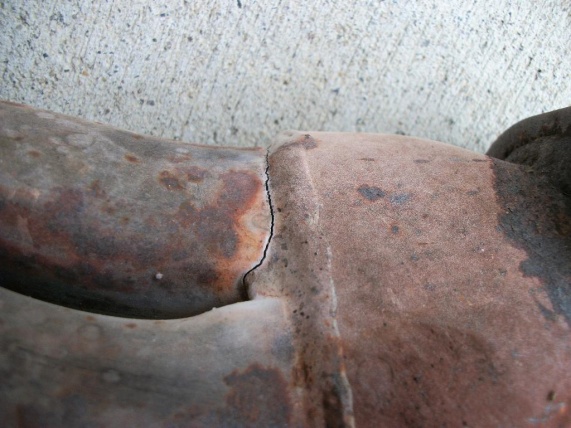
After removing the Exhaust Manifold, take a second to examine it for where the cracks might be. I had two cracks to my surprise. One ran halfway around the collector at the bottom, and the other had nearly completely broken the 6th exhaust pipe from the rest of the manifold. Scary.

Now reassembly starts. First, take the time to carefully scrape off the old gasket material from the cylinder head and the intake manifold ports. DO NOT LET ANYTHING FALL INTO THE CYLINDER HEAD PORTS! I found stuffing some paper towel into each port to help here. Get everything as smoothe as possible. Now take your new manifold gasket, and spray both sides with the Copper Gasket spray. Wait about a minute, and then position it on the cylinder head dowels that the intake had sat on. Move the gasket close to the cylinder head. Now here is where a friend is nearly invaluable. Take you new exhaust manifold and position it on the three cylinder head studs that the old one had sat on. Make sure the exhaust manifold and gasket sit flush against the cylinder head. Take the exhaust manifold stud nuts and finger tighten them onto the cylinder head studs. Now, go underside and connect the header to the flange with the new bolts that come with the header. Be sure to have the new gasket seated between the header and pipe. You can go ahead and tighten these bolts down to 23 ft. lbs IIRC. You APN header instructions will have the torque values.
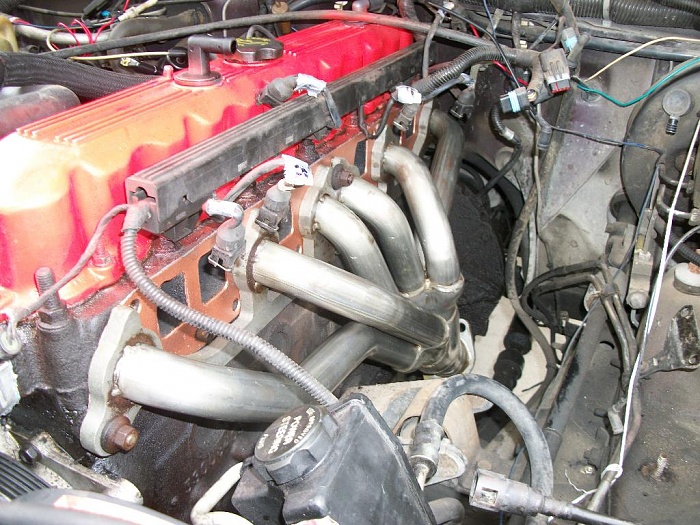
With the new header on and finger tightened down, it's time to put the intake manifold back on. First off, take the 4 lower bolts and coat them with the High Temp thread sealer per the package instructions. After coating, take the 4 bolts and thread them into their bolt holes about 1 or 2 turns. Just enough to keep them seated. Now, take the intake manifold and position it down onto the lower bolts and at the same time onto the cylinder head dowels. Be patient, for this can be tricky but it very much worth it. When you get the intake on the cylinder head dowels, it should sit flush with the head. Make sure it is sitting flush. Finger tighten the lower bolts. Apply thread sealer to the remaining bolts and finger tighten them as well. Double check that everything seems flush against the head. Now its time to tighten those bad boys down. Your APN header will have a paper with the proper torque values and bolt tightening pattern for your header. Here is said paper:
http://www.ineedparts.com/pdf/20009_install.pdf
Make sure you tighten these down in the correct order to the correct torque. I had a problem getting a torque wrench to the back lower 2 bolts under the intake. I tightened them in their proper order, but I had to guess how tight to get them with a regular wrench. All other bolts are accesible via a torque wrench using various extentions and a u-joint. With all bolts tight, check again that everything is flush against the head.


Now reassembly starts. First, take the time to carefully scrape off the old gasket material from the cylinder head and the intake manifold ports. DO NOT LET ANYTHING FALL INTO THE CYLINDER HEAD PORTS! I found stuffing some paper towel into each port to help here. Get everything as smoothe as possible. Now take your new manifold gasket, and spray both sides with the Copper Gasket spray. Wait about a minute, and then position it on the cylinder head dowels that the intake had sat on. Move the gasket close to the cylinder head. Now here is where a friend is nearly invaluable. Take you new exhaust manifold and position it on the three cylinder head studs that the old one had sat on. Make sure the exhaust manifold and gasket sit flush against the cylinder head. Take the exhaust manifold stud nuts and finger tighten them onto the cylinder head studs. Now, go underside and connect the header to the flange with the new bolts that come with the header. Be sure to have the new gasket seated between the header and pipe. You can go ahead and tighten these bolts down to 23 ft. lbs IIRC. You APN header instructions will have the torque values.
With the new header on and finger tightened down, it's time to put the intake manifold back on. First off, take the 4 lower bolts and coat them with the High Temp thread sealer per the package instructions. After coating, take the 4 bolts and thread them into their bolt holes about 1 or 2 turns. Just enough to keep them seated. Now, take the intake manifold and position it down onto the lower bolts and at the same time onto the cylinder head dowels. Be patient, for this can be tricky but it very much worth it. When you get the intake on the cylinder head dowels, it should sit flush with the head. Make sure it is sitting flush. Finger tighten the lower bolts. Apply thread sealer to the remaining bolts and finger tighten them as well. Double check that everything seems flush against the head. Now its time to tighten those bad boys down. Your APN header will have a paper with the proper torque values and bolt tightening pattern for your header. Here is said paper:
http://www.ineedparts.com/pdf/20009_install.pdf
Make sure you tighten these down in the correct order to the correct torque. I had a problem getting a torque wrench to the back lower 2 bolts under the intake. I tightened them in their proper order, but I had to guess how tight to get them with a regular wrench. All other bolts are accesible via a torque wrench using various extentions and a u-joint. With all bolts tight, check again that everything is flush against the head.
 03-07-2011, 11:29 PM
#5
CF Veteran
Thread Starter
Join Date: Oct 2009
Location: Fauquier County, Virginia
Posts: 2,867
Likes: 0
Received 15 Likes
on
13 Posts
Year: 1991
Model: Cherokee
Engine: I-6 4.0 HO
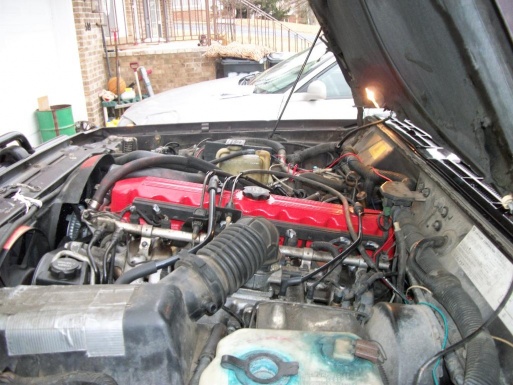
With the manifolds bolted back on, now it's time to get the Power Steering Pump, bracket, and the belt back on. If you want to prior to this, you can go ahead and reconnect all the hoses and electrical connections EXCEPT the fuel lines. Wait until the end for those.
Getting the pump and belt back on was actually a little harder than getting it off. It just takes time and patience. Position the bracket back into place and put all of it's bolts back into their respective locations. Now, take the power steering pump and line it up with its bracket. Make sure the bolt that sits behind the pump is back in place (don't ask me why I tell you to check this). Get all of the mounting bolts for the power steering pump in their respective locations, but do not completely tighten them down. Leave them loose. Now, put the two adjuster nuts back onto the pump; the ones that sat with the slots on the bracket. Leave them loose, and the whole power steering assembly should be allowed to move forward to reloop the belt onto the pulley. Make sure the belt sits correctly on the pulley, as well as check all other pulleys on the engine to make sure the belt sits correctly. With the belt on, have a friend use a large screwdriver to carefully pry between the metal hose line and pump resevoir and bring the belt partially taunt. Tighten down the bracket bolts holding the power steering pump on. Also tighten the adjuster nuts. The pump should now stay in place. Simply tighten the long adjuster bolt (the one under the pump thats horizontal) to tighten the belt. The belt should have no more than 1/4" of movement when pressed down. Again check that all belt routing is good. (Sorry, again no pics here. Another brain fart )
)
With the pump and belt back into their positions, all that's left is to reinstall the fuel lines, bolt down the fuel line bracket to the rear of the intake manifold, and reinstall the air box. The air box is as simple as setting it in place, replacing the 3 bolts and nuts, putting the air filter back in, and replacing the lid. Now reconnect the hose running from the valve cover to the air box lid. Reconnect the hose that goes from the ari box to the throttle body and tighten it down. Reconnect the hose that runs from the firewall to the air box. Make sure all other reconnections are made. Now take the throttle, cruise control, and transmission valve control cables and re-insert them back into their bracket. Reconnect the ends of the cables to the throttle body linkage by sliding the ball-joints onto the linkage and the socket joint onto the ball. Make sure everything is good and tight. Reconnect the negative battery cable. Prime the fuel pump a couple of times to get fuel pressure into the fuel rail. Start her up, and check for any gas or vacuum leaks.
COMMON PROBLEMS HERE:
1) Engine revs to a high RPM and stays there. This is a vacuum leak, most likely between the intake and cylinder head. Spray WD-40 at the seal, and if the revs drop for a second, you've found your problem.
2) The engine runs crappy. Check all the intake manifold connections. The MAP sensor hose is commonly knocked loose here.


I was lucky and had a good start the first time. No leaks, and no loud ticking, putting, or nasty exhaust fumes. BE WARNED!! Your engine bay will begin to smoke rather amazingly. This is normal; it is simply the grease on the new header burning away. The smoke will stop after a few moments.
Final steps. Take a test drive and smash the pedal a bit. Listen for any abnormal sounds. Make sure everything runs well. In about 300 or so miles, check the torque on the bolts. Then check the bolts yearly after that. Enjoy your crack and leak free exhaust!!
Getting the pump and belt back on was actually a little harder than getting it off. It just takes time and patience. Position the bracket back into place and put all of it's bolts back into their respective locations. Now, take the power steering pump and line it up with its bracket. Make sure the bolt that sits behind the pump is back in place (don't ask me why I tell you to check this). Get all of the mounting bolts for the power steering pump in their respective locations, but do not completely tighten them down. Leave them loose. Now, put the two adjuster nuts back onto the pump; the ones that sat with the slots on the bracket. Leave them loose, and the whole power steering assembly should be allowed to move forward to reloop the belt onto the pulley. Make sure the belt sits correctly on the pulley, as well as check all other pulleys on the engine to make sure the belt sits correctly. With the belt on, have a friend use a large screwdriver to carefully pry between the metal hose line and pump resevoir and bring the belt partially taunt. Tighten down the bracket bolts holding the power steering pump on. Also tighten the adjuster nuts. The pump should now stay in place. Simply tighten the long adjuster bolt (the one under the pump thats horizontal) to tighten the belt. The belt should have no more than 1/4" of movement when pressed down. Again check that all belt routing is good. (Sorry, again no pics here. Another brain fart
)With the pump and belt back into their positions, all that's left is to reinstall the fuel lines, bolt down the fuel line bracket to the rear of the intake manifold, and reinstall the air box. The air box is as simple as setting it in place, replacing the 3 bolts and nuts, putting the air filter back in, and replacing the lid. Now reconnect the hose running from the valve cover to the air box lid. Reconnect the hose that goes from the ari box to the throttle body and tighten it down. Reconnect the hose that runs from the firewall to the air box. Make sure all other reconnections are made. Now take the throttle, cruise control, and transmission valve control cables and re-insert them back into their bracket. Reconnect the ends of the cables to the throttle body linkage by sliding the ball-joints onto the linkage and the socket joint onto the ball. Make sure everything is good and tight. Reconnect the negative battery cable. Prime the fuel pump a couple of times to get fuel pressure into the fuel rail. Start her up, and check for any gas or vacuum leaks.
COMMON PROBLEMS HERE:
1) Engine revs to a high RPM and stays there. This is a vacuum leak, most likely between the intake and cylinder head. Spray WD-40 at the seal, and if the revs drop for a second, you've found your problem.
2) The engine runs crappy. Check all the intake manifold connections. The MAP sensor hose is commonly knocked loose here.
I was lucky and had a good start the first time. No leaks, and no loud ticking, putting, or nasty exhaust fumes. BE WARNED!! Your engine bay will begin to smoke rather amazingly. This is normal; it is simply the grease on the new header burning away. The smoke will stop after a few moments.
Final steps. Take a test drive and smash the pedal a bit. Listen for any abnormal sounds. Make sure everything runs well. In about 300 or so miles, check the torque on the bolts. Then check the bolts yearly after that. Enjoy your crack and leak free exhaust!!
The following users liked this post:
Thetastycat (01-14-2021)

Thread
Thread Starter
Forum
Replies
Last Post
XJ ONLY
Stock XJ Cherokee Tech. All XJ Non-modified/stock questions go here
8
01-26-2019 06:30 PM
mpmoe2002
Stock XJ Cherokee Tech. All XJ Non-modified/stock questions go here
0
08-23-2015 12:10 PM
Currently Active Users Viewing This Thread: 1 (0 members and 1 guests)

