When you click on links to various merchants on this site and make a purchase, this can result in this site earning a commission. Affiliate programs and affiliations include, but are not limited to, the eBay Partner Network.
welp i bought my first (running) car a few months ago to use as a daily for college, spent waaaaaaaay to much for it (i will not release the numbers) and it runs great, really clean interior 175k when i bought it, only aftermarket mod it has right now is a sunroof, and muffler. yes i have done wheeling, some light to moderate trails around the area and was surprised, i thought i would get stuck at least twice. anywho my plans are a 2-3" lift because it is a dd and being in college i don't have much money, but since it is an automotive college i have a plethora of tools. i'm going with 235/75r15 tires for now because i got them cheap, should have them on in the next week, i want a front winch bumper and a rear tire carrier, a roof rack, a light bar, air system, train horn, fuel pressure gauge, dual batteries, trans temp gauge, and in the next few years a 4.7 stroked and cammed. but that's about it for now, will post occasionally to update the build when i can afford new stuff.
Last edited by greynolds17; 12-19-2017 at 09:56 AM.
I put the white letters out on my MTZs so people would stop asking me which tires I had. I wouldn't mind if the following conversation was with other off-road hobbyists and not some random guy who's uncles cousins brother had a bronco with 40" boggers. Anyways.. good luck with your build!
so I just got my hands on a train horn kit (they aren't real train horns but they are still really loud) for $100, I would rate it a solid 8/10 because the horns could be louder but the tank is only rated for 110 psi. So here is my quick run over on how I installed it.
First I mounted the horns, they pretty much wont fit anywhere in the engine bay unless you have a snorkel or remove the air box somehow so I mounted them on the drivers side stock horn location, this does require cutting the bumper so they stick out.
Then, I ran one of the horn solenoid wires to the battery positive, the other one goes to a toggle switch that I will mention later, but that wire along with the air hose I poked through the grommet for the wiring harness, make sure you poke downwards towards driver side from the engine side of the grommet with somthing sharp so you don't poke into the harness. then I ran the tube back under the side molding to the compressor.
the easiest way to get the wire through the grommet it to shove about a foot of it into the tube and then shove the tube through and pull the wire out on the other side
Then I mounted the compressor with self tapping screws and went through the carpet into the metal, this usually takes a bit to get right and its a bit difficult based on where the mounting holes are. the power wire went to a 30amp relay at pin 30 and ground went under the rear seat to a spot on the metal that I put a nut and bolt through.
for relay wiring I followed the instructions that came with the kit for using an existing compressor
i mounted the relay on the kick panel with a self tapping screw, DO NOT DO THIS WITH THE PANEL ON THE VEHICLE OR YOU RUN THE RISK OF SCREWING INTO A LOOM
this is the location on the fuse box i ran the power for the relay, there is an inline fuse provided in the kit
for the dash wiring I used that empty spot on the right of the instrument cluster, to get to it I had to remove the bezel and steering column shroud. if you tilt the steering wheel down all the way this makes it easier but its still difficult to do, the bezel is pretty flexible but you can still break if you aren't careful. I used a lighted red rocker switch for the compressor and an on-off-on toggle (on-on works too but i didn't have one of those) for the horn because I wanted to be able to use the stock steering wheel buttons to sound the horn along with being able to use the stock horn. the wire from the 85 pin on the relay goes to (in my case) the center of the rocker switch, the power for the switch light came from the same location I wired the relay to in the fuse box, and a ground went to a screw that held in the lower dash cover where the pcm is, there is a piece of metal there that the screw threads in that is grounded. this is also where i grounded my relay.
the spot where the black wire comes out is a good place to run the wiring through, make sure you tuck it under the plastic or zip tie it so it wont hang down and get caught in the pedals. there are 3 screws holding in the plastic panel and the cigarette lighter you need to remove
for the horn wiring you need to unplug the yellowish connector at the steering wheel and cut the black and red wire, leaving enough wire on both ends to solder and attach wires too. the end of the wire attached to the plug needs to be lengthened and run back through the dash to the center terminal on the toggle, the other end of the black and red wire goes to one of the outside terminals and the wire from the train horn goes to the remaining outside terminal.
this is the location of the black and red wire, UNPLUG THE CONNECTOR SO IF YOU HAPPEN TO SHORT SOMTHING YOU DON'T SET OFF THE AIRBAG
now after putting the dash back together you should be able to turn on the compressor (it will work without the key in the ignition) and it will automatically shut off at 105 psi, then you should be able to switch the toggle and get either the stock horn or the train horn with the steering wheel buttons, (update) the hose they provide you is about 3 feet short of what you need to complete this setup, be sure you get a hose that is designed for high pressure and that is relatively thick, since the pressure is in the hose constant the heat from the engine can soften the hose and it will either come off the butt connector between the two sections or will explode somewhere in the middle, the connector I used was a basic 1/4" vacuum hose connector from autozone make sure its flared so it grips the hose tightly.
fixed an *** load of oil leaks, still leaks anyways cuz its a jeep
did the rear main and oil pan, also the valve cover gasket, still leaks from the oil filter adapter but i think that is the last one. but while i was at it I painted the valve cover. also got the springs for a lift, now i need the hardware and trackbar and shocks and it will be on. not much to update on otherwise, haven't had time or money to do much
Got my lift done finally, used a bastard pack with ZJ v8 coils and isolators. the whole s10 pack gave me about 6 inches of lift which was waaaaayy too high so i took out the main and 3rd s10 leaf and stuck the second one under the XJ second so it goes:
xj main
xj 2nd
s10 2nd
xj 3rd
xj 4th
i didn't redrill the XJ springs so i just used the 5/16th pin because heat is a good way to screw up spring steel, and since the S10 spring is sandwiched between the XJ leafs it shouldn't get moved around or anything. For the front i just stuck some zj coils with the isolator in and it matched perfectly. in total i got about 2.5 inches of lift above stock. still using the stock shocks for normal driving but before i go offroading again ill get my hands on some JK shocks for better flex. Got a longer rear brakeline although i didn't really need it but it only cost me $20 so didn't hurt. Trackbar is slightly off but its not noticeable and I don't have any alignment issues.
Its been a while since I updated but I've been busy changing jobs and moving but now i have actual money so modifications will come a little faster, but here is a short rundown of the new stuff I did.
Doorless mod on the front doors (yes i kept power everything, just used zj door jamb connectors spliced into the harness. DONT MIX UP WIRES I was chasing shorts for a month because i mixed up 2 colors that looked the same)...never got around to the rear doors yet.
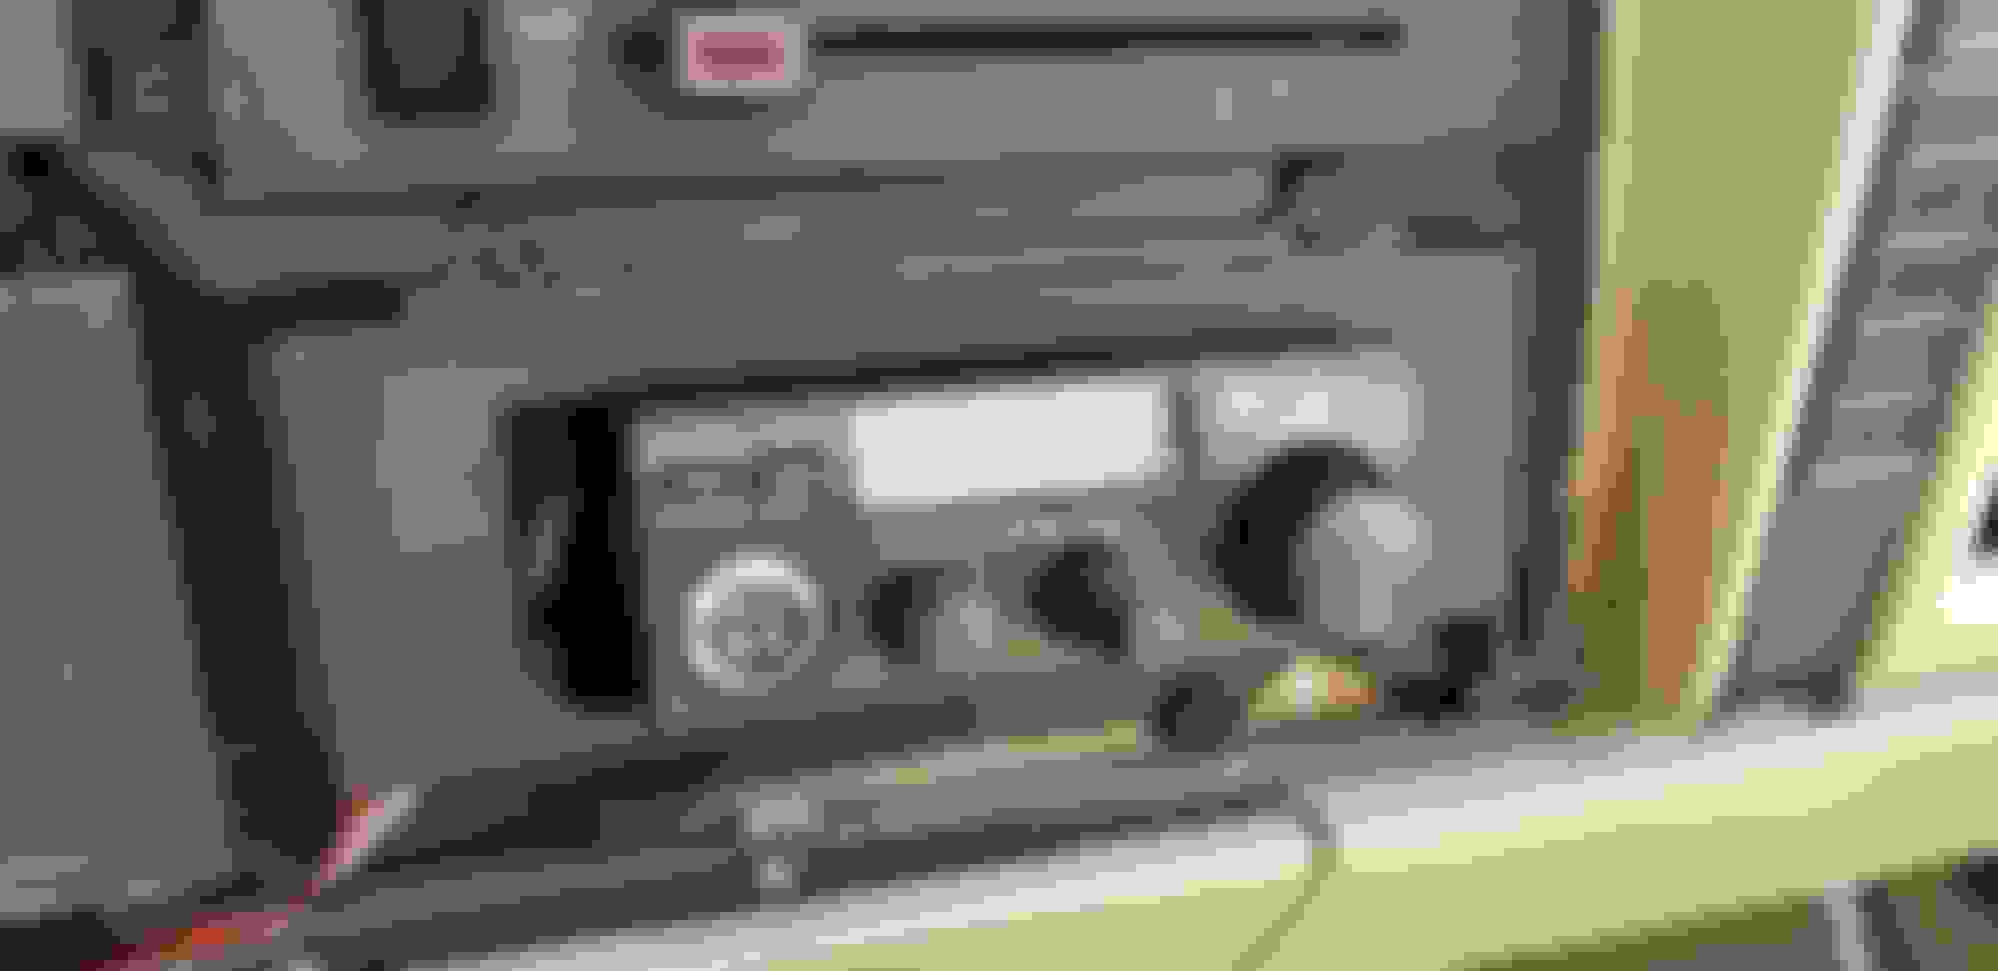
CB radio...installed in center dash vent, my goal with the interior is to make it look clean. I have many custom trim pieces to make buttons and extra gauges look nice and not just be self-tapped on the top of the dash.
Got in a crash so now I have no front bumper or fog lights...replacements coming soon...train horns survived for a bit but then were later crushed from sliding off a rock that i was high centered on...probably will be replaced with a PA horn somewhere safer...and the compressor stopped working...haven't looked into it yet
More stickers of course
Began to purchase parts for the turbo build as well as getting things to prep for paint
Anyways here is a quick rundown of how I did the CB install just in case anyone feels the need to do it like I did
1. Took apart the trim around dash and removed center vent...its basically spot welded on with plastic so you gotta break it off
once the vent is removed you will have a space like this, only not nearly as open...I used a dremel to grind and cut the plastic to the size of the CB so it would fit in
same opening with the blend door removed...you need to do this to fit a radio in here...they are vacuum actuated so you must move the slider to defrost and undo the screw in the middle...it is an 8 millimeter. once you have done that you can pry the door off the metal piece. then you need to go under the dash and remove the metal rod from the actuator and pull it out from there...it takes a bit of twisting and turning but it will come out without removing the dash (dont have a picture of this)
instead of cutting holes in the HVAC system you can just run the wires back around the front and down...they will fit behind the trim. but this is the test fit for the radio, there is a second blend door that you cant remove easily so you need to slide the **** to "vent" so you can push the radio in..after that you can slide it back so the door holds the radio
I removed the vent from the plastic trim piece and ground the top and bottom to fit the radio in...I had no way to secure it with screws so I made sure it was a tight fit, alternatively you can glue the radio in if you are afraid of it falling out or being stolen but im not worried about either..the plastic spot welds i drilled out and used some self tapping screws to attach the assembly to the dash.
here is how it looks with the dash back togther...I used some of the scrap plastic I cut out to fill the holes on the side then glued some felt over it to give it a better look...might put an extra button there in the future or something
NOTE: the HVAC system is still fully operational, however you may notice the defrost mode is not as strong as it used to be...you can close the vents in order to combat this but I found it is still strong enough to keep the window from fogging...filling in the holes around the radio helped this as well....as for antenna placement, I just put it above the tail light on the drivers side and ran the coax under the side panels and behind the spare tire...I didnt have a tail light mount so the antenna mount is just self tapped into the rear quarter panel above the belt line so I can add armor in the future.it holds well and doesn't look bad
 12-02-2017, 05:56 PM