LS swapped XJ
 03-20-2017, 02:01 PM
#46
Junior Member
Thread Starter

Join Date: Oct 2016
Location: Surrey, BC
Posts: 69
Likes: 0
Received 0 Likes
on
0 Posts
Year: 1992
Model: Cherokee
Engine: 6.0 LS
Hi, I'm back!
I know it's been a while since I updated but "stuff" has happened. Snow, snow and more snow. Clearing the driveway over and over several times a week for months when I've got severe arthritis is not my idea of a good time! And the cold, even though my shop is heated, it doesn't do well when it's this cold, so I haven't spent much time on my project in the last couple of months. Weather has warmed up in the last week, so, on with the show...
I've been working on the fuel system, exhaust, and shifting.
Fuel system
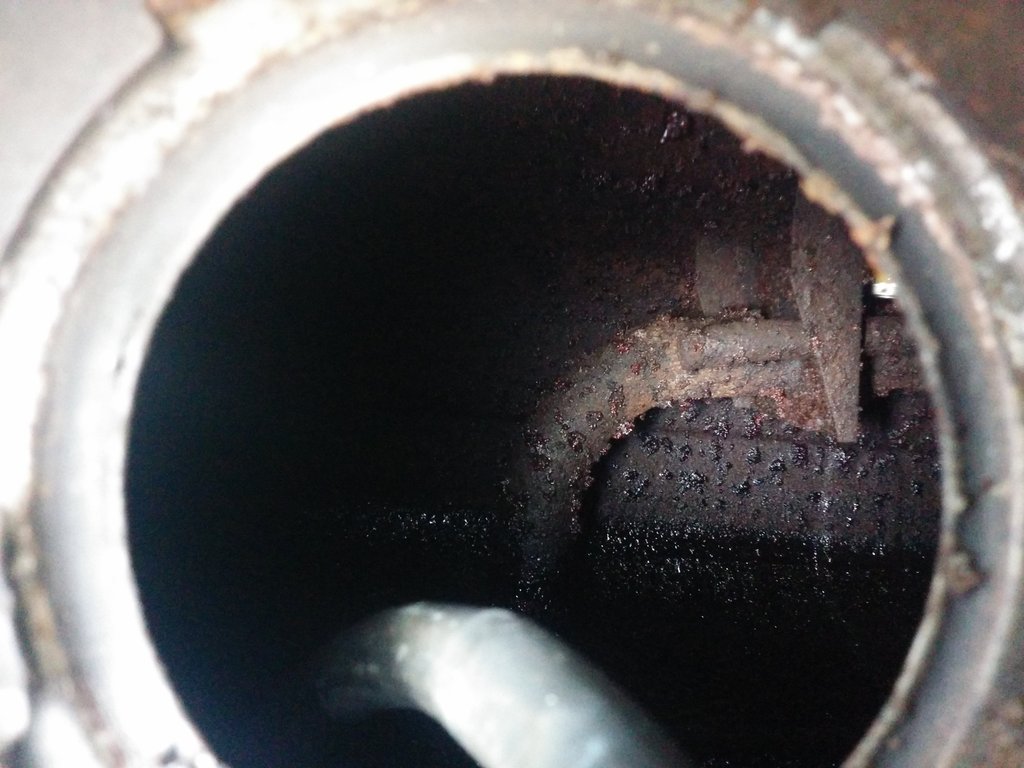
This thing has been sitting for many years with a 1/3 tank of fuel in it. I pulled the fuel pump/sender out and looked inside, and what do I see?
And the pump and sender.
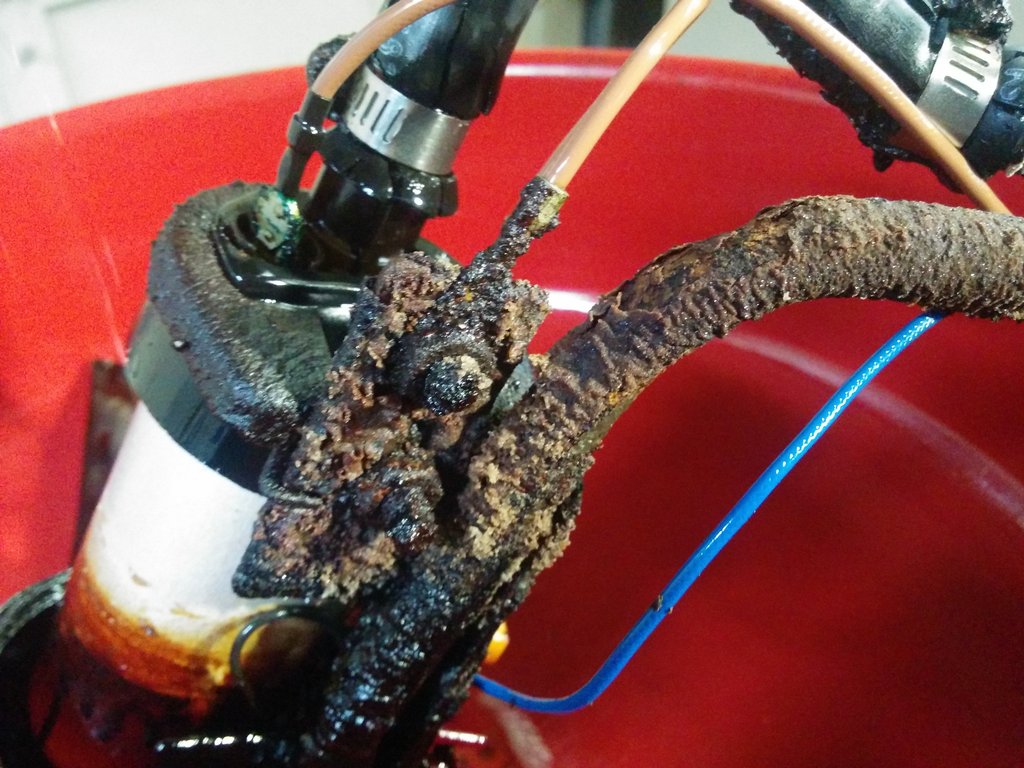
I never gave any thought to trying to restore the tank, bought a new one. The sender I tried to clean things up a bit, hoping to simply install a Walbro pump, but the gauge sender was so heavily gooped up with this stuff that looked like construction adhesive all over it, I bought a new pump/sender to install in the new tank. So the budget is taking another hit.
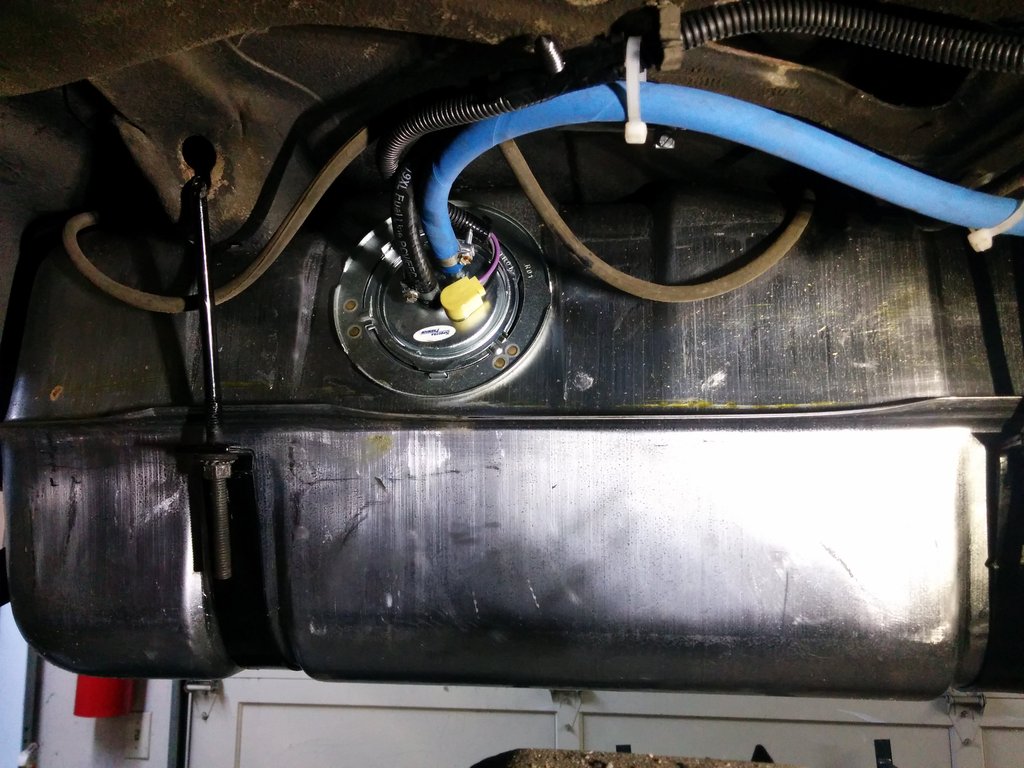
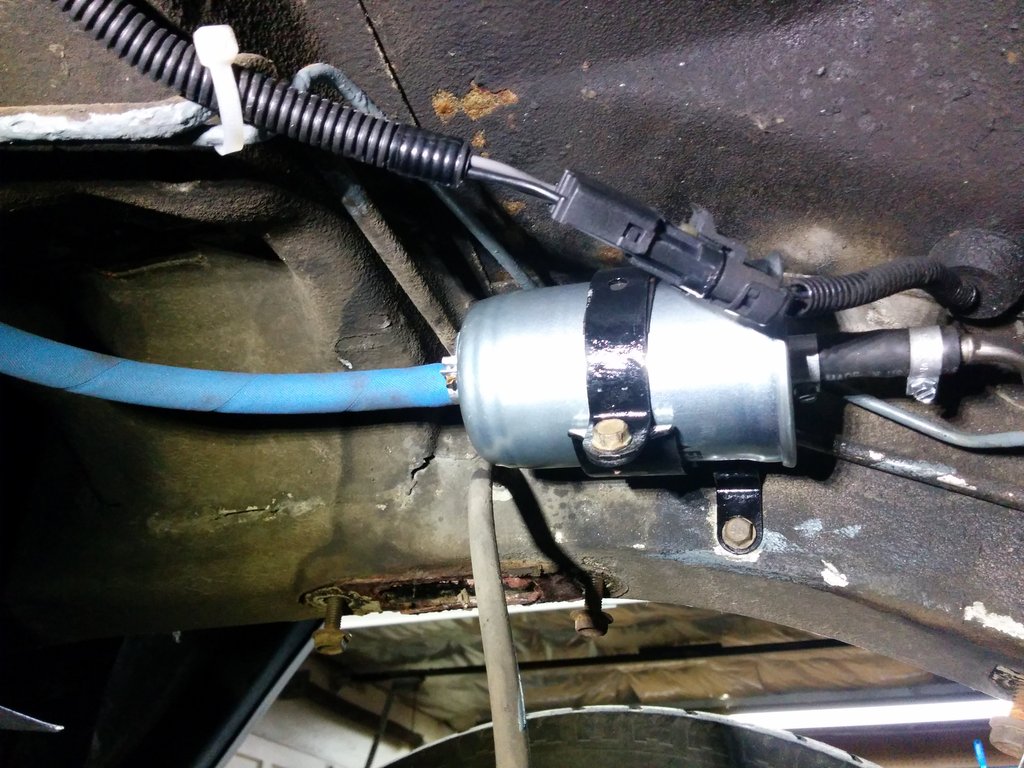
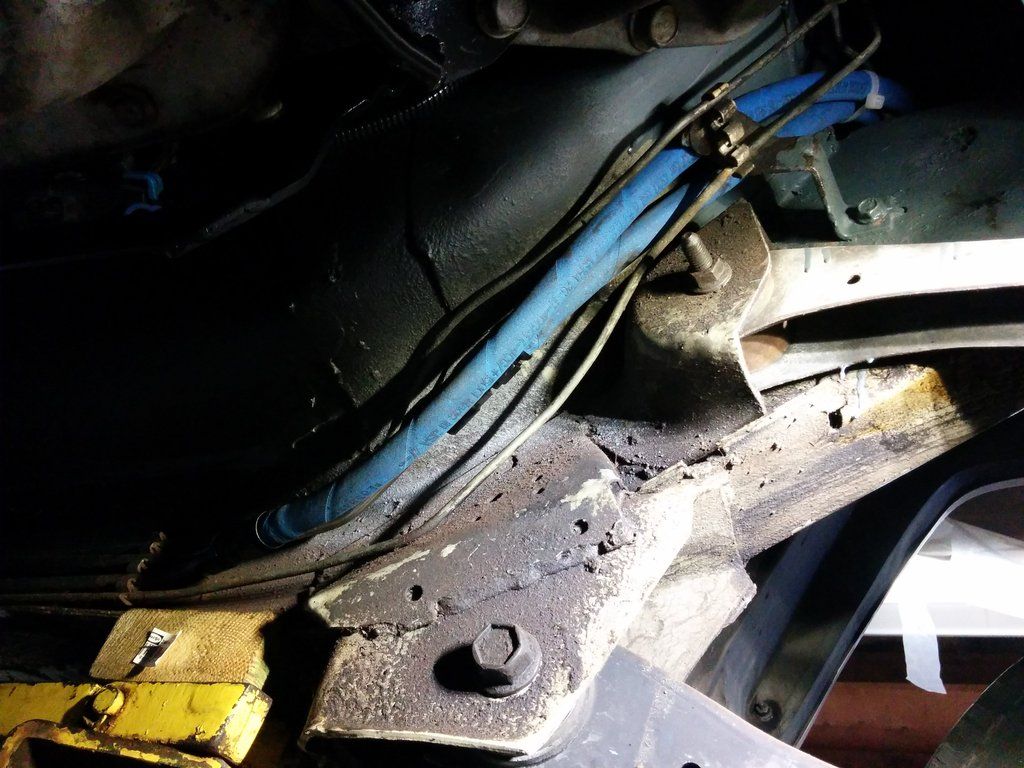
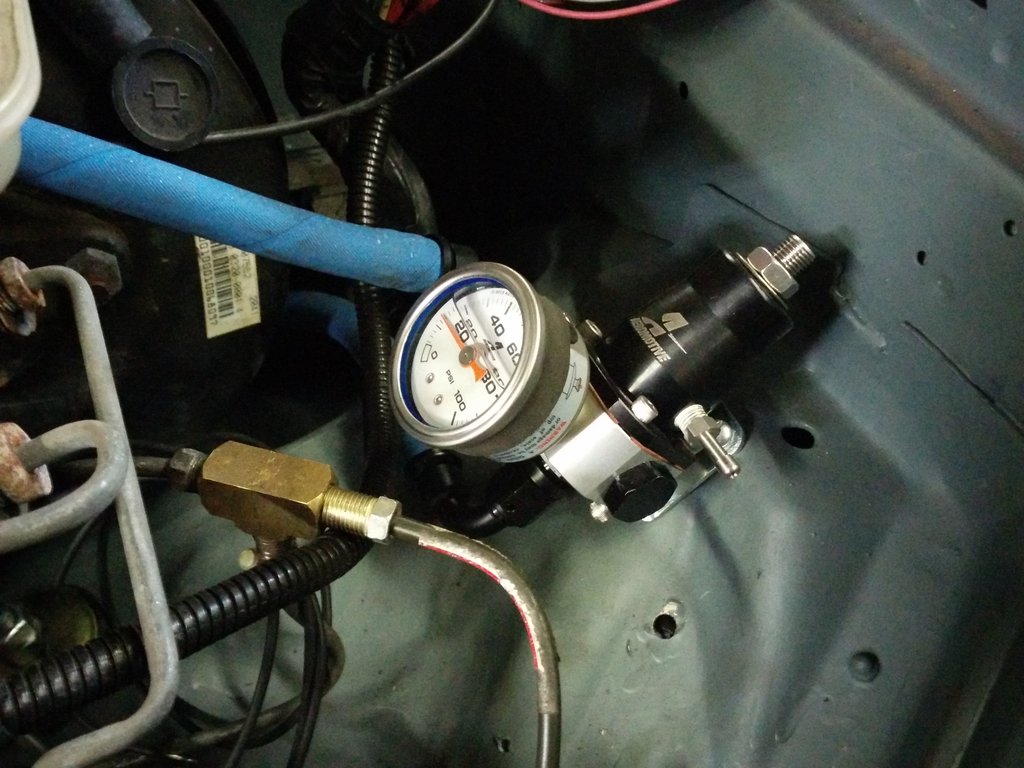
Installing a fuel reg and new lines leaving just the main steel line and return line. New tank installed with new flexible lines. The old rubber lines to the filter were real bad.
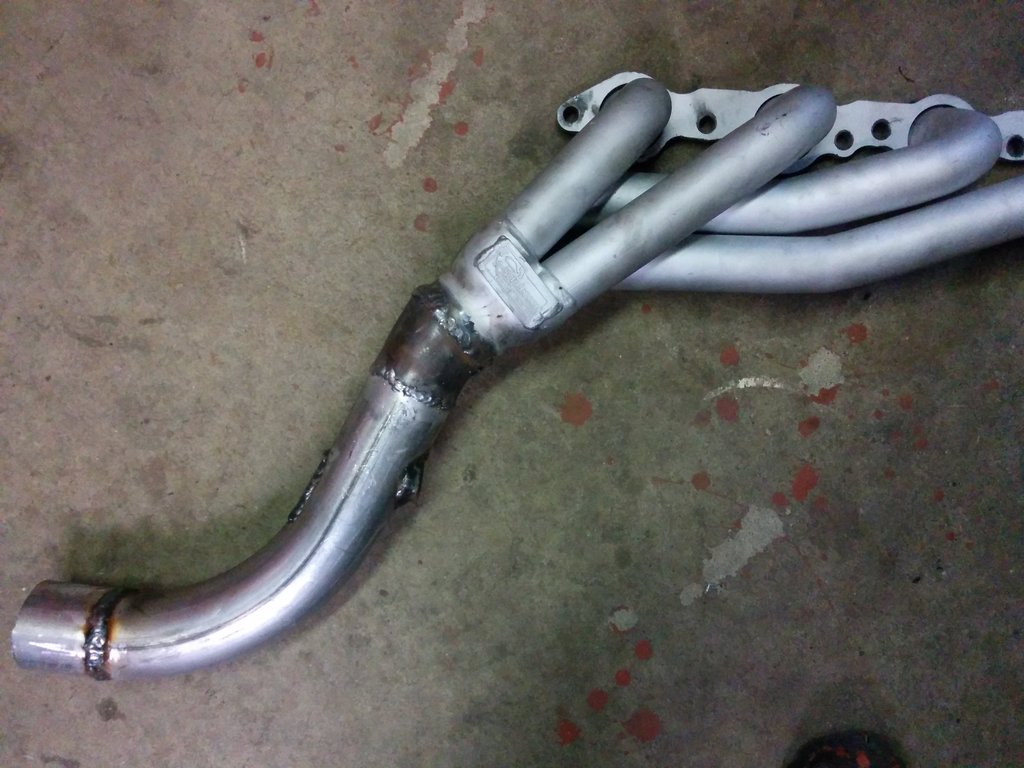
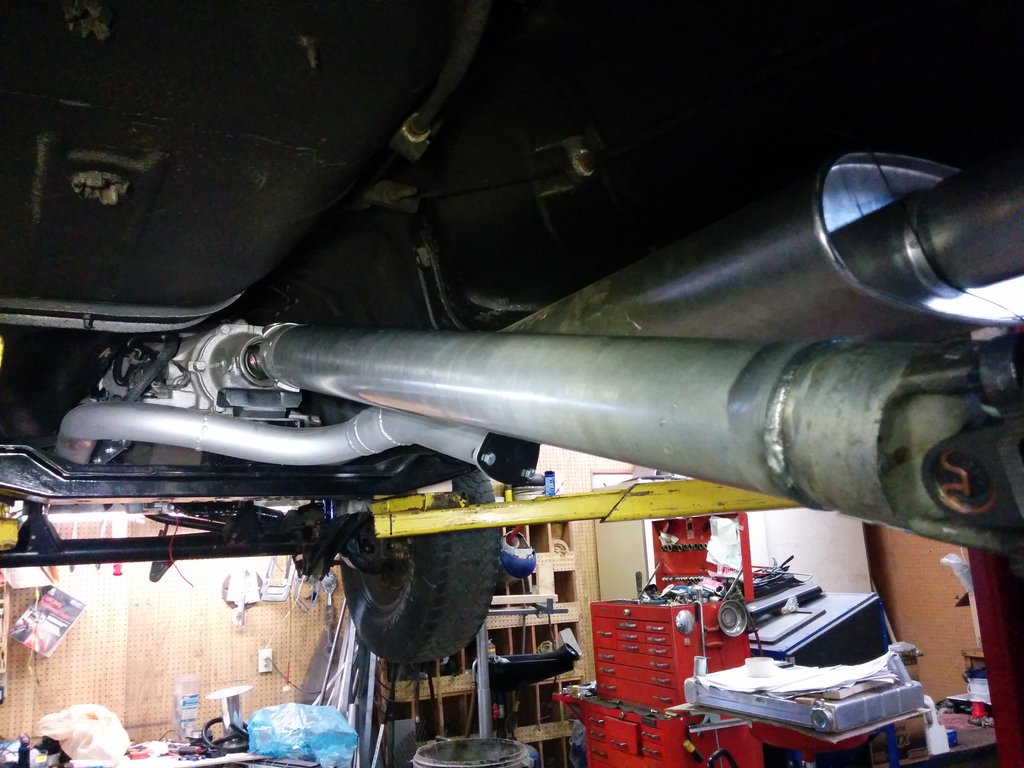
Exhaust is tight. This is the worse part of the swap. The headers are close to the block at the point where the exhaust is closest to the firewall and connects to the Y-pipe. In hindsight I'd cut the flanges off the headers and weld on an extension to drop the Y-pipe connection point lower. But it is what it is.
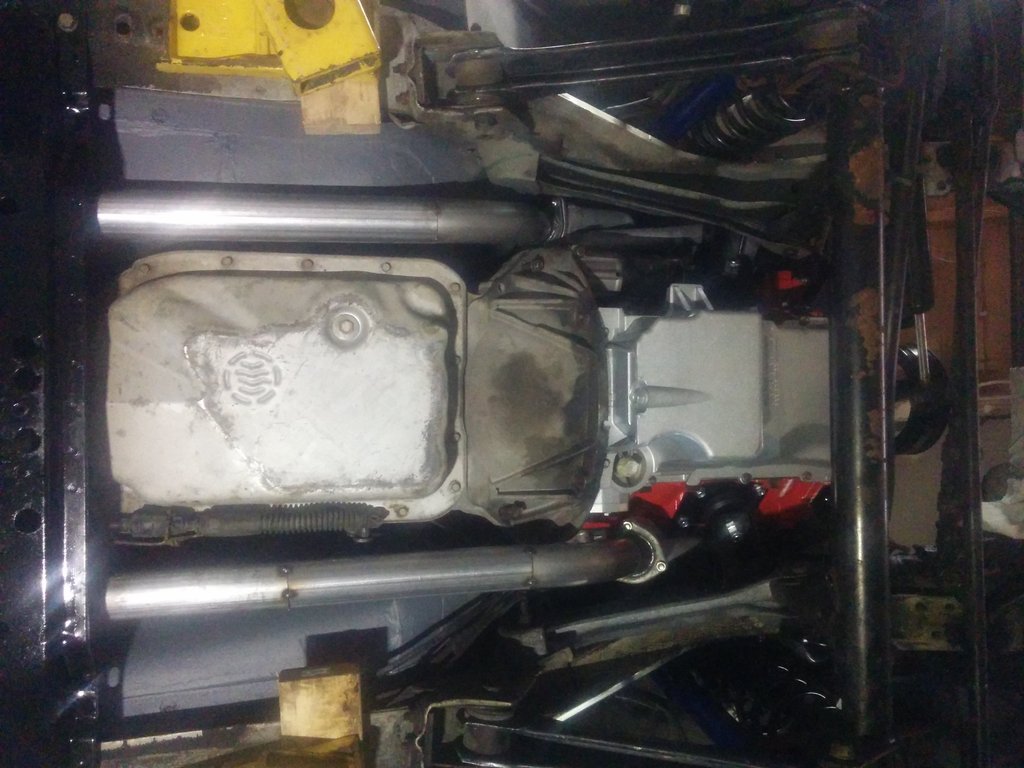
I'm using a cheapo muffler, no hotrod sound for me. Only 35 bucks!
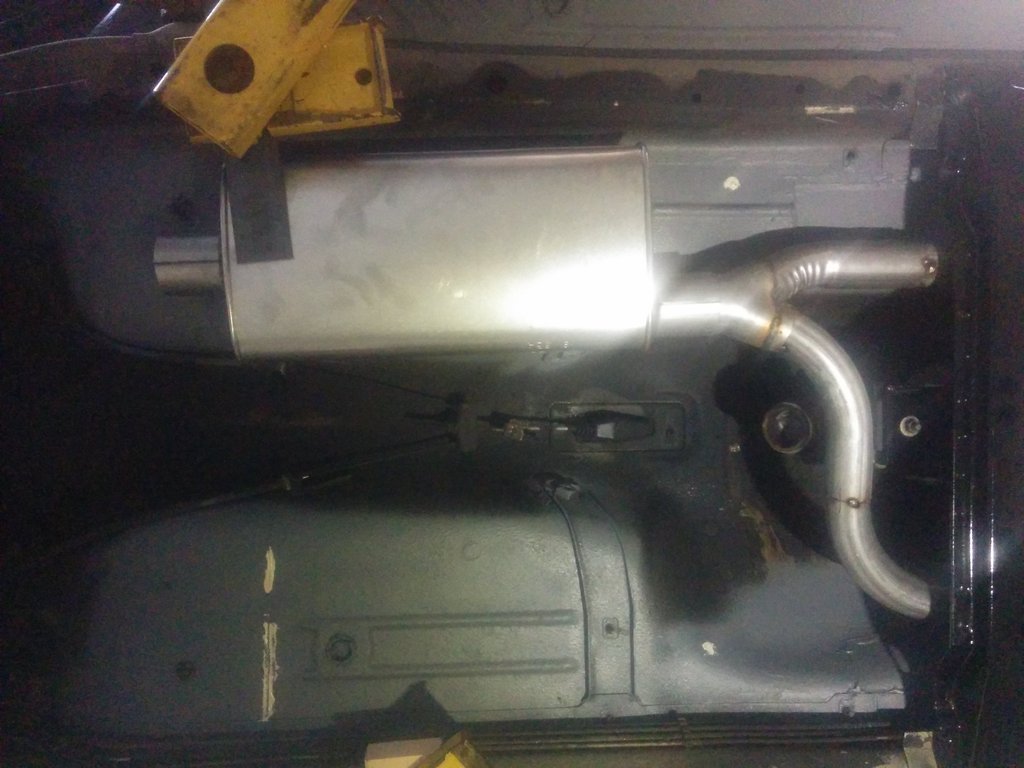
But you don't see the exhaust cut-out I installed after this pic was taken, ha ha ha
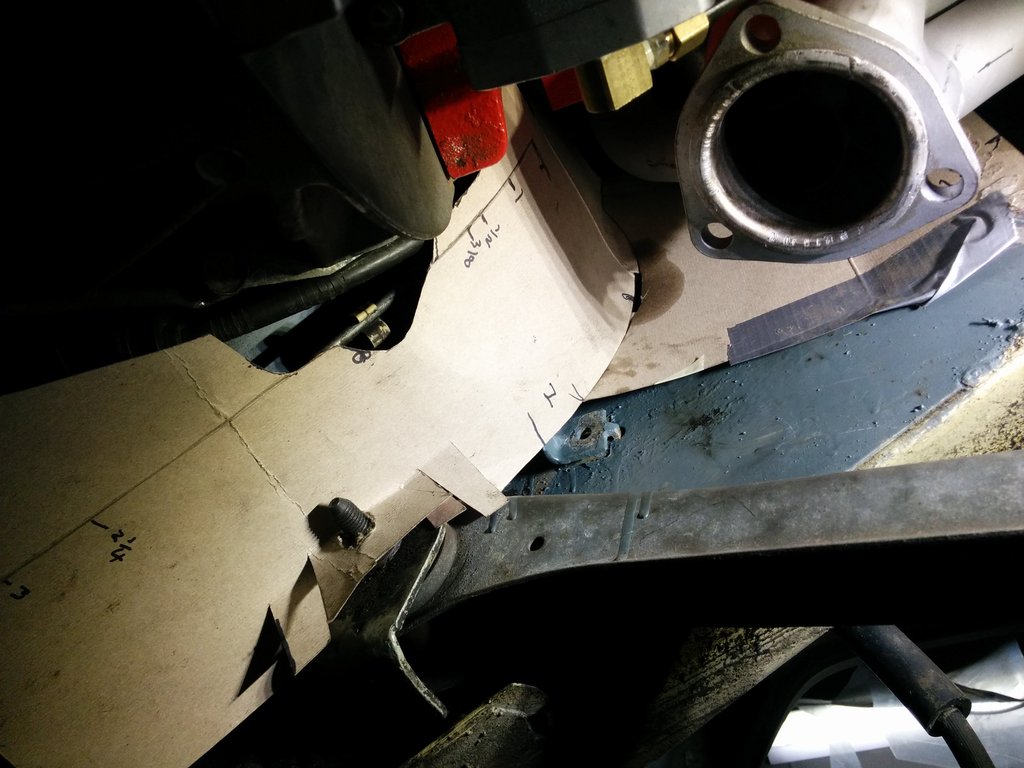
With the close proximity of the fuel lines to the exhaust I fabbed up some heat shields, I'm really big on fire safety.
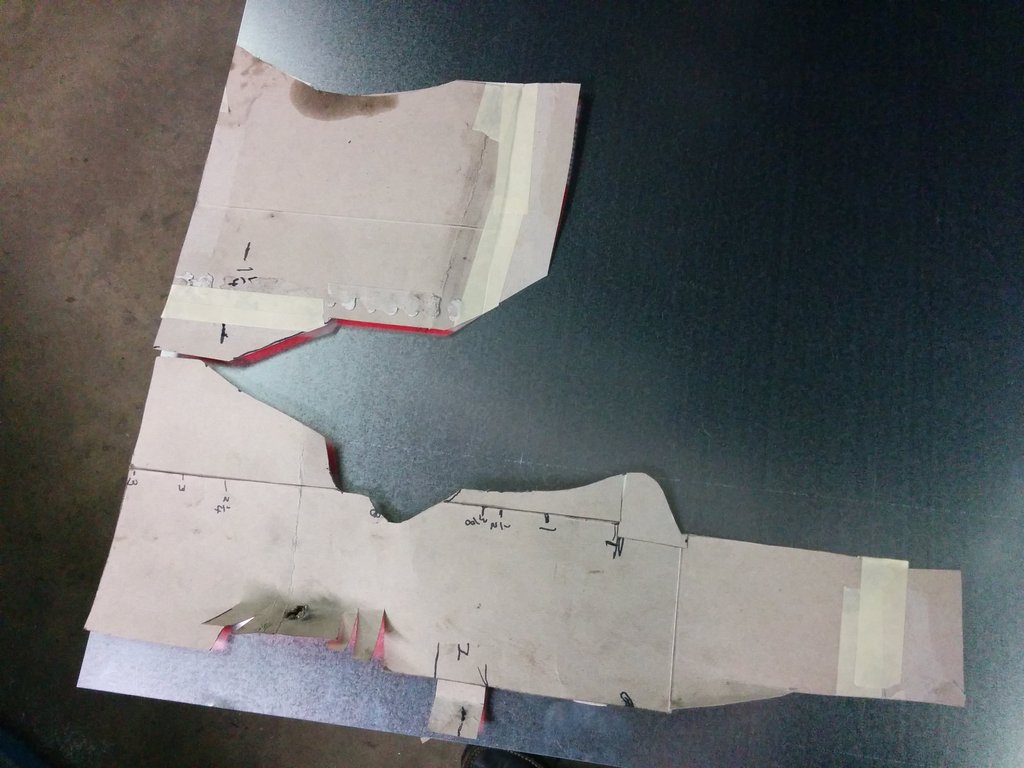
Cardboard template where the exhaust is closest. Will also protect the brake lines. It wraps right up the firewall and then turns at the top to protect more of the brake lines, fuel lines and the steering shaft universal.
Light gauge galvanized steel.
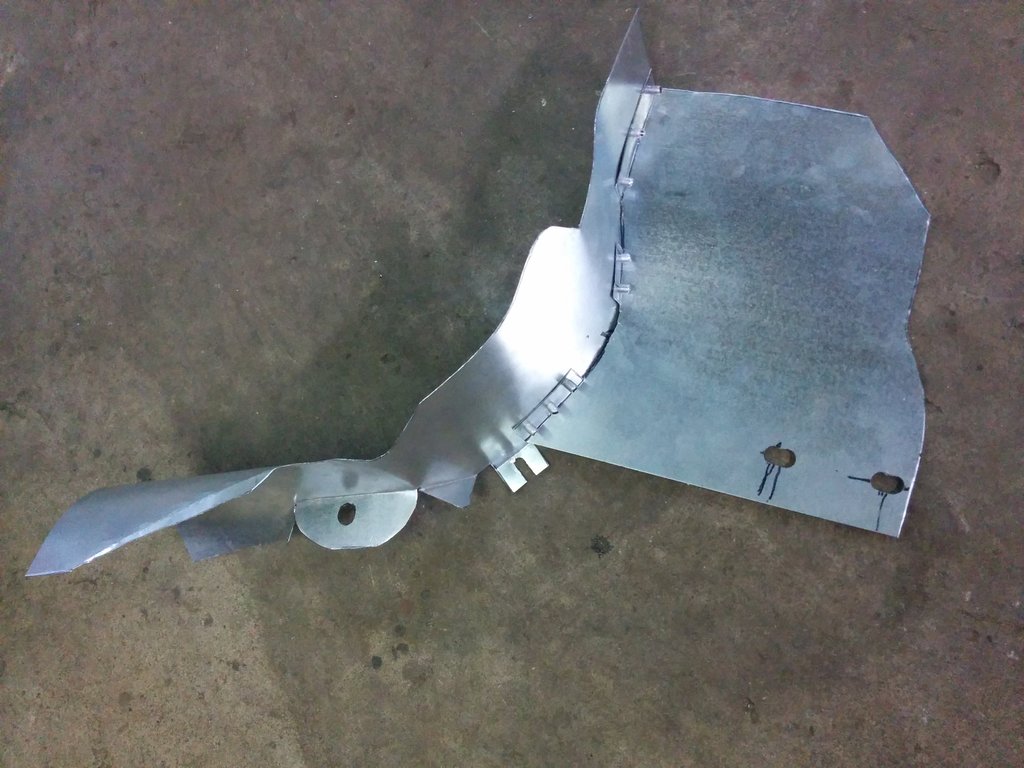
It's hard to tell at first, but that heat shield is double walled so I have an air space between the one side facing the exhaust and the other facing the fuel lines.
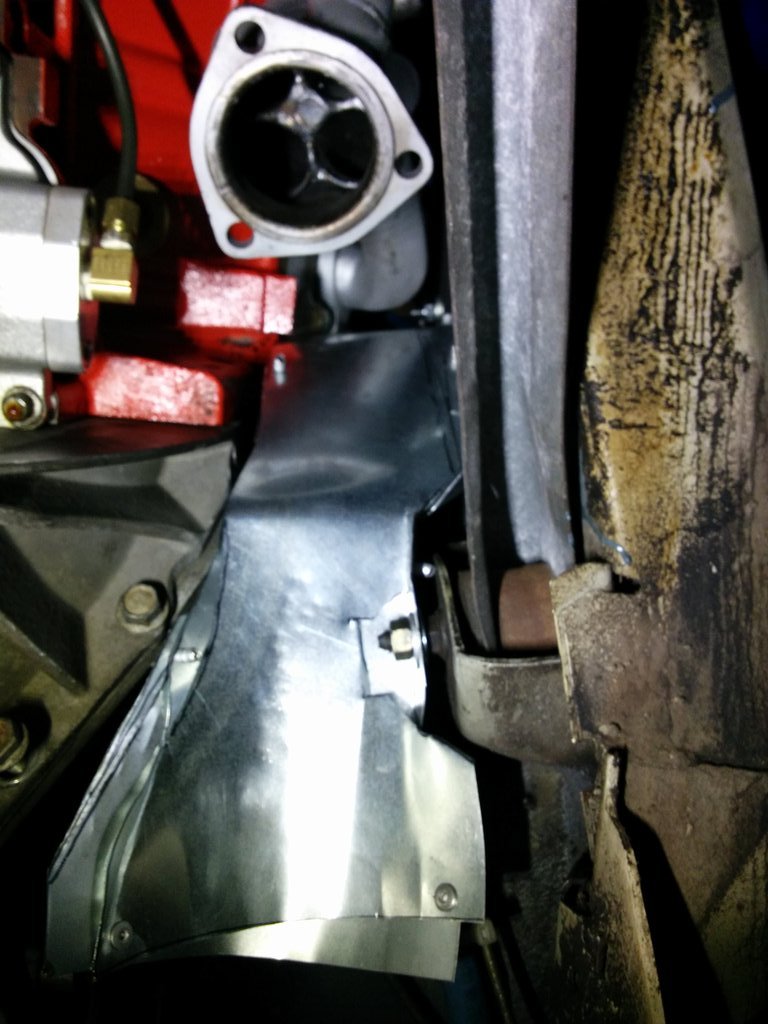
It's difficult to see from this perspective, but if you look between the header pipes and the steering shaft you can see the edge of the heat shield.
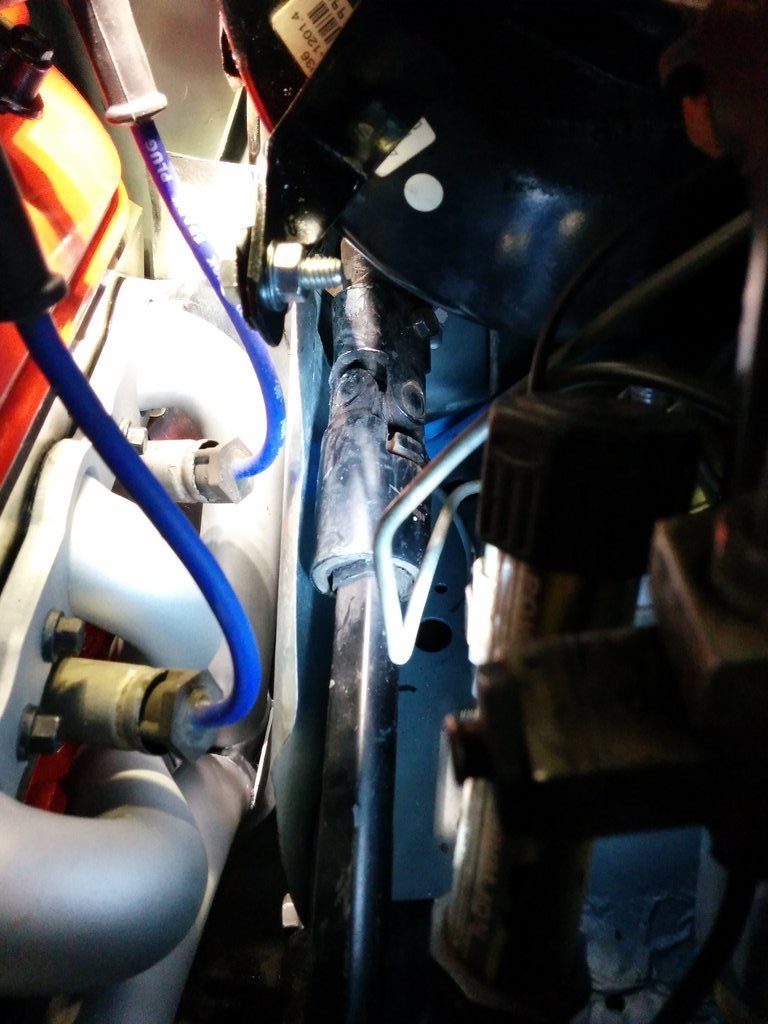
I'm also concerned about heat around the shift linage, plastic parts, and the plastic harness and wiring.
Fabbing a heat shield
So today I'm planning on completing the heat shield for the transmission harness and then install the Y-pipe. Then on to the FI wiring.
I know it's been a while since I updated but "stuff" has happened. Snow, snow and more snow. Clearing the driveway over and over several times a week for months when I've got severe arthritis is not my idea of a good time! And the cold, even though my shop is heated, it doesn't do well when it's this cold, so I haven't spent much time on my project in the last couple of months. Weather has warmed up in the last week, so, on with the show...
I've been working on the fuel system, exhaust, and shifting.
Fuel system
This thing has been sitting for many years with a 1/3 tank of fuel in it. I pulled the fuel pump/sender out and looked inside, and what do I see?

And the pump and sender.

I never gave any thought to trying to restore the tank, bought a new one. The sender I tried to clean things up a bit, hoping to simply install a Walbro pump, but the gauge sender was so heavily gooped up with this stuff that looked like construction adhesive all over it, I bought a new pump/sender to install in the new tank. So the budget is taking another hit.
Installing a fuel reg and new lines leaving just the main steel line and return line. New tank installed with new flexible lines. The old rubber lines to the filter were real bad.


Exhaust is tight. This is the worse part of the swap. The headers are close to the block at the point where the exhaust is closest to the firewall and connects to the Y-pipe. In hindsight I'd cut the flanges off the headers and weld on an extension to drop the Y-pipe connection point lower. But it is what it is.


I'm using a cheapo muffler, no hotrod sound for me. Only 35 bucks!

But you don't see the exhaust cut-out I installed after this pic was taken, ha ha ha
With the close proximity of the fuel lines to the exhaust I fabbed up some heat shields, I'm really big on fire safety.
Cardboard template where the exhaust is closest. Will also protect the brake lines. It wraps right up the firewall and then turns at the top to protect more of the brake lines, fuel lines and the steering shaft universal.

Light gauge galvanized steel.


It's hard to tell at first, but that heat shield is double walled so I have an air space between the one side facing the exhaust and the other facing the fuel lines.

It's difficult to see from this perspective, but if you look between the header pipes and the steering shaft you can see the edge of the heat shield.

I'm also concerned about heat around the shift linage, plastic parts, and the plastic harness and wiring.

Fabbing a heat shield

So today I'm planning on completing the heat shield for the transmission harness and then install the Y-pipe. Then on to the FI wiring.
 03-24-2017, 10:30 AM
#49
Junior Member
Thread Starter
Join Date: Oct 2016
Location: Surrey, BC
Posts: 69
Likes: 0
Received 0 Likes
on
0 Posts
Year: 1992
Model: Cherokee
Engine: 6.0 LS
05-01-2017, 11:35 PM
#51
Junior Member
Thread Starter
Join Date: Oct 2016
Location: Surrey, BC
Posts: 69
Likes: 0
Received 0 Likes
on
0 Posts
Year: 1992
Model: Cherokee
Engine: 6.0 LS
Small update
Finally got back on it after addressing some priority stuff around here.
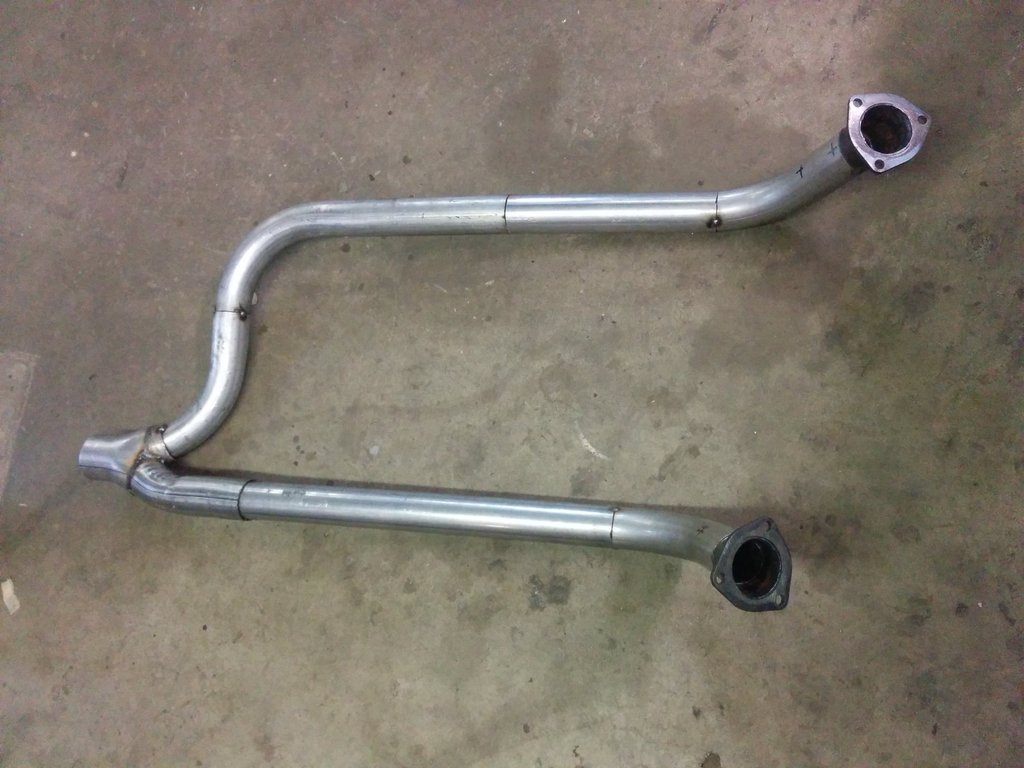
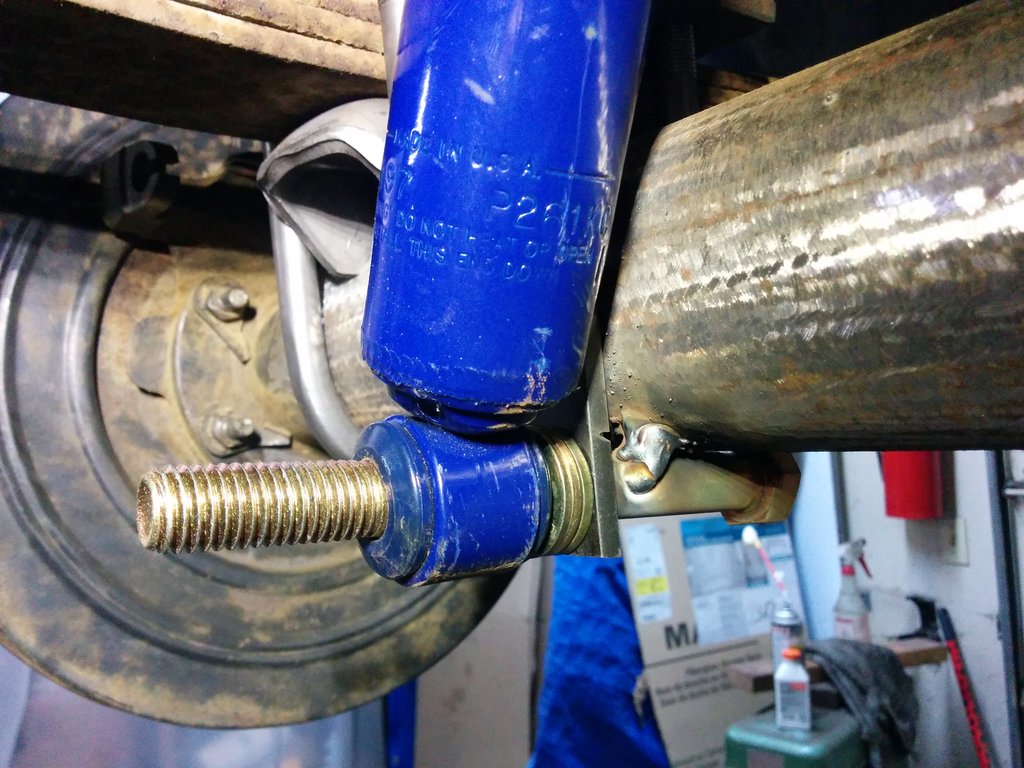
I was planning on moving onto the wiring after I buttoned up the Y-pipe. I had the Y-pipe and muffler fitted but did not fully tighten everything up. With the plan to fire it up after the wiring is far enough to get it running I had to tighten the exhaust. You can see how close the header collector flange is to the bell housing and firewall/floor, especially on the passenger side. I was only able to get one bolt in and fumbled with another and one not at all. It was so awkward that I pulled the header off and extended the down pipe to make the connection under the floor. It wasn't something I really wanted to redo, but I'm glad I did. The header still drops in just as easy, but now I just slip a band clamp over the joint and it's done.
The last 3 days I've been shortening the engine harness and rerouting wires. So far over 100 splices! The harness is considerably bulkier than I had thought, but I don't care, it's not a show car.
I fired it up tonight. Started right up like a DD should. The cheapo muffler sounds good! Deep purr.
I'll post up some pics later this week, maybe a video.
Finally got back on it after addressing some priority stuff around here.
I was planning on moving onto the wiring after I buttoned up the Y-pipe. I had the Y-pipe and muffler fitted but did not fully tighten everything up. With the plan to fire it up after the wiring is far enough to get it running I had to tighten the exhaust. You can see how close the header collector flange is to the bell housing and firewall/floor, especially on the passenger side. I was only able to get one bolt in and fumbled with another and one not at all. It was so awkward that I pulled the header off and extended the down pipe to make the connection under the floor. It wasn't something I really wanted to redo, but I'm glad I did. The header still drops in just as easy, but now I just slip a band clamp over the joint and it's done.

The last 3 days I've been shortening the engine harness and rerouting wires. So far over 100 splices! The harness is considerably bulkier than I had thought, but I don't care, it's not a show car.
I fired it up tonight. Started right up like a DD should. The cheapo muffler sounds good! Deep purr.
I'll post up some pics later this week, maybe a video.
05-02-2017, 03:54 PM
#53
Junior Member
Thread Starter
Join Date: Oct 2016
Location: Surrey, BC
Posts: 69
Likes: 0
Received 0 Likes
on
0 Posts
Year: 1992
Model: Cherokee
Engine: 6.0 LS

 05-03-2017, 11:27 AM
#55
Junior Member
Thread Starter
Join Date: Oct 2016
Location: Surrey, BC
Posts: 69
Likes: 0
Received 0 Likes
on
0 Posts
Year: 1992
Model: Cherokee
Engine: 6.0 LS
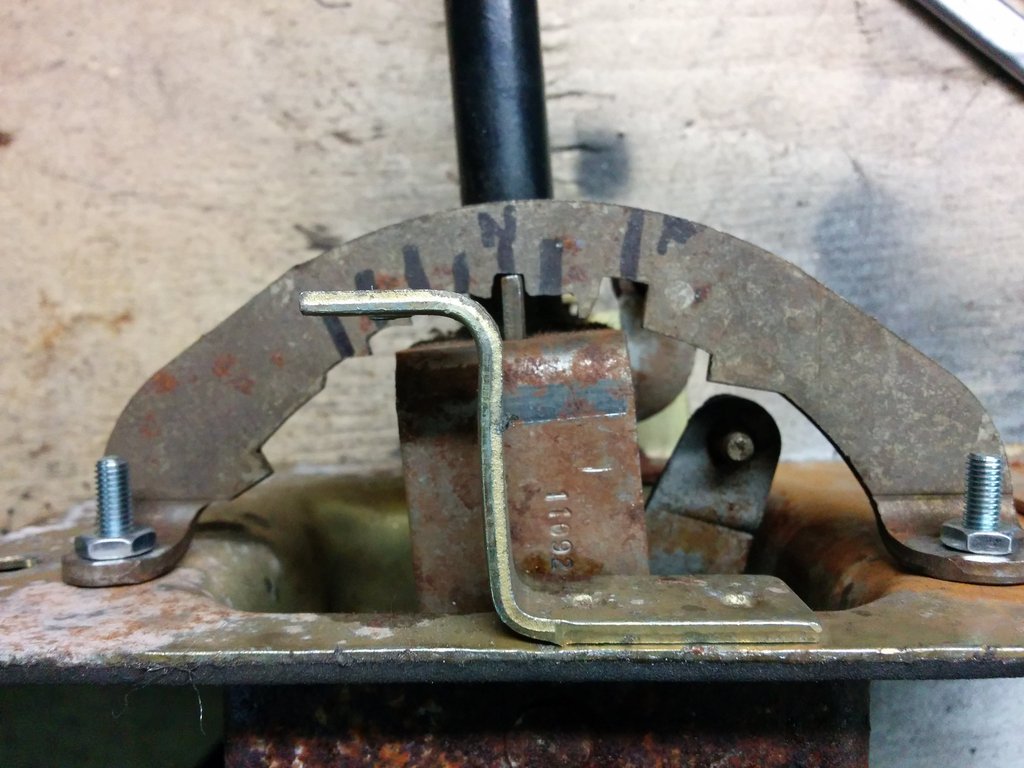
Shift linkage & shifter reworked for the 4 speed auto
Objective: to use the stock shift lever inside the Jeep, 3 speed shifter for 4 speed transmission. Keep the interior looking as stock as possible, no custom shifter. Also I'm too cheap to spend the money on a custom shifter.
I used the lever off the Jeep transmission and cut it down and temporarily tacked it to the GM transmission shift lever so I could figure the geometry. (no pic)
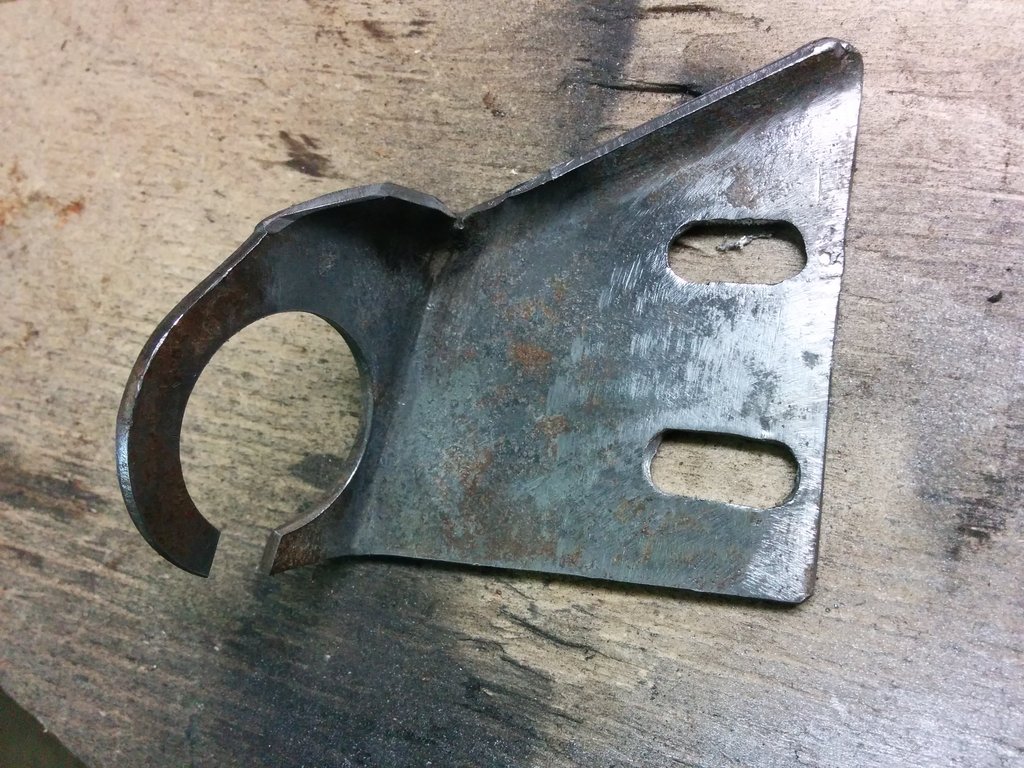
I cut down the Jeep shift cable support bracket to attach to a custom bracket I made for the 4L80
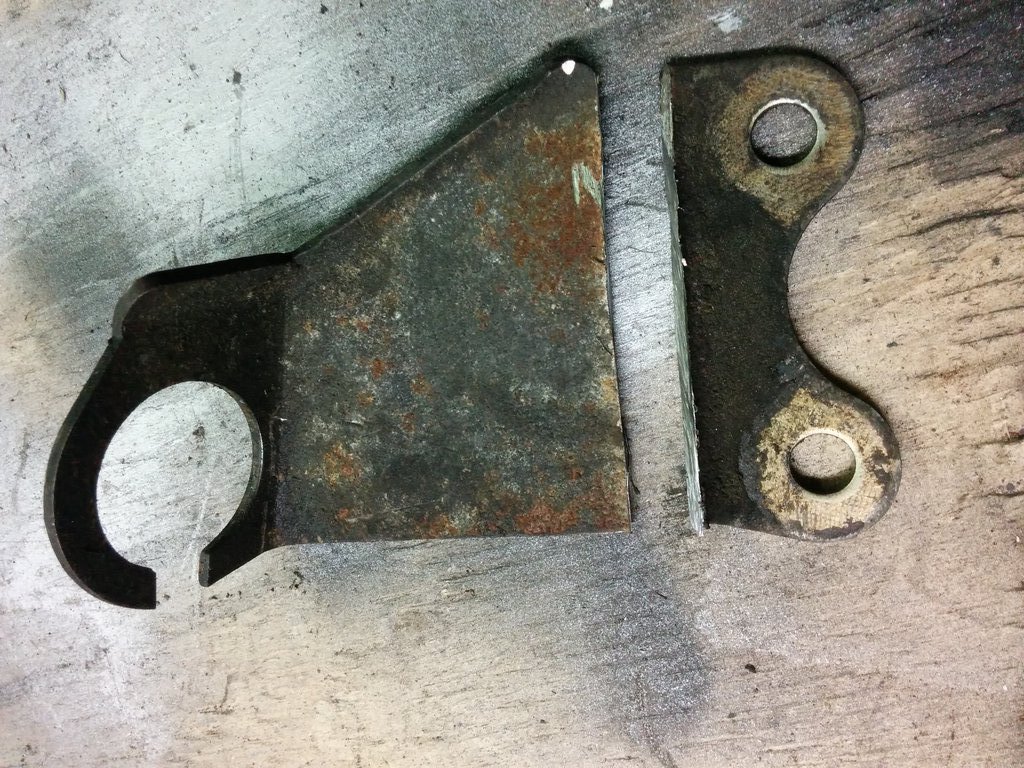
Drill mounting holes in it.
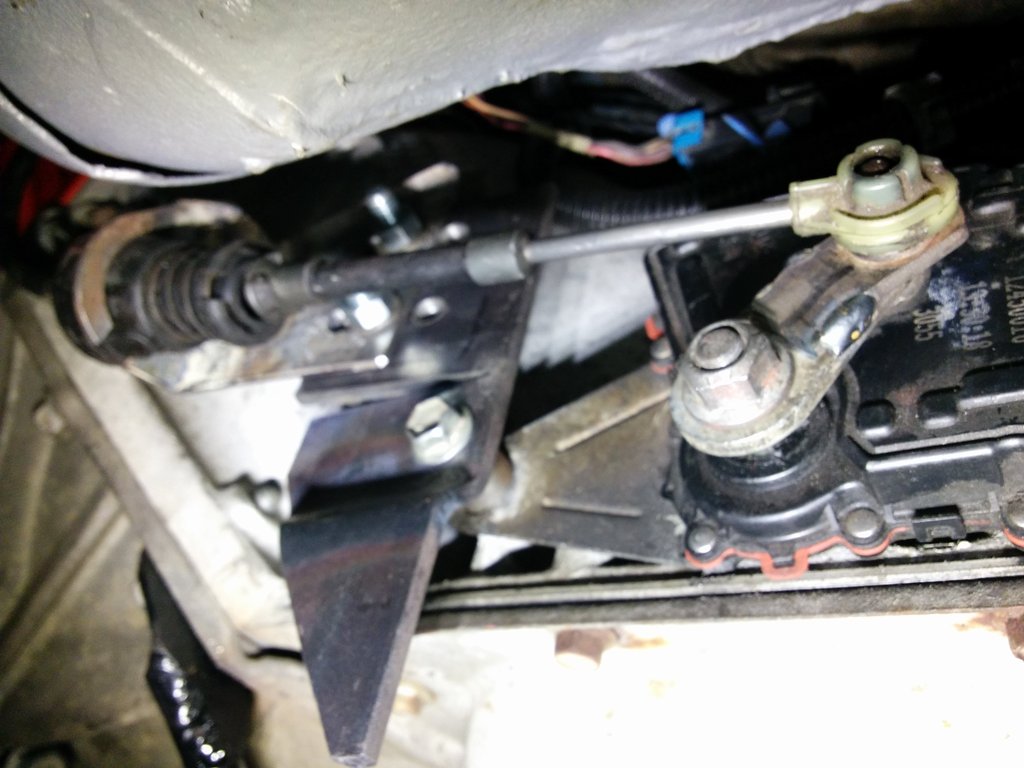
Then I attached the Jeep shifter cable to it. The Jeep cable will now attach to the GM transmission because I attached the Jeep lever to the GM lever.
I moved the shifter through the gears and made a few small corrections to the position of the Jeep lever to match the travel of the cable to the travel of the transmission shift lever. Once I had from Park to #1 gear over the span of the shifter travel I marked out the positions of the gears on the Jeep shifter detent so they would match the transmission detents.
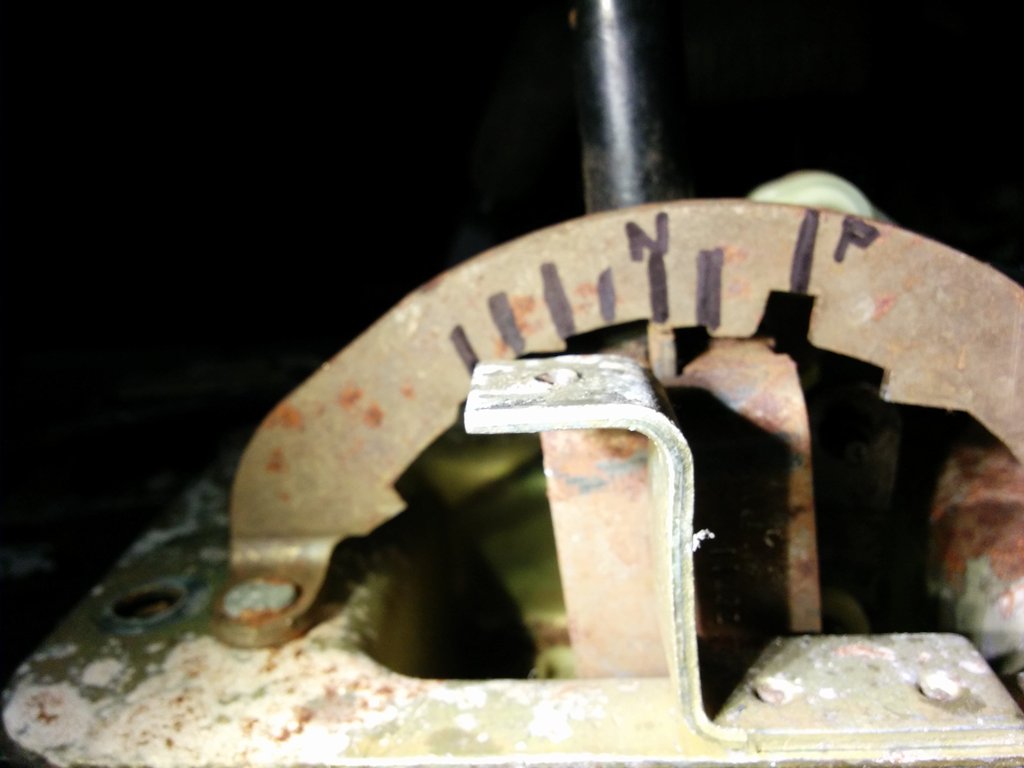
I removed the shifter detent and reworked it so the detents matched my markings.
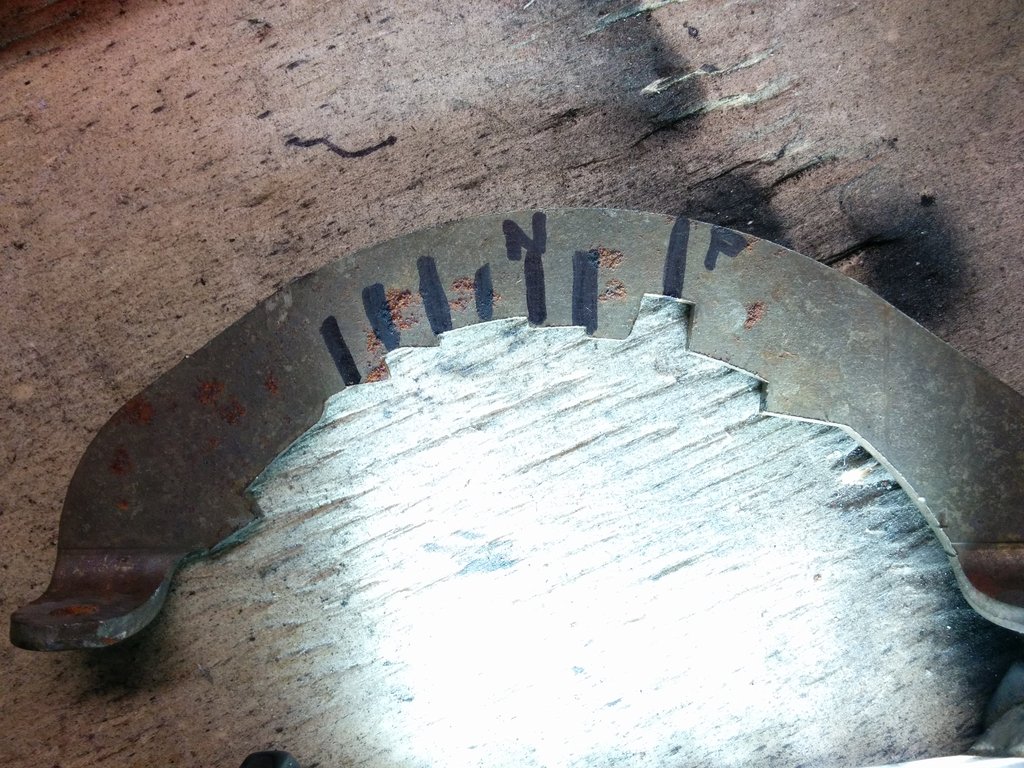
Reassembled the shifter detent.
Now the real cool part.
I took the console shift indicator apart, hot knife through the plastic assembly welds.
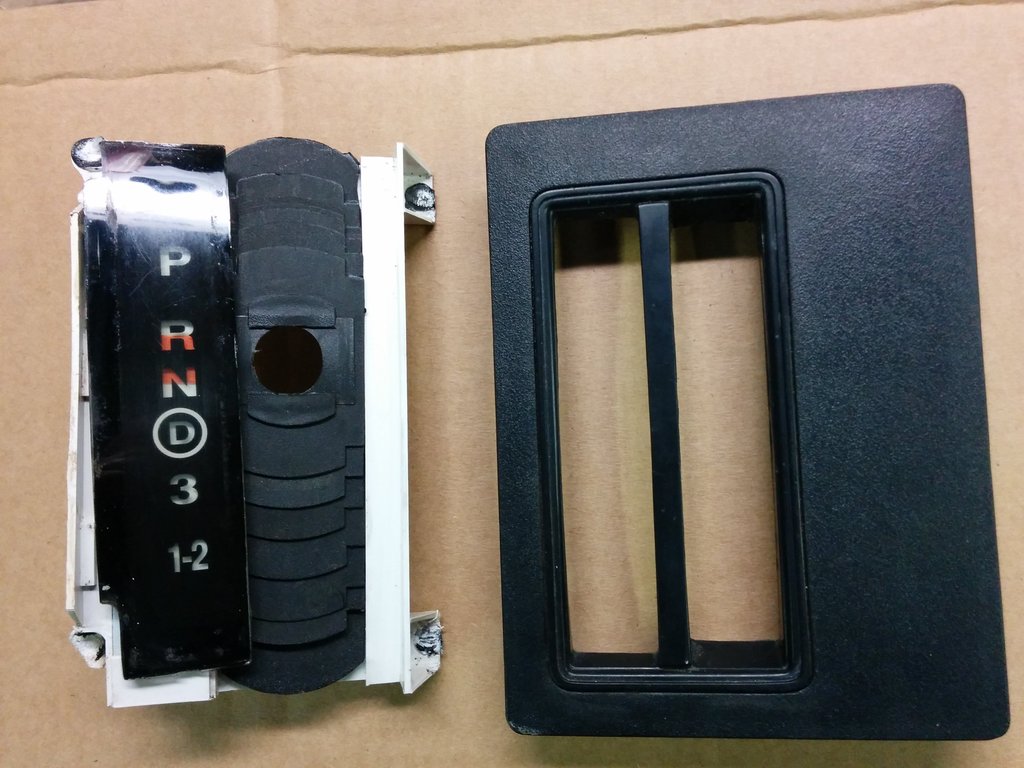
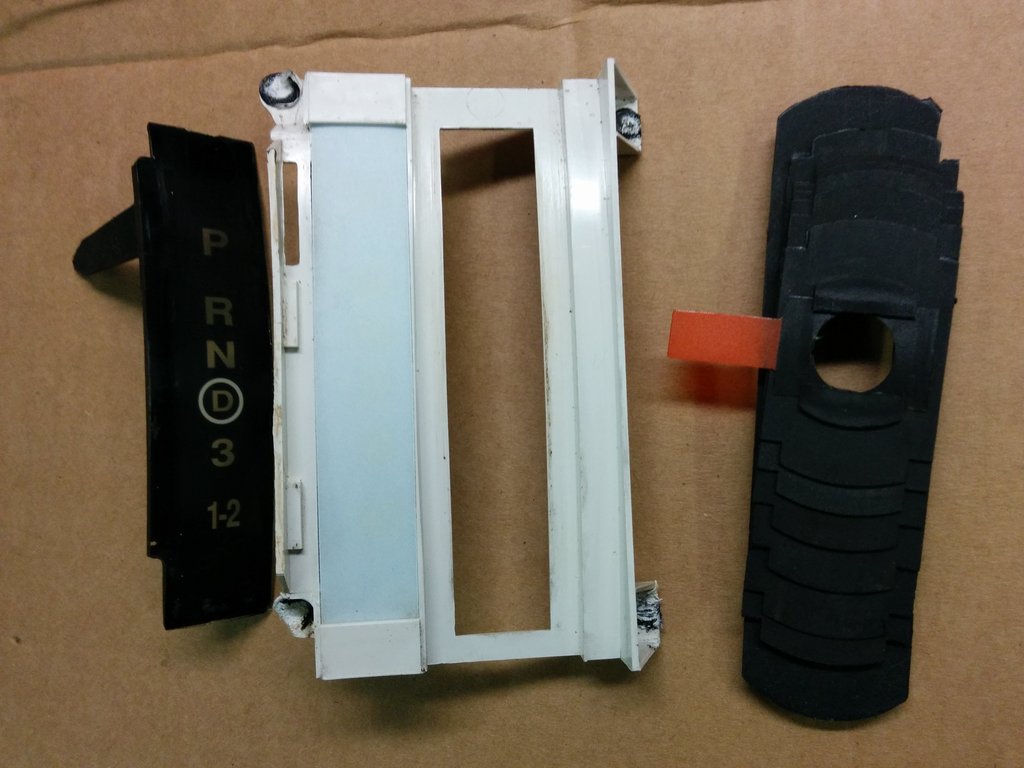
I put the shifter through the motions and marked where each gear position was.
I took the plastic piece that has the PRND31-2 and sanded off the paint so it was clear.
I have a family member who works in a sign/decal shop. I marked out the gear postions on the shift indicator in the console.
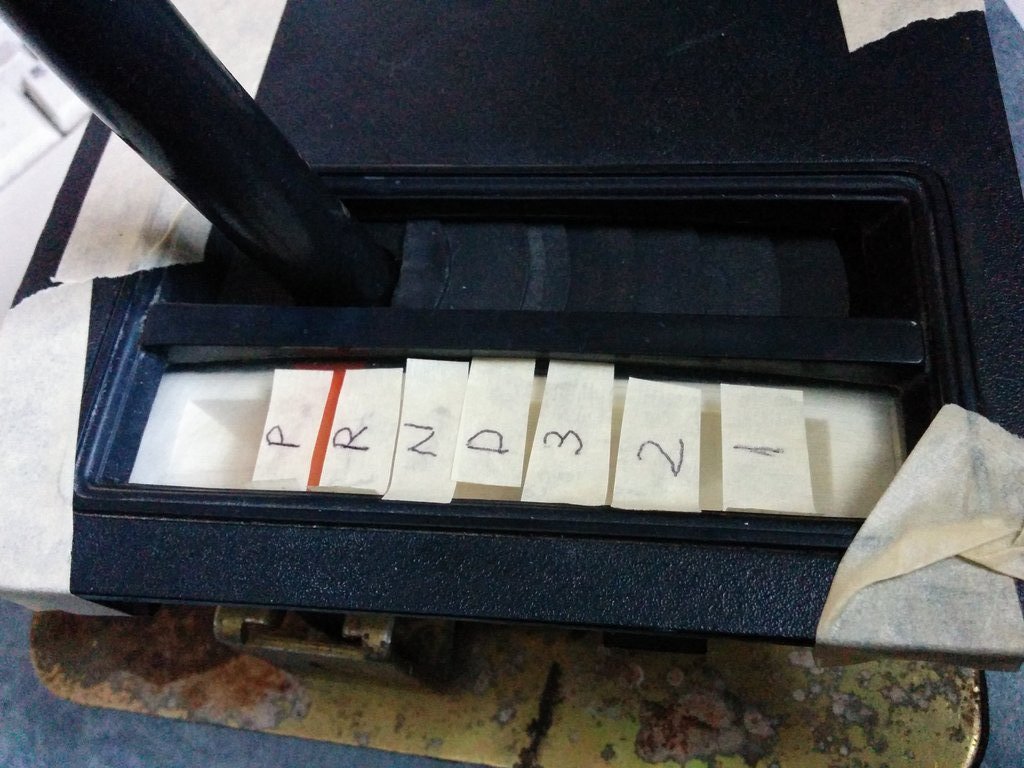
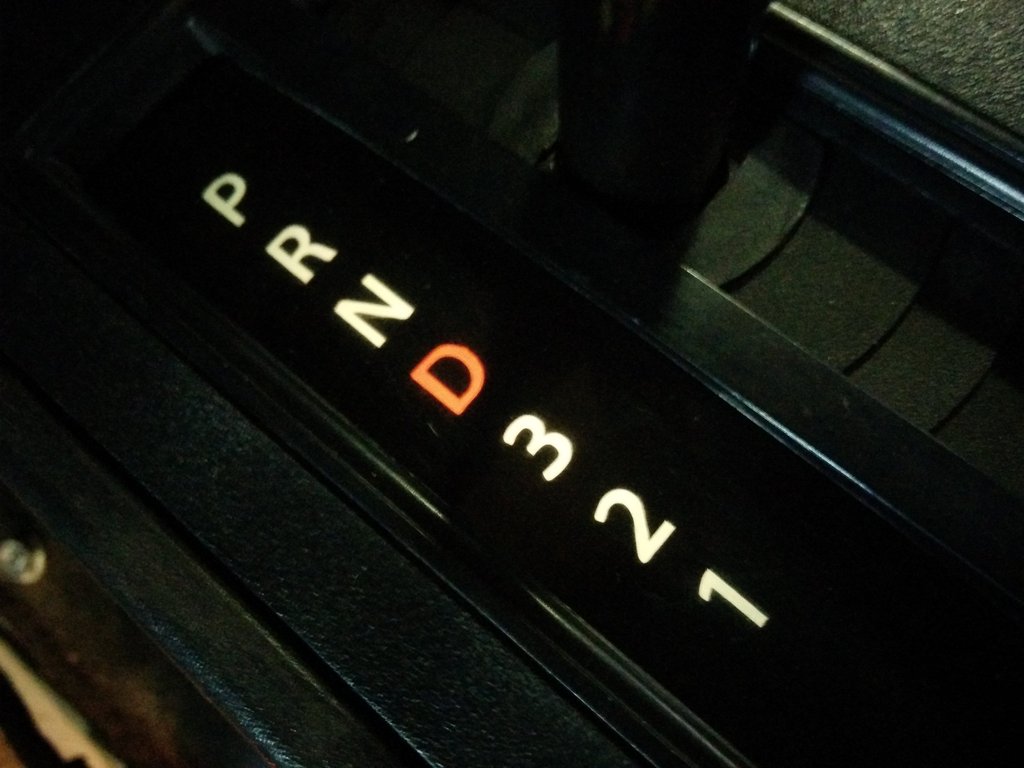
I gave him the tape marked piece and he made a new decal that replaced the old markings, so now I have the correct markings for a 4 speed auto.
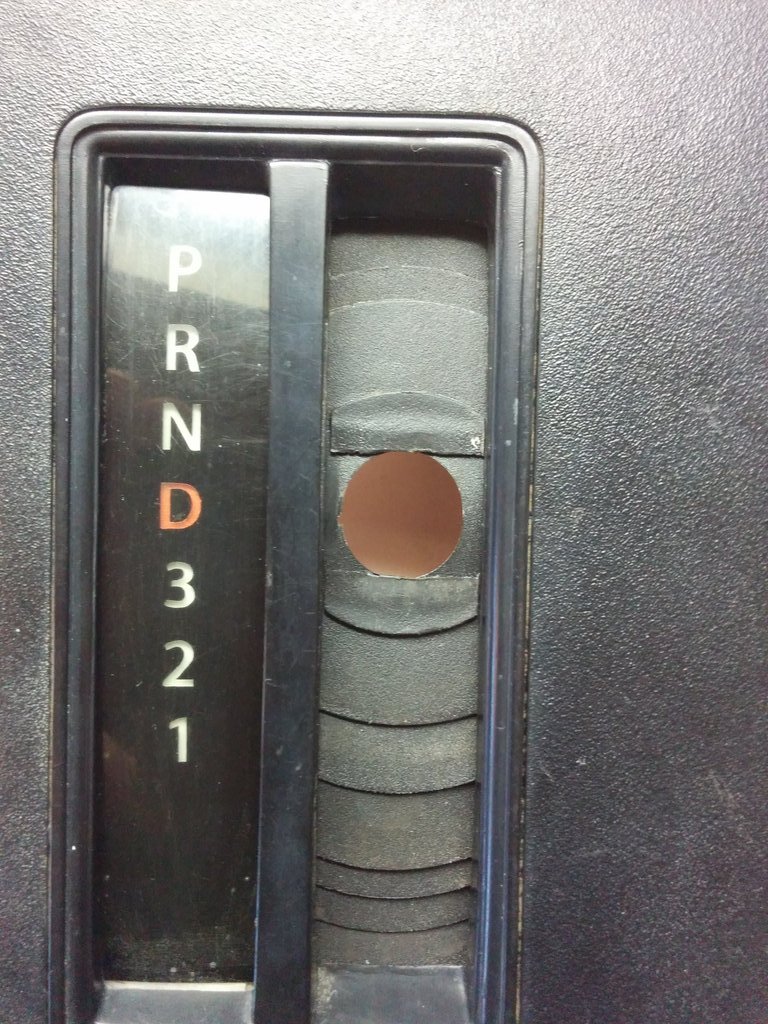
Installed and backlit.
Objective: to use the stock shift lever inside the Jeep, 3 speed shifter for 4 speed transmission. Keep the interior looking as stock as possible, no custom shifter. Also I'm too cheap to spend the money on a custom shifter.
I used the lever off the Jeep transmission and cut it down and temporarily tacked it to the GM transmission shift lever so I could figure the geometry. (no pic)
I cut down the Jeep shift cable support bracket to attach to a custom bracket I made for the 4L80

Drill mounting holes in it.

Then I attached the Jeep shifter cable to it. The Jeep cable will now attach to the GM transmission because I attached the Jeep lever to the GM lever.

I moved the shifter through the gears and made a few small corrections to the position of the Jeep lever to match the travel of the cable to the travel of the transmission shift lever. Once I had from Park to #1 gear over the span of the shifter travel I marked out the positions of the gears on the Jeep shifter detent so they would match the transmission detents.

I removed the shifter detent and reworked it so the detents matched my markings.

Reassembled the shifter detent.

Now the real cool part.
I took the console shift indicator apart, hot knife through the plastic assembly welds.


I put the shifter through the motions and marked where each gear position was.
I took the plastic piece that has the PRND31-2 and sanded off the paint so it was clear.
I have a family member who works in a sign/decal shop. I marked out the gear postions on the shift indicator in the console.

I gave him the tape marked piece and he made a new decal that replaced the old markings, so now I have the correct markings for a 4 speed auto.

Installed and backlit.
 05-13-2017, 11:05 PM
#58
Junior Member
Thread Starter
Join Date: Oct 2016
Location: Surrey, BC
Posts: 69
Likes: 0
Received 0 Likes
on
0 Posts
Year: 1992
Model: Cherokee
Engine: 6.0 LS
Thanks guys!
Update
I wanted to get this thing sitting on it's own wheels, sort of. I had the 8.8 chained up to the leaf springs so it would sit and roll around, but because the tires are so close to the leaf springs the rear end would shift and then it would not roll and it would also shift off center on my hoist if I let it rest on the wheels, so next time I lifted it I would need to remember to re-position my hoist arms, VERY important.
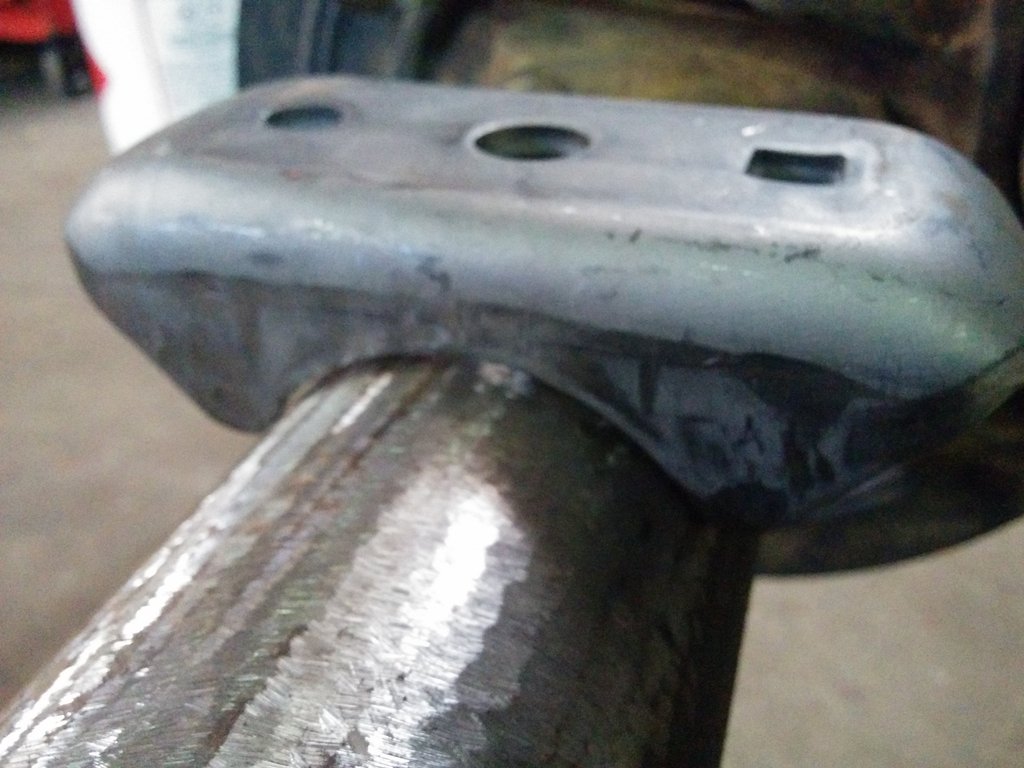
I got the spring perches removed, needs to be spring over now, not spring under.
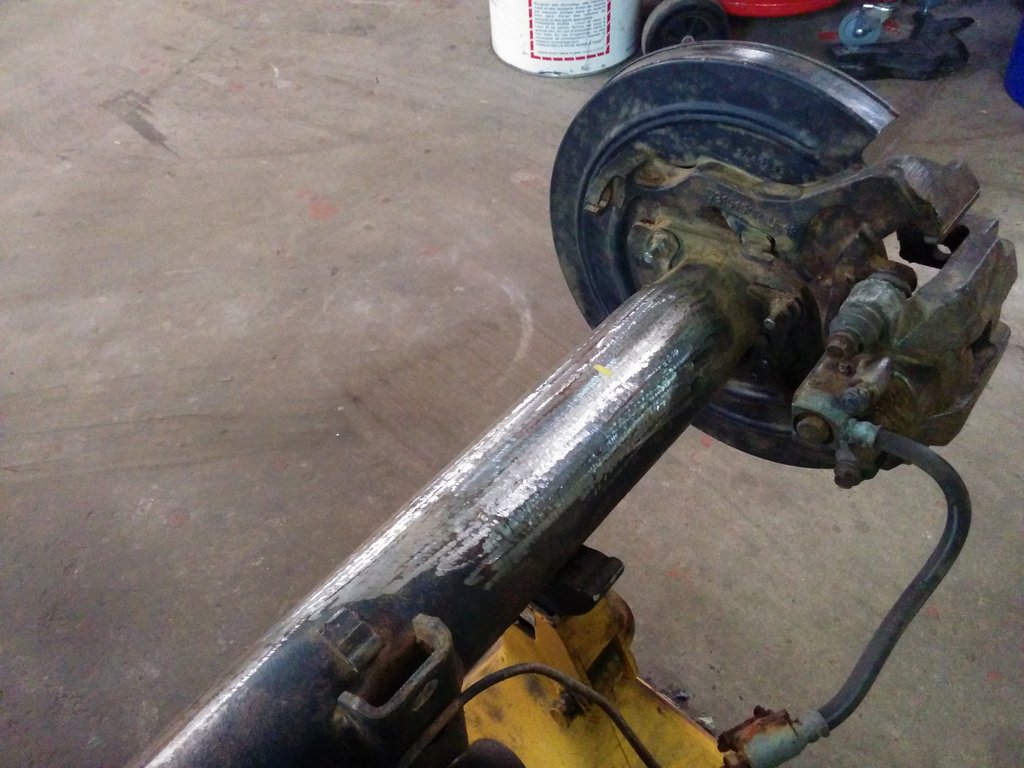
Picked up some new perches from the spring shop. I set the axle on jack stands to replicate the ride height of the axle with the wheels on. Need to do this to set the pinion angle. I gently set the Cherokee down with the perches loose so I could shift the diff to get the wheels positioned left & right.
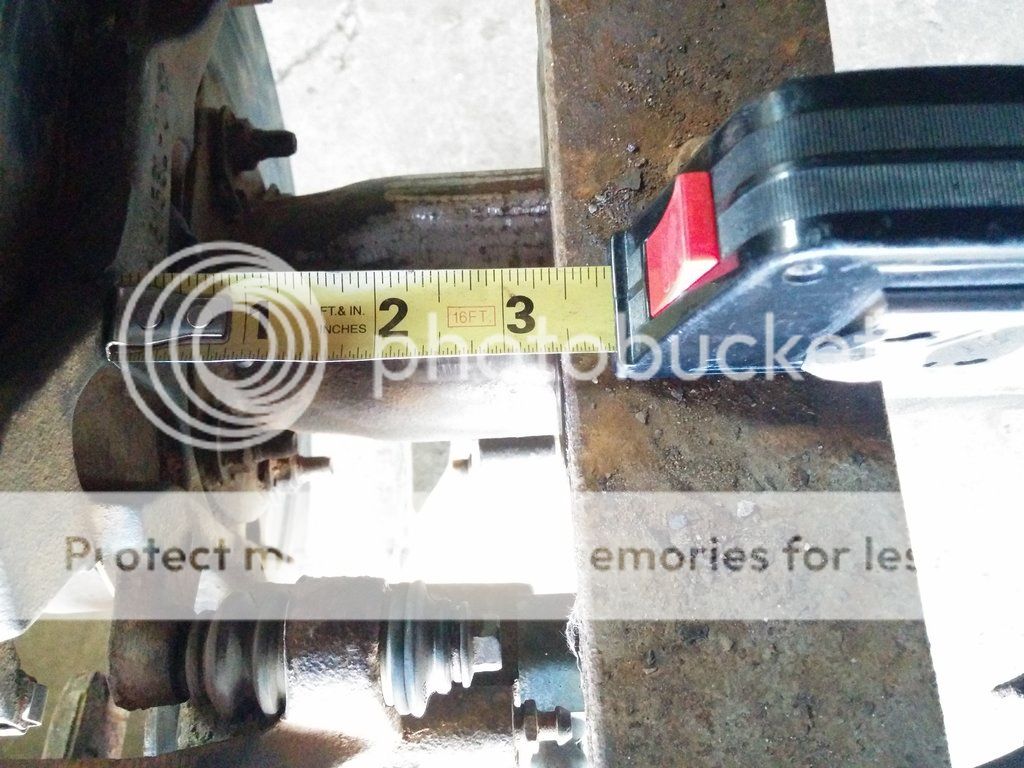
I measured from the caliper mount to the spring and adjusted so each side was equal.
With that done I crawled under and read the inclinometer on the transmission rail and duplicated the pinion angle by tilting the diff up or down. Once that was done I tacked the perches in place.
Measured up for my drive shaft to be shortened. I had an aluminum drive shaft from an Aerostar. Turns out the 8.8 in the Aerostar uses a different pinion flange. The opening for the pinion nut wasn't big enough, I had to have the shop supply an Explorer one. Also the slip yoke in the 4l80 uses too large a U-joint to be compatible with the Areostar drive shaft.
But I got it done.
Mocked up my shock mounts.

A couple of coats of paint now that it's all welded up.
So now to do the rear brakes and then back to wiring. Just need to wrap the loom up using Tesa tape. For those that do not know, Tesa tape is what the German auto manufacturers use. It's a fabric tape that is super super sticky, and the adhesive will not release with the under hood heat. It is super strong stuff. Very hard to find here. I had to order off eBay. 20 bucks for 4 rolls, 25 yards each.
Then need to integrate the LS harness into the Jeep's system, fuel pump, ignition, etc. Then it's drop the rad in, hoses and put the grill back on then then burn rubber!
Update
I wanted to get this thing sitting on it's own wheels, sort of. I had the 8.8 chained up to the leaf springs so it would sit and roll around, but because the tires are so close to the leaf springs the rear end would shift and then it would not roll and it would also shift off center on my hoist if I let it rest on the wheels, so next time I lifted it I would need to remember to re-position my hoist arms, VERY important.
I got the spring perches removed, needs to be spring over now, not spring under.

Picked up some new perches from the spring shop. I set the axle on jack stands to replicate the ride height of the axle with the wheels on. Need to do this to set the pinion angle. I gently set the Cherokee down with the perches loose so I could shift the diff to get the wheels positioned left & right.

I measured from the caliper mount to the spring and adjusted so each side was equal.

With that done I crawled under and read the inclinometer on the transmission rail and duplicated the pinion angle by tilting the diff up or down. Once that was done I tacked the perches in place.
Measured up for my drive shaft to be shortened. I had an aluminum drive shaft from an Aerostar. Turns out the 8.8 in the Aerostar uses a different pinion flange. The opening for the pinion nut wasn't big enough, I had to have the shop supply an Explorer one. Also the slip yoke in the 4l80 uses too large a U-joint to be compatible with the Areostar drive shaft.
But I got it done.


Mocked up my shock mounts.


A couple of coats of paint now that it's all welded up.

So now to do the rear brakes and then back to wiring. Just need to wrap the loom up using Tesa tape. For those that do not know, Tesa tape is what the German auto manufacturers use. It's a fabric tape that is super super sticky, and the adhesive will not release with the under hood heat. It is super strong stuff. Very hard to find here. I had to order off eBay. 20 bucks for 4 rolls, 25 yards each.
Then need to integrate the LS harness into the Jeep's system, fuel pump, ignition, etc. Then it's drop the rad in, hoses and put the grill back on then then burn rubber!
05-13-2017, 11:30 PM
#59
CF Veteran
Join Date: Jul 2012
Location: San Antonio, TX
Posts: 4,104
Likes: 0
Received 2 Likes
on
2 Posts
Year: 1996
Model: Cherokee
Engine: 4.0L
good call on the 8.8.
im planning on jk 44s in the future, otherwise id swap in an 8.8
im sure with a 6.0 you'll have no trouble burning rubber, i dont with 4.10s 33s and a 5.3
im planning on jk 44s in the future, otherwise id swap in an 8.8
im sure with a 6.0 you'll have no trouble burning rubber, i dont with 4.10s 33s and a 5.3
05-21-2017, 05:58 PM
#60
Junior Member
Thread Starter
Join Date: Oct 2016
Location: Surrey, BC
Posts: 69
Likes: 0
Received 0 Likes
on
0 Posts
Year: 1992
Model: Cherokee
Engine: 6.0 LS
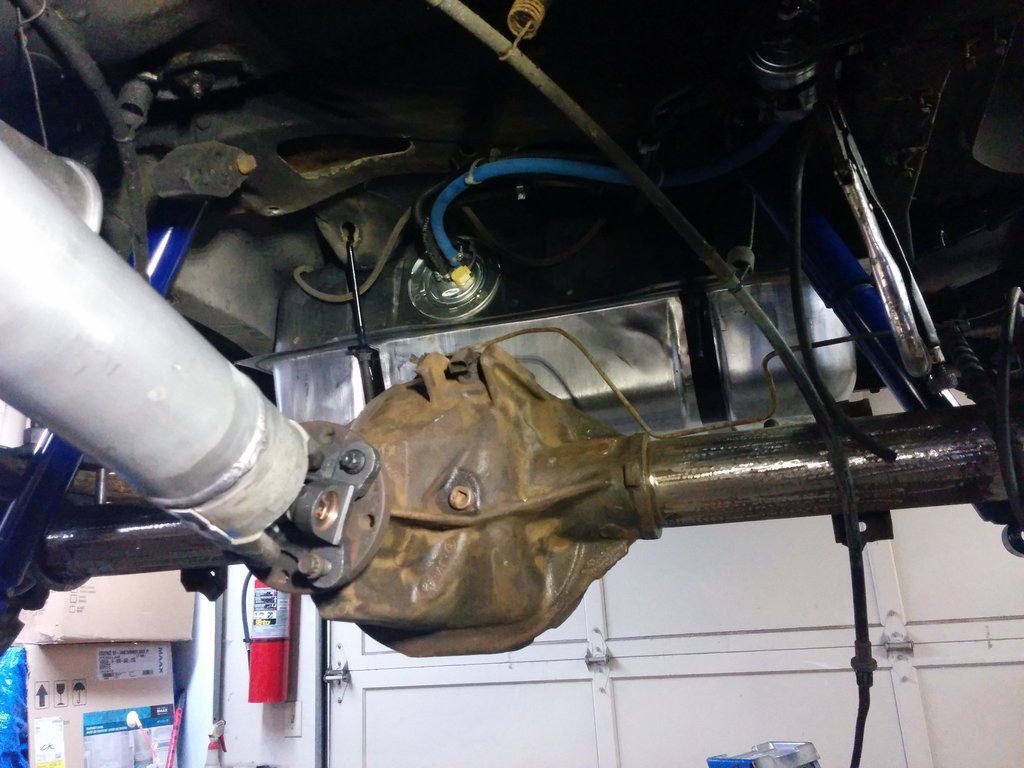
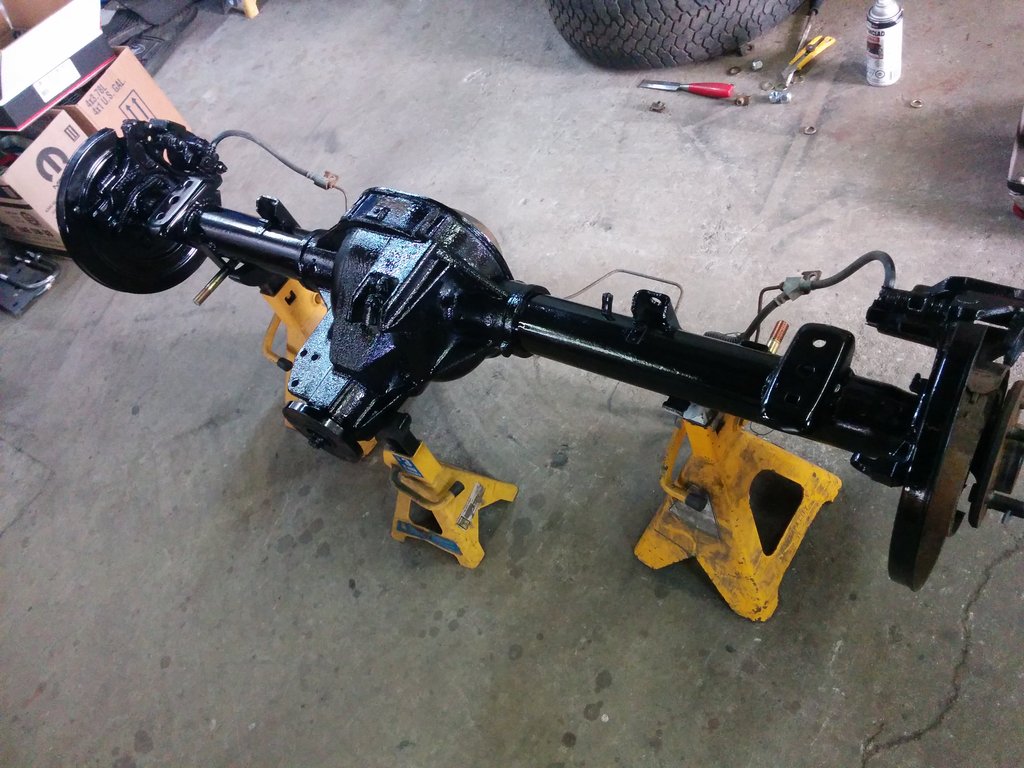
8.8 rear end is installed. It went much quicker than I had thought.
Spring pads welded in place, shock mounts made and the whole works installed.
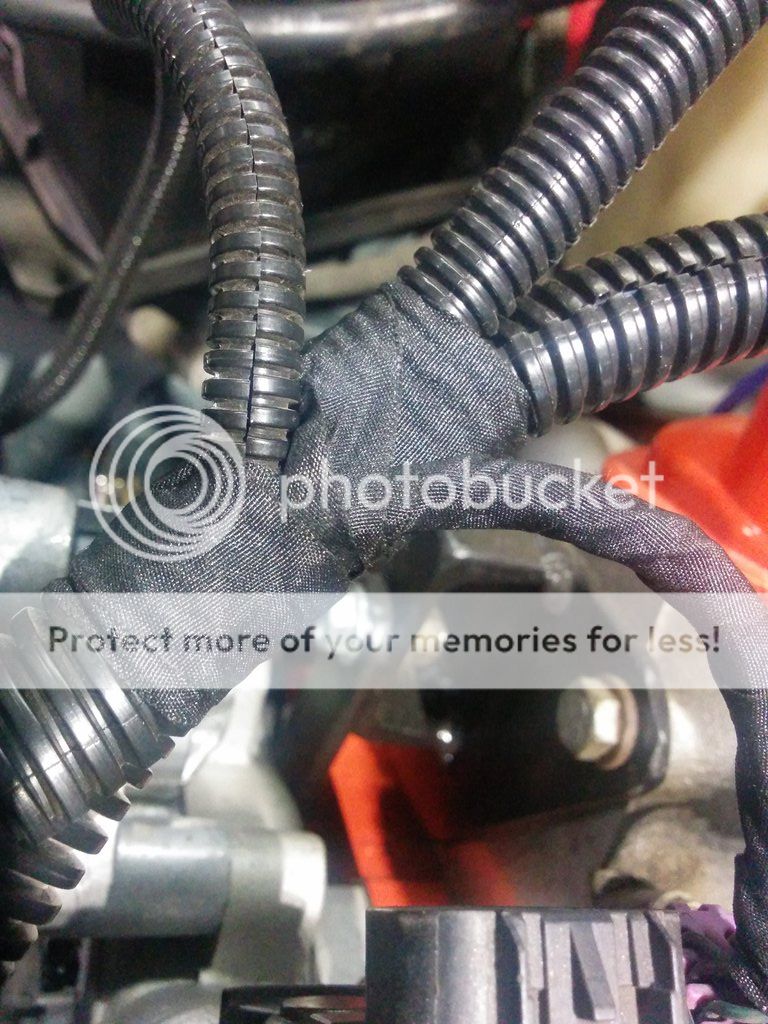
I got the engine harness cleaned up and wrapped with Tesa tape. What, you haven't heard of Tesa tape!
This is the best kept trade secret. Tesa brand tape is a cloth tape that is used by VW, BMW & MB on their engine harnesses. It forms itself very well as you wrap it. It sticks REALLY well and is very resistant to underhood temps. It does not relax with heat and release itself.
I've just got to mount my little swap fuse boxes and wire the engine harness into the Jeep's system.
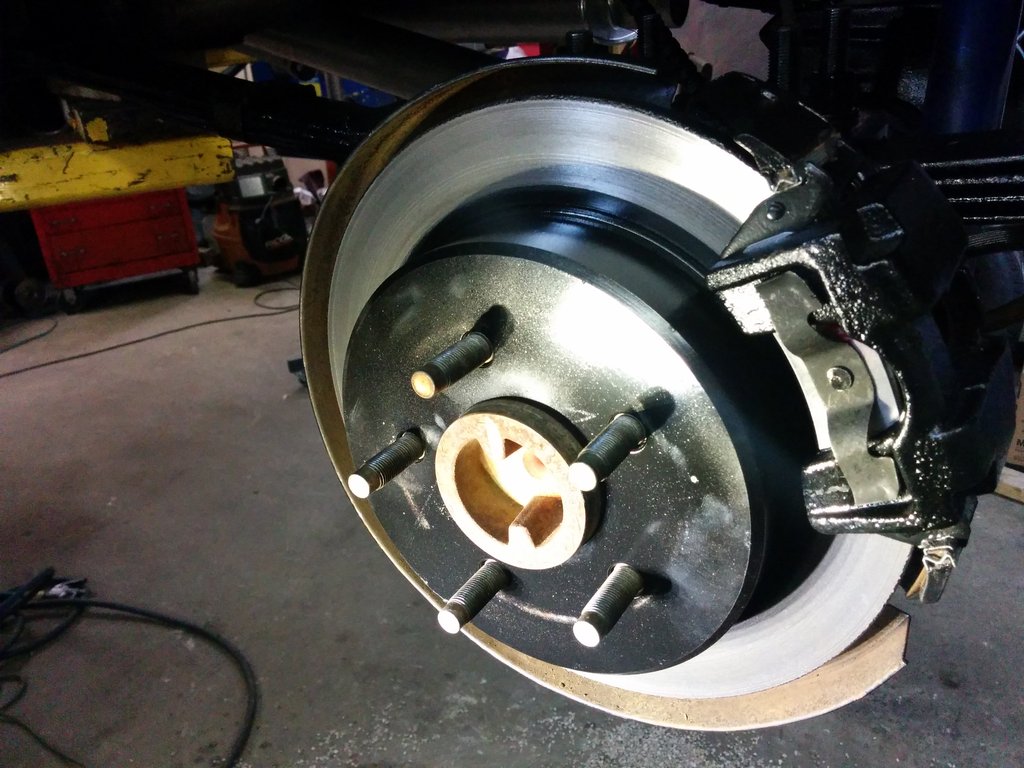
Rear brakes are done. Just a good clean up and new pads.
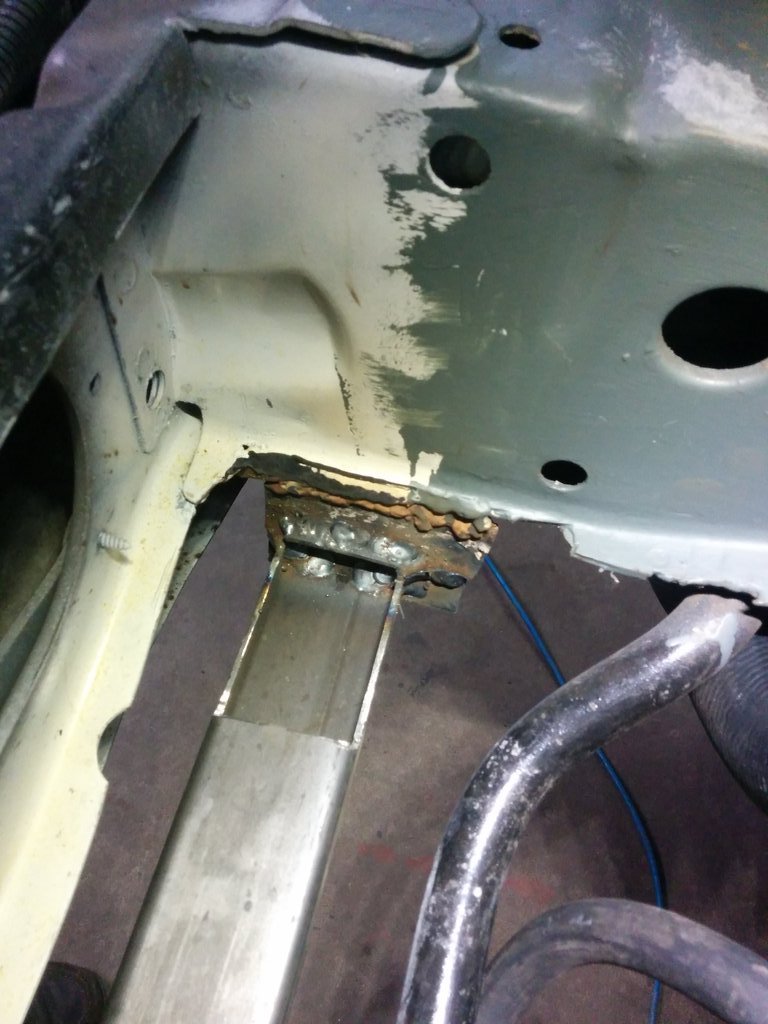
The biggest relief was getting the rad & fan installed. I had fabbed something up but was not really feeling it was my best work. I didn't like how the rad was supported and the cooling fan didn't fit as nice as I had hoped.
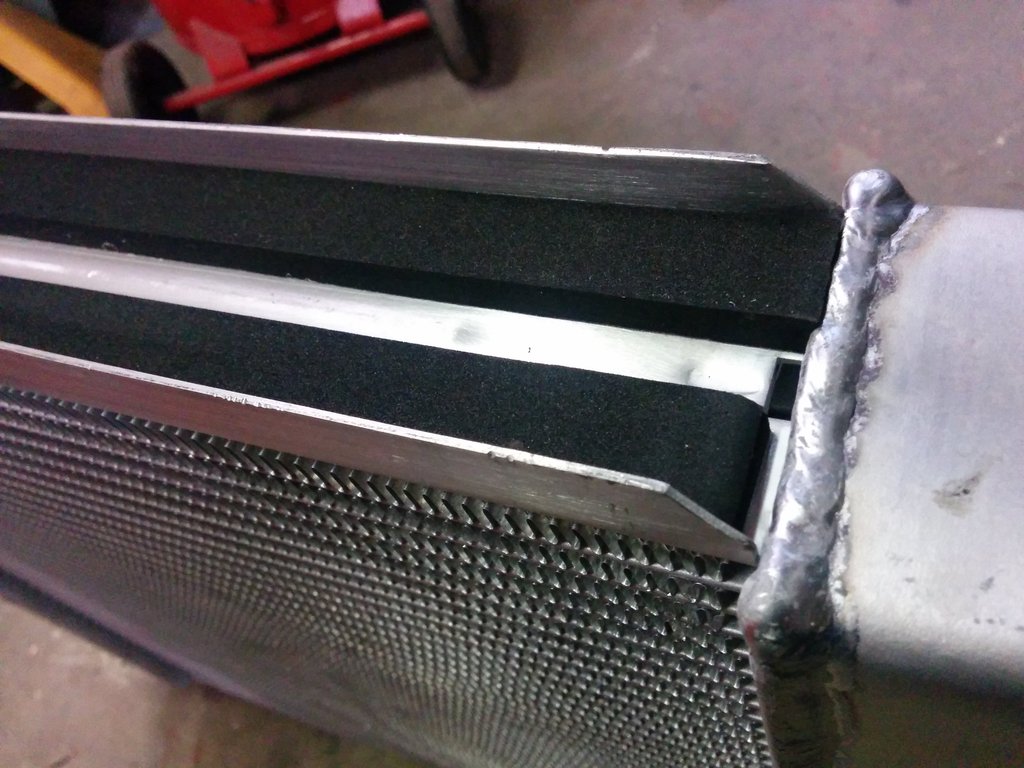
I redid the lower rad support and used a piece of 1 x 2 tubing with some foam strips to support it.
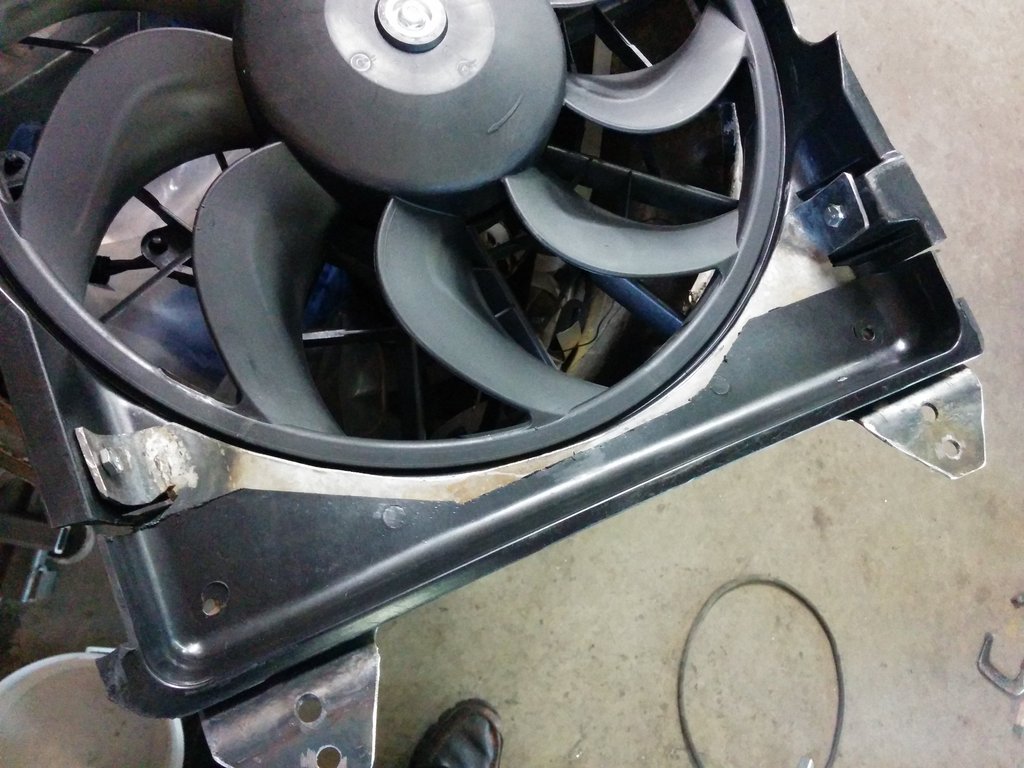
The Taurus fan is a bit too long for the core so I cut it down.
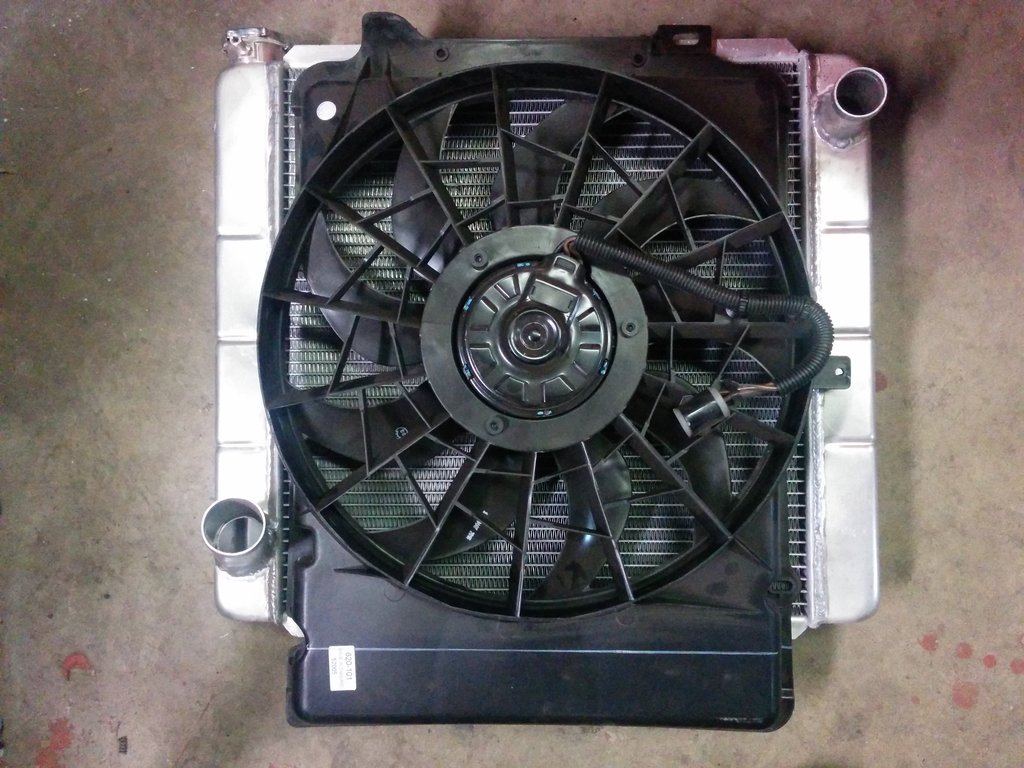
Reworked the shroud and fabbed a support of the lower rad support.
Installed and looking purdy!
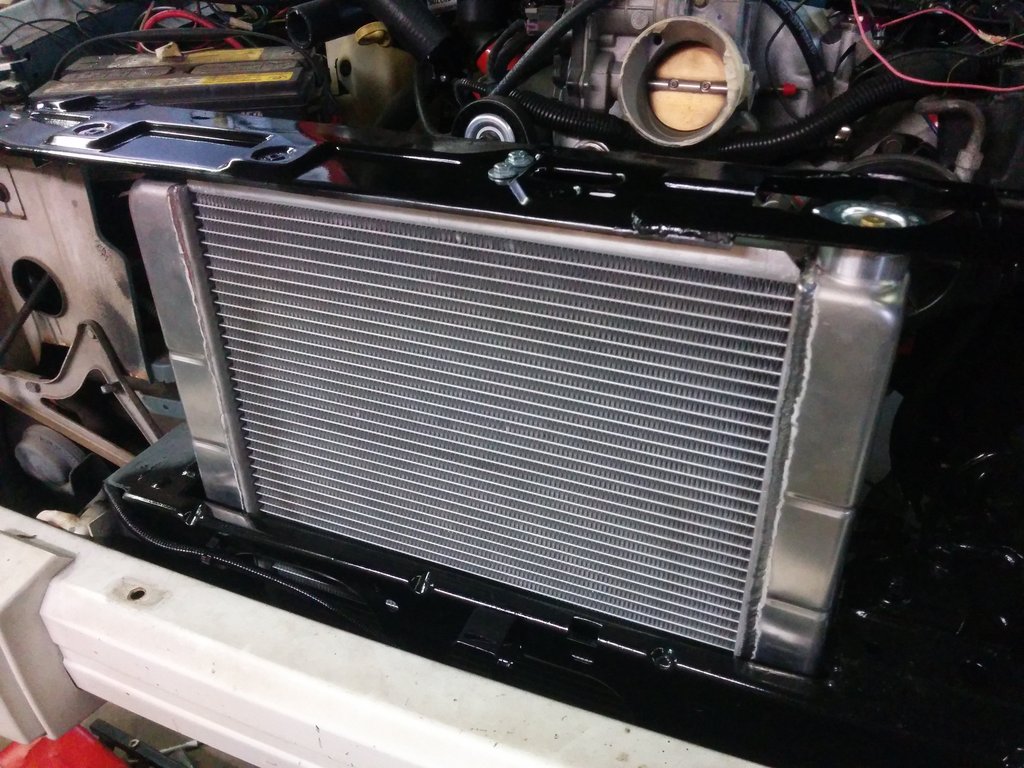
I've just got the rad wired on low right now. It still moves a lot of air. If I find out I need more cooling I can wire the high speed.
I've got 3/4" between the fan & the water pump pulley.
Here is a Youtube video with a quick look around on the rad & fan.
Hoses look straight forward. Spent a few minutes looking at the rad hoses on the wall, picked out 6 that I thought I could make work. 4 will and I just need one pipe to complete the system.
I can already smell the burning rubber!
Spring pads welded in place, shock mounts made and the whole works installed.
I got the engine harness cleaned up and wrapped with Tesa tape. What, you haven't heard of Tesa tape!
This is the best kept trade secret. Tesa brand tape is a cloth tape that is used by VW, BMW & MB on their engine harnesses. It forms itself very well as you wrap it. It sticks REALLY well and is very resistant to underhood temps. It does not relax with heat and release itself.

I've just got to mount my little swap fuse boxes and wire the engine harness into the Jeep's system.
Rear brakes are done. Just a good clean up and new pads.

The biggest relief was getting the rad & fan installed. I had fabbed something up but was not really feeling it was my best work. I didn't like how the rad was supported and the cooling fan didn't fit as nice as I had hoped.
I redid the lower rad support and used a piece of 1 x 2 tubing with some foam strips to support it.


The Taurus fan is a bit too long for the core so I cut it down.

Reworked the shroud and fabbed a support of the lower rad support.

Installed and looking purdy!

I've just got the rad wired on low right now. It still moves a lot of air. If I find out I need more cooling I can wire the high speed.
I've got 3/4" between the fan & the water pump pulley.
Here is a Youtube video with a quick look around on the rad & fan.
Hoses look straight forward. Spent a few minutes looking at the rad hoses on the wall, picked out 6 that I thought I could make work. 4 will and I just need one pipe to complete the system.
I can already smell the burning rubber!