Doing it right from the start
 11-08-2012, 08:23 PM
#1
Seasoned Member
Thread Starter
Join Date: Oct 2010
Location: Colorado Rocky Mountains
Posts: 486
Likes: 0
Received 2 Likes
on
2 Posts
Year: 1999
Model: Cherokee
Engine: 4.0 I6
So my old 96 XJ with all its rust and miles is now sold. I was something like the 6th or 7th owner on that one, and all the previous owners had done something stupid. Body putty to fix the rust holes in the floors, incomplete and cheap block lift on the suspension, heck - the windshield wasn't even attached when I first got that thing. I went to clean the inside and when I pushed on it it almost fell out on the hood! I drove it to 202K miles and during that time it taught me a lot, including how awesome a vehicle the Jeep Cherokee XJ really is. Recently I decided I'd had enough nonsense and decided I was going to get a 99 XJ with as few miles as possible in stock condition and start from scratch, building it up correctly from the start.
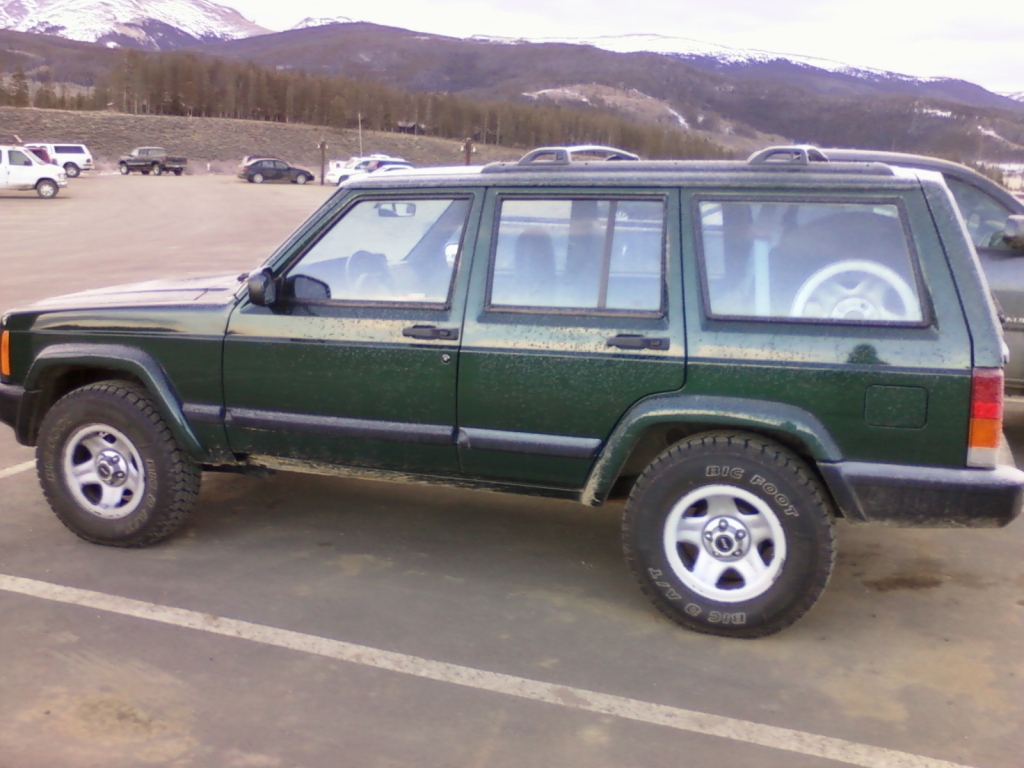
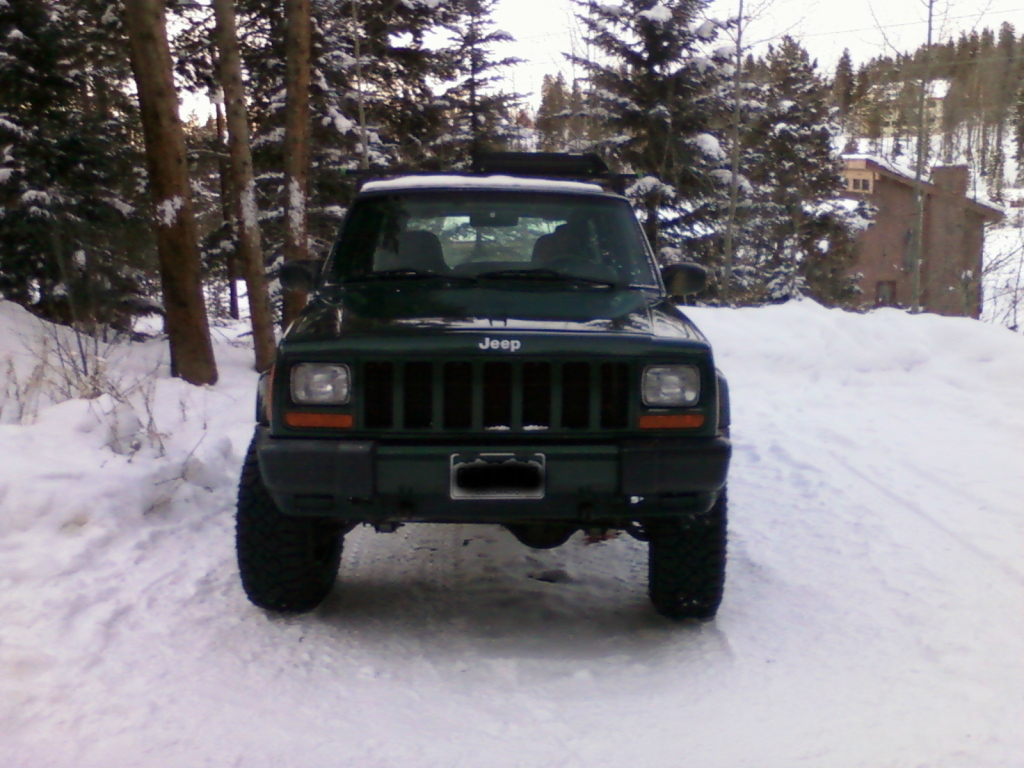
Here's what I found and bought last week - a 99 built in May of that year with 106K miles and only one modification. It has a tow bar mount installed on the front bumper and lots of little stone chips on the bumper paint, so I'm pretty sure some of those 106K aren't even real driving miles!
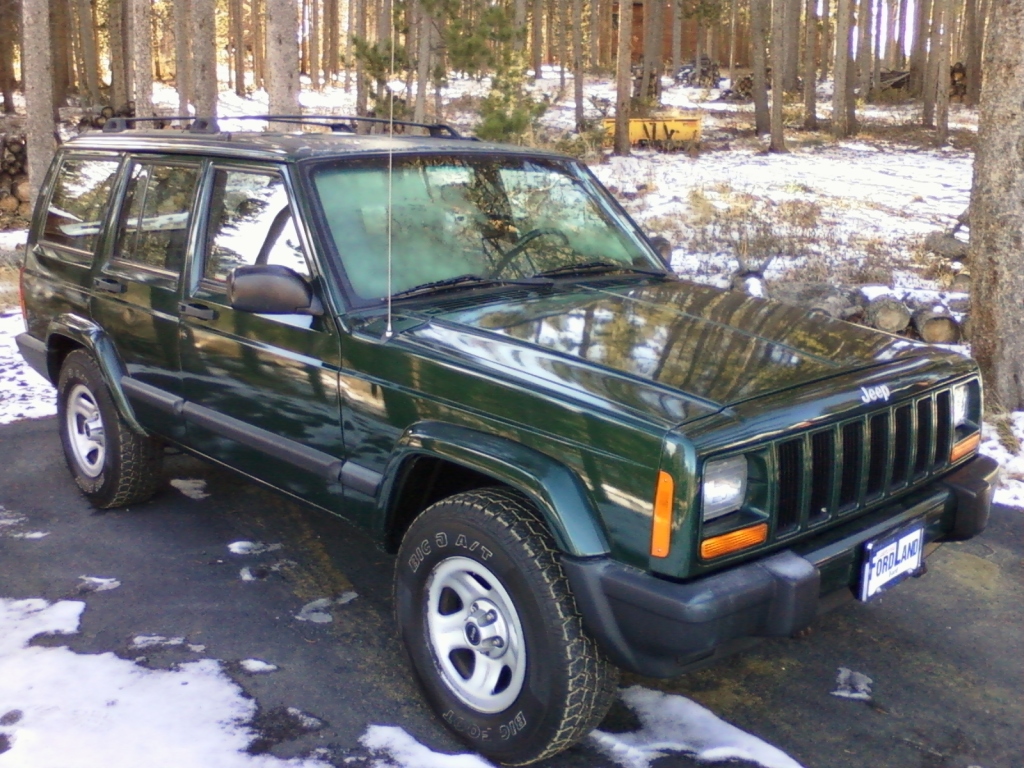
It has a few little oddities like little dents and missing badges so it's probably had some body work and possible a repaint because the paint certainly looks almost new! The center console mounting bracket is broken inside, but that's the only interior flaw I could find. I haven't figured out what I'm going to do about that yet, but am considering two things: replace the bracket if I can find one at a JY, or build an all-new custom center console. I'm gonna think on that for a while, in the mean time I've got lots of other things to do.
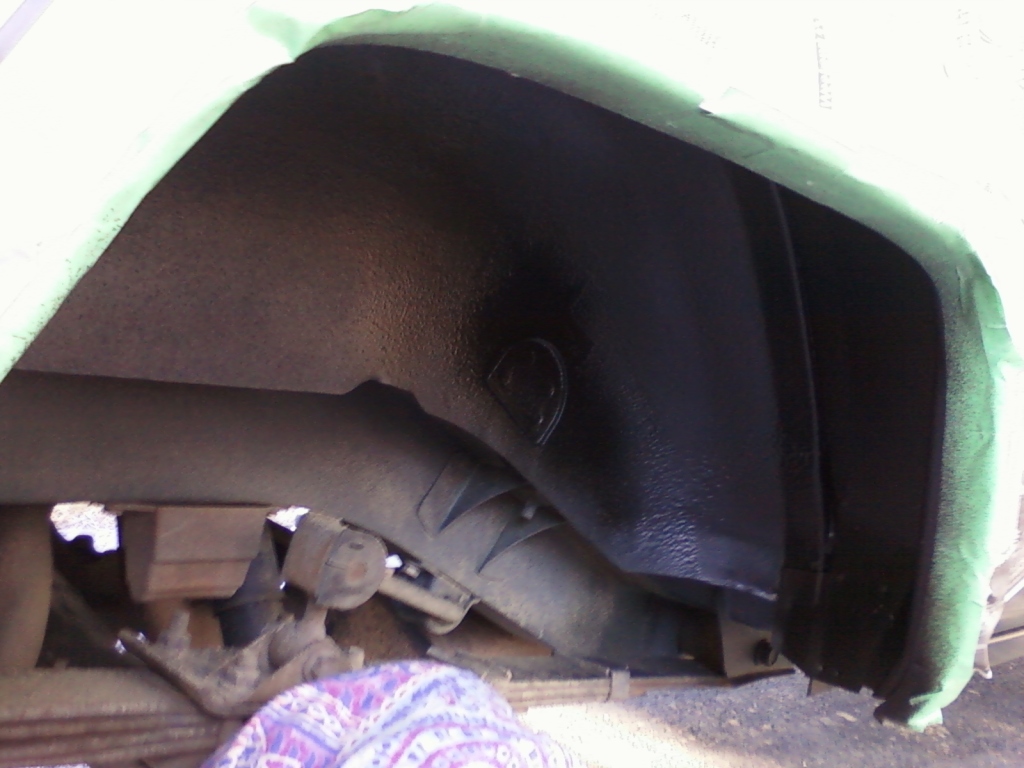
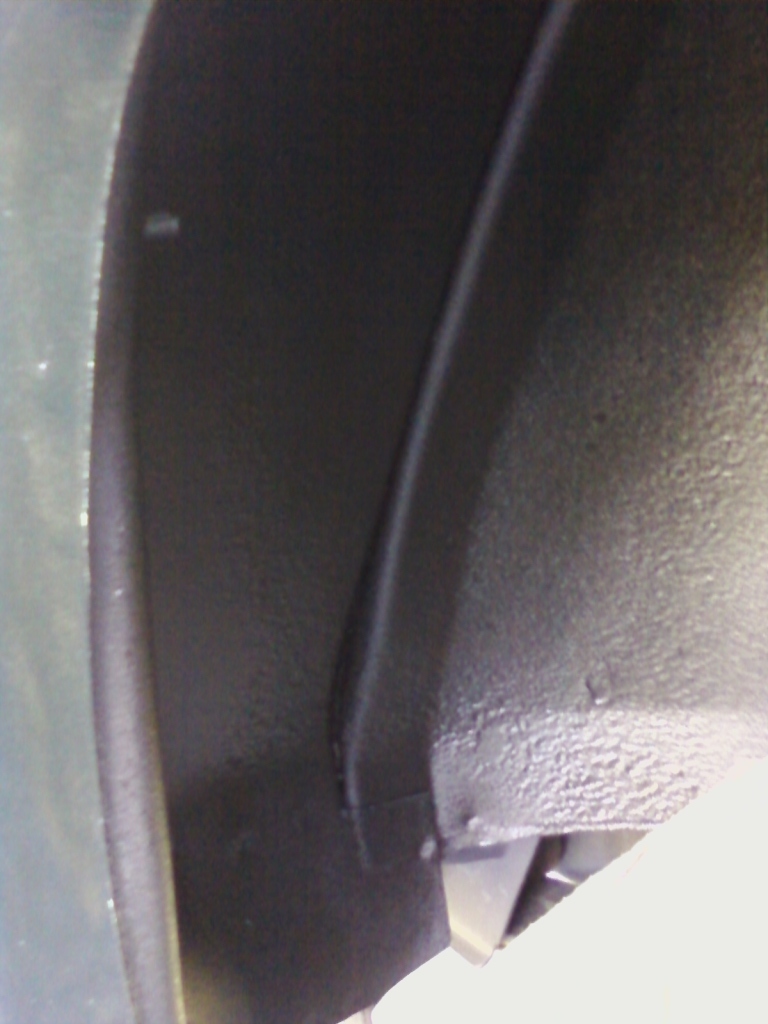
The first work I did on it was to start the process of prevention, to prevent it from ever having one tiny spot of rust anywhere on it. My last 4 vehicles died of rust so I'm not ever going through that again. I put the rear up on jack stands, took the wheels off, and started the preventative maint. with the wheel wells. I started by scrubbing them down with detergent and a scrubber sponge, then after it dried I used scotchbrite and a bristle brush to get any old paint or whatever off.
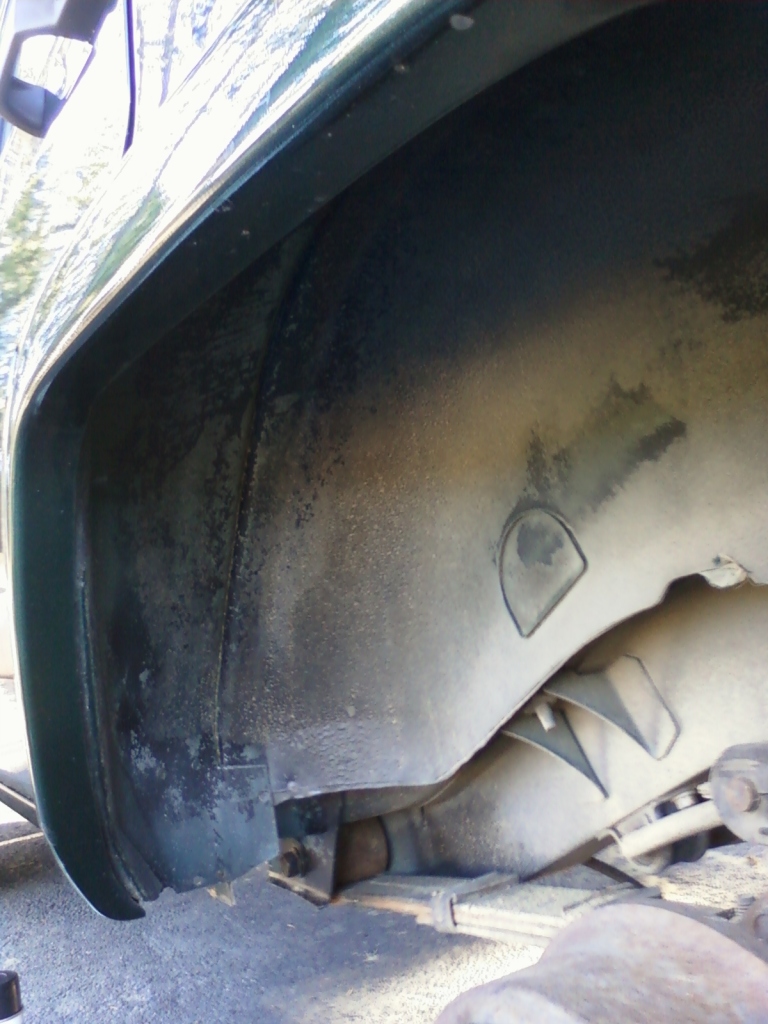
Then I took some 3M rubberizing undercoat spray and covered them completely from front to back. I used up a 16oz spray can of the stuff on just the two rear wheel wells, so I think it's layered on there nice and thick!
Here's what I found and bought last week - a 99 built in May of that year with 106K miles and only one modification. It has a tow bar mount installed on the front bumper and lots of little stone chips on the bumper paint, so I'm pretty sure some of those 106K aren't even real driving miles!
It has a few little oddities like little dents and missing badges so it's probably had some body work and possible a repaint because the paint certainly looks almost new! The center console mounting bracket is broken inside, but that's the only interior flaw I could find. I haven't figured out what I'm going to do about that yet, but am considering two things: replace the bracket if I can find one at a JY, or build an all-new custom center console. I'm gonna think on that for a while, in the mean time I've got lots of other things to do.
The first work I did on it was to start the process of prevention, to prevent it from ever having one tiny spot of rust anywhere on it. My last 4 vehicles died of rust so I'm not ever going through that again. I put the rear up on jack stands, took the wheels off, and started the preventative maint. with the wheel wells. I started by scrubbing them down with detergent and a scrubber sponge, then after it dried I used scotchbrite and a bristle brush to get any old paint or whatever off.
Then I took some 3M rubberizing undercoat spray and covered them completely from front to back. I used up a 16oz spray can of the stuff on just the two rear wheel wells, so I think it's layered on there nice and thick!
 11-08-2012, 08:39 PM
#2
Seasoned Member
Thread Starter
Join Date: Oct 2010
Location: Colorado Rocky Mountains
Posts: 486
Likes: 0
Received 2 Likes
on
2 Posts
Year: 1999
Model: Cherokee
Engine: 4.0 I6
I've got new plugs, wires, rotor & cap to go on it and will be replacing whatever hanus fluid the ford dealership put in the engine with some nice Valvoline Maxlife synthetic 10W30 next week. I'll be draining and replacing whatever is in the tranny sooner than later too, but it shifts beautifully now so it's more towards the middle of the list.
When my buddy gets back from vacation and gives me the money for the 96 I sold him, I'll be getting a lift kit for it and some 31" tires and new rims. Undecided on the rims, but definitely getting 31" GY Wrangler Duratracs! I've been pondering a set of 15x8 Canyon wheels off a wrangler I saw on craigslist the other day, but may just go with black steelies since they cost about the same. I'm going with a 3.5" Rubicon Express super-ride kit with new rear springs instead of AAL, for starters on the suspension. I'll probably add disconnects and a beefier adjustable track bar before too long. I do most of my driving on gravel and dirt roads and through deep snow so I can't really justify spending any more money on the super-flex version since all that gets me is flex-link bushings instead of rubber and I don't do that much serious crawling. Plus I don't have much cash left after buying the jeep! I can always add stuff later if I decide I need more flex or start doing gnarlier trails.
I've ordered some leds for the interior lighting since half those sockets are missing bulbs and I'm so used to the bright-*** SMDs I put in the old XJ. Next week ought to be fun - I think I've got enough to keep me busy for my whole weekend! If not, I'll just get another can or five of 3M undercoat and do the floors and rockers and frame!
11-13-2012, 04:00 PM
#3
Seasoned Member
Thread Starter
Join Date: Oct 2010
Location: Colorado Rocky Mountains
Posts: 486
Likes: 0
Received 2 Likes
on
2 Posts
Year: 1999
Model: Cherokee
Engine: 4.0 I6
Today I went to town on the new XJ. I put the new plugs, wires, cap & rotor on first. It definitely likes Champion plugs way better than Autolite - stupid fordies .That went without a hitch and I found it to be easier to change the plugs, etc. on a 99-era XJ than it is on a 96 or earlier since the heater stuff is not nearly as in-the-way. That made me happy.
Then I drove it down to the parts store to warm it up for an oil change. I found out that the Car Quest synthetic oil is the same as Valvoline so I snagged a batch of that. It was -6deg F the other morning so I went with 5w30. 6 quarts of synthetic and a Wix filter came to $39.70 after tax and a meager discount. WOO HOO! Drove it back home, drained it and went to take the Motorcraft filter off that the fordies put on there. This turned out to be the first bump in the road while working on the new XJ - those DBs must have put it on there with some kind of power tool? I had to use a strap wrench, with sandpaper inside the strap to get the thing to loosen up. I was about 10 seconds away from hammering a screwdriver through it, but then it started to turn. Got the new Wix premium filter on there, and filled 'er up with synthetic. Started it up and WOW does it run a lot quieter with synthetic in there! That made me even happier.
Then I decided that since it was a balmy 25deg F out, and my hands had only frozen twice so far today, that it would be a good idea to start on the LED upgrades. I got some green SMD panels installed in the footwells, then some white SMD panels in the dome lights. Something about green footwell lights just makes me chuckle every time I open a door. About this time, I realized I had skipped lunch and should probably seek nourishment, so I called it enough for one day. It was a good day!
11-19-2012, 08:36 PM
#4
Seasoned Member
Thread Starter
Join Date: Oct 2010
Location: Colorado Rocky Mountains
Posts: 486
Likes: 0
Received 2 Likes
on
2 Posts
Year: 1999
Model: Cherokee
Engine: 4.0 I6
Decided to fix the wobbly center console today with the spare mounting bracket I picked up from "PJ Harvey" up in Kremmling who is parting out a 99 XJ on here. His bracket was in way better shape than the one I pulled out of my console - mine was in 4 pieces and only had one leg still attached. I started by reinforcing the bracket I got from him with some 22ga steel sheeting that I cut/bent into brackets. I then riveted those to the plastic console bracket. One of the legs was missing the end on the bracket I got from him, so I made a new end for that out of the steel sheeting as well. It took me most of 6 hours to bend, cut and rivet it all together - but when I went out to install it, I got it to fit on the first try! No more wobbly center console! (Three bloody fingers though from that damn sheet steel though - ow.)
Of course, I was so damn tired of working on it, I totally forgot to take any pics before I installed it. Oops. Anyway, I'm not touching that thing ever again. If it ever manages to break again, I'll just build a whole new center console from the e-brake back and graft it onto the front half of the factory plastic one.
Of course, I was so damn tired of working on it, I totally forgot to take any pics before I installed it. Oops. Anyway, I'm not touching that thing ever again. If it ever manages to break again, I'll just build a whole new center console from the e-brake back and graft it onto the front half of the factory plastic one.
 11-27-2012, 09:24 PM
#6
Seasoned Member
Thread Starter
Join Date: Oct 2010
Location: Colorado Rocky Mountains
Posts: 486
Likes: 0
Received 2 Likes
on
2 Posts
Year: 1999
Model: Cherokee
Engine: 4.0 I6
Spent the day in Denver today grinding my teeth while I waited for someone else to install my lift kit. I had been looking forward to doing this myself but since the landlords ruled the garage off limits and the ice laid claim to the driveway I didn't have much choice. I considered waiting until spring after the snow and ice left but realized I'd never make it and really wanted to get new tires. I didn't want to buy a set of 30" duratracs only to then get bigger ones in less than a year and I didn't want to keep driving on the crappy big-o at's that are on there since I've already slid past the turn to my drive way twice this month on those. I'm sure I'll find plenty of other things to do to the jeep that don't require flat dry ground and will keep my tools & I happy. After driving it home in it's grown-up form, I'm glad I didn't wait and feel it was worth every cent I paid in labor and the 5 hr wait. Those guys were quick.

The new stuff: 3.5" Rubicon Express Super Ride, Bilstien 5100s, RE Adj. Track bar, 1" TC drop, 15x8 black steel d-windows, 31x10.5 GY Duratracs
It rides incredibly smooth compared to the old beat up springs and shocks I had on the 96XJ with 3" lift I just sold. I'm pretty sure the net lift gain on the RE kit is closer to 4.5 or 5" of total lift, depending on whether you measure the front or rear. I probably could have fit 33s on there but then I'da wanted gears and I'm already broke again as it is. It has a little more height in the rear than the front. I'm hoping that settles out once the new leaf packs break in - if not I'll just get some spacers up front. Really loving the Bil. 5100s though, I can already feel they are the best shocks I've ever had on any 4x4 and can't wait to perform a more thorough trail test!
It has some noticeable vibrations even with the 1" TC drop, so next I'll be saving for a SYE and driveshaft. I also noticed what sounds like either the u-joints in my front axle, the unit bearings or both are sounding pretty dry and raspy, so replacing all those is in the near future as well. I guess the exhaust will just have to wait it's turn!
My new XJ is all ready for the big 3-foot dump of snow I've been praying for; and I'm mostly already over the frustration of paying labor on the install. If it still bothers me in a few weeks, I'll just cut holes in the hood or do the cowl snorkel mod to the airbox or something. (I should probably get some license plates on there too mebbe. hehe)
12-05-2012, 07:12 PM
#7
Seasoned Member
Thread Starter
Join Date: Oct 2010
Location: Colorado Rocky Mountains
Posts: 486
Likes: 0
Received 2 Likes
on
2 Posts
Year: 1999
Model: Cherokee
Engine: 4.0 I6
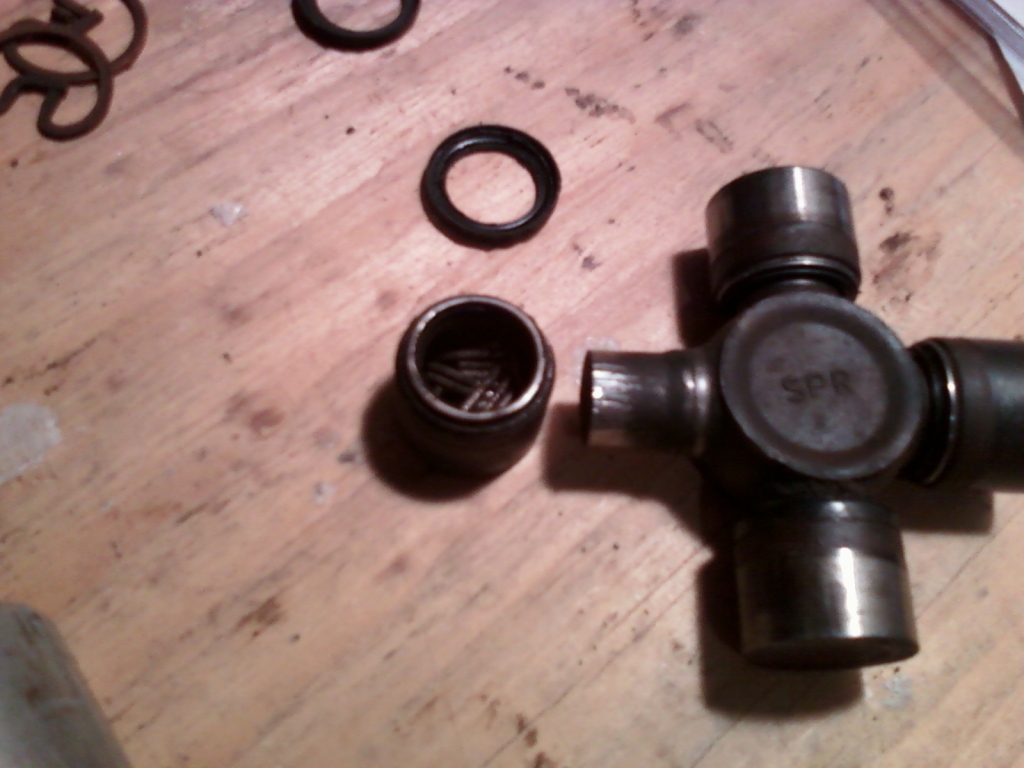
Today I took the rear driveshaft off to do some investigating. I wanted to measure from the rear yoke to the output shaft on the TC to see if I could do a hack n tap and use a JY front XJ driveshaft. Well, according to the info I got from IRO, you have to measure 33.75" from the rear yoke and still have a good amount of splines left on the output shaft to be able to use a XJ front shaft in the rear with the HnT. Mine would have no splines left at all if I cut the output shaft at 33.75" so it looks like I'll need a custom shaft of shorter length to do a hack n tap. Glad I measured that before deciding!
Also during the process, I found one of the U-joints on my rear driveshaft was suspect. So I went down to the parts store and got 2 new U-joints so I could replace them while I had it off. Went with cheaper Precision ones since I'll be replacing the whole thing within the year. It was a PITA but I replaced them, put it all back together and my rear driveline vibes are now a good bit less. Yay! Plus I got to grease the dried out slip-yoke which was making a few clunks here and there so that's all better too. Still there are some minor vibrations between 30 and 50mph, so I'm still gonna convert to a double cardan driveshaft once I get the money saved up.
I gotta hand it to all you guys who do your u-joints with a hammer and sockets. I have a ball joint press I use on mine and it still pisses me off, so I can't imagine how evil a job it must be without that! Kudos to ya!
Oh, and I finally got some license plates on it. They let me reuse/re-register the ones off my 96 XJ which I sold last month too so a piece of it lives on still! hehehe
Last edited by Potatowalker; 12-05-2012 at 10:31 PM.
Trending Topics
12-05-2012, 07:20 PM
#8
Seasoned Member
Thread Starter
Join Date: Oct 2010
Location: Colorado Rocky Mountains
Posts: 486
Likes: 0
Received 2 Likes
on
2 Posts
Year: 1999
Model: Cherokee
Engine: 4.0 I6
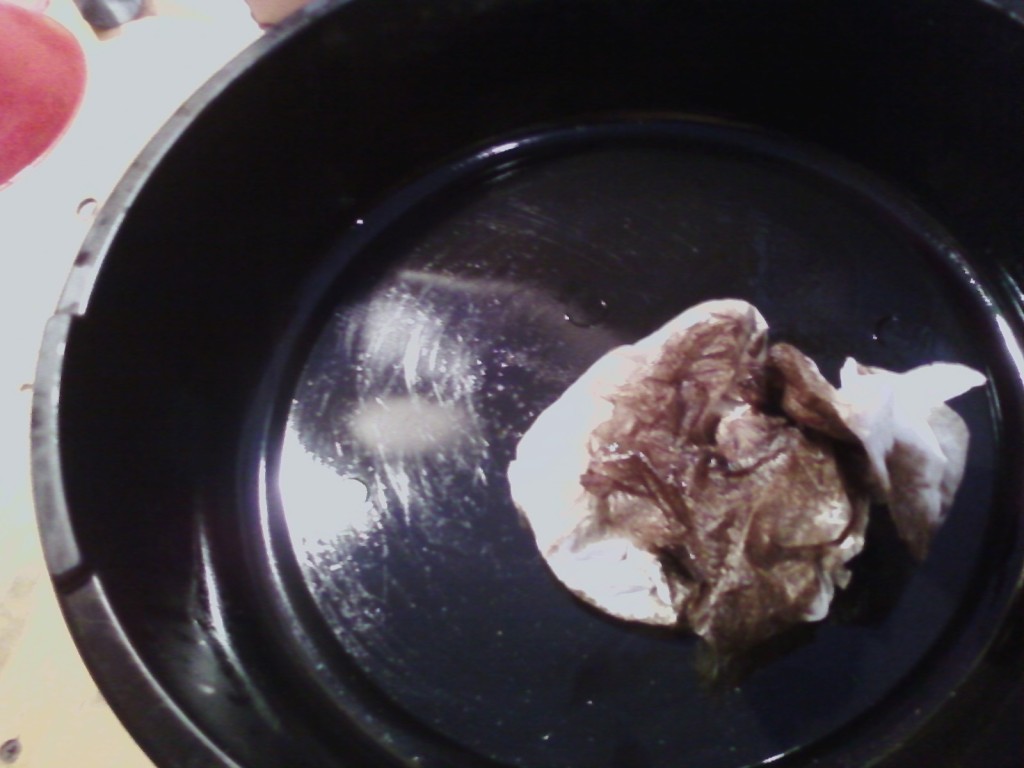
This U-joint was toast. Completely dried out, rusty, and all kinds of wear on the post thingy!

Last edited by Potatowalker; 12-05-2012 at 10:28 PM.
12-05-2012, 08:23 PM
#9
Junior Member
Join Date: Apr 2012
Location: NH (White Mountain region)
Posts: 61
Likes: 0
Received 0 Likes
on
0 Posts
Year: 1997
Model: Cherokee
Engine: 4.0 I6
The first work I did on it was to start the process of prevention, to prevent it from ever having one tiny spot of rust anywhere on it. My last 4 vehicles died of rust so I'm not ever going through that again. I put the rear up on jack stands, took the wheels off, and started the preventative maint. with the wheel wells. I started by scrubbing them down with detergent and a scrubber sponge, then after it dried I used scotchbrite and a bristle brush to get any old paint or whatever off.
Then I took some 3M rubberizing undercoat spray and covered them completely from front to back. I used up a 16oz spray can of the stuff on just the two rear wheel wells, so I think it's layered on there nice and thick!
Then I took some 3M rubberizing undercoat spray and covered them completely from front to back. I used up a 16oz spray can of the stuff on just the two rear wheel wells, so I think it's layered on there nice and thick!
Last edited by Semtex6; 12-06-2012 at 07:59 AM.
12-05-2012, 11:03 PM
#10
Newbie

Join Date: Nov 2012
Location: Oak Lawn, IL
Posts: 14
Likes: 0
Received 0 Likes
on
0 Posts
Year: 2000
Model: Cherokee
Engine: 4.0
Truck looks great! Very similar to my plans for my 2000 XJ. Just looking for a mild lift with some good components. It is my daily driver so I need it to have good road manners. Thinking the Bilsteins are the way to go. Subscribed.
12-25-2012, 04:34 PM
#11
Seasoned Member
Thread Starter
Join Date: Oct 2010
Location: Colorado Rocky Mountains
Posts: 486
Likes: 0
Received 2 Likes
on
2 Posts
Year: 1999
Model: Cherokee
Engine: 4.0 I6
Last week I drained the transfer case and put new Valvoline MaxLife Dex/Merc in there. It's a synthetic based dex/merc so I'm pretty sure it'll be better for the gears when it's negative-freezing outside like it has been. It was 15deg F. when I did the change and then it went down to -20F that night!
It's a good thing I did this cuz when I pulled the drain plug, something that was black and smelled like burned death came out. It very well could have been original from '99!
Then today I went skiing while all the vacationers were at home unwrapping their presents. I got in 2 good hours before they showed up, which meant it was time for me to go home and install more parts on the XJ!
I put on a new Monroe Magnum steering stabilizer which I got last week. I painted it with some Hot Rod Green Engine Enamel which I discovered on the last XJ is surprisingly chip and rust resistant, plus it looks cool. I also found a set of greaseable sway bar bushings and brackets on Amazon for $7.50 last week so I put those on there while I was under there today. It was a balmy 21deg. F which sure beats the 10degrees it's been for the last week during the day. Everything went on nice and easy - man do I love the fact that this thing's got no rust anywhere. The bolts barely even resisted me and I was able to re-use them all since they still had black factory paint on them!

As you can see in the pic, my oil filter adapter has started leaking since I switched to synthetic oil. I'm okay with that though because I'd rather have the high-quality synthetic oil in there and have to replace a seal that was old and going bad anyway, than run dino oil for the sake of not having to do work. I'm planning on giving this thing the works so I'd have probably done those adapter o-rings eventually anyway.
I've been hearing a bit of squeaking and rasping up front somewhere, so the next plan is to rebuild the front driveshaft, install new unit bearings and replace the front axle u-joints. It might be a bit until I can do that since the driveway keeps getting buried in snow and ice. In the mean time I may get started on replacing the rusty, cracked, old factory exhaust. I'm gonna eventually get a magnaflow cat, and one of their cat-back kits in 2.5" on there. I want to put a new front pipe and header on too eventually, but haven't decided what header is going on yet. If anyone has any suggestions for a header on a 99 with a Magnaflow kit behind it, feel free to chime in! If the borla fit, I'd put that on, but they all say they only fit up to 97 and I'd rather get one that fits out of the box than have to modify the flanges or anything.
It's a good thing I did this cuz when I pulled the drain plug, something that was black and smelled like burned death came out. It very well could have been original from '99!
Then today I went skiing while all the vacationers were at home unwrapping their presents. I got in 2 good hours before they showed up, which meant it was time for me to go home and install more parts on the XJ!
I put on a new Monroe Magnum steering stabilizer which I got last week. I painted it with some Hot Rod Green Engine Enamel which I discovered on the last XJ is surprisingly chip and rust resistant, plus it looks cool. I also found a set of greaseable sway bar bushings and brackets on Amazon for $7.50 last week so I put those on there while I was under there today. It was a balmy 21deg. F which sure beats the 10degrees it's been for the last week during the day. Everything went on nice and easy - man do I love the fact that this thing's got no rust anywhere. The bolts barely even resisted me and I was able to re-use them all since they still had black factory paint on them!
As you can see in the pic, my oil filter adapter has started leaking since I switched to synthetic oil. I'm okay with that though because I'd rather have the high-quality synthetic oil in there and have to replace a seal that was old and going bad anyway, than run dino oil for the sake of not having to do work. I'm planning on giving this thing the works so I'd have probably done those adapter o-rings eventually anyway.
I've been hearing a bit of squeaking and rasping up front somewhere, so the next plan is to rebuild the front driveshaft, install new unit bearings and replace the front axle u-joints. It might be a bit until I can do that since the driveway keeps getting buried in snow and ice. In the mean time I may get started on replacing the rusty, cracked, old factory exhaust. I'm gonna eventually get a magnaflow cat, and one of their cat-back kits in 2.5" on there. I want to put a new front pipe and header on too eventually, but haven't decided what header is going on yet. If anyone has any suggestions for a header on a 99 with a Magnaflow kit behind it, feel free to chime in! If the borla fit, I'd put that on, but they all say they only fit up to 97 and I'd rather get one that fits out of the box than have to modify the flanges or anything.
12-31-2012, 09:16 PM
#12
Seasoned Member
Thread Starter
Join Date: Oct 2010
Location: Colorado Rocky Mountains
Posts: 486
Likes: 0
Received 2 Likes
on
2 Posts
Year: 1999
Model: Cherokee
Engine: 4.0 I6
OK, so I spazzed out the other day and ordered some new exhaust components. I have a stainless Magnaflow hi-flow Cat, Magnaflow stainless cat-back kit, new O2 sensor and a bunch of band clamps slowly making their way towards me. I did some more research and found an ATP (same as APN) header for 145.00 in 302 Stainless steel. I didn't order that yet but pretty soon here I'm gonna order that and the Walker downpipe without the crimp in it to match the rest of the new stuff. Thanks to the folks at Performance-curve for helping me figure out what I want and giving me a sweet deal on the Magnaflow cat-back kit (429.00 shipped free)! I'll be sure to post pics and my review of the install and performance on this thread after I get it all put on there. I should probably make sure I have a few cut-off wheels for my grinder while I'm sitting around waiting and twitching...
Also, I found this for my front driveshaft but haven't ordered it yet because I want to do some more investigating to make sure that's what my squeaking noises are first (second guessing and wondering if it may be axle u-joints or hubs):
http://www.dennysdriveshaft.com/p108...reaseable.html
Seems like a good deal on all those parts though so probably won't be long until I freak out and just order it cuz the front driveshaft definitely looks old and squeaky...
01-02-2013, 06:43 PM
#13
Seasoned Member
Thread Starter
Join Date: Oct 2010
Location: Colorado Rocky Mountains
Posts: 486
Likes: 0
Received 2 Likes
on
2 Posts
Year: 1999
Model: Cherokee
Engine: 4.0 I6
nope, didn't take long - I ordered the front driveshaft rebuild stuff. I got tired of sitting around waiting for all my other stuff to show up, so I also finished restoring the Yakima ski rack I picked up for cheap on ebay and got that put on. I was feeling ambitious and getting kind of pissed about my rough idle so decided to take the throttle body apart and clean that. It had some varnish-like buildup around the butterfly but nothing too bad. The orifice around the IAC was worse so I gave that a good scrubbing and gently cleaned the plunger on the IAC. I cleaned off the rubber air tube as well since it had a lot of crap building up around where it seals on top of the TB as well as the airbox. Put it all back together and it definitely idles a little smoother. I also found what else is making it run in a less-than-ideal manner: there is definitely a crack in the exhaust header in the "traditional" place. Where the 2 pipes join into the single large collector the inboard pipe has a crack about 1/3 of the way around where it meets the collector. I pretty much knew where to look, having seen this on many of the used XJs I had looked at prior to buying this one. I knew something wasn't right on the manifold cuz I could hear exhaust noise from that area but wasn't sure if it was cracked or had a bad seal on the head or what - now I know it's cracked. Guess it won't be long until I order up the APN header and walker downpipe.
Here's the "new" ski rack and steel-pipe crossbars I put on today:

Here's the "new" ski rack and steel-pipe crossbars I put on today:
01-09-2013, 05:13 PM
#14
Seasoned Member
Thread Starter
Join Date: Oct 2010
Location: Colorado Rocky Mountains
Posts: 486
Likes: 0
Received 2 Likes
on
2 Posts
Year: 1999
Model: Cherokee
Engine: 4.0 I6
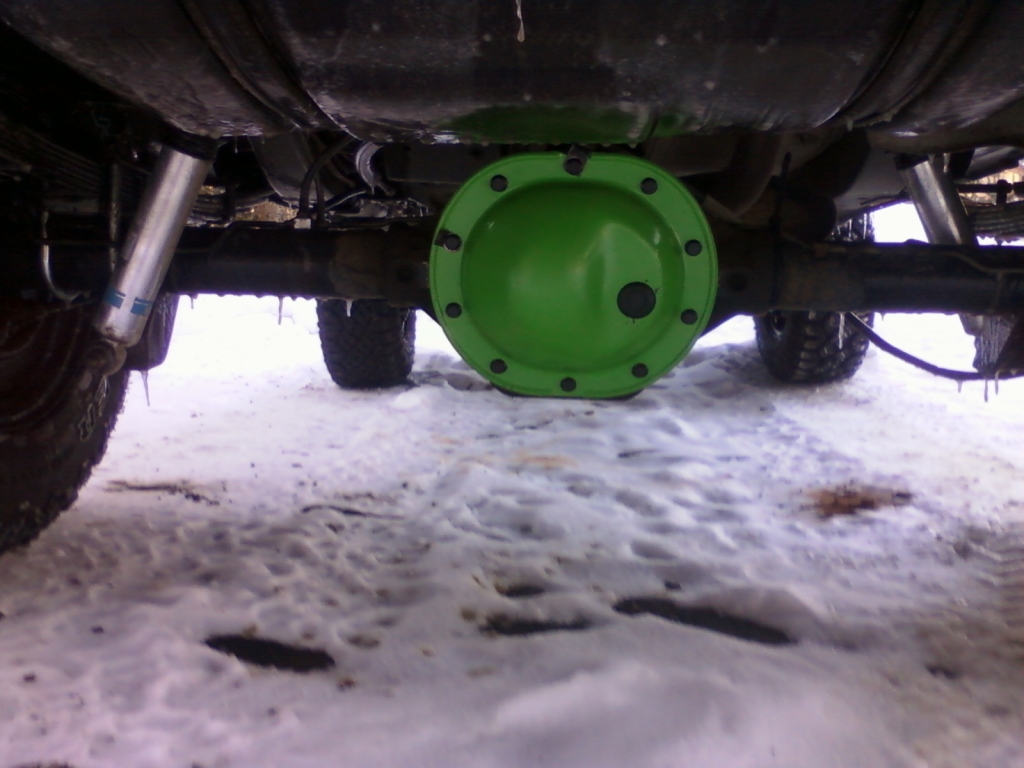
Got the rear diff fluid changed and painted the cover. The front one is getting a nodular iron cover and a fluid change as soon as the paint dries on the cover...
Got almost all of my exhaust parts in a pile waiting. Found out the hard way that the ATP exhaust manifold is definitely NOT the same as the APN. The ATP is basically an overpriced stock manifold and even has the flex bellows on the 1 & 6 pipe. For a minute I actually considered installing it - then I came to my senses. The welds looked like they were done by a blind preschooler and I could hear it just begging to self-destruct, so I'm sending it back and already ordered the APN. We'll see what that looks like in a few days when it gets here. In the mean-time, more waiting. GRRRRRRRRR Man am I getting tired of driving around with cracks in every major exhaust component. Hopefully it won't be long now before I can have it completely replaced from engine to bumper!
No way am I gonna bolt this junk onto my Jeep - it would hate me for it:
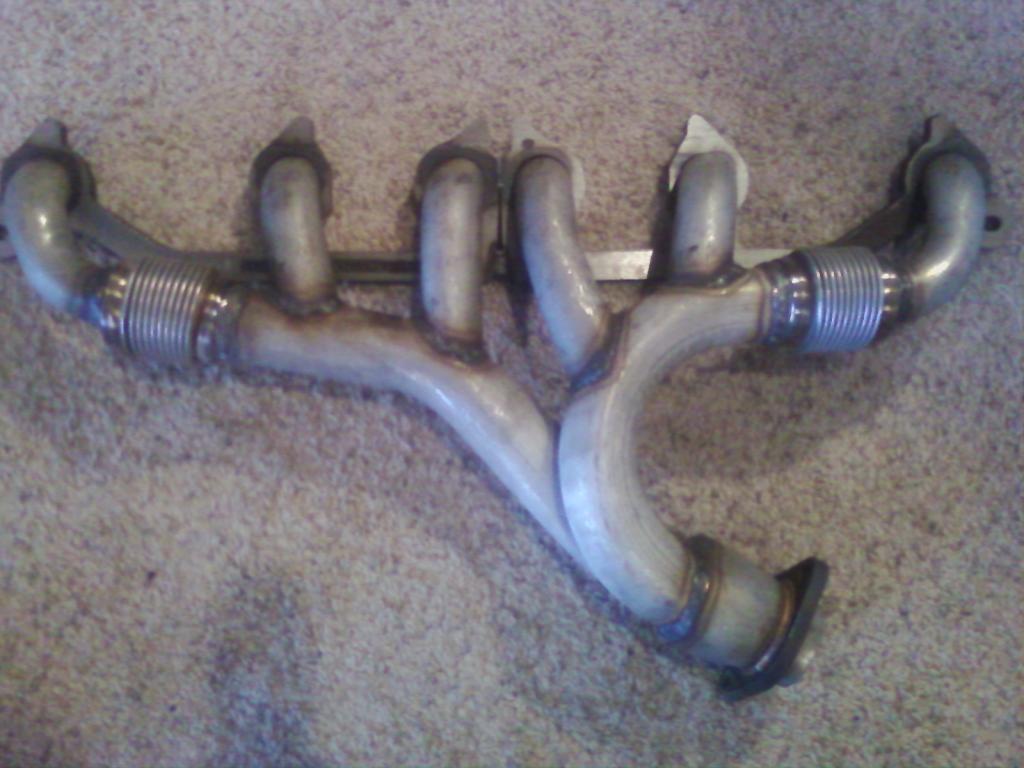
Got almost all of my exhaust parts in a pile waiting. Found out the hard way that the ATP exhaust manifold is definitely NOT the same as the APN. The ATP is basically an overpriced stock manifold and even has the flex bellows on the 1 & 6 pipe. For a minute I actually considered installing it - then I came to my senses. The welds looked like they were done by a blind preschooler and I could hear it just begging to self-destruct, so I'm sending it back and already ordered the APN. We'll see what that looks like in a few days when it gets here. In the mean-time, more waiting. GRRRRRRRRR
Man am I getting tired of driving around with cracks in every major exhaust component. Hopefully it won't be long now before I can have it completely replaced from engine to bumper!No way am I gonna bolt this junk onto my Jeep - it would hate me for it:
01-30-2013, 06:52 PM
#15
Seasoned Member
Thread Starter
Join Date: Oct 2010
Location: Colorado Rocky Mountains
Posts: 486
Likes: 0
Received 2 Likes
on
2 Posts
Year: 1999
Model: Cherokee
Engine: 4.0 I6
Progress update:
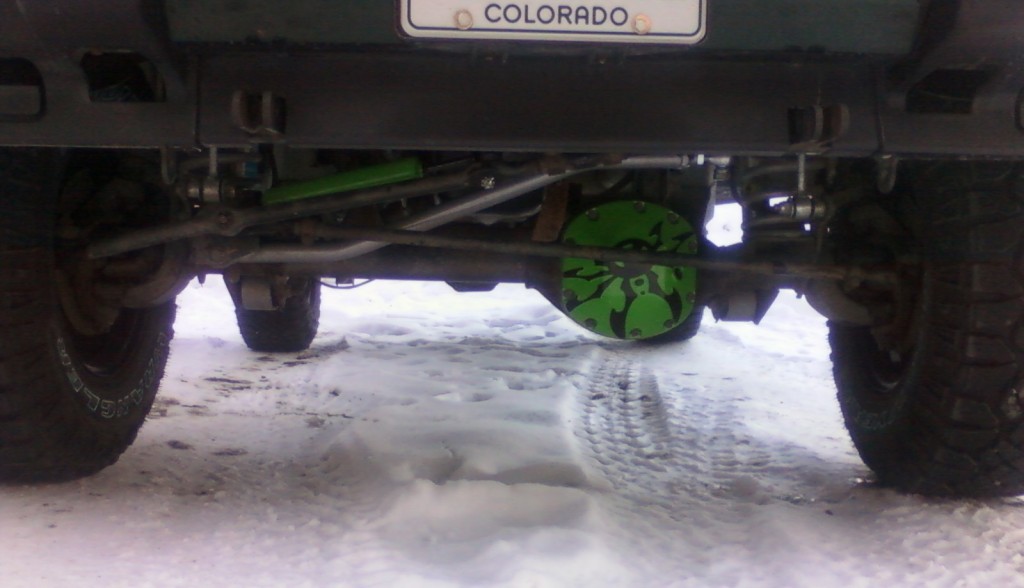
Replaced front diff. cover with Poison Spider iron cover and got synthetic 75-90 fluid in there. I painted the cover green to match the rear cover and then painted the spider black. It looks pretty cool when it isn't all covered in dirt and grime, which is pretty much only right after I wash the XJ.
Then I took it to a shop to have the new header put on since it is winter and my work-area is covered in snow and freezing cold. The APN header went on without any modifications needed and bolted right up to the walker down pipe. That clamped nicely to the magnaflow cat and cat/back I got. New O2 sensors round out that package. I haven't taken any pictures of the exhaust yet but will post some when I do. That 3" rear tip barely fits between the springs and the tow hitch, but there's no rubbing/vibes and it sure sounds a lot better than it did! The engine is quiet again and the exhaust fumes are all exiting the rear where they belong! It seems like I'm getting better gas mileage (need more samples/time to be sure exactly how much better) and it feels a lot more responsive on the throttle too. It's now begging me to put a spectre cold-air/cowl intake on it...