When you click on links to various merchants on this site and make a purchase, this can result in this site earning a commission. Affiliate programs and affiliations include, but are not limited to, the eBay Partner Network.
Starter was acting up on Dat Jeep - bought a replacement from O'Reilly Auto Parts.
Got it swapped out in about 15 minutes.
The old one kept locking up and refusing to crank, unless I knocked on the starter housing and jumped the leads.
New starter cranks over so much faster, it's a substantial difference.
Had mine go out in -12F weather. 8" of snow on the ground. Got it off, got a ride to town (1 hour away). Stupid thing tested fine. However, I didn't trust it so I picked up a re-man anyway. Fires right up now.
Way back on January 26th, 2017, I decided to design and build custom taillight boxes.
Yes that's right, this was a 3 month long build/design period from start-finish!
For a while I was tossing between making them out of steel or sheet metal, but then it hit me why not fiberglass?
I started with the base framework made of cardboard, wrapped in a fleece blanket coated with fiberglass resign.
(worked much better than it sounds)
See list at end for build list.
This was what I started with - boring , stock taillights, aside from the tint paint.
PHASE I (V1.0)
Phase I was basically me trying to figure out how I was going to actually do this design.
So V1.0 was basically a box with no back cover, essentially it helped me fine tune my final design as far as body line contouring.
I wrapped it in the leftover fleece/flannel headliner material.
Applied liberal amounts of fiberglass resin.
Before and after sanding.
I learned after applying regular Bondo body filler that fiberglass strand-reinforced body filler is what I should have used.
(Notes were taken for V2.0)
Sanded and prepped for paint.
Seal coat of paint applied.
PHASE II (V2.0)
After test fitting V1.0 of the boxes, I realized quickly that the boxes were not fitting to the body lines as much as I would have hoped.
And without a backside it would leave the boxes extremely vulnerable to the elements, DUH!
Not entirely sure why I didn't realize that in the beginning, must've been all the fumes.
So that means time to build another set of boxes.
I modified V1.0 boxes to fit better and copied my adjustments to the V2.0. The new boxes are a fully-enclosed box(all sides) and modified to fit the body lines better.
Mock-up/test fitting of the LED Taillight lights I plan on using.
Applying the resin to the mounting bracket side (top & inside edge).
Test fitting the mounting brackets after riveting them on.
Reinforcing the rivets with some additional layers of resin.
After sanding, I did a quick test fit to make sure I was on the right path.
Everything looks like it's fitting right so far.
After a little bit more sanding they are ready for Fiberglass strand reinforced body filler to help fill any low spots and strengthen the overall boxes.
Filler applied.
Filler sanded.
Applied a couple of coats of Rustoleum Rubberized Under-body Coating to give it a textured look. It'll help hide the imperfections in the body work.
Holes drilled out for the lights.
Top-coated with hammer texture paint to help seal the under-body coating.
Getting all the LED lights grommets installed.
LED lights installed and ready to be wired to Dat Jeep. All connections were soldered and heat shrinked to prevent corrosion.
No turning back now. I made sure to leave myself plenty of wire length on the OEM socket ends just in case I ever need to go back in the future.
I used 5pin waterproof connectors from Amazon to allow for easy removal of the light boxes from the Jeep if needed.
Mounted to the Jeep for the final time.
Hatch shut/latch test - success! (They didn't break!)
How do your turn signals and brakes work? I tried converting my jeep to all led and the turn signals light up when I hit the brakes with incandescent bulbs in the brake lights still, and when leds are put in the brake light both sides flash on the turn signals whenever one side is turned on... I don't know what the deal is I've tried different resistors and all that but can't get it.
How do your turn signals and brakes work? I tried converting my jeep to all led and the turn signals light up when I hit the brakes with incandescent bulbs in the brake lights still, and when leds are put in the brake light both sides flash on the turn signals whenever one side is turned on... I don't know what the deal is I've tried different resistors and all that but can't get it.
A special LED flasher and 2 relays worked for me with the same tail lights. If you need a diagram, let me know.
How do your turn signals and brakes work? I tried converting my jeep to all led and the turn signals light up when I hit the brakes with incandescent bulbs in the brake lights still, and when leds are put in the brake light both sides flash on the turn signals whenever one side is turned on... I don't know what the deal is I've tried different resistors and all that but can't get it.
The oval light is just for brake and parking lights
the 2 round red led lights are turn signals and the 4 lights on the bottom are reverse.
The only idea I can think of is have you changed your turn signal flasher to a LED electronic flasher?
Since LED lights draw next to nothing for amperage, the vehicle thinks that the lights aren't working and causes all sorts of issues. I don't have any resistors wired anywhere on my rig, just a LED flasher swap.
If your hazards work fine with no issues you can try switching the hazard relay with the turn signal one and see if that fixes then you'll know if you need a LED relay like the one above.
Got a true deep cycle battery for the camping side of Dat Jeep.
Now I should be able to run my camping accessories for an extended period before having to recharge.
Both batteries are wired to a battery isolator that allows my 160 amp alternator to charge both batteries.
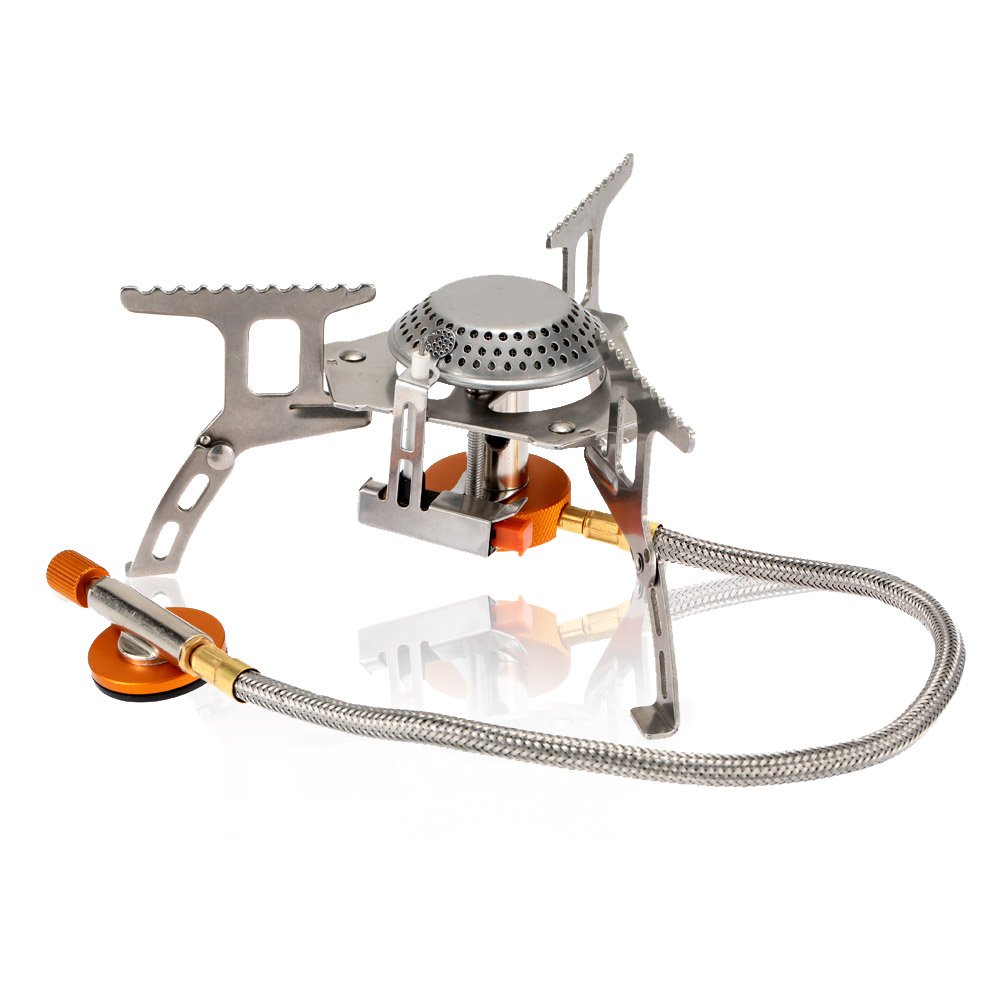
I have not had a chance to test out the run-time yet, but I have a camping trip planned Labor Day weekend.
Also going to be testing out several new camping products to do some reviews for.
I decided to recover the boring OEM center console cover using left over headliner fabric. No more arm sticking to the armrest/cover.
Plus added benefit of not being so cold in the winter.
Greasy/dirty stock boring OEM center console cover.
Removed the screws from the underside of the cover and separated the plastic insert from the foam top piece.
I cut the material about 1/4"-1/2" past the edge/seam where the plastic insert meets the foam top piece. Reinstalled the plastic insert piece and all the screws.
Turned out very nice. The material is held in only by the screws sandwiching the material between the foam top piece and the plastic insert.
Reinstalled into Dat Jeep. Next up covering the stereo/HVAC cover/trim piece.
 02-28-2017, 07:13 PM