Behemothxj RockKrawler 11 inch lift build thread
 06-07-2012, 05:38 PM
#1
Member
Thread Starter
Join Date: May 2011
Location: Mesa AZ
Posts: 170
Likes: 0
Received 2 Likes
on
2 Posts
Year: 2000
Model: Cherokee
Engine: 4.0
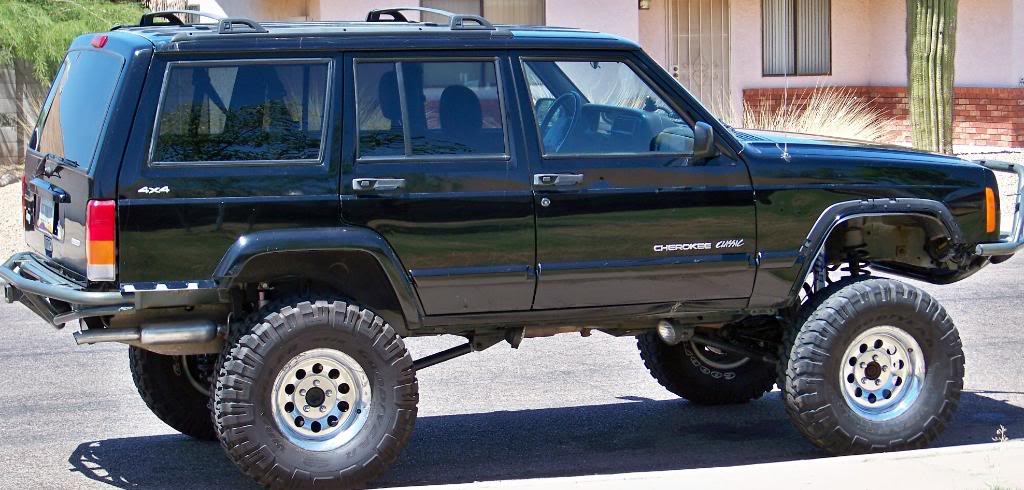
I'm going to start off by saying that I have poured my blood, sweat, and almost 10 years of hard work to get my Jeep to where it is at. This will be a thread FULL of photos from over the years of everything I've done to make my Jeep a custom rig.
The other reason is to also explain (In detail) what I've learned when I took my RockKrawler 8 inch long arm (1st Generation)kit, into the 11 inch kit you see now. It seems like going up 3 more inches isn't a big deal.... That isn't soooo simple. I will explain this in my photos over the next few weeks.
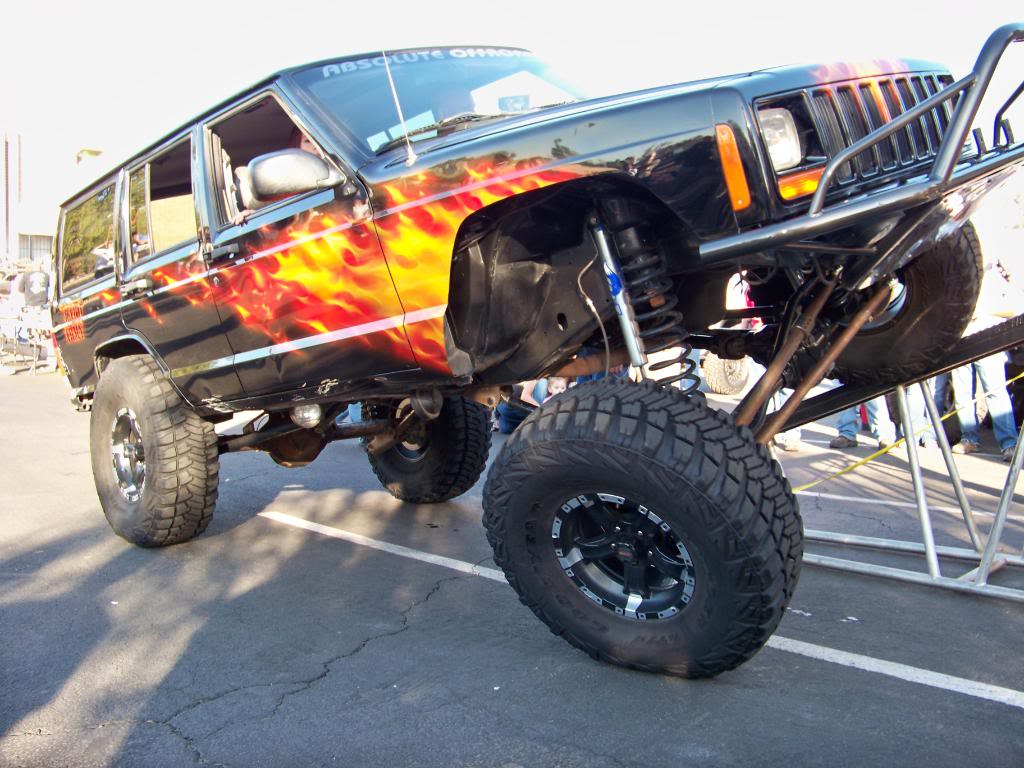
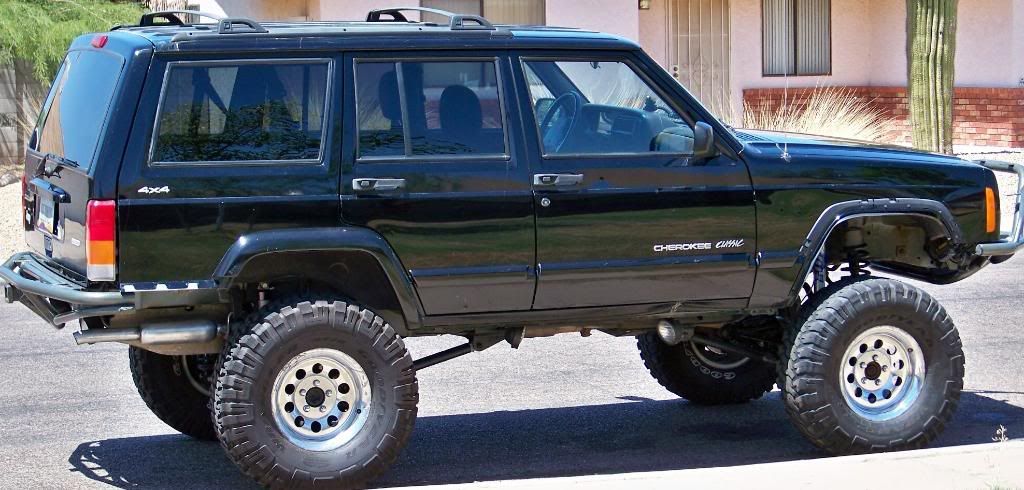
This is how I always imagined my Jeep to look from day one. I had seen a Jeep lifted at a RK dealer here in Phoenix. I said I wanted one of everything you own.
Here is my 8 inch lift with the 3 inch steel spacer that I built in the front.... It is steel because I welded it in.
The other reason is to also explain (In detail) what I've learned when I took my RockKrawler 8 inch long arm (1st Generation)kit, into the 11 inch kit you see now. It seems like going up 3 more inches isn't a big deal.... That isn't soooo simple. I will explain this in my photos over the next few weeks.
This is how I always imagined my Jeep to look from day one. I had seen a Jeep lifted at a RK dealer here in Phoenix. I said I wanted one of everything you own.
Here is my 8 inch lift with the 3 inch steel spacer that I built in the front.... It is steel because I welded it in.
 06-07-2012, 05:46 PM
#2
Member
Thread Starter
Join Date: May 2011
Location: Mesa AZ
Posts: 170
Likes: 0
Received 2 Likes
on
2 Posts
Year: 2000
Model: Cherokee
Engine: 4.0
First off, if you look at the photo, the long arm kit had directions of where to mount all of the tabs on the body.... Jacking this kit up caused the Wheelbase to shrink (Due to the radius swing of the front and rear control arms. This is 97.5 inches. The front axle had to be pushed forward 3 inches, and the rear coilover kit was moved back 2 inches.That moves it to 101.5 inches now.
These tires are 33s.... If I wanted to go to 35s, I would have to stretch the WB first.
With this short WB, my Jeep didn't flex like it was suppossed to. Plus the tires would grind away in the wheel wells.
These tires are 33s.... If I wanted to go to 35s, I would have to stretch the WB first.
With this short WB, my Jeep didn't flex like it was suppossed to. Plus the tires would grind away in the wheel wells.
Last edited by behemothxj; 06-07-2012 at 11:49 PM.
06-07-2012, 05:56 PM
#3
Member
Thread Starter
Join Date: May 2011
Location: Mesa AZ
Posts: 170
Likes: 0
Received 2 Likes
on
2 Posts
Year: 2000
Model: Cherokee
Engine: 4.0
Once I moved the axles, I moved onto the steering. Here is the problem with the stock setup. It is a Y-link that truly doesn't stay straight when NOT on a level surface.
I tried the Currie HD kit, The tierod on the pitman link wore out in six months. The OTK link kit I bought didn't come with the teflon spacer to keep the passenger tierod locked in to the knuckle made me have to float the steering.... as it I was in a yaught. It lasted an entire week.
Now I have the Ballistic 3/4 to 5/8 High misalignment steering kit. Here is the link.
http://www.ballisticfabrication.com/...rs_p_1335.html
It is $240 right now. Plus I hava a tube clamp to mount the stabilizer... That was $30
Here is the setup I have now.
06-07-2012, 06:08 PM
#4
Member
Thread Starter
Join Date: May 2011
Location: Mesa AZ
Posts: 170
Likes: 0
Received 2 Likes
on
2 Posts
Year: 2000
Model: Cherokee
Engine: 4.0
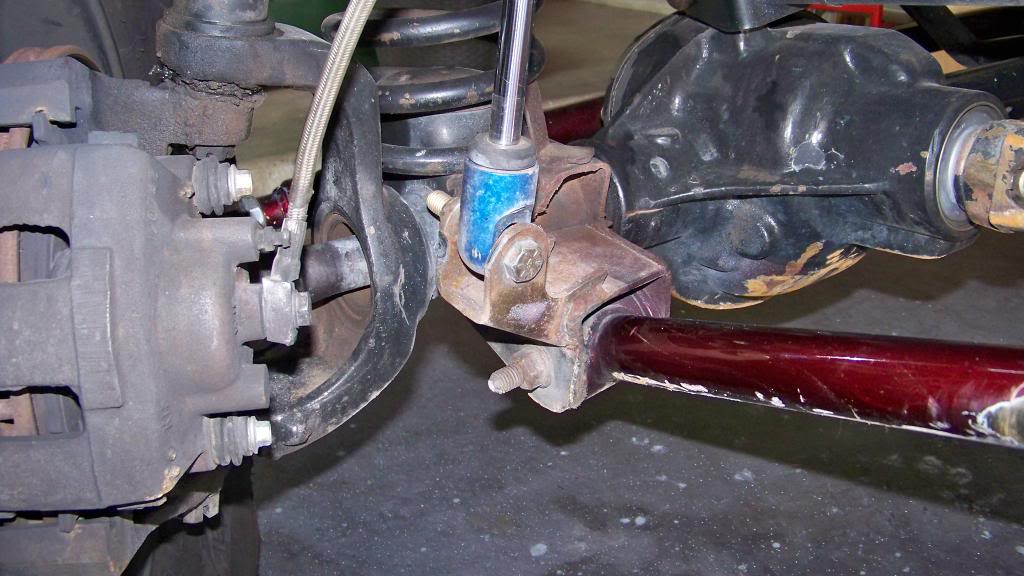
The pitman are was made into double shear, because the stress of the single shear was making the bolt hole wallowed out. Especially on the lower passenger knuckle. Plus I wanted to not worry about it breaking. The tab is a piece of 2 inch flat stock heated and bent, then 2 pieces of 1/2 inch solid square to make the gap between the arm.
Here is a photo of the Steering painted with House of Kolor Candy red.... Don't worry, I have many photos of the paint scratched off from wheeling.

Here is a photo of the Steering painted with House of Kolor Candy red.... Don't worry, I have many photos of the paint scratched off from wheeling.
06-07-2012, 06:25 PM
#5
CF Veteran
Join Date: Jan 2011
Location: Virginia
Posts: 1,635
Likes: 0
Received 0 Likes
on
0 Posts
Year: 1999
Model: Cherokee
Engine: 4.0
Man I Love your jeep. Your cherokee has always been one of my favorites. Its what keeps me inspired to build mine but yet still keeping it clean. Great work man. I will be following your thread. So im subscribed.
06-07-2012, 06:27 PM
#6
Member
Thread Starter
Join Date: May 2011
Location: Mesa AZ
Posts: 170
Likes: 0
Received 2 Likes
on
2 Posts
Year: 2000
Model: Cherokee
Engine: 4.0
Now let me point out my front driveshaft problem. At an 8 inch lift you are pushing the limits of the double cardan in the front end. Jeep Cherokees have 1310 u-joints in both shafts. The maximum angle you can bent a double cardan is 22 degrees. You have to modify the front shaft in two major ways. Let me explain why.
The inner part of the housing holding the u-joints has to be ground down to get more bend out of the shaft. I needed to grind down thru this opening.
In the middle of the center of the casing, the bump in the photo, you need to grind down the hump past flat. This helps bind up the assembly, and will break the ball when you flex out the suspension.
I have gone thru 12 front driveshafts BEFORE I knew what the root cause of why they would get jacked up. I even tried the Double cardan on each end... That was $600, and only lasted 60 days... BECAUSE each end of the driveshaft will bind up, as it fights with the other end. I broke the ball in one end of the shaft, and the shop even predicted how it'd break. He was right.
Last edited by behemothxj; 06-07-2012 at 11:56 PM.
06-07-2012, 06:42 PM
#7
Member
Thread Starter
Join Date: May 2011
Location: Mesa AZ
Posts: 170
Likes: 0
Received 2 Likes
on
2 Posts
Year: 2000
Model: Cherokee
Engine: 4.0
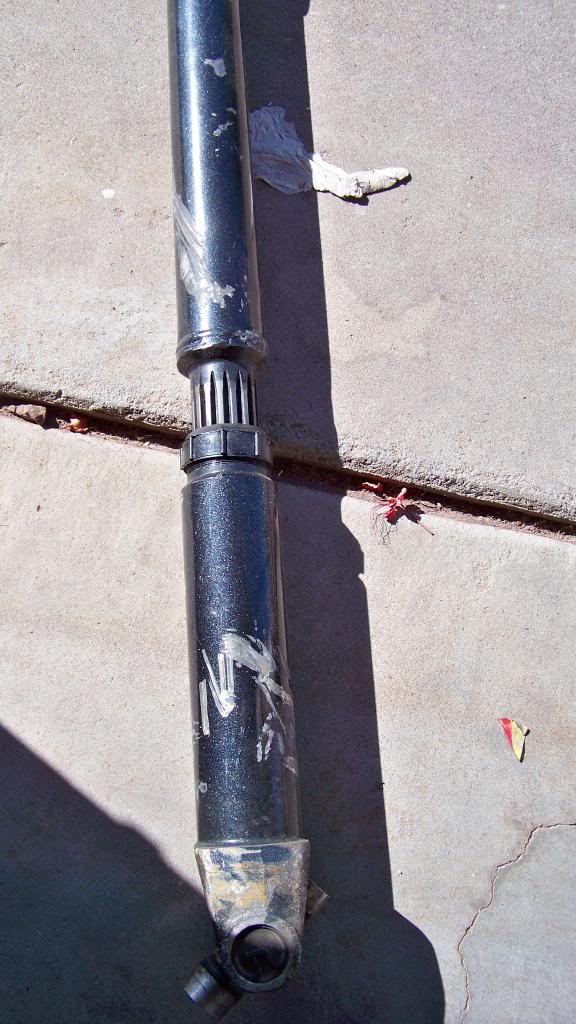
The second problem is that every driveshaft has a blue teflon coating on the smaller spline to kep the vibration down. This is the correct angle that the driveshaft front yoke has to be. Because if you crank up the yoke to make the driveshaft line up, you get the steering to wander all over the road above 40mph. Cranking it down link this corrects the steering, but makes the vibes increase a tiny bit. Here is the before shot of the stock shaft.
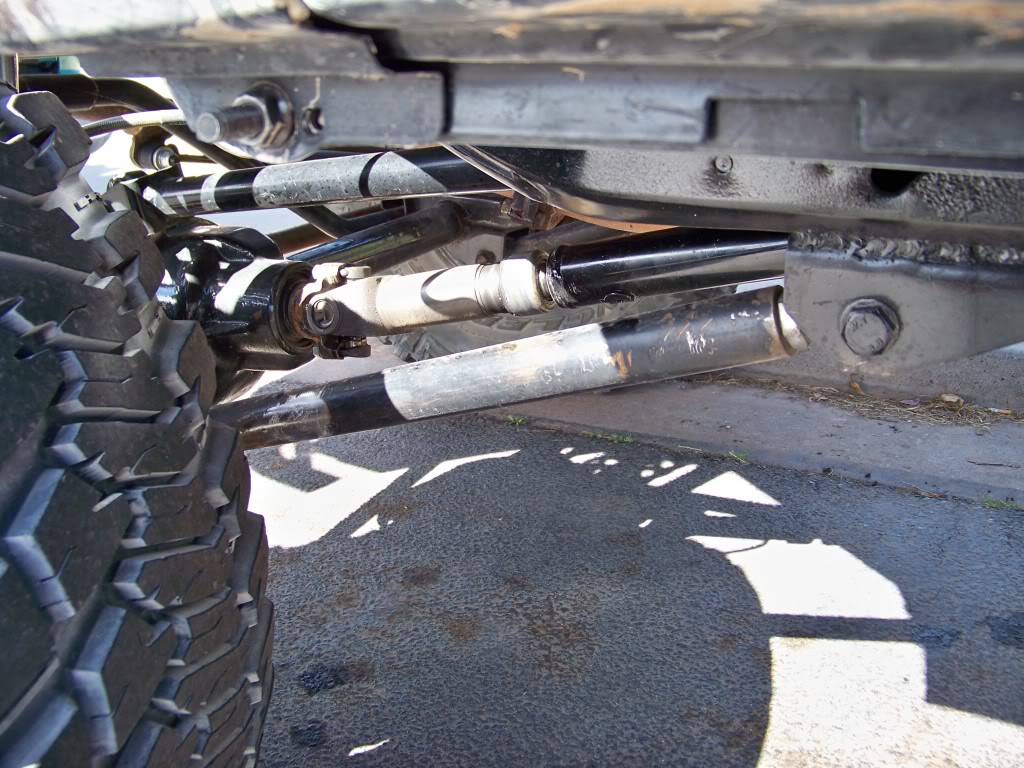
Here is the newest front shaft with an all steel spline insert to make the vibe minimized.
This was machined down to fit the tube. It is a Chevy one ton spline setup.
Here is the newest front shaft with an all steel spline insert to make the vibe minimized.
This was machined down to fit the tube. It is a Chevy one ton spline setup.
Trending Topics
06-07-2012, 06:59 PM
#8
Member
Thread Starter
Join Date: May 2011
Location: Mesa AZ
Posts: 170
Likes: 0
Received 2 Likes
on
2 Posts
Year: 2000
Model: Cherokee
Engine: 4.0
Now the shock issue when you go this high. I have had 6 pairs of shocks over the past decade. I've had Ranchos, Bilsteins, but I have landed on the Fox shock. I prefer this because it makes the Jeep ride better than any other shock. They do not fade as easily.
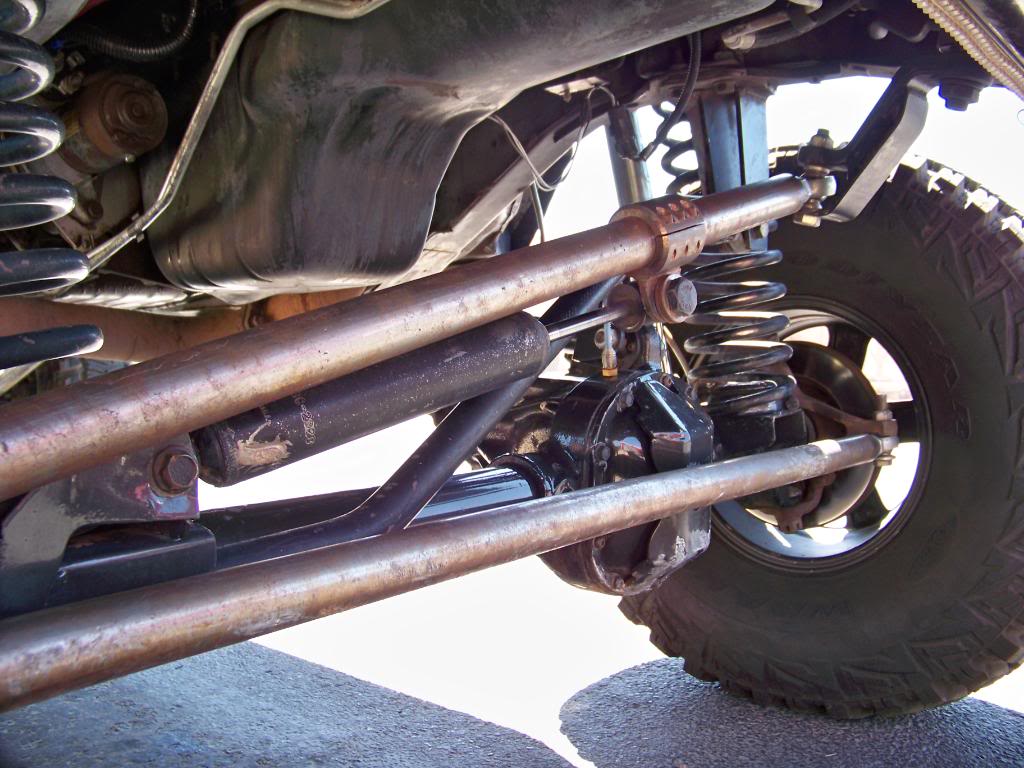
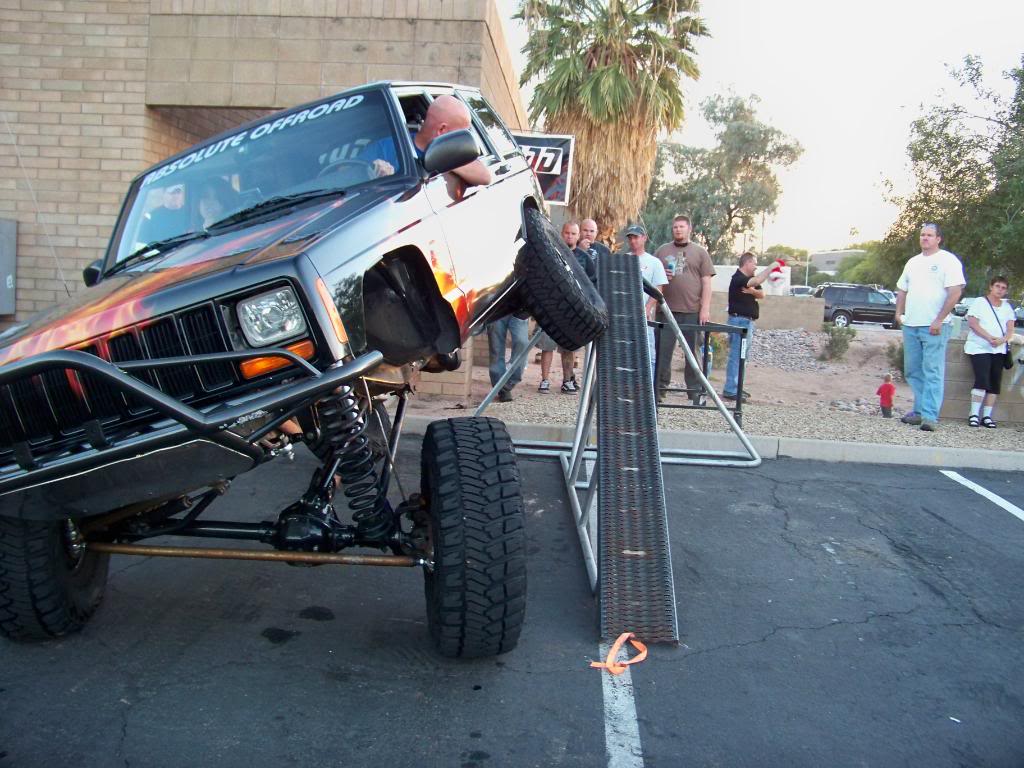
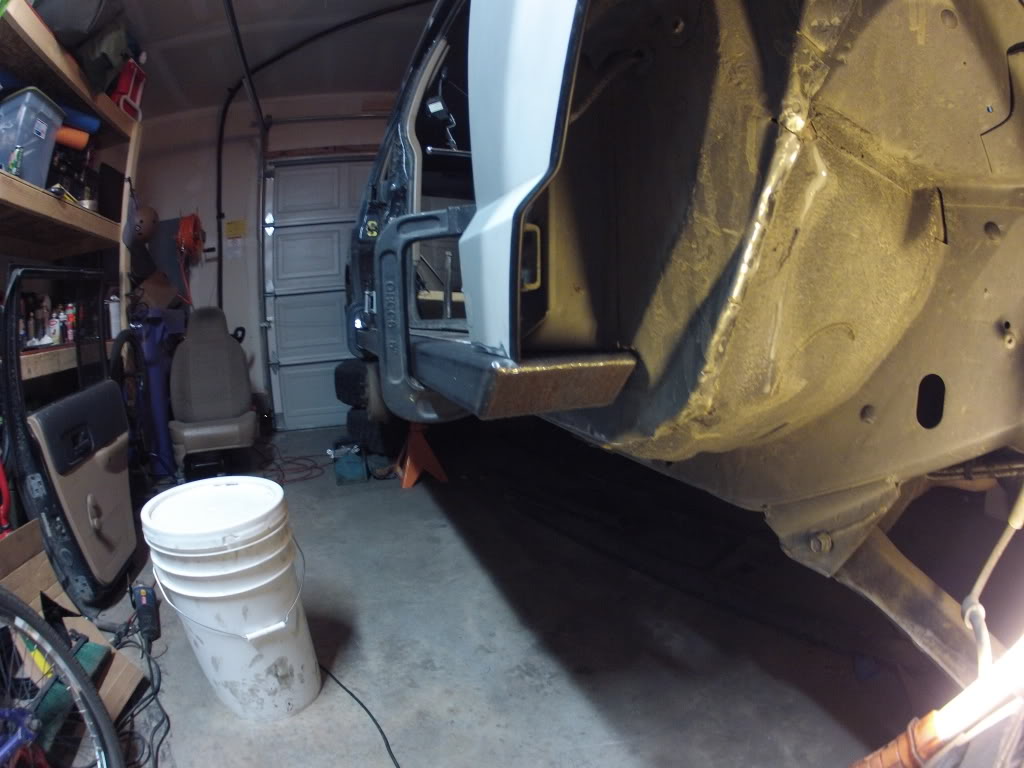
Now for my issue being this tall. When the Jeep is flexed, the body of the shock hits the inner sheet metal of the subframe. Here is a photo of my flex, and how I moved the lower tab out, so the shock wont hit. The lower tab is moved out 2 and a half inches.
Here is how much flex my front end has.
Here is what I did so the shock clears the body of the Jeep.
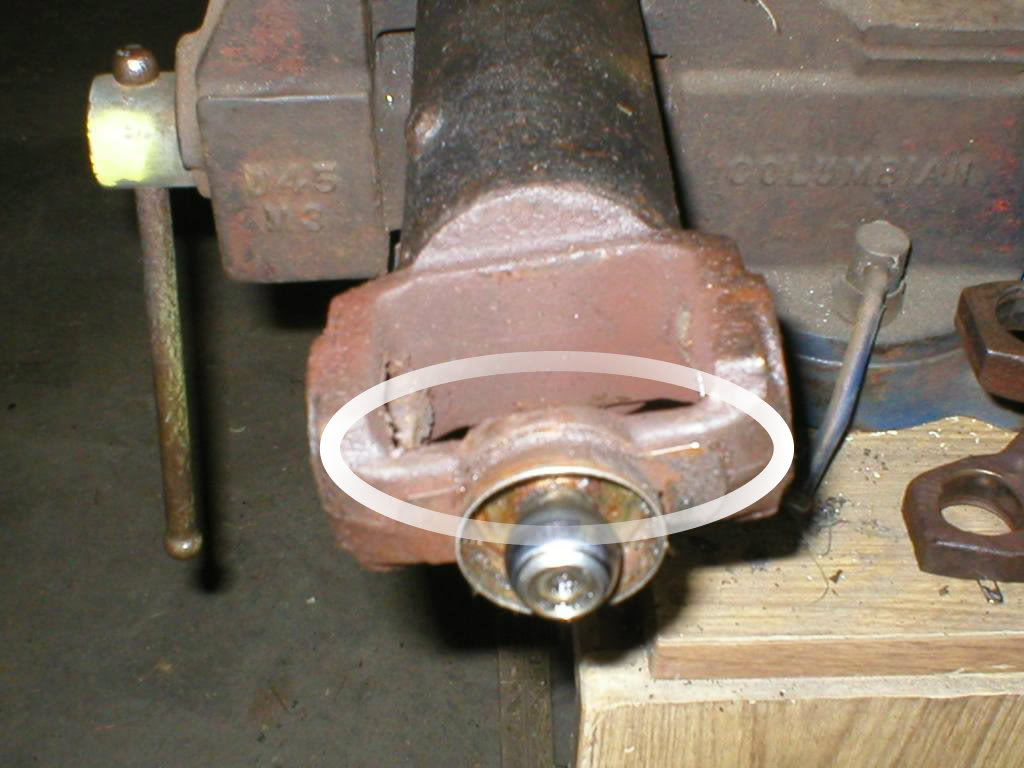
I cut off the factory mounts, even the shock tab. Look at how much twisting happens to 3/16 plate from the entire weight of the Jeep pressed into this shock tab. Here is the tab, and a second photo of HOW it gets that much stress.. Each tab is bent the same.
Now for my issue being this tall. When the Jeep is flexed, the body of the shock hits the inner sheet metal of the subframe. Here is a photo of my flex, and how I moved the lower tab out, so the shock wont hit. The lower tab is moved out 2 and a half inches.
Here is how much flex my front end has.
Here is what I did so the shock clears the body of the Jeep.
I cut off the factory mounts, even the shock tab. Look at how much twisting happens to 3/16 plate from the entire weight of the Jeep pressed into this shock tab. Here is the tab, and a second photo of HOW it gets that much stress.. Each tab is bent the same.
06-07-2012, 07:16 PM
#9
Member
Thread Starter
Join Date: May 2011
Location: Mesa AZ
Posts: 170
Likes: 0
Received 2 Likes
on
2 Posts
Year: 2000
Model: Cherokee
Engine: 4.0
Let me address my paint job for a second. It isn't too pretty to wheel. I am a custom high end motorcycle painter. I have painted for Titan Motorcycle in my past. With that said, I wanted to make my Jeep paint as badass as the suspension. YES I scratch it, and it doesn't bother me one bit.
Wheeling a great trail does not mean I have to bash in the sheet metal to be an avid wheeler. I do have more spotters at times I wheel. There are scratches... Here are a few... (I am in the middle of boatsiding this... This isn't staying like this)..
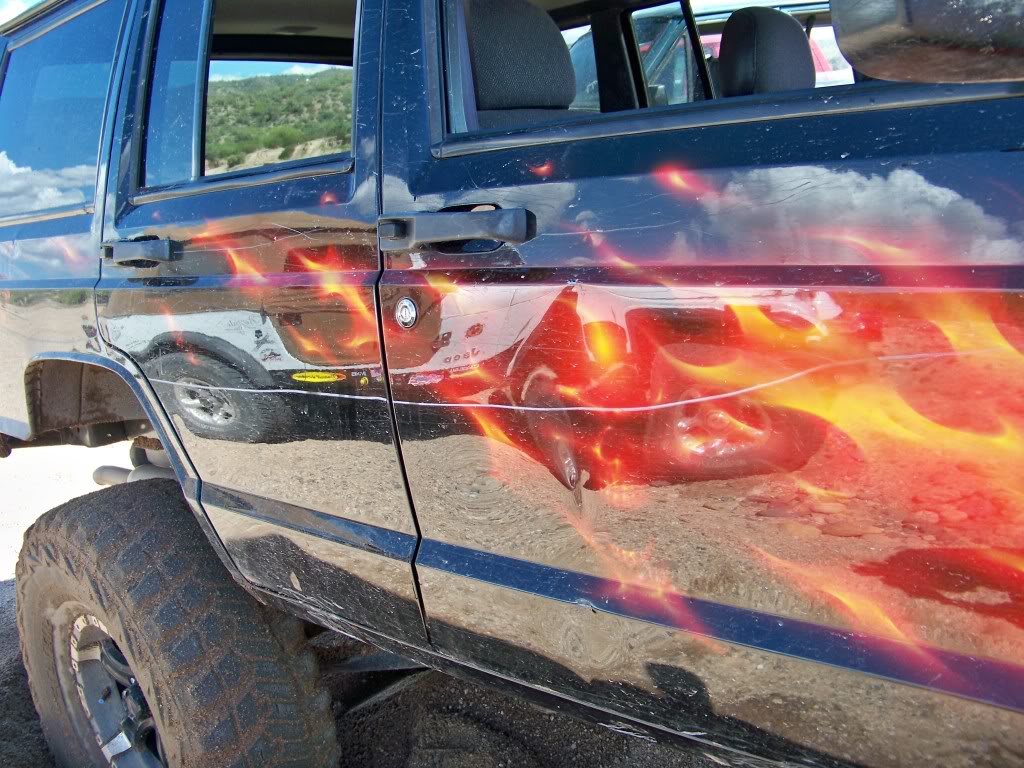
Wheeling a great trail does not mean I have to bash in the sheet metal to be an avid wheeler. I do have more spotters at times I wheel. There are scratches... Here are a few... (I am in the middle of boatsiding this... This isn't staying like this)..
06-07-2012, 07:34 PM
#10
Member

Join Date: May 2012
Location: Mcguire AFB NJ 08641
Posts: 247
Likes: 0
Received 0 Likes
on
0 Posts
Year: 1995
Model: Cherokee
Engine: Inline 6
I'm going to start off by saying that I have poured my blood, sweat, and almost 10 years of hard work to get my Jeep to where it is at. This will be a thread FULL of photos from over the years of everything I've done to make my Jeep a custom rig.
The other reason is to also explain (In detail) what I've learned when I took my RockKrawler 8 inch long arm (1st Generation)kit, into the 11 inch kit you see now. It seems like going up 3 more inches isn't a big deal.... That isn't soooo simple. I will explain this in my photos over the next few weeks.
This is how I always imagined my Jeep to look from day one. I had seen a Jeep lifted at a RK dealer here in Phoenix. I said I wanted one of everything you own.
Here is my 8 inch lift with the 3 inch steel spacer that I built in the front.... It is steel because I welded it in.
06-07-2012, 07:41 PM
#11
Member
Join Date: May 2012
Location: Mcguire AFB NJ 08641
Posts: 247
Likes: 0
Received 0 Likes
on
0 Posts
Year: 1995
Model: Cherokee
Engine: Inline 6
i wish i was good enough at paintin, and its cool that you got the look you wanted but didnt make it a trailer queen, and go out there and scratch up the paint props
06-07-2012, 07:43 PM
#12
Member
Join Date: May 2012
Location: Mcguire AFB NJ 08641
Posts: 247
Likes: 0
Received 0 Likes
on
0 Posts
Year: 1995
Model: Cherokee
Engine: Inline 6
and mind explaining what you mean about boat sideing the jeep, ive heard of the term but never able to actualy see what there talking about
06-07-2012, 09:14 PM
#14
Member
Thread Starter
Join Date: May 2011
Location: Mesa AZ
Posts: 170
Likes: 0
Received 2 Likes
on
2 Posts
Year: 2000
Model: Cherokee
Engine: 4.0
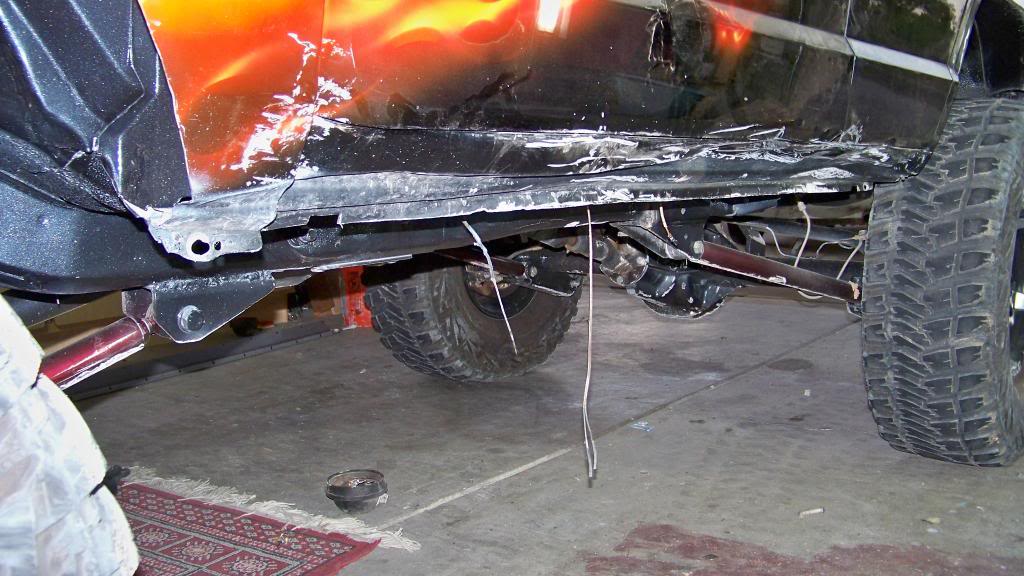
My Jeep with this overkill suspension is putting ALOT more stress to the sheet metal below, at key points below the rear seat. There is a fissure (Torn open) in the body.
Here is my problem...
06-07-2012, 09:24 PM
#15
Member
Thread Starter
Join Date: May 2011
Location: Mesa AZ
Posts: 170
Likes: 0
Received 2 Likes
on
2 Posts
Year: 2000
Model: Cherokee
Engine: 4.0
Here is the stress crack below the rear seat.
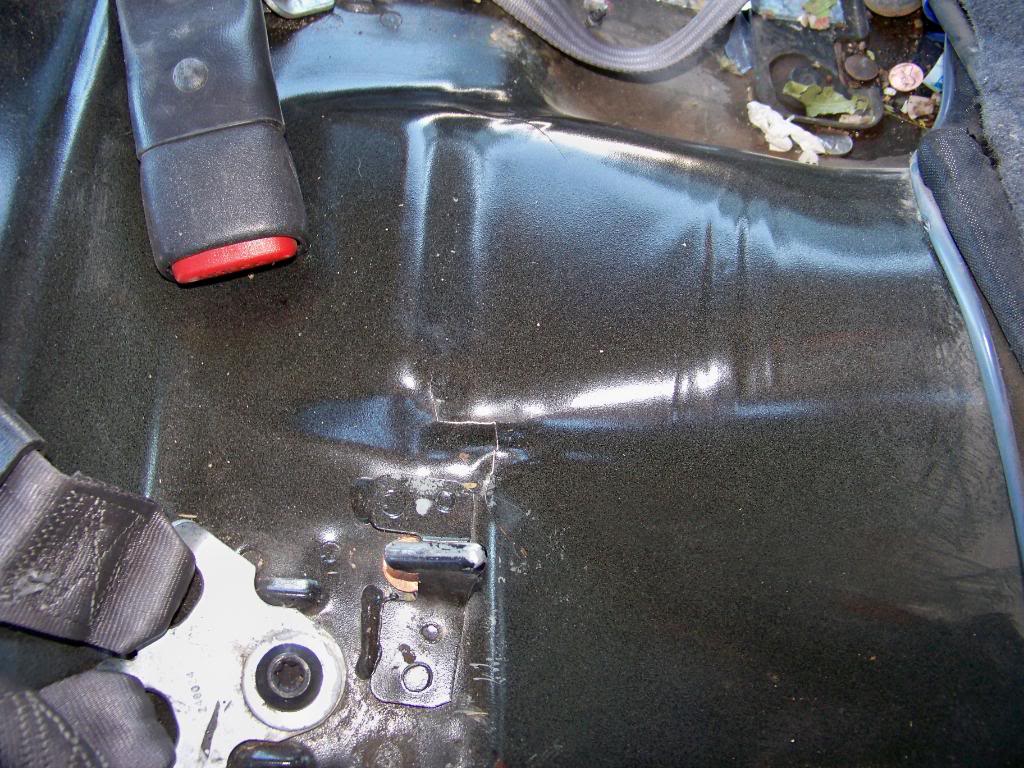
It is from my rear coilover setup with my rear axle and compounding the stress all into one spot.

It is from my rear coilover setup with my rear axle and compounding the stress all into one spot.