99 sport project- RE 5.5"LA, SYE, 8.8 install
 06-07-2008, 05:37 PM
#1
Seasoned Member
Thread Starter
Join Date: Apr 2008
Location: Grand Junction, Colorado
Posts: 377
Likes: 0
Received 2 Likes
on
1 Post
Year: 1999
Model: Cherokee
Engine: 4.0L
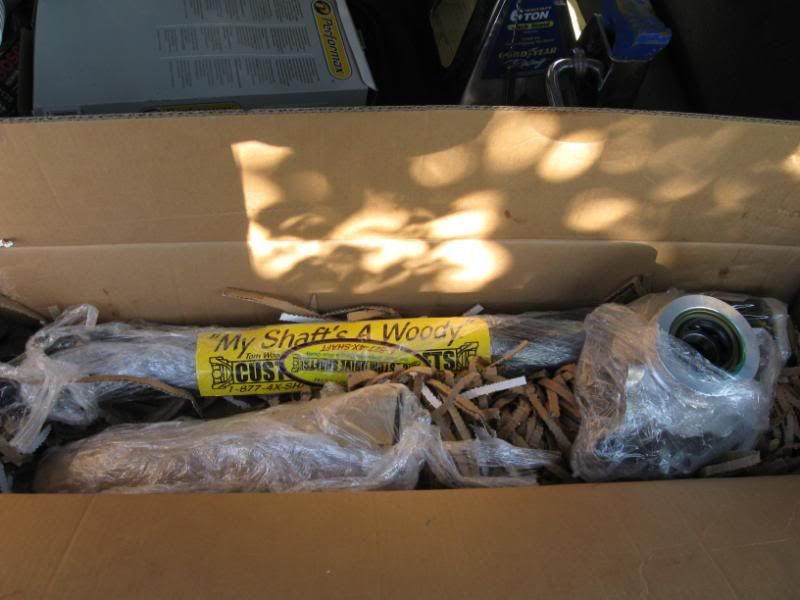
Okay so this morning I got up and got to working on my jeep around 8:00. I started with the AA HD SYE kit that I bought from 4x4groupbuy.com. I was a little nervous about attempting the SYE by myself but figured what the hell I might as well try it. So this is what I started with. NP241 HD SYE from AA and a Tom Woods DS.
So I started by removing the driveshafts like the instructions said.
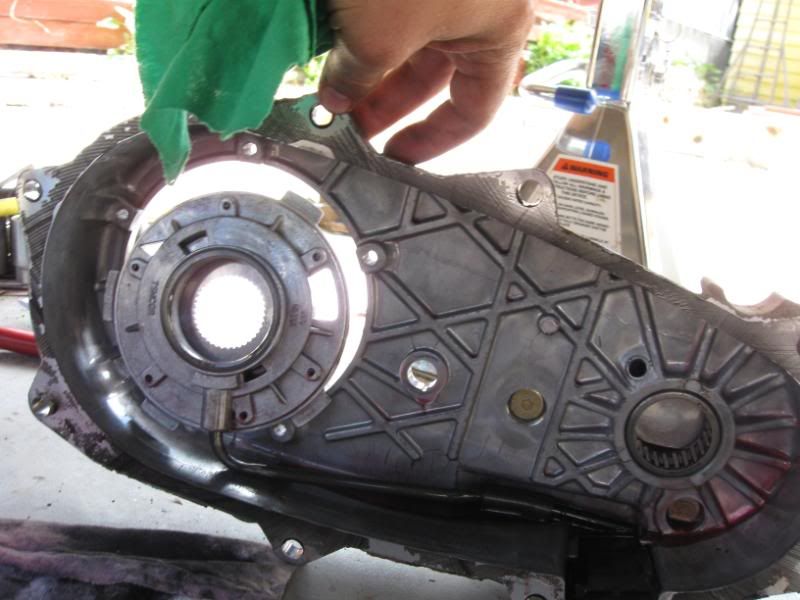
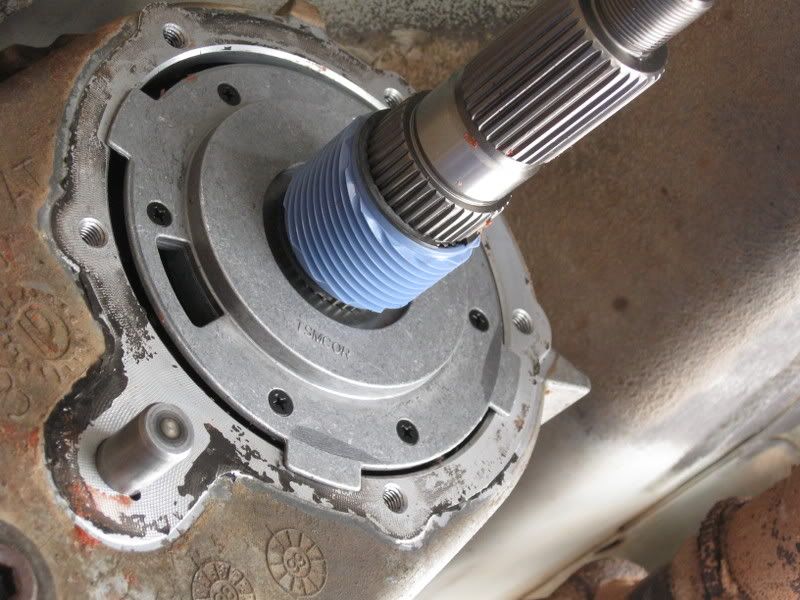
Then from there I removed the oil slinger (didn't have a long enough puller) so I used a HUGE flat screw driver and a BFH (if you don't know what that is PM me). Next I removed the seal, and then proceeded to remove the lockring with my new HD lockring pliers. I messed with that for a couple of minutes (10 or so) and then it came right off. After that I proceeded to tackle the large snap ring that held on the tailshaft housing. Oh yeah I removed the Speedo sensor before going after the Oil Slinger.
Anyways, so after snapping the 2 pairs of snapring pliers tips I had to travel to the local Napa Autoparts (only 1 in my town) and bought a better set. I didn't have the $90 to spend on the HD ones but the pair I got was a selectable inner or outer snapring set ($30). Got back and attempted them and after like 5 minutes of adjusting the tips out on the pliers I got it.
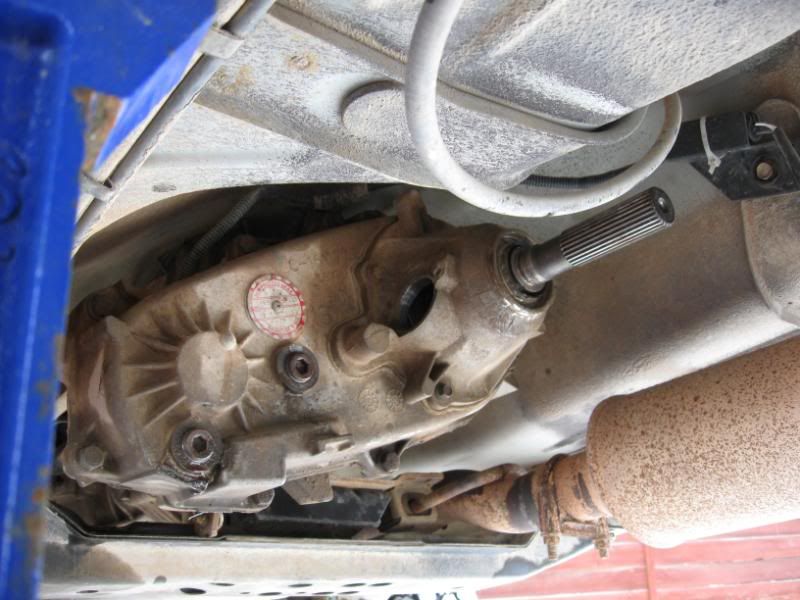
Okay so then I took the tailshaft housing off and pulled 2 more sets of lockrings and then unbolted the 10mm 12point bolt and the rest of the case uses 15mm sockets. By the way I used Air for unbolting everything except the drivelines.
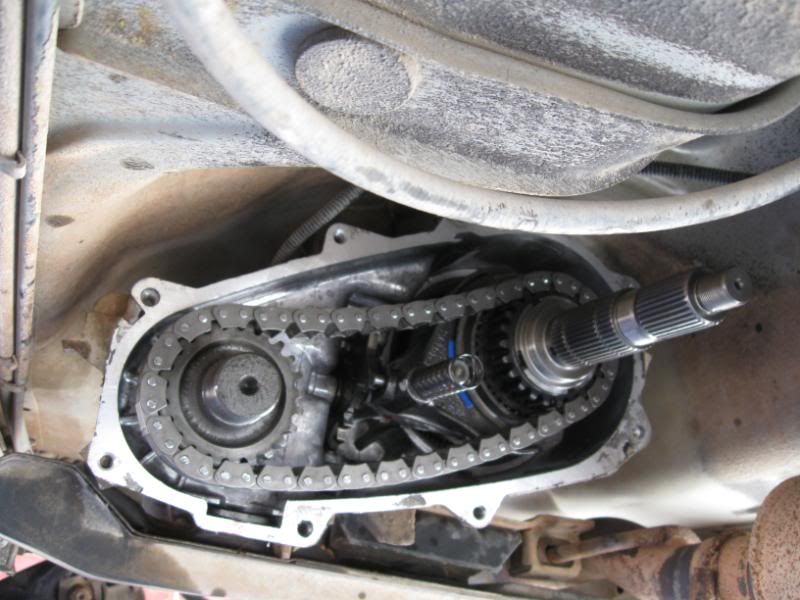
So this is what I was down to.
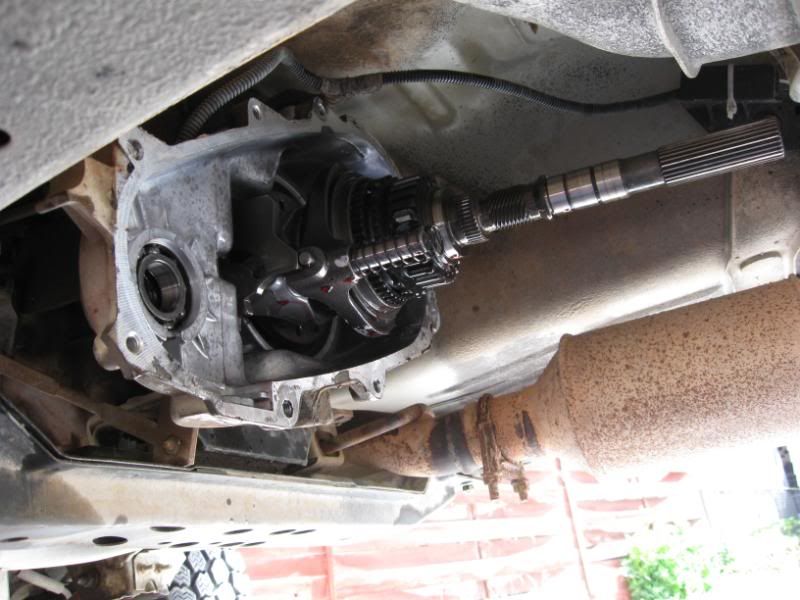
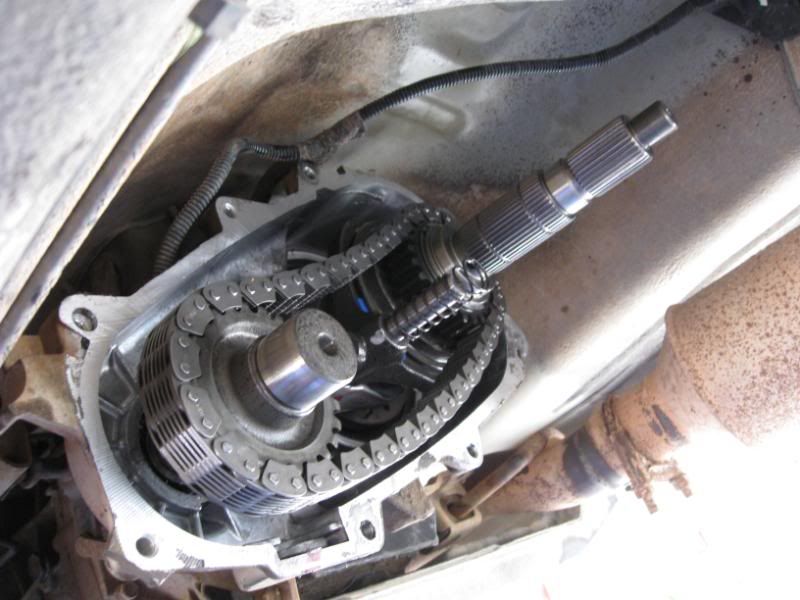
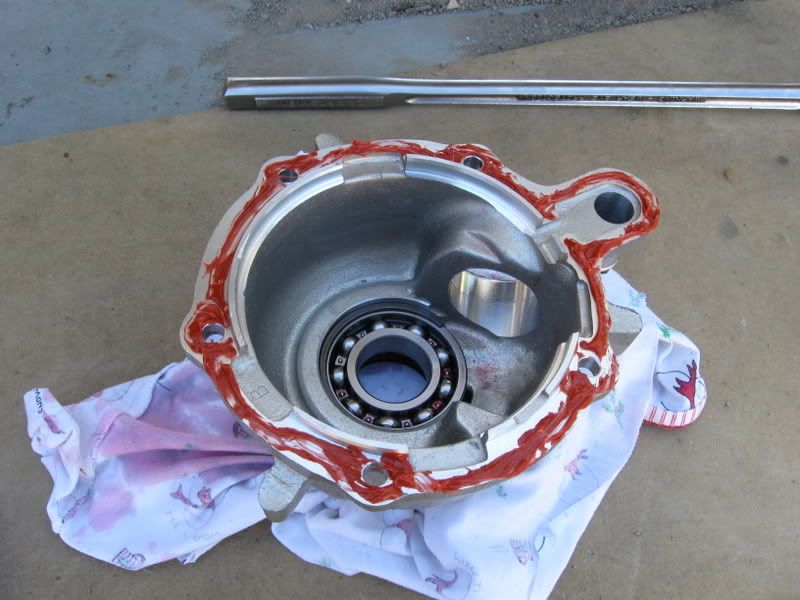
After removing the case half and inspecting the O-ring for the pump I layed it to the side. Next you pull out the front output shaft and tilt it towards the passenger side to unhook the chain. Then I inspected that.
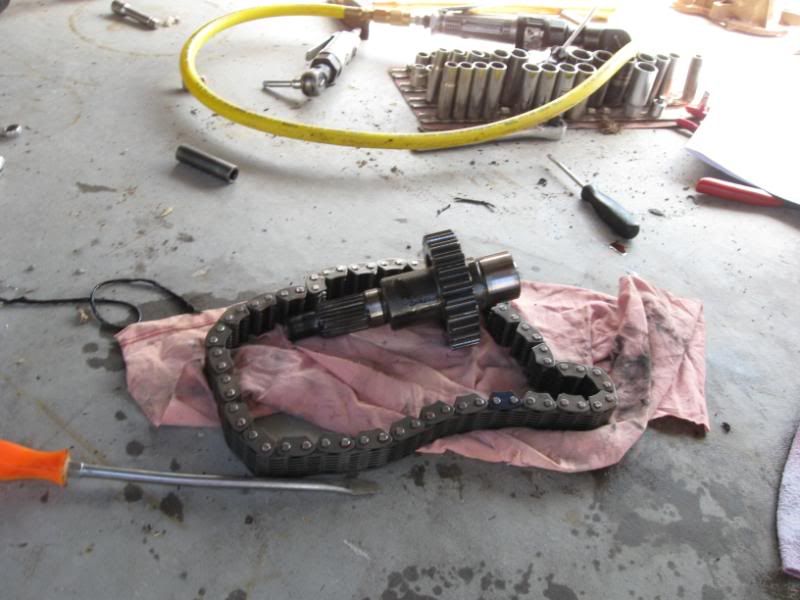
Then I pulled the stock slipyoke shaft and removed the 1 lockring, and the 2 gears that it held on.
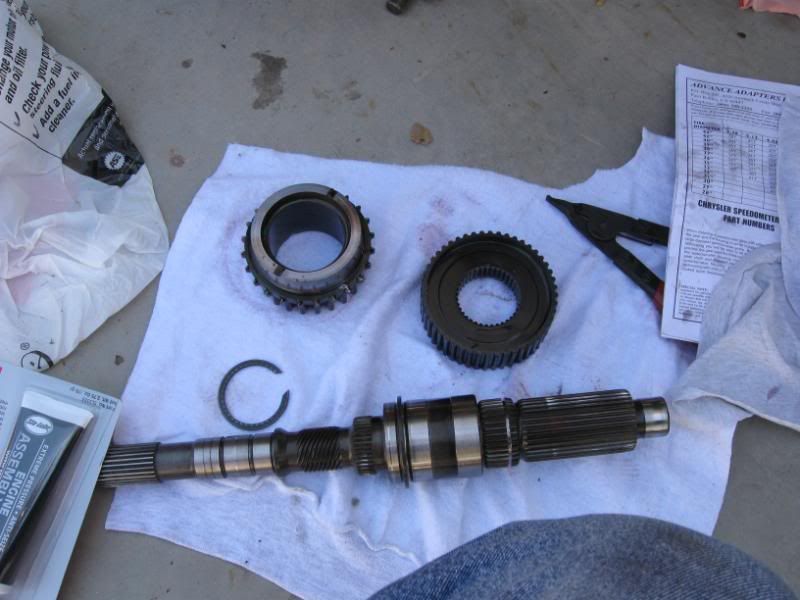
Then using some assembly lube I transfered the gears to the new output shaft and stuck it back into place being carefull not to be over aggressive.
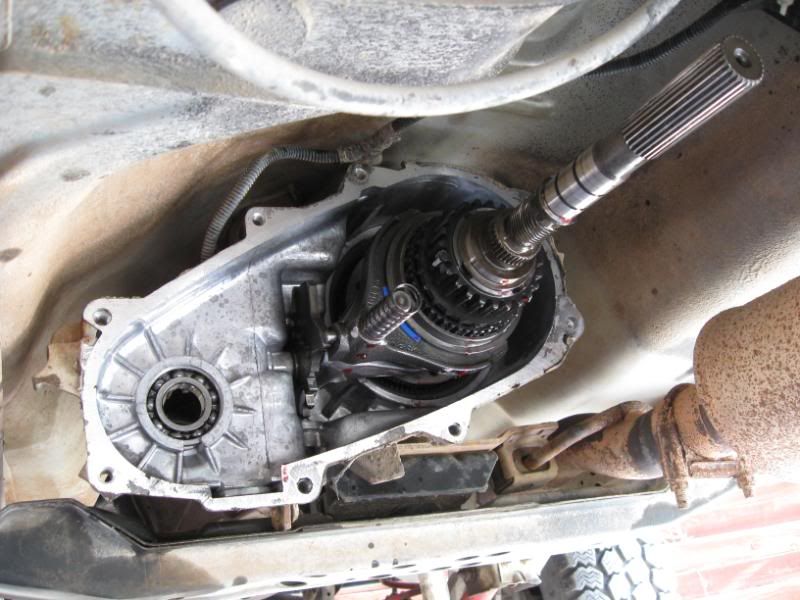
After that I cleaned up the case half and the oil pump and layed a layer of orange RTV arount the back half of the case.
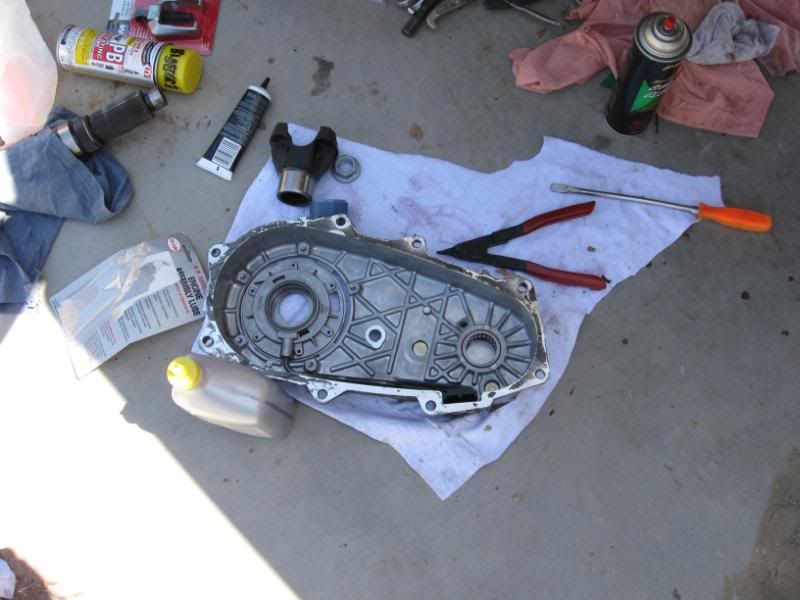
Next step was to put the case half back together and torque all of the bolts to 25ft lbs. So I did that and then went to the next step.
Next step is to slide on the speedo gear and hold it into place with the supplied lock ring. Well guess what! No new lockring! Or any new O-rings or any of the stuff that I needed to finish the job. So I make a call to 4x4groupbuy.com and they were closed, so I left them a message. AA is closed on saturday, and Tom Woods where the package came from is closed also. So I guess we'll see what happens monday.
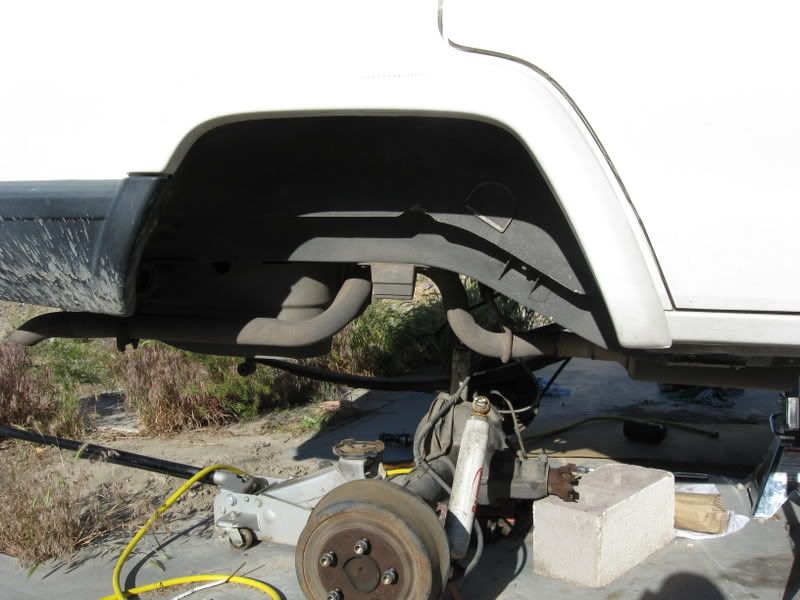
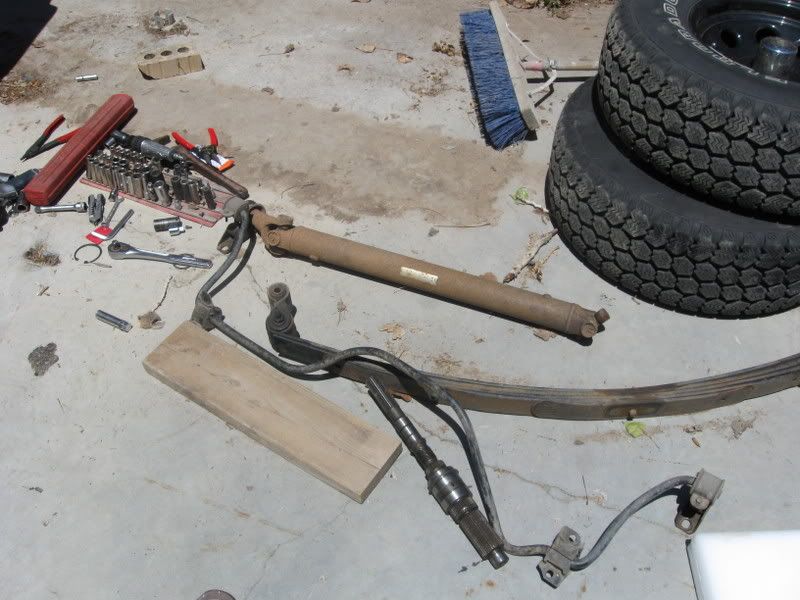
So I decided to say F-it and tackle the rear part of the RE 5.5" LA kit. So I start off with removing the Shocks from the body of the jeep (at the bar pin) next I remove the rear sway bar. Those are the first steps in the instructions from RE. Next is to install the rear extended brake line that came with the kit. So I did that.
By the way I couldn't figure out how to get the other brake line off where it is attached at the framerail. It seems to be welded into place but it looks like a clip. So after using a screwdriver and a BFH again I said F-it I'll cut it off later. So next I removed the the ubolts and dropped the axle. After that I started on the leafspring removal. I got the passenger side off after about 20 minutes ( glad that I have air at this point) and then started on the drivers side. I got the shackle unbolted and droped the drivers leaf but couldn't get that front bolt to break loose. I soked it in PB Blaster again as I did everything that I could think of the day before, 2 times. So then I decide that I would install the shackles while that PB was soaking in.
I opened the box for the shackles,
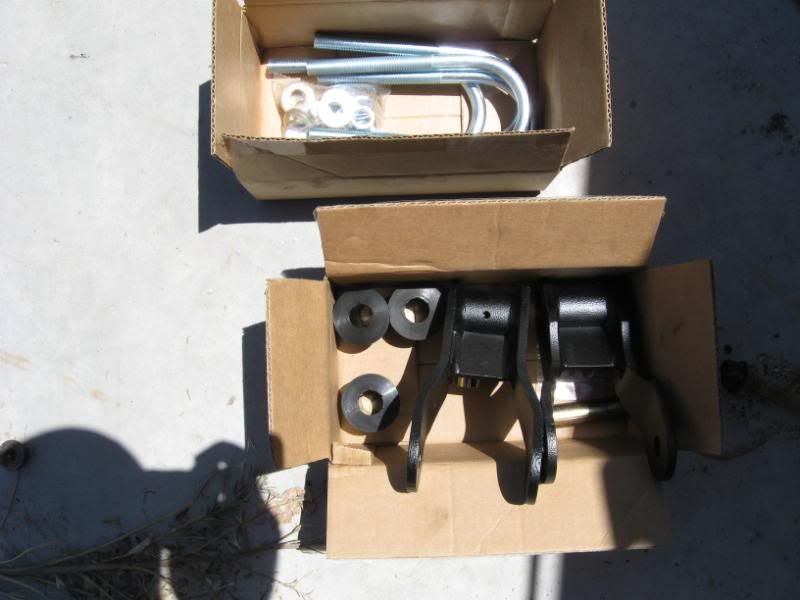
Does anything seem odd to you? 2 shackles, 2 crush sleeves, 2 grease zerks, and WHAT! only 3 bushings there are supposed to be 2 for each shackle.
So after that I cleaned up a little, turned off the air compressor rolled up the hose and left it all outside in the hot sun to go to hell!
Then I left in my dads huge box van, drove to my work (lube center) to clean up and hit the liquor store for a Bud Light 40oz. Came home and took a shower, drank some beer and ate some lunch. I just got off of the phone with the manager from where I purchased the lift and he said that he would contact a local company for the bushings ( which they may or may not have) on monday. So here I sit.
I might as well try it. So this is what I started with. NP241 HD SYE from AA and a Tom Woods DS.So I started by removing the driveshafts like the instructions said.
Then from there I removed the oil slinger (didn't have a long enough puller) so I used a HUGE flat screw driver and a BFH (if you don't know what that is PM me). Next I removed the seal, and then proceeded to remove the lockring with my new HD lockring pliers. I messed with that for a couple of minutes (10 or so) and then it came right off. After that I proceeded to tackle the large snap ring that held on the tailshaft housing. Oh yeah I removed the Speedo sensor before going after the Oil Slinger.
Anyways, so after snapping the 2 pairs of snapring pliers tips I had to travel to the local Napa Autoparts (only 1 in my town) and bought a better set. I didn't have the $90 to spend on the HD ones but the pair I got was a selectable inner or outer snapring set ($30). Got back and attempted them and after like 5 minutes of adjusting the tips out on the pliers I got it.
Okay so then I took the tailshaft housing off and pulled 2 more sets of lockrings and then unbolted the 10mm 12point bolt and the rest of the case uses 15mm sockets. By the way I used Air for unbolting everything except the drivelines.
So this is what I was down to.
After removing the case half and inspecting the O-ring for the pump I layed it to the side. Next you pull out the front output shaft and tilt it towards the passenger side to unhook the chain. Then I inspected that.
Then I pulled the stock slipyoke shaft and removed the 1 lockring, and the 2 gears that it held on.
Then using some assembly lube I transfered the gears to the new output shaft and stuck it back into place being carefull not to be over aggressive.
After that I cleaned up the case half and the oil pump and layed a layer of orange RTV arount the back half of the case.
Next step was to put the case half back together and torque all of the bolts to 25ft lbs. So I did that and then went to the next step.
Next step is to slide on the speedo gear and hold it into place with the supplied lock ring. Well guess what! No new lockring! Or any new O-rings or any of the stuff that I needed to finish the job.
So I make a call to 4x4groupbuy.com and they were closed, so I left them a message. AA is closed on saturday, and Tom Woods where the package came from is closed also. So I guess we'll see what happens monday.So I decided to say F-it and tackle the rear part of the RE 5.5" LA kit. So I start off with removing the Shocks from the body of the jeep (at the bar pin) next I remove the rear sway bar. Those are the first steps in the instructions from RE. Next is to install the rear extended brake line that came with the kit. So I did that.
By the way I couldn't figure out how to get the other brake line off where it is attached at the framerail. It seems to be welded into place but it looks like a clip. So after using a screwdriver and a BFH again I said F-it I'll cut it off later. So next I removed the the ubolts and dropped the axle. After that I started on the leafspring removal. I got the passenger side off after about 20 minutes ( glad that I have air at this point) and then started on the drivers side. I got the shackle unbolted and droped the drivers leaf but couldn't get that front bolt to break loose. I soked it in PB Blaster again as I did everything that I could think of the day before, 2 times. So then I decide that I would install the shackles while that PB was soaking in.
I opened the box for the shackles,
Does anything seem odd to you? 2 shackles, 2 crush sleeves, 2 grease zerks, and WHAT! only 3 bushings
there are supposed to be 2 for each shackle. So after that I cleaned up a little, turned off the air compressor rolled up the hose and left it all outside in the hot sun to go to hell!
Then I left in my dads huge box van, drove to my work (lube center) to clean up and hit the liquor store for a Bud Light 40oz. Came home and took a shower, drank some beer and ate some lunch. I just got off of the phone with the manager from where I purchased the lift and he said that he would contact a local company for the bushings ( which they may or may not have) on monday. So here I sit.
 06-07-2008, 06:23 PM
#2
CF Veteran
Join Date: Apr 2008
Posts: 1,272
Likes: 0
Received 0 Likes
on
0 Posts
Year: 1990
Model: Cherokee
Engine: 4.0 I 6
nice wright up. this gives me the courage to do mine. do you have tractor supply by you? if so cut the bolts and upgrade to grade 8 for cheap and save money
06-07-2008, 06:23 PM
#3
CF Veteran
Not bad, I've always removed the t-case when installing a SYE, easyer to fill with fluid after, but good job any ways..
06-07-2008, 06:52 PM
#5
Seasoned Member
Thread Starter
Join Date: Apr 2008
Location: Grand Junction, Colorado
Posts: 377
Likes: 0
Received 2 Likes
on
1 Post
Year: 1999
Model: Cherokee
Engine: 4.0L
The 8.8 is a 3.73 limited slip disc brake axle. I picked it up for $250 from one of my dad's friends that owns a junk yard. I will be doing the 8.8 install in the fall, with 4.88's and 35's. I'm sticking with the D35 for now. But I will be posting the install in this thread.
I do have a tractor supply by me but they closed at Noon. I can't just cut the bolt because it is the one that is under the rear driver door that I can't get out. It is boxed into the frame rail like the shackle nut. Hopefully the PB works it's magic.
UPDATE: My parents dropped off my daughter earlier and when they left my dad came back banging on the door with a little present, asking me what's this? It seems that when I oppent the box to take pictures of the SYE and DS that I somehow knocked out the pack of lockrings and pinyon gaskets.
I figured that they would have fallen out at my work when I was showing the guys. Oh well, now I don't have to wait for that. Hopefully I didn't knock out the other bushing or i'm really going to feel like an ***.Oh and on a scale of 1-10 the SYE install was about a 6-low7. If you can change a clutch or do a motor swap (one that isn't a factory option) then it is a piece of cake.
Okay I'm off to drink beer and watch UFC. Have a good night guys.
06-07-2008, 06:58 PM
#6
Renix Super Guru
Join Date: Mar 2008
Location: In yourz postez fissin jurr spelinzs
Posts: 24,653
Likes: 0
Received 16 Likes
on
12 Posts
Year: 1990XJ/1989MJ
Model: Comanche
Engine: 4.0L Renix
Excellent job. It was not as daunting a job as you thought before you started. I have always had a helper but knew it could be done alone. Did two with the 231 and one HnT on my 242. Good luck with the missing bushing. Let us know what kind of service you get from them on your shortage.

Trending Topics
06-08-2008, 08:37 AM
#8
Seasoned Member
Thread Starter
Join Date: Apr 2008
Location: Grand Junction, Colorado
Posts: 377
Likes: 0
Received 2 Likes
on
1 Post
Year: 1999
Model: Cherokee
Engine: 4.0L
Yeah I can do my best. Does it need to be more informal than what is already there or is it good the way I've been doing it.
I'm going to call RE myself on Monday and express my displeasure in the situation. Do you think a local shop would carry their bushing for the Shackle because I know it's not just a regular bushing. I guess I'll find out on Monday. Anyways i'm off to finish the SYE and get started on the front part of the lift. Hopefully no more snags!
 06-08-2008, 12:42 PM
#10
Renix Super Guru
Join Date: Mar 2008
Location: In yourz postez fissin jurr spelinzs
Posts: 24,653
Likes: 0
Received 16 Likes
on
12 Posts
Year: 1990XJ/1989MJ
Model: Comanche
Engine: 4.0L Renix
The job you have done so far is excellent. Easy to understand. When you complete a section you might just list and photograph the tools involved b/c no one wants to be in the middle and have to go get a missing tool like you did with the snap ring pliers.
Your pics are clear and precise, your descriptions easy to understand and they follow each other just fine. Again, Good Job 99.
Your pics are clear and precise, your descriptions easy to understand and they follow each other just fine. Again, Good Job 99.
06-08-2008, 03:11 PM
#11
Seasoned Member
Thread Starter
Join Date: Apr 2008
Location: Grand Junction, Colorado
Posts: 377
Likes: 0
Received 2 Likes
on
1 Post
Year: 1999
Model: Cherokee
Engine: 4.0L
No gory details with the SYE install, everything went back together smooth. It was a lot easier than I had figured. I finished it up in about 20 minutes this morning and got started on front section of the LA install.
This thing has given me nothing but trouble. The instructions from RE are almost worthless.It took almost a half an hour to figure out how the x-member and skid went together only to figure out that I couldn't put it on because I didn't have a stud removal tool. So then I decided to tackle the Pitman arm which I didn't have a big enough socket to take that off and I don't condone (sp) the use of adjustable crecent wrenches. So tomorrow I will borrow a friends 3/4" drive socket set and figure out how to get the studs out of the framerails where the Stock x-member was bolted.
I tried the old double nut trick but just kept backing the nuts off. Any info there would be a big help. Oh, and I will get up the rest of the pics that I took today of the SYE and stuff, later tonight.
06-09-2008, 08:03 AM
#12
Seasoned Member
Thread Starter
Join Date: Apr 2008
Location: Grand Junction, Colorado
Posts: 377
Likes: 0
Received 2 Likes
on
1 Post
Year: 1999
Model: Cherokee
Engine: 4.0L
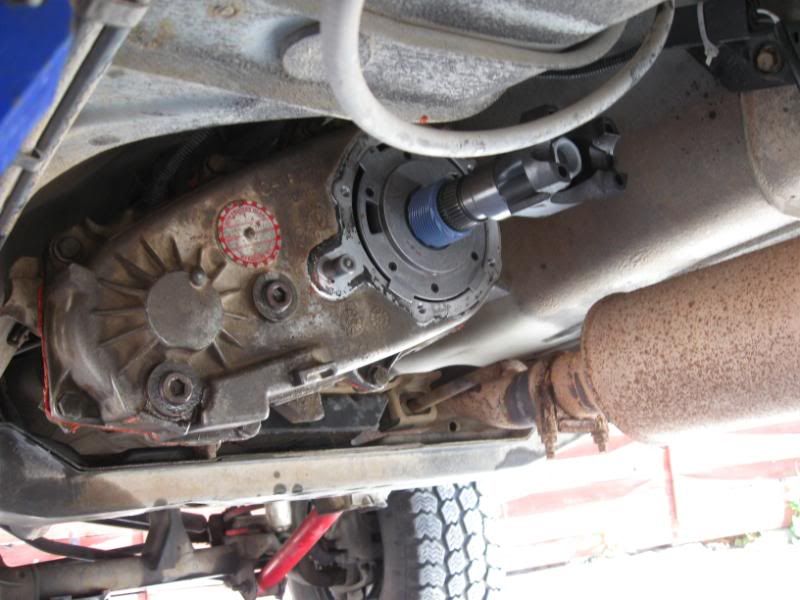
Okay here is the rest of the pics and info on the SYE. The next step after putting the case half back on was to clean the surfaces of the pump area and make sure that the new tailshaft housing was clean. After that I installed the first lockring that goes between the pump and the speedo gear. Then the speedo gear goes on, with the next lock ring holding it in place. There was one more lockring in the package that was unused because the bearing in the tailshaft housing was already installed.
Next a nice bead of the RTV was applied to the tailshaft housing. After making sure that the pump was in the correct position, I pre-lubed the bearing inside the housing along with the shaft, then slid the housing over the shaft and tourqed the 10mm bolts to 25ft lbs.
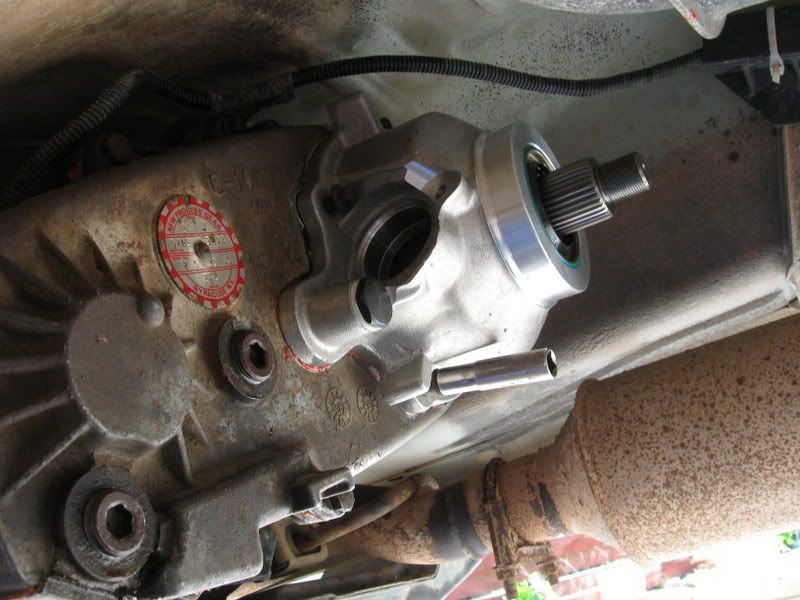
Next order of buisness was to put the supplied yoke o-rings on along with the yoke's. So after lubing the 2 rubber washers (large one on the rear, small on the front) I slid those into place. Then the yoke went on and recieved a hefty 150ft lbs of tourqing.
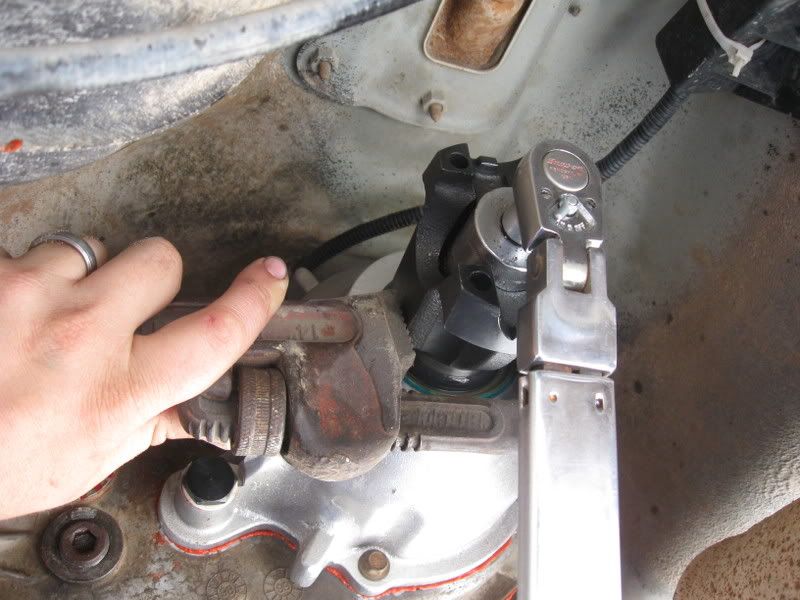
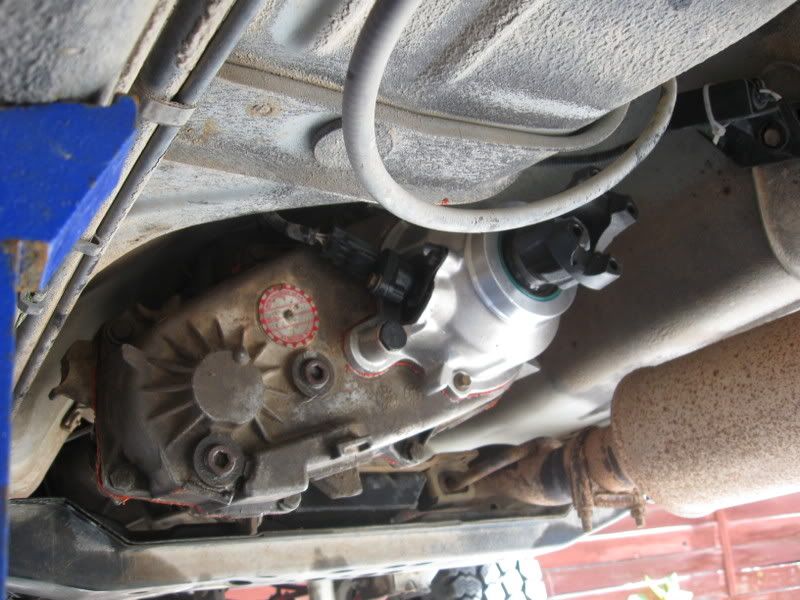
All that is left to do is add the speed sensor and hook up the connection, also reattach the lever selector, fill with fluid, and attach driveshafts. All I did was install the speedsensor and plug it back in.

After that I turned my attention to the front of the lift, mainly to open all of the boxes and make sure that nothing else was missing. After fumbling witht he skid plate install I tried the pitman arm then called it a day. Here are a few pics of how it is sittting now.
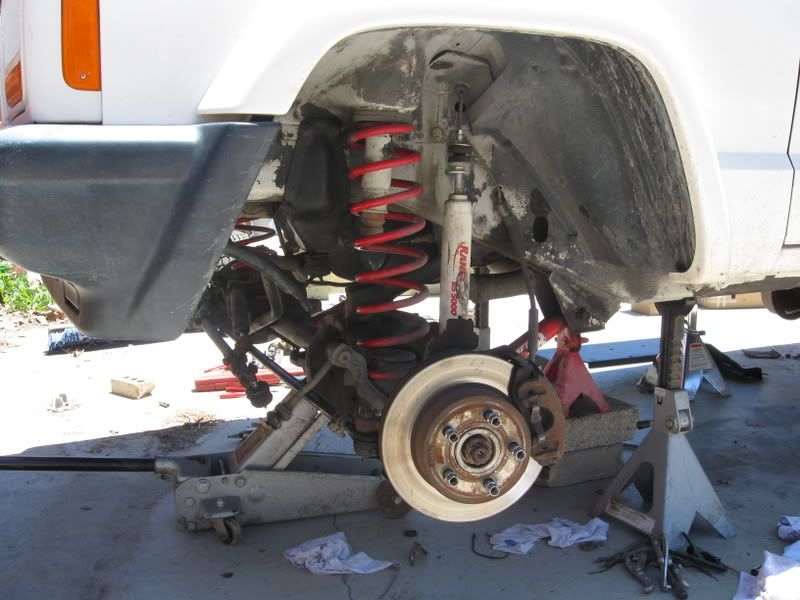
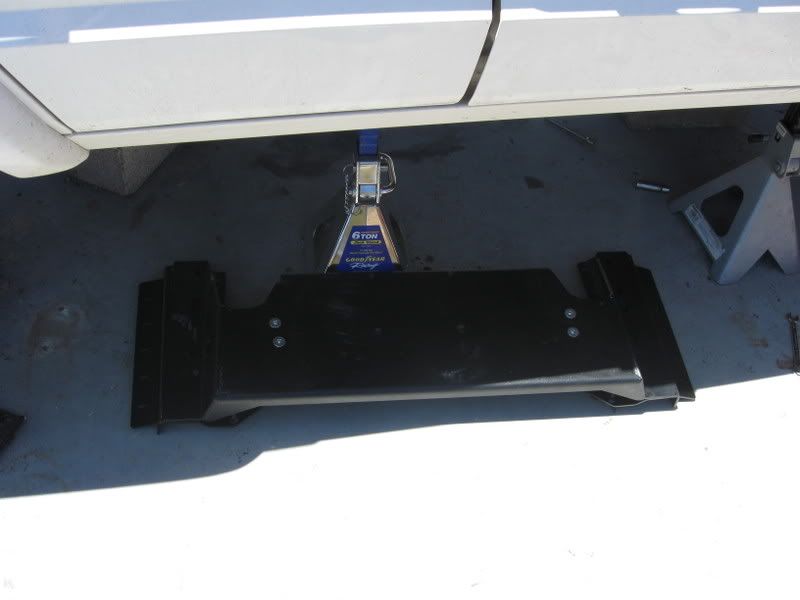
passenger rear spring off.
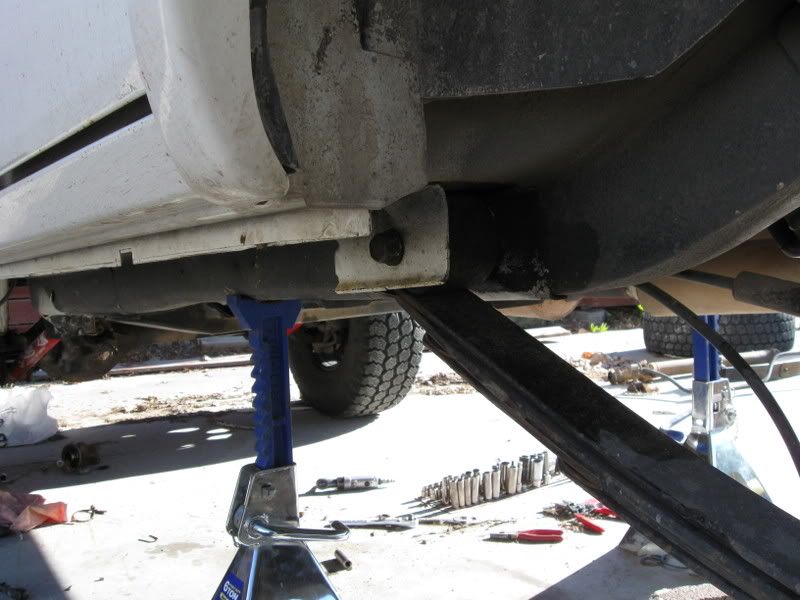
pesky drivers bolt that I can't seem to coax out.
How the front is sitting right now.
The 3 piece (pain in my ***) skid plate. Oh and for your info, I was under the impression that this kit needed no welding, but they say to weld the controll arm mounts front and back to the Unibody.
Parts that will not be going back on.
Next a nice bead of the RTV was applied to the tailshaft housing. After making sure that the pump was in the correct position, I pre-lubed the bearing inside the housing along with the shaft, then slid the housing over the shaft and tourqed the 10mm bolts to 25ft lbs.
Next order of buisness was to put the supplied yoke o-rings on along with the yoke's. So after lubing the 2 rubber washers (large one on the rear, small on the front) I slid those into place. Then the yoke went on and recieved a hefty 150ft lbs of tourqing.
All that is left to do is add the speed sensor and hook up the connection, also reattach the lever selector, fill with fluid, and attach driveshafts. All I did was install the speedsensor and plug it back in.
After that I turned my attention to the front of the lift, mainly to open all of the boxes and make sure that nothing else was missing. After fumbling witht he skid plate install I tried the pitman arm then called it a day. Here are a few pics of how it is sittting now.
passenger rear spring off.
pesky drivers bolt that I can't seem to coax out.
How the front is sitting right now.
The 3 piece (pain in my ***) skid plate. Oh and for your info, I was under the impression that this kit needed no welding, but they say to weld the controll arm mounts front and back to the Unibody.
Parts that will not be going back on.
06-09-2008, 09:49 AM
#13
Renix Super Guru
Join Date: Mar 2008
Location: In yourz postez fissin jurr spelinzs
Posts: 24,653
Likes: 0
Received 16 Likes
on
12 Posts
Year: 1990XJ/1989MJ
Model: Comanche
Engine: 4.0L Renix
Again good write up. You are doing an excellent job sir. I look forward to future installments.
Blue
Blue
06-09-2008, 10:46 PM
#14
Seasoned Member
Thread Starter
Join Date: Apr 2008
Location: Grand Junction, Colorado
Posts: 377
Likes: 0
Received 2 Likes
on
1 Post
Year: 1999
Model: Cherokee
Engine: 4.0L
On the upside I did get the leaf spring bolt to break loose but I can only get it to come about 3/4" out of the hole and it won't slide out or turn out any more than it is right now.
06-09-2008, 11:07 PM
#15
Renix Super Guru
Join Date: Mar 2008
Location: In yourz postez fissin jurr spelinzs
Posts: 24,653
Likes: 0
Received 16 Likes
on
12 Posts
Year: 1990XJ/1989MJ
Model: Comanche
Engine: 4.0L Renix
There may not be any more if I don't figure out how to mount the damn lower controll arm mounts. I'm stuck and can't figure out what to do. I don't know if I can just hack of the studs that are there or if I have to use that hole.
On the upside I did get the leaf spring bolt to break loose but I can only get it to come about 3/4" out of the hole and it won't slide out or turn out any more than it is right now.
On the upside I did get the leaf spring bolt to break loose but I can only get it to come about 3/4" out of the hole and it won't slide out or turn out any more than it is right now.