'01 XJ Driver/Crawler
 11-20-2017, 07:19 AM
#61
CF Veteran
Nice!!! Yep, definitely looks good with it up to the next body line!
I just need to get my *** through winter so I can start wrenching on mine again.
I just need to get my *** through winter so I can start wrenching on mine again.
 11-22-2017, 11:43 AM
#62
Seasoned Member
Join Date: Nov 2012
Location: Fort Collins, Colorado
Posts: 327
Likes: 0
Received 4 Likes
on
3 Posts
Year: 1998 (buggy), 1998 DD
Model: Cherokee
Good to know what those bumpers will look like on mine.
I had my rear spec'd without the large round holes, so I could cut those as I see fit. On the front, I think the biggest thing I'll have to add is the gap that is on the sides. Fill that angled gap with a matching piece should make it flow a little better. I'll be combining mine with a Boostwerks hidden winch mount, otherwise I also wouldn't mind getting the bumper a little more flush with the front.
Good looking build!
12-03-2017, 04:04 PM
#63
Member
Thread Starter

Join Date: Jan 2017
Location: Anthem, AZ
Posts: 125
Likes: 0
Received 2 Likes
on
2 Posts
Year: 2001
Model: Cherokee
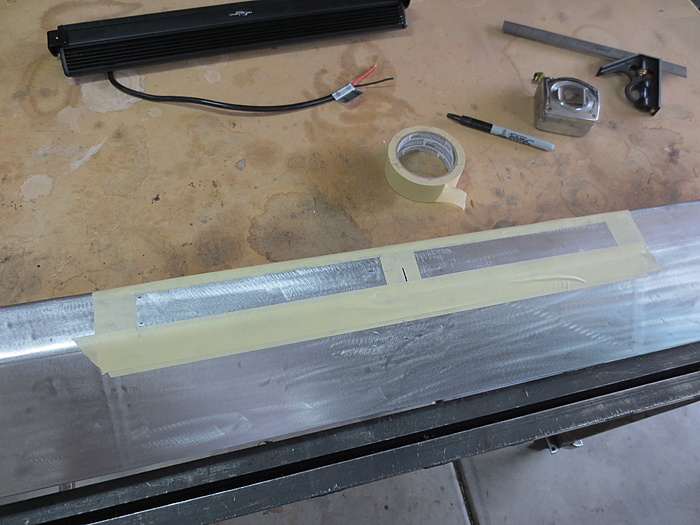
For some reason, I always like to do things the hard way and this front bumper is no different! I wanted a small light bar on the front, but didn't want it mounted to the top of the bumper, so I figured I'd mount it inside the bumper since I can't fit a winch. I wasn't sure how I'd get everything lined up and make the light somewhat even with the hole, but it worked out pretty well. It was a little off, but I opened up the mounting holes on the tabs a little and now it's near perfect and still have a little adjustment to aim it up or down if needed.
Also, I took the piece I cut out and fit it to the end of the bumper to finish it off as Freerider15 had mentioned. I plan to do the same thing to the rear bumper when I'm fabbing the tire carrier. Front bumper is done for now though, overall, I like how it turned out.
Taped off the area to be cut
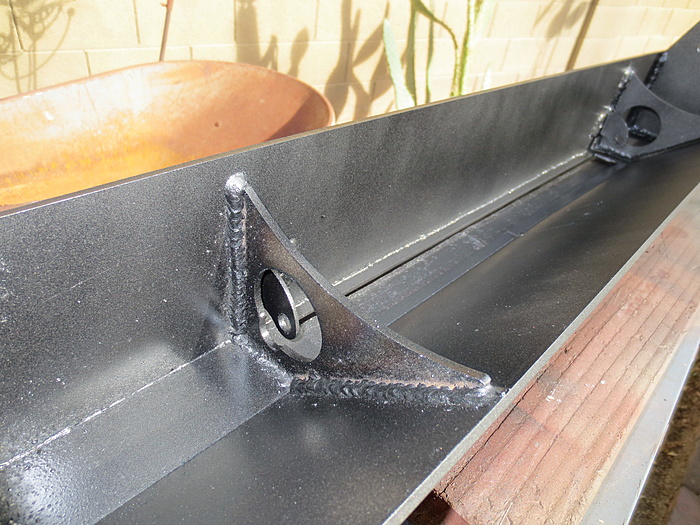
Cut out and cleaned up

Tabs welded on and painting the inside, I had to clearance the gussets a little to have access to the mounting bolts. I went with a wider light than originally planned, luckily I was able to make it work
Light mounted
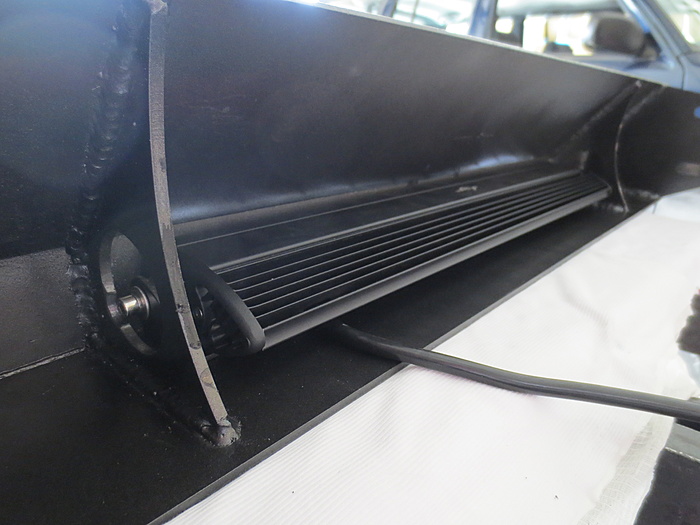
You can see the little piece I added to clean up the end of the bumper
Done

Also, I took the piece I cut out and fit it to the end of the bumper to finish it off as Freerider15 had mentioned. I plan to do the same thing to the rear bumper when I'm fabbing the tire carrier. Front bumper is done for now though, overall, I like how it turned out.
Taped off the area to be cut

Cut out and cleaned up

Tabs welded on and painting the inside, I had to clearance the gussets a little to have access to the mounting bolts. I went with a wider light than originally planned, luckily I was able to make it work

Light mounted

You can see the little piece I added to clean up the end of the bumper

Done


 12-13-2017, 08:22 PM
#66
Member
Thread Starter
Join Date: Jan 2017
Location: Anthem, AZ
Posts: 125
Likes: 0
Received 2 Likes
on
2 Posts
Year: 2001
Model: Cherokee
Oh, yeah, that would probably look better filled in a bit, it doesn't stand out nearly as much with the bumper painted darker. I think it's open mainly for clearance and approach angle, but you could probably plate it right and not affect that too much.
12-13-2017, 08:59 PM
#67
Member
Thread Starter
Join Date: Jan 2017
Location: Anthem, AZ
Posts: 125
Likes: 0
Received 2 Likes
on
2 Posts
Year: 2001
Model: Cherokee
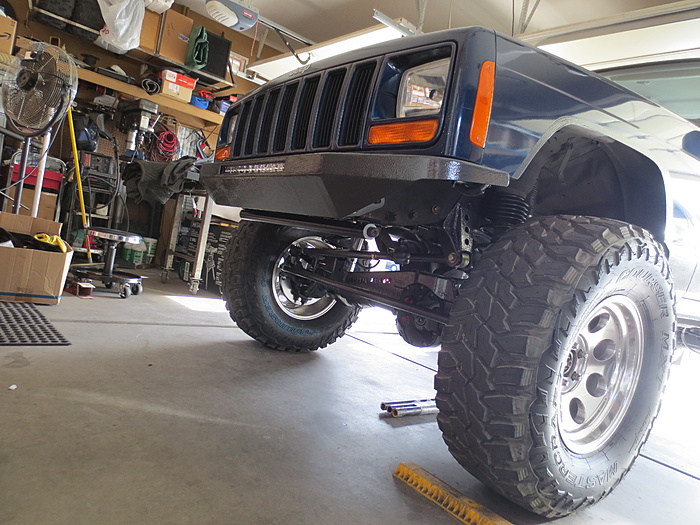
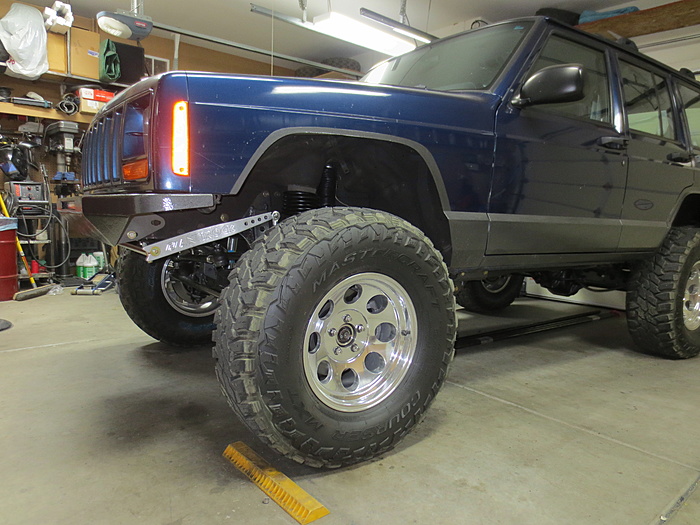
I've put over 300 miles on it in the past couple weeks. I hated the rear shocks and went to a much softer shock and it works with the front much better. It was very nice to drive on the highway, very little sway even without a sway bar. My daughter drove it on the highway and was very comfortable with it, was pretty close to stock handling/feel. I'm going to add a steering stabilizer only because they have them stock and it must be better overall to have one. It doesn't need one though as far as handling goes.
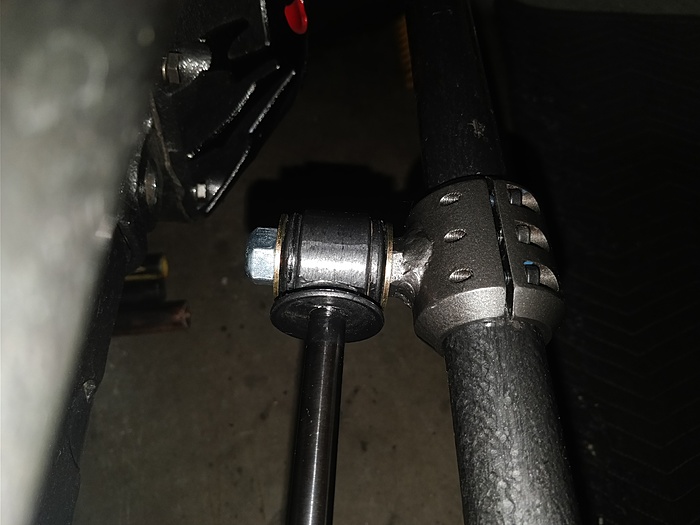
I finally got the correct length links for the Antirock and installed those today. Took it around the block and it handles even better now, curious to see how it performs on the highway and whether it gets even better than it was already. Clearances were tight and the drag link TRE actually touches the rod end at full lock. I think it will be ok, I can always clearance the TRE if I need to.
Just have to hook up the 4x4 actuator and do some lighting and electrical and it will be ready for it's maiden voyage. First trip is going to be to Glamis, my daughter will drive it on the approximately 500 mile roundtrip and we'll play with it in the dunes a bit and she'll drive it home. That's why I need it to have near stock highway manners, I want her to be safe and comfortable driving it long distances on the highway. Wasn't really planning on taking it to the dunes, but figure, why not?!? It was her idea to drive it and follow me hauling the enclosed trailer and quads. I think it will be fun to play with in the little dunes and just cruise the washes, nothing too crazy of course!
I took it in the dirt/rocks real quick one day. It was way more comfortable than I expected. It should be a lot of fun on the trails, way better than my previous XJ that just rode like crap and I didn't even want to get it up to speed as it was so stiff and rough.
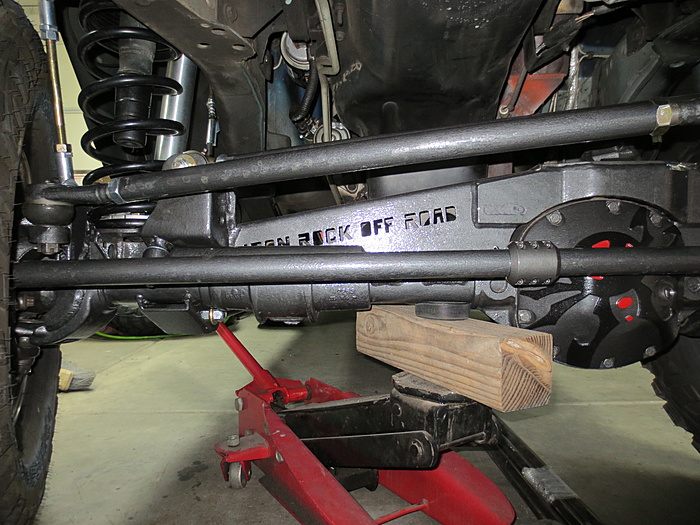
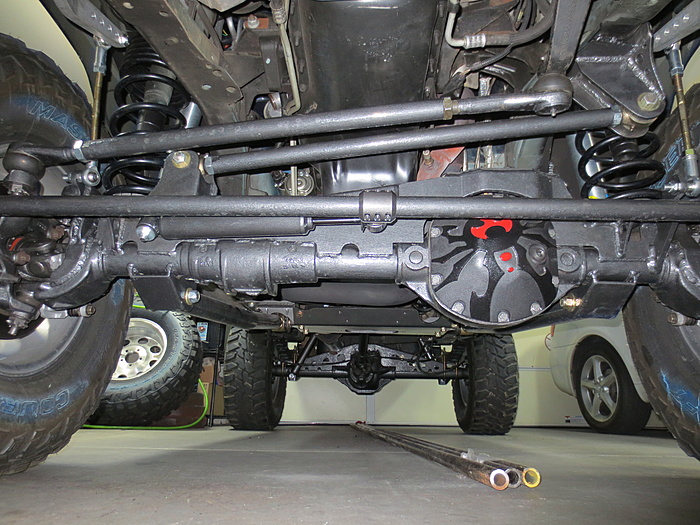
On to some pics of the sway bar.
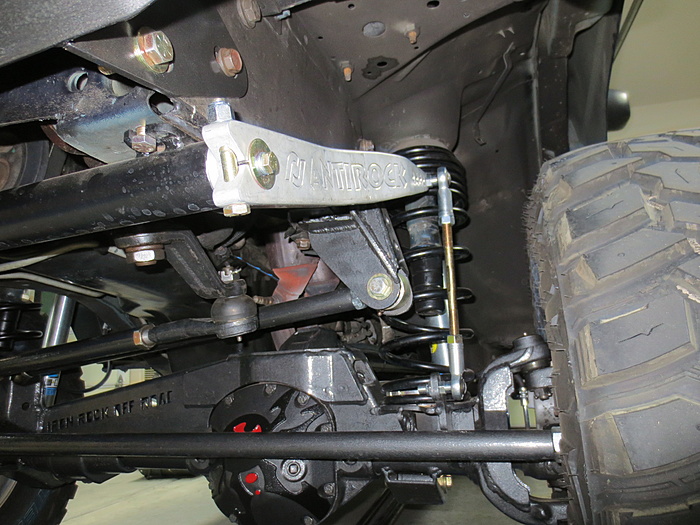
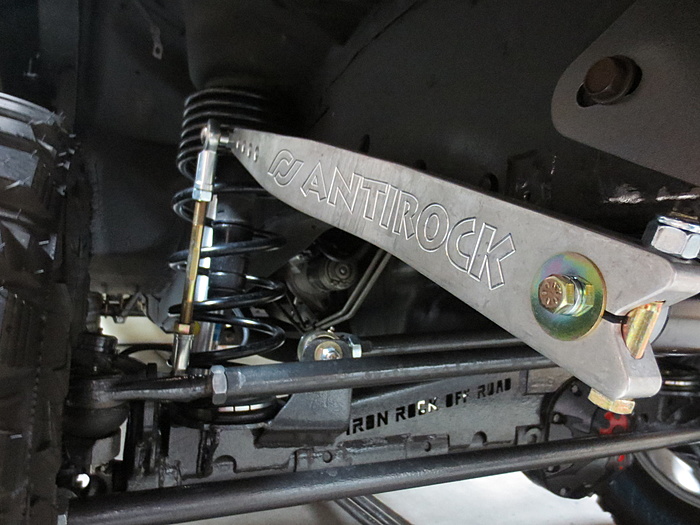
Just barely clears the track bar bracket
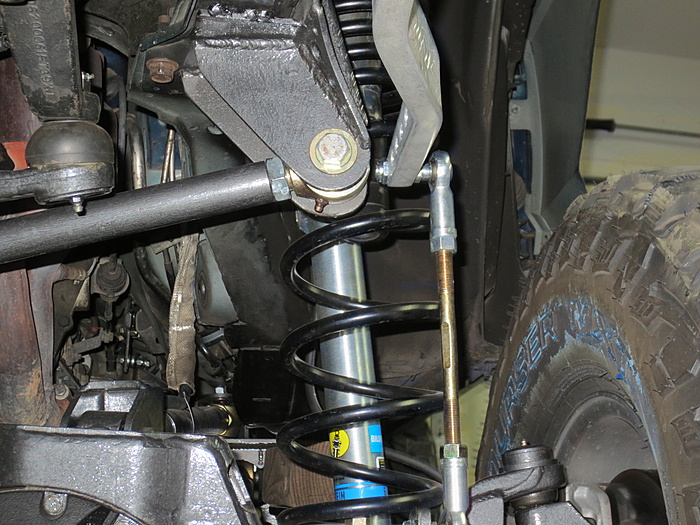
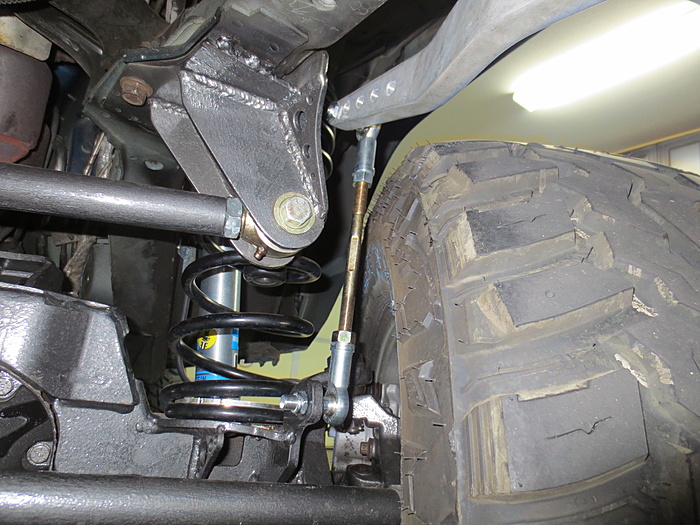
Barely clears the tire
Barely clears the spring
Doesn't quite clear, but barely makes contact here
Pretty close to passenger tire too
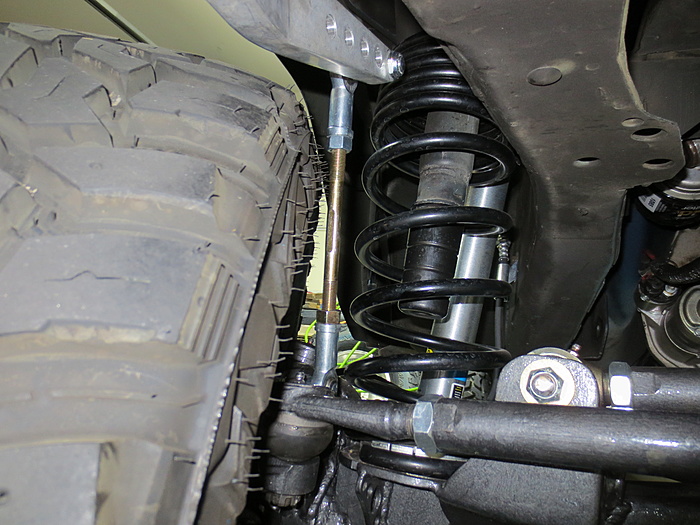
Decent amount of clearance from tie rod to Poison Spyder diff cover
I finally got the correct length links for the Antirock and installed those today. Took it around the block and it handles even better now, curious to see how it performs on the highway and whether it gets even better than it was already. Clearances were tight and the drag link TRE actually touches the rod end at full lock. I think it will be ok, I can always clearance the TRE if I need to.
Just have to hook up the 4x4 actuator and do some lighting and electrical and it will be ready for it's maiden voyage. First trip is going to be to Glamis, my daughter will drive it on the approximately 500 mile roundtrip and we'll play with it in the dunes a bit and she'll drive it home. That's why I need it to have near stock highway manners, I want her to be safe and comfortable driving it long distances on the highway. Wasn't really planning on taking it to the dunes, but figure, why not?!? It was her idea to drive it and follow me hauling the enclosed trailer and quads. I think it will be fun to play with in the little dunes and just cruise the washes, nothing too crazy of course!
I took it in the dirt/rocks real quick one day. It was way more comfortable than I expected. It should be a lot of fun on the trails, way better than my previous XJ that just rode like crap and I didn't even want to get it up to speed as it was so stiff and rough.
On to some pics of the sway bar.


Just barely clears the track bar bracket

Barely clears the tire
Barely clears the spring

Doesn't quite clear, but barely makes contact here

Pretty close to passenger tire too

Decent amount of clearance from tie rod to Poison Spyder diff cover
 12-23-2017, 10:15 AM
#68
Member
Thread Starter
Join Date: Jan 2017
Location: Anthem, AZ
Posts: 125
Likes: 0
Received 2 Likes
on
2 Posts
Year: 2001
Model: Cherokee
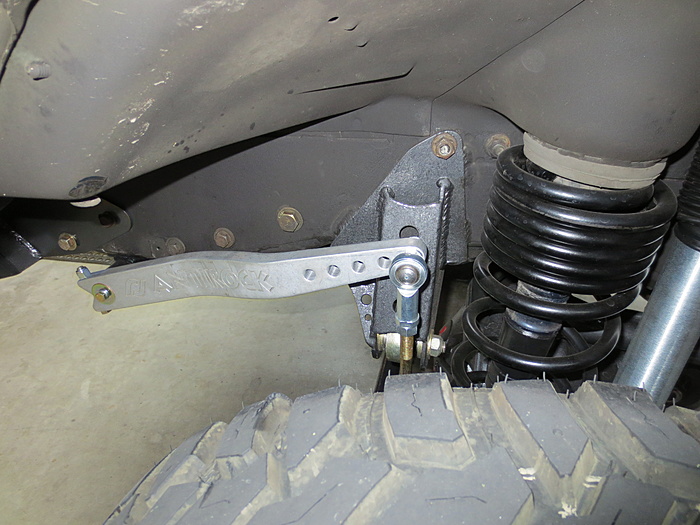
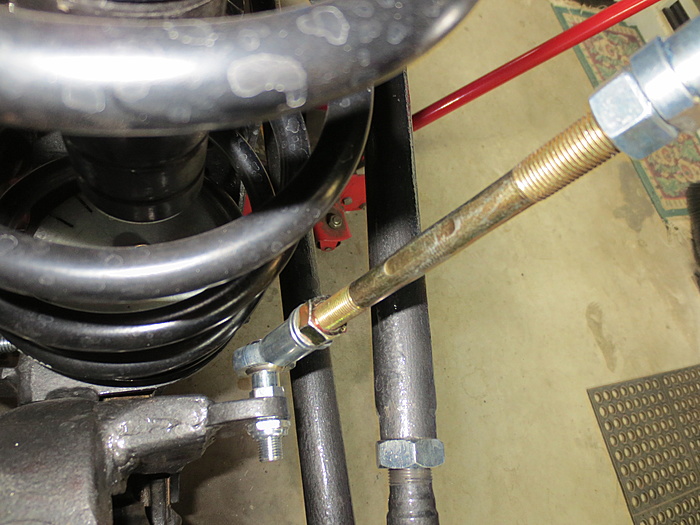
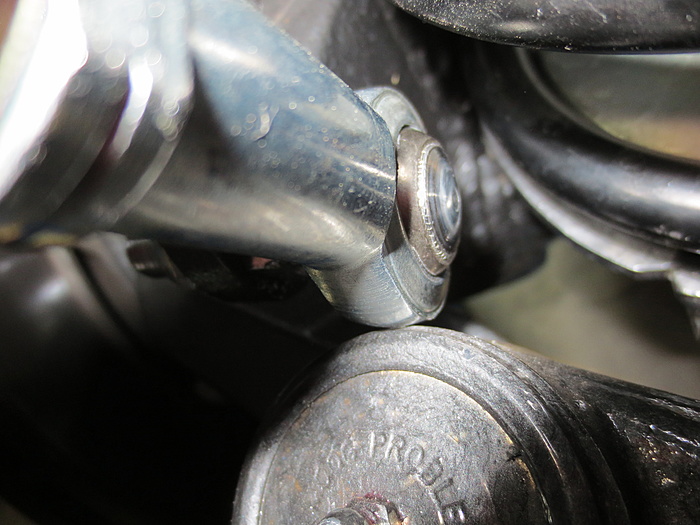
I installed a steering stabilizer over the last couple days. Originally I wasn't going to run one and didn't plan for one, so I had a hell of a time trying to figure out how to mount it and fit it after everything was done! In the end, I'm almost glad I didn't plan for it, it couldn't have turned out better. My goal was to keep it somewhat stealth, I hate having brackets everywhere and having things cluttered. I was able to modify the stud the stabilizer came with and weld it to the track bar mount and I found a cage clamp that fit my tie rod and didn't have anything welded to it. I just welded a bolt to that and the stabilizer sort of hides behind the tie rod. Turned out pretty clean I think.
Even though I didn't think I needed a stabilizer, I just felt it would be that much better having one. I figure it will put less stress on the steering components as the stabilizer will control the front end rather than putting the stress on the gearbox trying to stop shake or whatever when going over bumps. I know there's arguments both ways about stabilizers, I just felt this was best for my build and so far, it's much more civilized on the highway, even though it wasn't bad at all before. The only negative is at slow speeds, like through the neighborhood, after rounding a corner, it doesn't self center as fast as before. This stabilizer is pretty hard to compress, not sure if it will loosen up or not, but it sure works well on the highway!!
On to the pics...
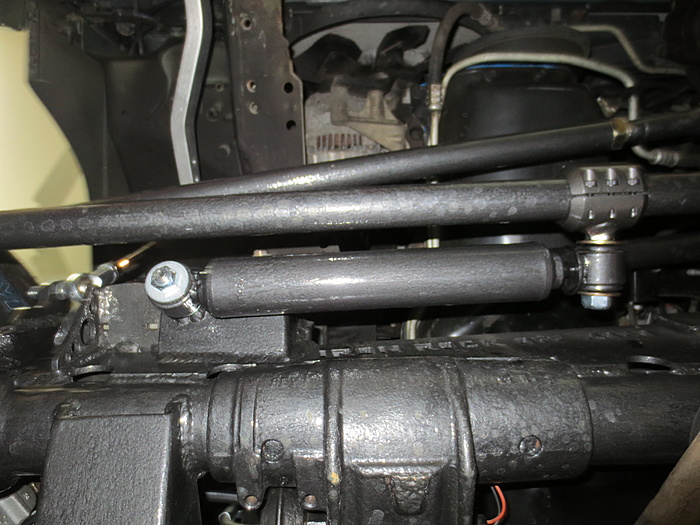
I welded the bolt at an angle to match the angle the stabilizer would be at when centered, but, I'm an idiot and installed it backwards!
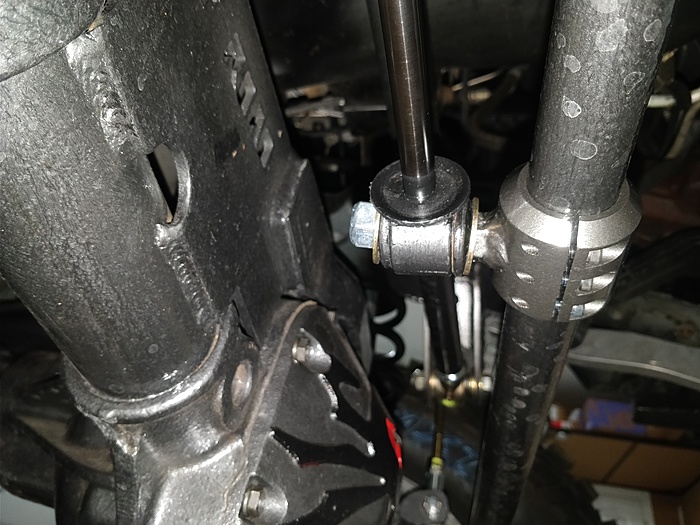
Fixed it, that looks better!
Even though I didn't think I needed a stabilizer, I just felt it would be that much better having one. I figure it will put less stress on the steering components as the stabilizer will control the front end rather than putting the stress on the gearbox trying to stop shake or whatever when going over bumps. I know there's arguments both ways about stabilizers, I just felt this was best for my build and so far, it's much more civilized on the highway, even though it wasn't bad at all before. The only negative is at slow speeds, like through the neighborhood, after rounding a corner, it doesn't self center as fast as before. This stabilizer is pretty hard to compress, not sure if it will loosen up or not, but it sure works well on the highway!!
On to the pics...


I welded the bolt at an angle to match the angle the stabilizer would be at when centered, but, I'm an idiot and installed it backwards!

Fixed it, that looks better!

 12-24-2017, 10:23 AM
#70

Yea agree nicely done! I was glancing at the cost of your anti rock sway bar setup and wholly smokes that's a lot of $. I imagine it is night and day difference over factory setup?
12-24-2017, 10:47 PM
#71
Member
Thread Starter
Join Date: Jan 2017
Location: Anthem, AZ
Posts: 125
Likes: 0
Received 2 Likes
on
2 Posts
Year: 2001
Model: Cherokee
Thanks!
Thanks! Yes, I initially thought there was no way I'd do the Antirock, but as I designed the track bar and frame mount, I figured it was the only way I'd get a sway bar to work. I started looking into it and just happened to find an amazing deal I couldn't pass up, so I bought it. I never had a sway bar on my last XJ, so not sure how it compares, but so far it works very well. I don't even know it's there most of the time. Like it doesn't act like a normal sway bar on bumps or pulling into a driveway at an angle, it doesn't rock back and forth, it lets it articulate. You know it's there on the highway to help with sway and around corners it helps a lot. Very happy with it so far!
Thanks! Yes, I initially thought there was no way I'd do the Antirock, but as I designed the track bar and frame mount, I figured it was the only way I'd get a sway bar to work. I started looking into it and just happened to find an amazing deal I couldn't pass up, so I bought it. I never had a sway bar on my last XJ, so not sure how it compares, but so far it works very well. I don't even know it's there most of the time. Like it doesn't act like a normal sway bar on bumps or pulling into a driveway at an angle, it doesn't rock back and forth, it lets it articulate. You know it's there on the highway to help with sway and around corners it helps a lot. Very happy with it so far!
12-25-2017, 04:28 PM
#72
Thanks!
Thanks! Yes, I initially thought there was no way I'd do the Antirock, but as I designed the track bar and frame mount, I figured it was the only way I'd get a sway bar to work. I started looking into it and just happened to find an amazing deal I couldn't pass up, so I bought it. I never had a sway bar on my last XJ, so not sure how it compares, but so far it works very well. I don't even know it's there most of the time. Like it doesn't act like a normal sway bar on bumps or pulling into a driveway at an angle, it doesn't rock back and forth, it lets it articulate. You know it's there on the highway to help with sway and around corners it helps a lot. Very happy with it so far!
Thanks! Yes, I initially thought there was no way I'd do the Antirock, but as I designed the track bar and frame mount, I figured it was the only way I'd get a sway bar to work. I started looking into it and just happened to find an amazing deal I couldn't pass up, so I bought it. I never had a sway bar on my last XJ, so not sure how it compares, but so far it works very well. I don't even know it's there most of the time. Like it doesn't act like a normal sway bar on bumps or pulling into a driveway at an angle, it doesn't rock back and forth, it lets it articulate. You know it's there on the highway to help with sway and around corners it helps a lot. Very happy with it so far!
Well you got a good deal you said and your happy that's all it matters. Looks nice too!
12-26-2017, 08:41 AM
#73
Member

Join Date: Sep 2017
Location: Seattle
Posts: 110
Likes: 0
Received 1 Like
on
1 Post
Year: 1988
Model: Cherokee
Engine: 4.0 Renix
Awesome build! My situation is very similar to yours. I bought a built XJ about 3 years ago and have spent those 3 years trying to essentially rebuild it. It was pretty beat and I didnt care for much of the home brew solutions on it. This past fall, I finally decided to start all over. Like you I just realized it wasnt ever going to be up to my standards. I now have a stock XJ in the driveway and the build is about to commence. I hope it turns out close to as nice as yours.
12-26-2017, 11:04 PM
#74
CF Veteran
Join Date: Jul 2012
Location: Andover, VT
Posts: 2,971
Received 226 Likes
on
176 Posts
Year: 1999
Model: Cherokee (XJ)
Engine: 4.0 L
Great work! I'm really impressed with the amount of work you got done this year. Looks awesome. I will definitely be using this for ideas because you did exactly what I'm looking to do. I really like seeing that you got an anti-rock to work with your track bar mount.
Does the tire rub the anti-rock while flexed?
How does the anti-rock mount to the unibody? It looks pretty far forward, would it interfere with a hidden winch setup with the cross-member trimmed?
I know you don't have much seat time yet but is there anything you would've done different up to this point?
What's next?
01-13-2018, 04:17 PM
#75
Member
Thread Starter
Join Date: Jan 2017
Location: Anthem, AZ
Posts: 125
Likes: 0
Received 2 Likes
on
2 Posts
Year: 2001
Model: Cherokee
Great work! I'm really impressed with the amount of work you got done this year. Looks awesome. I will definitely be using this for ideas because you did exactly what I'm looking to do. I really like seeing that you got an anti-rock to work with your track bar mount.
Does the tire rub the anti-rock while flexed?
How does the anti-rock mount to the unibody? It looks pretty far forward, would it interfere with a hidden winch setup with the cross-member trimmed?
I know you don't have much seat time yet but is there anything you would've done different up to this point?
What's next?
Does the tire rub the anti-rock while flexed?
How does the anti-rock mount to the unibody? It looks pretty far forward, would it interfere with a hidden winch setup with the cross-member trimmed?
I know you don't have much seat time yet but is there anything you would've done different up to this point?
What's next?
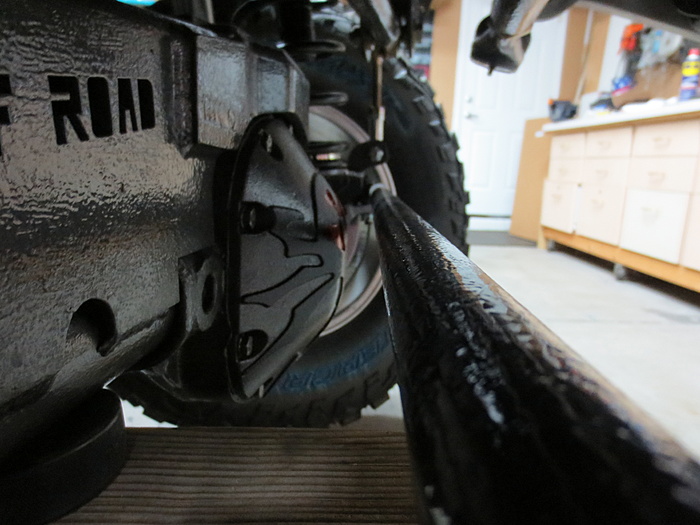
I did have a chance to check the flex and it doesn't contact the Antirock until near full lock and full stuff. I think I have a couple options to get a little more clearance, but it will be really tight on the drivers side, not sure if I can make it clear completely or not.
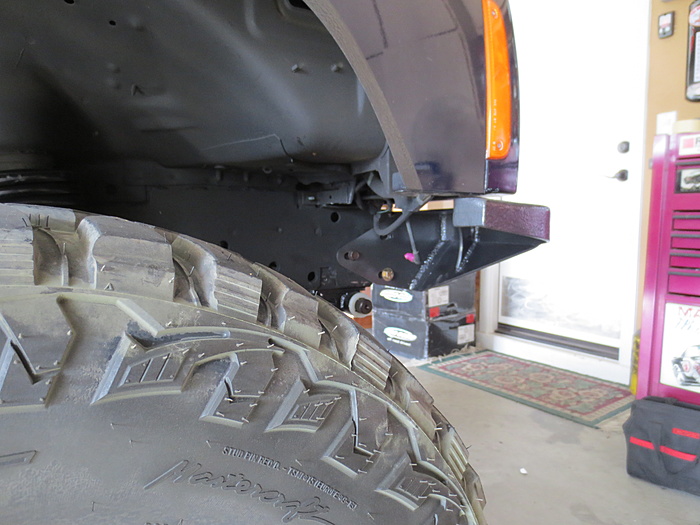
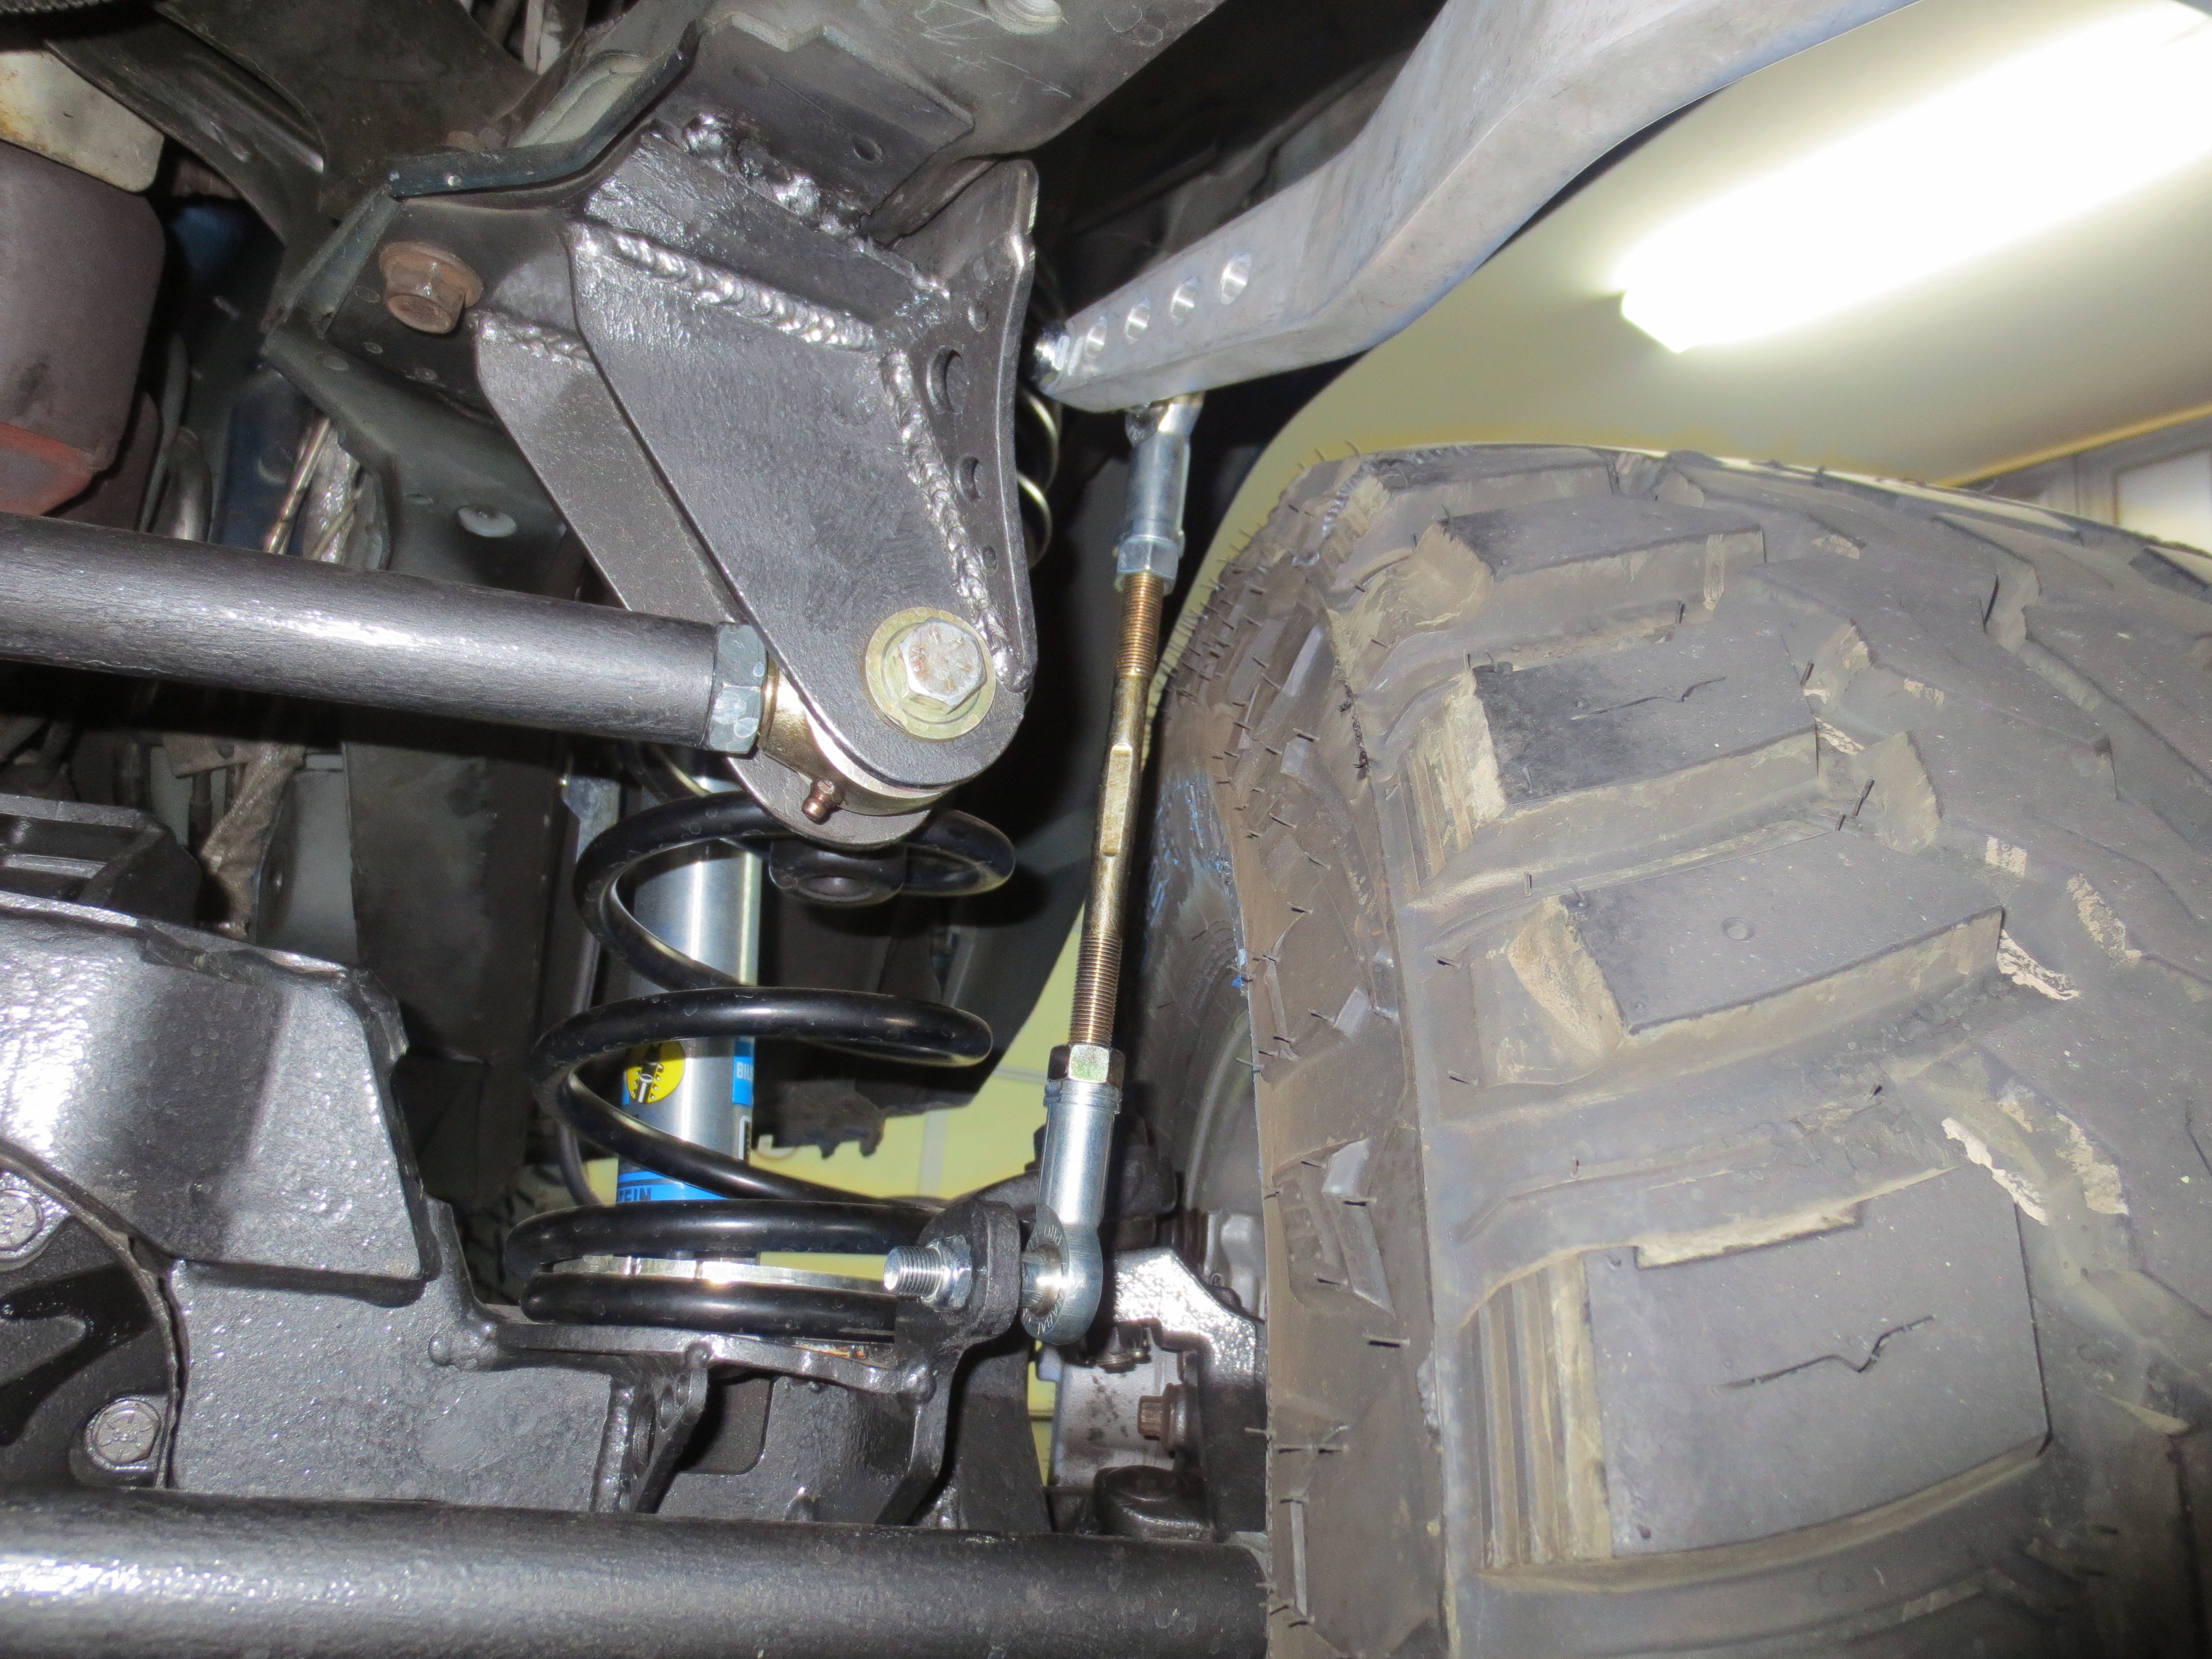
The Antirock mounts almost to the front edge of the unibody, I had to put it there to clear with the full length arms. If you trim the arms, you can mount it further back, maybe even near the stock mounting location. It will most likely interfere with a hidden winch, I had to cut the lower section of the cross-member as the tube for the sway bar mounts right where the lower part of the cross-member goes across.
So far, I would've done a different front axle, I thought I'd make this one work with 2-low, but this disconnect setup is not working out for me yet. I may try an electric actuator or I may just put a one piece shaft in and forget about 2-low. I also wish I had known I was using an Antirock and been able to design around a hidden winch while making the Antirock work, I may still try and modify it to fit a hidden winch, but I kind of doubt it. Everything else has actually gone pretty well so far. I'll know more once I get it out on the trails.
I just swapped out the AC compressor, accumulator and hoses, I still need to finish the rear bumper and make a tire carrier and figure out what to do for rock sliders. It's getting close to being done for the most part.
You can kind of see where the Antirock is mounted here, pretty much as far forward as I could get it.
