Hydraulic handbrake install
 09-18-2010, 11:44 PM
#1
Newbie
Thread Starter
Join Date: Sep 2010
Posts: 8
Likes: 0
Received 0 Likes
on
0 Posts
Model: Cherokee
Since I'm new to this forum but not new to cars, I figured I'd for my first post I'd write up a walk through of my latest mod: a hydraulic handbrake. The purpose of a hydraulic handbrake (HH from now on) is to allow me to lock up only the rear wheels with an easy pull of a lever while retaining normal rear braking when the lever is not pulled. If you have to ask why, then this thread is not for you (hint: check my user name).
Also, apparently newbies are not allowed to post in the "How To" section or I would have put this there. I suppose it will remain here until the forum mods move it.
So, without further ado, the HH XJ install:
First off, I quickly discovered that while "hydraulic handbrake" yields almost no product results, there's a device FWD drag racers use called a "staging brake" that serves the same function. Generally, the "cutting brakes" used in crawlers DO NOT allow normal brake pedal actuation of the rear brakes, which is something I wanted to retain in this application. So, after some import forum surfing, I found a CNC-brand stage brake from thechassisshop for about $150 shipped. It arrived like this:
The handle is chromed steel, handle is blue anodized aluminum, and the cylinder is cast aluminum. It also came with the two 90 degree NPT-to-3/16" elbows. Here's a closeup of the cylinder:

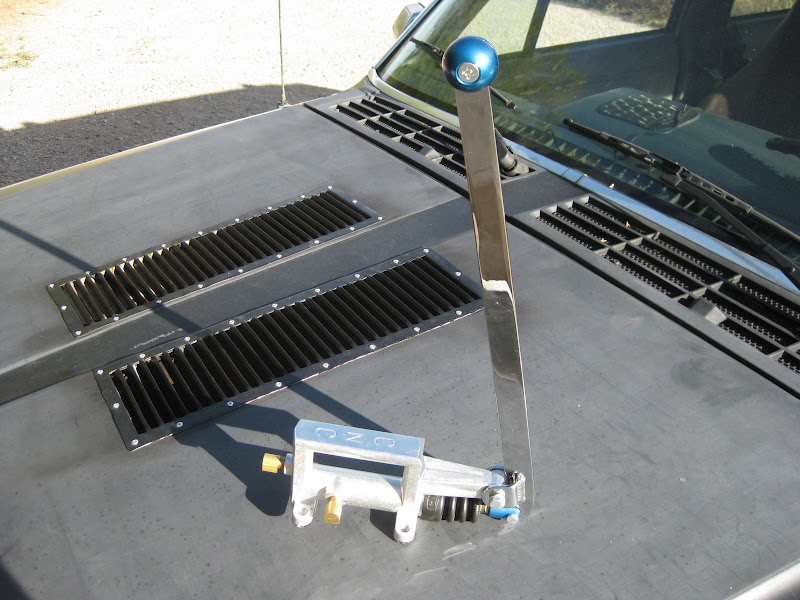
I quickly decided I wanted to mount the brake in the standard rally location, next to the steering wheel sticking up from the trans tunnel. To see where I could mount it, I pulled the console plastic and sliced out the carpet. Here's what I found:

The bulges in the sheetmetal combined with the mounting for the transfer case range selector gate meant the brake would have to be mounted a bit offset to the passenger side. I stuck the brake unit in to see how it would fit in that location:

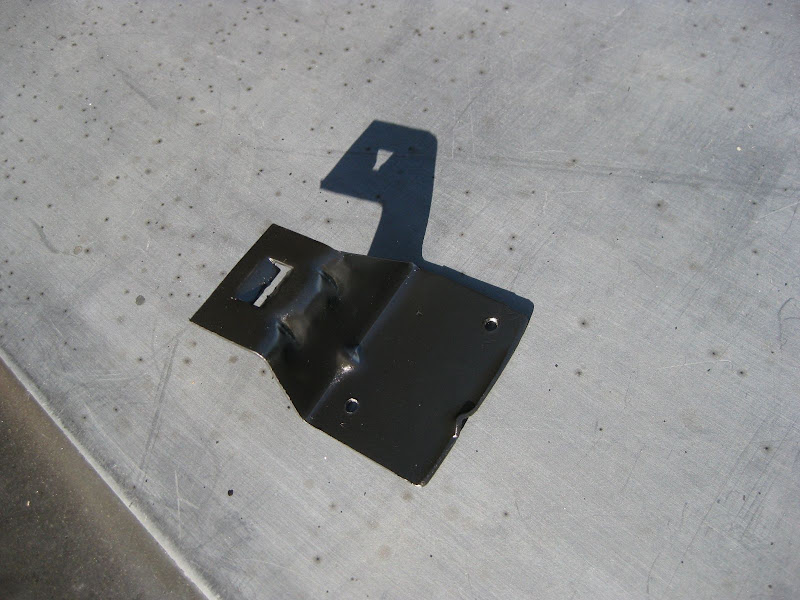
Since I wanted to keep the emergency brake, there was a need to get the original lever out of the way and find another way to actuate it. I decided I could cut the lever off and convert it to be cable actuated (more on that later). Here's how the lever turned out:

I'll repaint it before final assembly. Here's how it clears the HH unit:

The rod sticking out is what connected the button ont he end of the lever to the ratcheting mechanism inside. For now it is bent out of the way.
The HH also had a conflict with the little sheetmetal console mounting bracket. I had to cut off one side and figured I could also paint it. It came out like this:
This shows it mounted with the obvious clearance issue resolved:

More in next post...
Also, apparently newbies are not allowed to post in the "How To" section or I would have put this there. I suppose it will remain here until the forum mods move it.
So, without further ado, the HH XJ install:
First off, I quickly discovered that while "hydraulic handbrake" yields almost no product results, there's a device FWD drag racers use called a "staging brake" that serves the same function. Generally, the "cutting brakes" used in crawlers DO NOT allow normal brake pedal actuation of the rear brakes, which is something I wanted to retain in this application. So, after some import forum surfing, I found a CNC-brand stage brake from thechassisshop for about $150 shipped. It arrived like this:
The handle is chromed steel, handle is blue anodized aluminum, and the cylinder is cast aluminum. It also came with the two 90 degree NPT-to-3/16" elbows. Here's a closeup of the cylinder:
I quickly decided I wanted to mount the brake in the standard rally location, next to the steering wheel sticking up from the trans tunnel. To see where I could mount it, I pulled the console plastic and sliced out the carpet. Here's what I found:
The bulges in the sheetmetal combined with the mounting for the transfer case range selector gate meant the brake would have to be mounted a bit offset to the passenger side. I stuck the brake unit in to see how it would fit in that location:
Since I wanted to keep the emergency brake, there was a need to get the original lever out of the way and find another way to actuate it. I decided I could cut the lever off and convert it to be cable actuated (more on that later). Here's how the lever turned out:
I'll repaint it before final assembly. Here's how it clears the HH unit:
The rod sticking out is what connected the button ont he end of the lever to the ratcheting mechanism inside. For now it is bent out of the way.
The HH also had a conflict with the little sheetmetal console mounting bracket. I had to cut off one side and figured I could also paint it. It came out like this:
This shows it mounted with the obvious clearance issue resolved:
More in next post...
Last edited by RallyXJ; 09-19-2010 at 11:19 PM.
 09-18-2010, 11:46 PM
#2
Newbie
Thread Starter
Join Date: Sep 2010
Posts: 8
Likes: 0
Received 0 Likes
on
0 Posts
Model: Cherokee
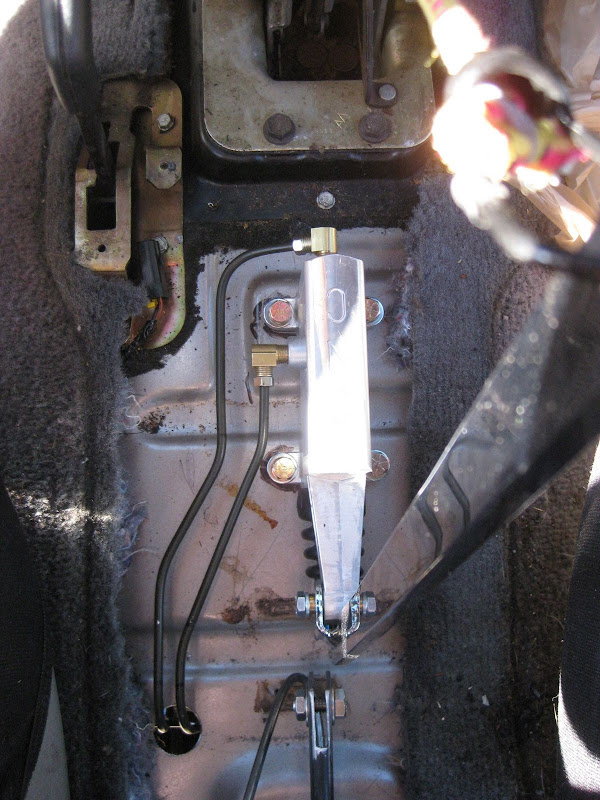
Next, I drilled the holes to mount the HH to the tunnel. It uses four 1/4" holes, which are fortunately somewhat easy to access from beneath. Here are the hole locations:

I had originally planned to use flex lines for the plumbing, but once I got the HH located it actually looked like I could use cheaper hard lines instead. I drilled a single 7/8" hole (or really a 1" hole with a 7/8" hole saw, thanks HF) to the rear of the HH near the E-brake mount where there happened to be a circle pressed into the sheetmetal. Here's the hole:
And from below:

The rearward location means the lines will run to the rear of the transfer case rather than over the top of it. I picked up some 30" long, 3/16" diam. brake lines with the right fittings from NAPA for roughly $8 apiece. After a few minutes with a tubing bender, here are the resulting lines in place:
And from the bottom:

Now knowing how the lines would be run, I could seal the NPT fittings to the HH cylinder. As much as I hate teflon tape, I had to use it to index the fittings. After a few attempts, I ended up with what I needed:

That brings us to now. Next I plan to find some kind of hose clamps or something to hold the lines to the wall of the tunnel. After that, all that's left will be to splice the lines into the rear brake circuit, bleed the system, and get my console pieces to fit over the HH. I'll update as I make more progress.
I had originally planned to use flex lines for the plumbing, but once I got the HH located it actually looked like I could use cheaper hard lines instead. I drilled a single 7/8" hole (or really a 1" hole with a 7/8" hole saw, thanks HF) to the rear of the HH near the E-brake mount where there happened to be a circle pressed into the sheetmetal. Here's the hole:
And from below:
The rearward location means the lines will run to the rear of the transfer case rather than over the top of it. I picked up some 30" long, 3/16" diam. brake lines with the right fittings from NAPA for roughly $8 apiece. After a few minutes with a tubing bender, here are the resulting lines in place:
And from the bottom:
Now knowing how the lines would be run, I could seal the NPT fittings to the HH cylinder. As much as I hate teflon tape, I had to use it to index the fittings. After a few attempts, I ended up with what I needed:
That brings us to now. Next I plan to find some kind of hose clamps or something to hold the lines to the wall of the tunnel. After that, all that's left will be to splice the lines into the rear brake circuit, bleed the system, and get my console pieces to fit over the HH. I'll update as I make more progress.
Last edited by RallyXJ; 09-19-2010 at 11:15 PM.
09-19-2010, 08:57 AM
#3
CF Veteran
Join Date: Jan 2009
Posts: 2,740
Likes: 0
Received 0 Likes
on
0 Posts
Year: 87
Model: Cherokee
Engine: 4.0
Unless you have a selectable rear axle(arb/ox) I think you are going to have issues with stuff breaking. The buggy I drive occasionally has cutting brakes and is able to rear/front digs and the cutting brakes work great. I have also seen ppl use them and twist driveshafts in half
09-19-2010, 06:49 PM
#5
Newbie
Thread Starter
Join Date: Sep 2010
Posts: 8
Likes: 0
Received 0 Likes
on
0 Posts
Model: Cherokee
The only way I could see that happening would be if you hit the handbrake while under hard acceleration and the momentum of the rotating assembly twisted something off. Ill just have to avoid that and make sure I am coasting when I hit the handbrake.
09-19-2010, 09:45 PM
#6
Newbie
Thread Starter
Join Date: Sep 2010
Posts: 8
Likes: 0
Received 0 Likes
on
0 Posts
Model: Cherokee
So, I decided to attack the plumbing today. First step was to slightly raise the driver's side of the Jeep. I figured it might minimize the amount of brake fluid that would come gushing out when I cut the line.

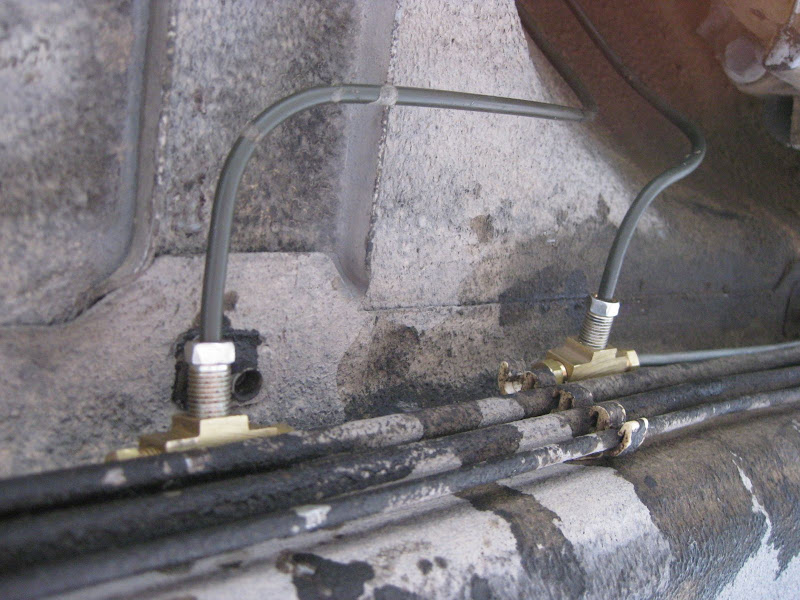
I then bolted the HH unit in place so I could determine exactly where the lines would intersect the stock rear brake line. I used Grade-8 bolts to attach the HH to the floor, and even though I put some fender washers on the underside, the whole thing still ended up having a bit more give than I would like. I may go back and add some reinforcement bars under the tunnel to stiffen it up. I also unlatched the stock rear brake line from the plastic holders and scrubbed it with a wire brush and some sandpaper to remove the undercoating. Here's how it all came out:
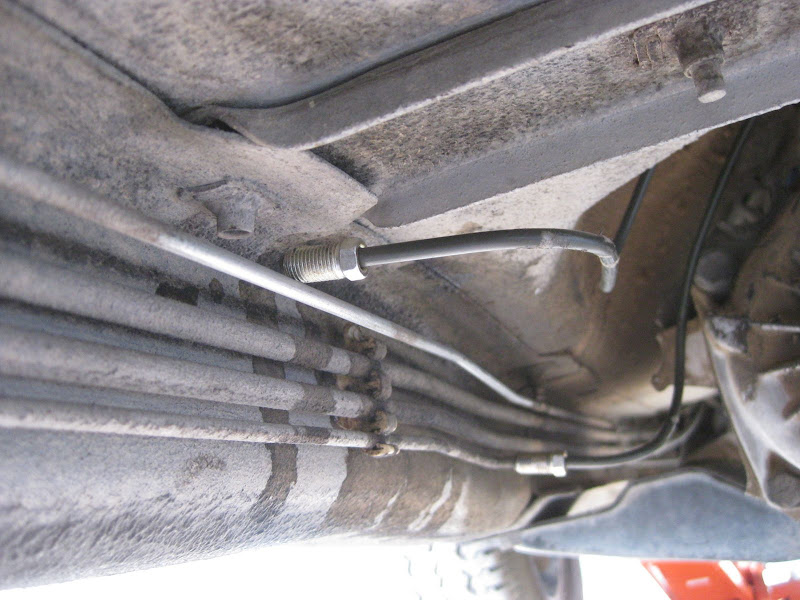
Note how well the 30" lines happened to work out. The top line along the "frame" in the photo is the rear feed. I used a handy little low-profile tubing cutter to slice the line:

NOTE: do not use this tubing cutter for brake lines ("General" brand from Home Depot). When brake fluid got on the handle, it disintegrated completely. I had to use a tiny vise-grip for the second cut.
After that point, I didn't take any photos until the plumbing was sealed to avoid getting fluid on my camera. I used a double-flare tool from Pep Boys on the lines (which were 3/16", FYI). Here's how it turned out:
And a closeup of the fitting combo I went with:

In the event that the HH fails, I can easily swap the plugs into the ports that now go to the HH and run a short line to re-connect the rear brakes.
A final shot of how the plumbing inside ended up:

I plan to slap a grommet around the hole in the tunnel to keep the lines from chafing.
So then I bled the whole system, which took a while, and I must have stopped short of getting the HH master cylinder all the way bled. Right now it will lock up the rear wheels in gravel but only after about three inches of pull on the handle. I plan to re-bleed this week and try it again. After that it will be time to put the console back together. More to come.
I then bolted the HH unit in place so I could determine exactly where the lines would intersect the stock rear brake line. I used Grade-8 bolts to attach the HH to the floor, and even though I put some fender washers on the underside, the whole thing still ended up having a bit more give than I would like. I may go back and add some reinforcement bars under the tunnel to stiffen it up. I also unlatched the stock rear brake line from the plastic holders and scrubbed it with a wire brush and some sandpaper to remove the undercoating. Here's how it all came out:
Note how well the 30" lines happened to work out. The top line along the "frame" in the photo is the rear feed. I used a handy little low-profile tubing cutter to slice the line:
NOTE: do not use this tubing cutter for brake lines ("General" brand from Home Depot). When brake fluid got on the handle, it disintegrated completely. I had to use a tiny vise-grip for the second cut.
After that point, I didn't take any photos until the plumbing was sealed to avoid getting fluid on my camera. I used a double-flare tool from Pep Boys on the lines (which were 3/16", FYI). Here's how it turned out:
And a closeup of the fitting combo I went with:
In the event that the HH fails, I can easily swap the plugs into the ports that now go to the HH and run a short line to re-connect the rear brakes.
A final shot of how the plumbing inside ended up:
I plan to slap a grommet around the hole in the tunnel to keep the lines from chafing.
So then I bled the whole system, which took a while, and I must have stopped short of getting the HH master cylinder all the way bled. Right now it will lock up the rear wheels in gravel but only after about three inches of pull on the handle. I plan to re-bleed this week and try it again. After that it will be time to put the console back together. More to come.
Last edited by RallyXJ; 09-19-2010 at 11:14 PM.
09-19-2010, 09:45 PM
#7
CF Veteran
Join Date: May 2008
Posts: 3,018
Likes: 0
Received 13 Likes
on
13 Posts
Year: 1988
Model: Cherokee
Engine: AMC242
You can also get what is called (usually) a "micro-lock" from an industrial supply house - they're common on forklifts.
However, whether it's an automotive part or an industrial part, they're not generally approved for inspections or tech, and you'll still be required to have a cable-operated park brake. Hydraulic locks are designed for short-term use only, and therefore will bleed off pressure over the space of, say, 15-30 minutes. This is by design - maintaining hydraulic pressure in a braking system (which isn't designed for more than a few minutes' pressure maintenance) is going to result in things blowing out on you - nicht gut.
A hydraulic lock can be useful for technical terrain (I've seen it done where each wheel had a hydraulic lock in some cases, all remotely actuated with control cables on the IP or in the centre console,) but I wouldn't use it for a park brake, since I really don't like overhauling my brakes more than once every few years or so (generally, as part of a resto or restomod...)
Trending Topics
09-19-2010, 10:11 PM
#8
Newbie
Thread Starter
Join Date: Sep 2010
Posts: 8
Likes: 0
Received 0 Likes
on
0 Posts
Model: Cherokee
I think I've installed and used what you're describing in drag cars - in that arena it is referred to as a "line-lock." You hook it into your front circuit and use it to hold front brake pressure while you do your burnout. Unfortunately, the procedure to use a line lock (stomp the brake pedal, hold the button, release the brake pedal, release the button) is much too time consuming for use in a rally context. It's easier (and harder to screw up) to just yank a handle.
Last edited by RallyXJ; 09-19-2010 at 10:14 PM.
09-22-2010, 12:32 PM
#10
MJ>XJ
Join Date: Mar 2009
Location: Griffin, G.A.
Posts: 17,836
Likes: 0
Received 4 Likes
on
3 Posts
Year: 1990
Model: Comanche
Engine: 4.0 I6
PM me when u are complete... ill take your posts out and transfer them to the write up section... but ill be adding a disclaimer to not use this is a parking brake... just to make sure people know this before doing it... let me know man...

Thread
Thread Starter
Forum
Replies
Last Post
NM-XJ
Stock XJ Cherokee Tech. All XJ Non-modified/stock questions go here
18
10-23-2018 04:21 PM
98JGC826
Stock Grand Cherokee Tech. All ZJ/WJ/WK Non-modified/stock questions go here!
2
09-03-2016 08:10 PM
frado2jr
Stock XJ Cherokee Tech. All XJ Non-modified/stock questions go here
14
09-15-2015 10:20 AM
Sandyman
Stock XJ Cherokee Tech. All XJ Non-modified/stock questions go here
1
09-10-2015 09:21 AM
Currently Active Users Viewing This Thread: 1 (0 members and 1 guests)