Jeep Grand Cherokee 1993-1998: How to Replace Rear Shocks
Shocks are incredibly important for proper vehicle handling. Here's how to change the rear ones to get your Jeep back to handling like it should.
This article applies to the Jeep Grand Cherokee ZJ (1993-1998).
Shock absorbers are more important to your vehicle's handling than you might think. If you didn't have them on your vehicle, you would just bounce down the road whenever you hit a bump. They don't support the weight of the vehicle, but they do help control it. That is actually an easy way to figure out if you need some new shocks or not. If you hit a bump and are still feeling the effects from that bump down the road, it's probably time for some new shocks. Shocks are constantly working all the time and as a consequence to this, they wear out. It takes them a while, but they do. They usually either become less effective or they blow a seal. Another good way to tell if it's time for some new shocks is if you see fluid dripping from them or on them. This probably means that the seal for the piston shaft has failed and the fluid inside is now leaking out through it.

When it comes to shocks, there are many options from many different manufacturers to choose from. It's safe to say that there are a set of shocks for every budget and they are not all created equal.
Luckily for you these Jeep Grand Cherokees were essentially truck based, so changing out shocks, especially rear ones, is pretty easy. This is mainly due to the fact that the shock itself is separate from the spring, so there is no need for disassembling an assembly to change the shock out like you would have to do with a strut or coilover.
(Related Article: How to Replace Front Shocks - CherokeeForum.com)

Materials Needed
- 16-21mm sockets
- Ratchet
- 16-21mm wrenches
- Mallet
- Jack and jack stands
- Punch (around the same diameter as the lower shock bolt)
Always remember that if you are going to change out the rear shocks, that you should do both of them at the same time. If you only change one out, you could cause your vehicle to handle improperly.
Step 1 – Raise rear of vehicle and remove rear wheels
Raise the rear of the vehicle and support it on jack stands. For this kind of repair it is actually quite important where you place the jack stands. You want to place them on the frame so that it allows the rear end assembly to hang down to its lowest position. This will help in installing the new shock, as you won't have to compress it very far to slide it into place.
It does look as though it's not necessary to remove the rear wheels to perform the shock replacement, but it will make the job much easier.
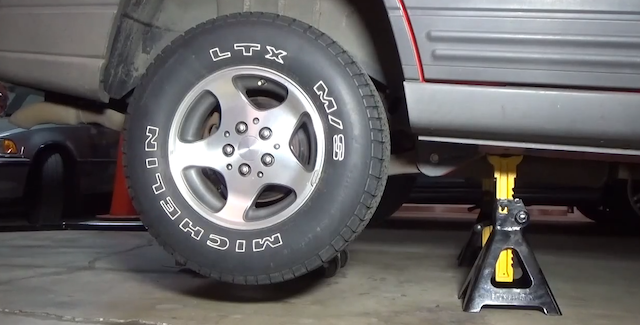
Figure 2. Place vehicle on jack stands. 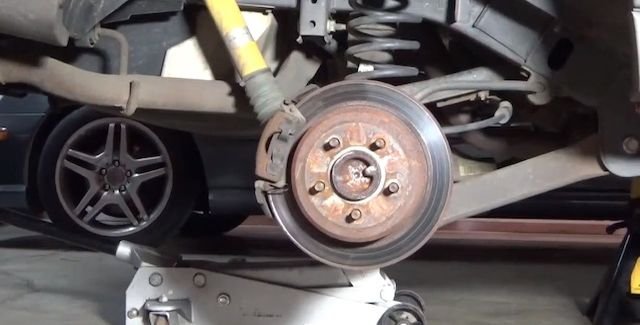
Figure 3. Remove the rear wheels.
Step 2 – Remove the lower mounting bolt
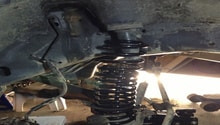
After you have the wheels removed and can now easily see the shock, go ahead and place your floor jack under the center of the differential to apply just a little bit of pressure, just enough so that you can feel that the shock is easy to wiggle where it is mounted. Now go ahead and loosen as well as remove the lower shock nut and bolt. Below is a diagram of the rear suspension so that you can see how it all breaks down.

Figure 4. Diagram of rear suspension. 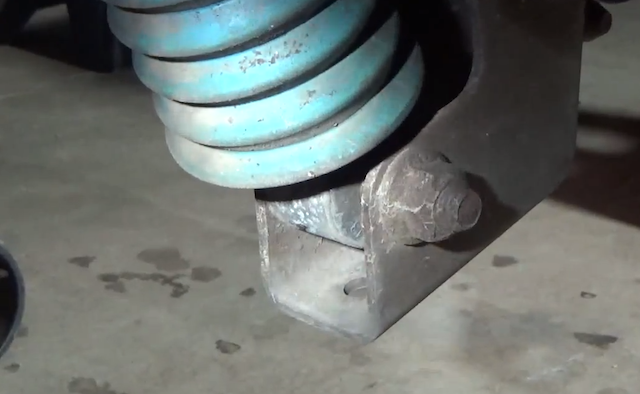
Figure 5. Rear shock's lower bolt and nut.
Step 3 – Remove the upper nut and washer
Now that you have the lower bolt and nut removed, all you will have to do is loosen as well as remove the upper nut and washer to completely remove the shock. The upper part of the shock just slides over a stud that is part of the frame of the vehicle. All that holds it onto that stud is the nut. Once you have removed it, the shock will be free and you can just slide it off of the stud. At this point the shock can be completely removed from the vehicle.

Step 4 – Install new shock
The shocks on both sides are removed the same way. Once you have them both removed, you can now install your new shocks. The process of installation is the reverse as removal. Make sure to position the shock in place before you completely tighten everything down.
- Place the top of the shock over the stud on the frame.
- Place the washer over the stud and thread the nut onto the stud, but don't completely tighten.
- Place the bottom of the shock in the mount on the rear end assembly.
- Slide the bolt through and thread on the nut. (A punch or similar tool might be required to align the holes.)
- Finish tightening the upper nut as well as lower bolt and nut.
- Put the wheels back on the vehicle.
- Lower the vehicle back onto the ground.
Featured Video: How to Replace Shocks
Related Discussions
- Input on Replacing Shocks - CherokeeForum.com
- Shocks, What Do You Recommend - CherokeeForum.com
- Bilstein Shock Replacement - CherokeeForum.com
- '97 Grand Cherokee Rear End Clunk - CherokeeForum.com