Mounting a Liberty light bar on an XJ
 04-02-2012, 09:34 PM
#1
Senior Member
Thread Starter
Join Date: Nov 2010
Location: Cloquet, MN
Posts: 976
Likes: 0
Received 5 Likes
on
5 Posts
Year: 2000 Ltd.
Model: Cherokee
Engine: 4.0L I6
Well here's the finished results.
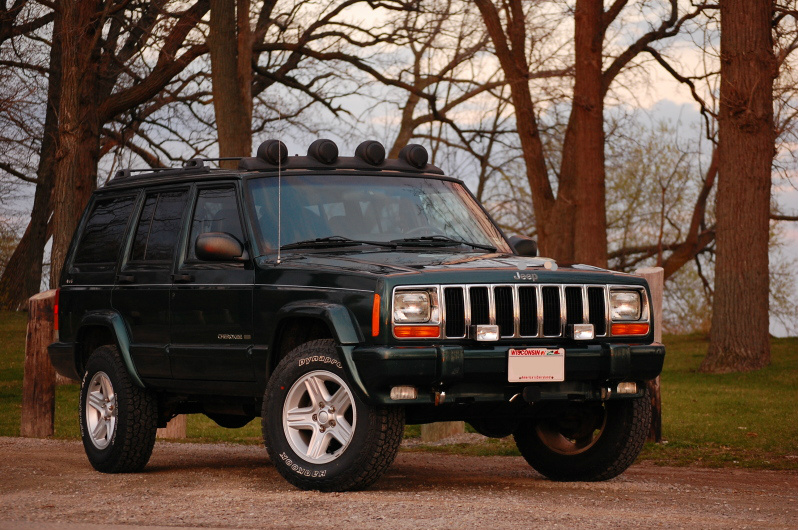
I was reading some posts one night and ran across where someone had put one of these on a MJ. I thought it looked pretty sweet so I started to research it more. Happened to get on eBay and found that someone had a complete unit with lights and covers and even the wiring plug (snipped the wires at the roof) that I was able to snap up in a buy it now for $90. When I found out how much these things went for, even used, I couldn't pass it up for only $90. I figured I could sell it and turn a profit if it didn't work.
So... here's what I ended up doing.
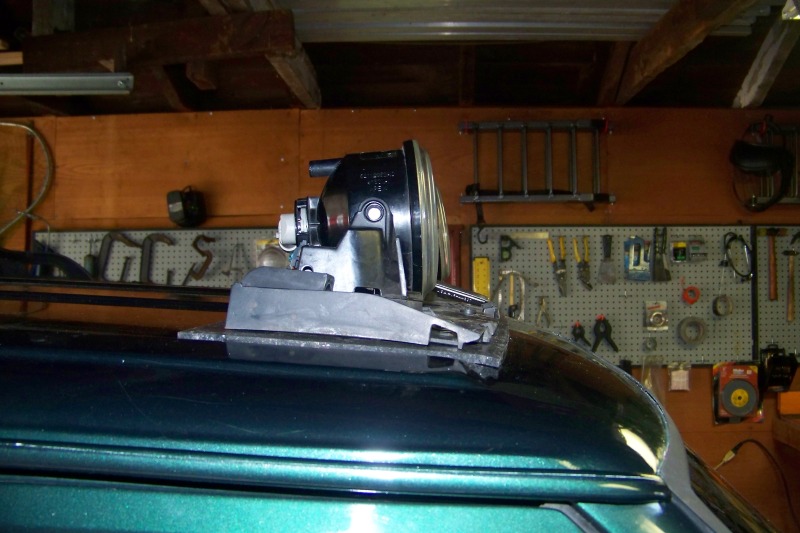
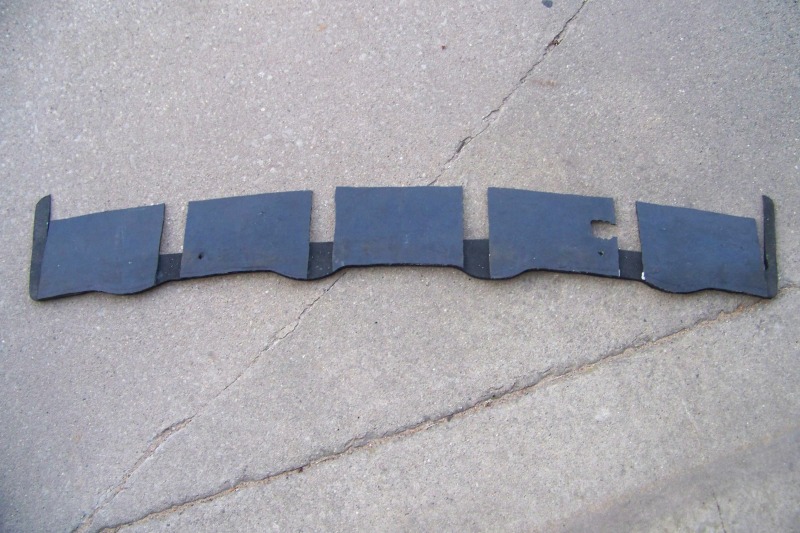
The first problem is the ridges that run the length of the roof. The light bar won't mount flat with them like it can on the flat roof of an MJ. My solution was to make a custom 3/16 spacer out of rubber.
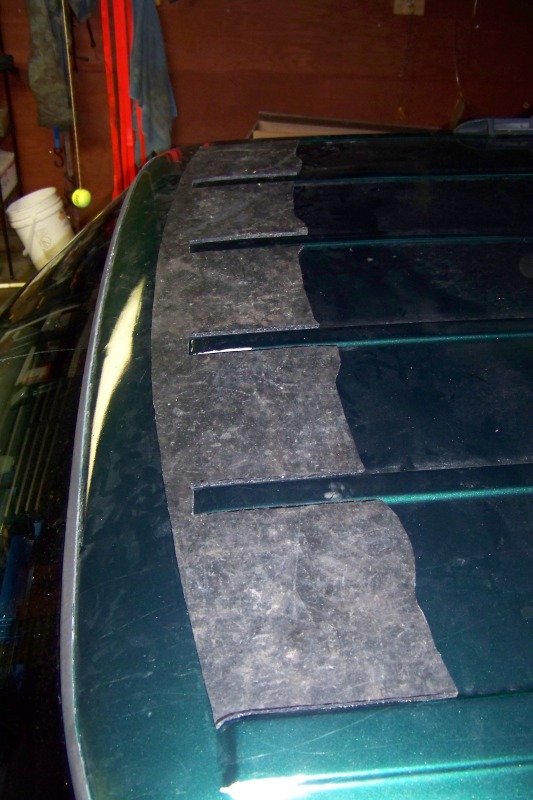
I traced the outline of the light bar onto it and then cut out where needed for the ridges.
Then I laid out the holes for the mounting bolts and the wires and drilled them. You use nutserts as anchor points. The originals were M6, but I just used 1/4-20. To seal around the holes I just use black RTV on the nutsert before putting it in the roof, then smeared the excess around the perimeter.
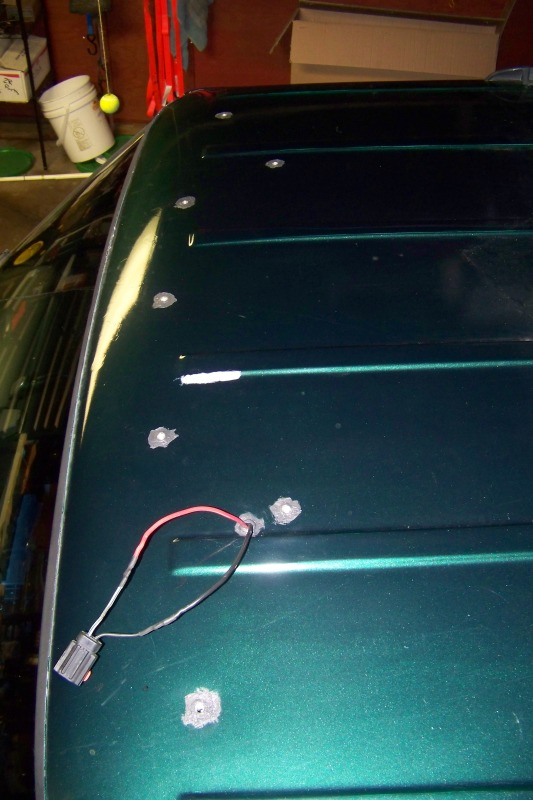
I ran the wires over to the a-pillar and then down to the dash where I had the relay under the steering column. I soldered the connector to the wires after pulling them through the roof so I could get away with a smaller hole. You can't see it but I used a rubber grommet in the roof and then RTVed the crap out of it to seal it up.
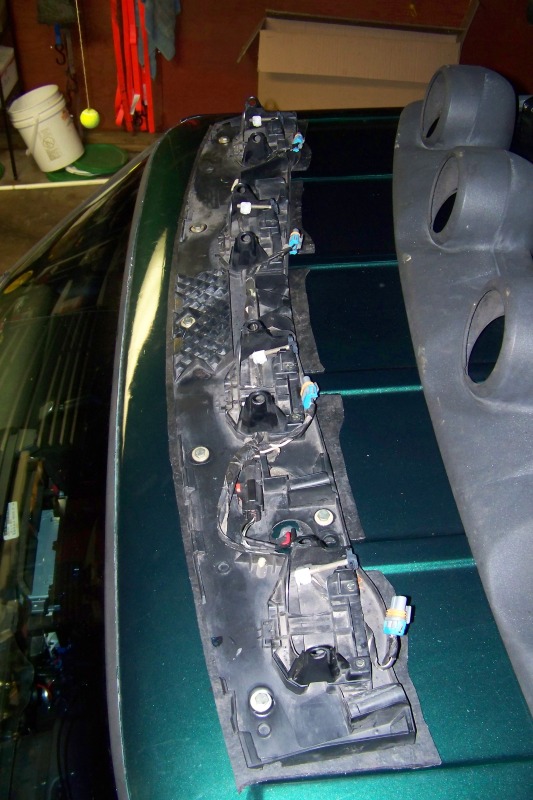
I then bolted the main assembly down to the roof. The light housings are off the bar because they had a film on the inside of the lenses. I took them off to clean them.
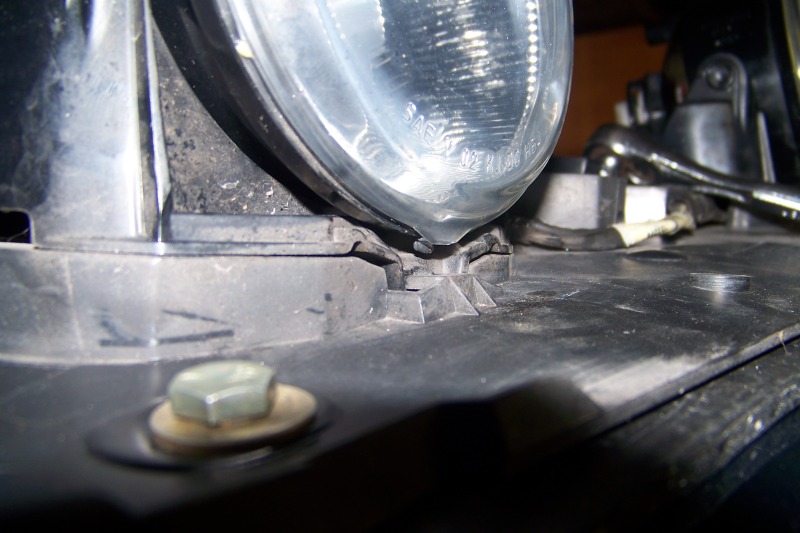
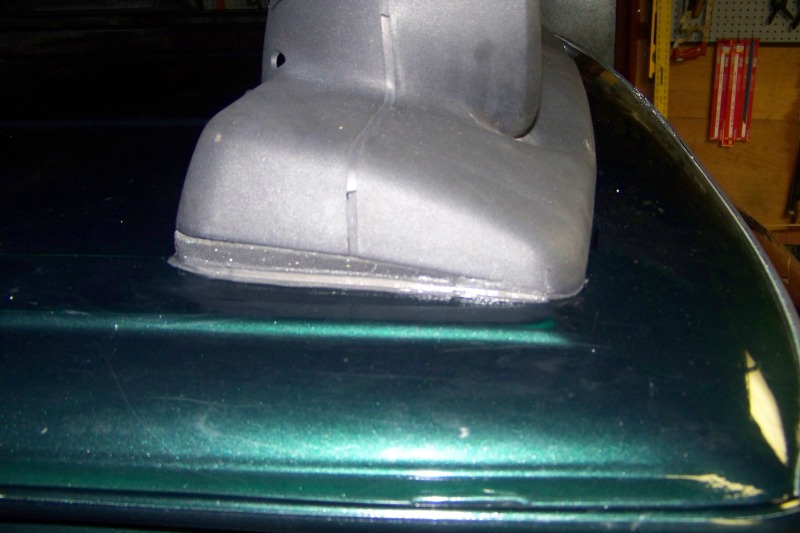
The real fun began when I put the light housings back in and tried to adjust them. There's a screw on the back side that adjusts the lights up and down. Unfortunately, the lights won't adjust far enough down! Of course I realized this AFTER punching eight holes in the roof! In the picture below you can see how the closest light is still pointing up even though it's adjusted all the way down.
This posed a bit of a problem. The reason this is an issue is that the leading part of the Liberty's roof is slanted down and the XJ has a flat roof. The adjustment mechanism isn't intended to be mounted on a roof like what we have.
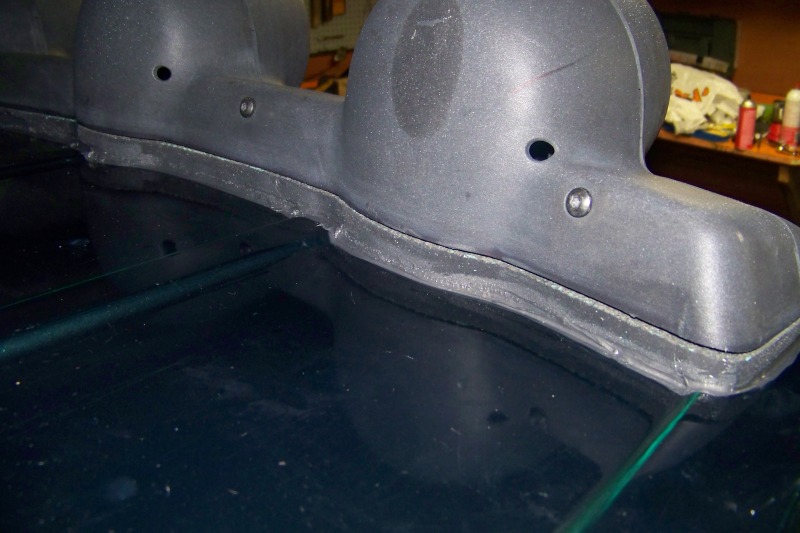
Now, I did NOT want to punch eight more holes into the roof to move it to the front edge. If someone else installs this, you might want to think about doing that. I had to figure out some way to tip the lights farther forward. You can see below where the base of the light hits the mount.
I tried a couple options. First I used the die grinder to remove some of the webbing at the base of the housing. That bought me about half a degree and a less ridged brace for the light. No go on that. I tried using mini washers to space the back of the light brace up (the part that hold the housing comes off the rest of the bar assembly) but that moved the lights far enough forward that they hit the cover and wouldn't allow the individual caps to be installed. My final solution was to make a wedge base.
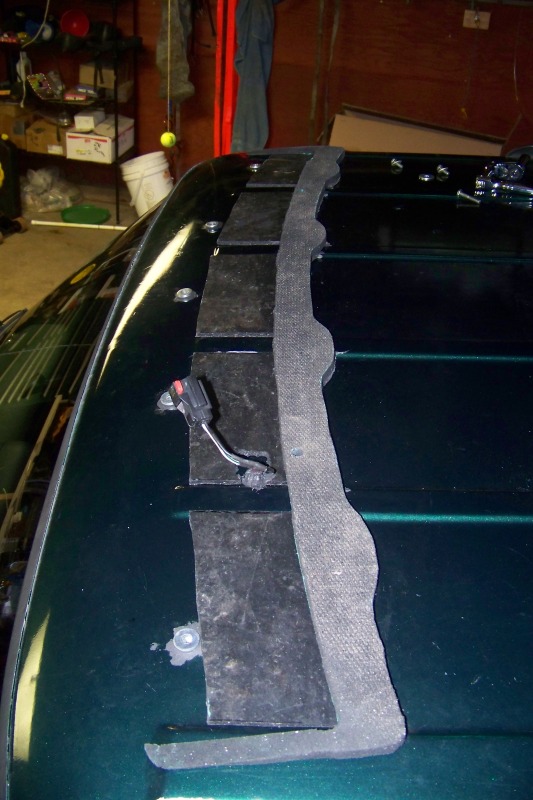
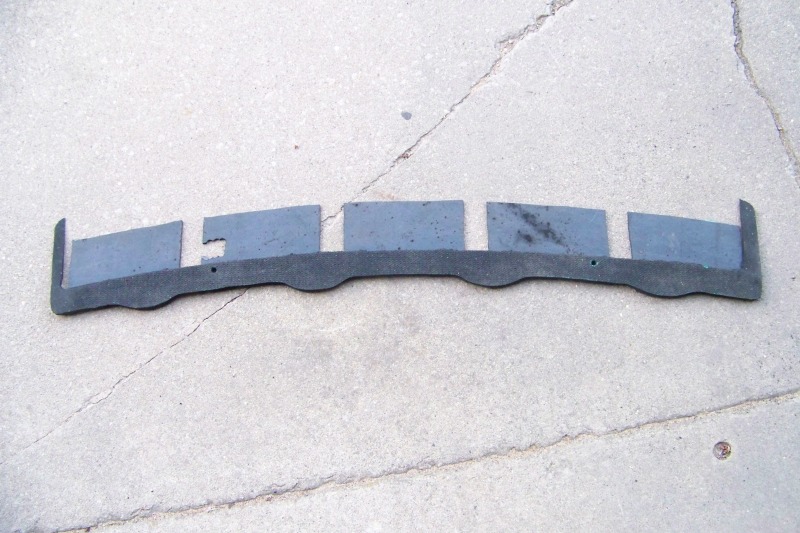
I found some thick rubber that used to be a cow mat used in a barn (freebee from a co-worker) that was about 3/8" or so thick. I can't remember exactly, I'd have to measure it. It's pretty much like an anti-fatigue mat, but for livestock. Pressure washer cleaned it right up.
I had to do a few things to get this to work (sorry, no intermediate pictures.) I trimmed the leading edge of my 3/16" rubber back behind the forward mounting bolts to allow the front edge of the light bar to be flush on the roof. Then I cut the cow mat so that it was a perimeter along the back and sides of the light bar as shown. I also used two washers on each of the front five bolts to keep the front of the base up high enough to be able to get the cover on.
Before I cut the 3/16 rubber I glued the pieces together with RTV. To taper the sides I just used a belt sander. The finished product was one piece that I could move around as needed.
With this I was able to mount the light bar and be able to adjust the lights down far enough to not be shining owls instead of the trail.
Living in Wisconsin, we have to deal with salt, but I also didnt' want mud collecting under the rubber and helping to deteriorate the paint/roof metal. To keep this from happening I ran a bead of black RTV around the base to seal it. I sealed the sides and the back, but not the front. I want to let what ever water gets under the cover to be able to drain out the front and not get trapped. I didn't seal between the plastic and rubber, only between the rubber layers and the rubber/roof. This allows the light bar to be removed if needed.
I was reading some posts one night and ran across where someone had put one of these on a MJ. I thought it looked pretty sweet so I started to research it more. Happened to get on eBay and found that someone had a complete unit with lights and covers and even the wiring plug (snipped the wires at the roof) that I was able to snap up in a buy it now for $90. When I found out how much these things went for, even used, I couldn't pass it up for only $90. I figured I could sell it and turn a profit if it didn't work.
So... here's what I ended up doing.
The first problem is the ridges that run the length of the roof. The light bar won't mount flat with them like it can on the flat roof of an MJ. My solution was to make a custom 3/16 spacer out of rubber.
I traced the outline of the light bar onto it and then cut out where needed for the ridges.
Then I laid out the holes for the mounting bolts and the wires and drilled them. You use nutserts as anchor points. The originals were M6, but I just used 1/4-20. To seal around the holes I just use black RTV on the nutsert before putting it in the roof, then smeared the excess around the perimeter.
I ran the wires over to the a-pillar and then down to the dash where I had the relay under the steering column. I soldered the connector to the wires after pulling them through the roof so I could get away with a smaller hole. You can't see it but I used a rubber grommet in the roof and then RTVed the crap out of it to seal it up.
I then bolted the main assembly down to the roof. The light housings are off the bar because they had a film on the inside of the lenses. I took them off to clean them.
The real fun began when I put the light housings back in and tried to adjust them. There's a screw on the back side that adjusts the lights up and down. Unfortunately, the lights won't adjust far enough down!
Of course I realized this AFTER punching eight holes in the roof! In the picture below you can see how the closest light is still pointing up even though it's adjusted all the way down. This posed a bit of a problem. The reason this is an issue is that the leading part of the Liberty's roof is slanted down and the XJ has a flat roof. The adjustment mechanism isn't intended to be mounted on a roof like what we have.
Now, I did NOT want to punch eight more holes into the roof to move it to the front edge. If someone else installs this, you might want to think about doing that. I had to figure out some way to tip the lights farther forward. You can see below where the base of the light hits the mount.
I tried a couple options. First I used the die grinder to remove some of the webbing at the base of the housing. That bought me about half a degree and a less ridged brace for the light. No go on that. I tried using mini washers to space the back of the light brace up (the part that hold the housing comes off the rest of the bar assembly) but that moved the lights far enough forward that they hit the cover and wouldn't allow the individual caps to be installed. My final solution was to make a wedge base.
I found some thick rubber that used to be a cow mat used in a barn (freebee from a co-worker) that was about 3/8" or so thick. I can't remember exactly, I'd have to measure it. It's pretty much like an anti-fatigue mat, but for livestock. Pressure washer cleaned it right up.
I had to do a few things to get this to work (sorry, no intermediate pictures.) I trimmed the leading edge of my 3/16" rubber back behind the forward mounting bolts to allow the front edge of the light bar to be flush on the roof. Then I cut the cow mat so that it was a perimeter along the back and sides of the light bar as shown. I also used two washers on each of the front five bolts to keep the front of the base up high enough to be able to get the cover on.
Before I cut the 3/16 rubber I glued the pieces together with RTV. To taper the sides I just used a belt sander. The finished product was one piece that I could move around as needed.
With this I was able to mount the light bar and be able to adjust the lights down far enough to not be shining owls instead of the trail.
Living in Wisconsin, we have to deal with salt, but I also didnt' want mud collecting under the rubber and helping to deteriorate the paint/roof metal. To keep this from happening I ran a bead of black RTV around the base to seal it. I sealed the sides and the back, but not the front. I want to let what ever water gets under the cover to be able to drain out the front and not get trapped. I didn't seal between the plastic and rubber, only between the rubber layers and the rubber/roof. This allows the light bar to be removed if needed.
Last edited by Northwoods Snowman; 04-02-2012 at 09:48 PM.

 04-02-2012, 10:09 PM
#4
Senior Member
Join Date: Oct 2009
Location: NW Florida
Posts: 537
Likes: 0
Received 2 Likes
on
2 Posts
Year: 1999
Model: Grand Cherokee
Engine: 4.0
Wow man, nice work! What is the width of that thing? What kind and wattage bulb do they use? I'd also like to request some pictures of how well it lights up the trail.
04-02-2012, 10:15 PM
#5
CF Veteran
Join Date: Feb 2011
Location: Long Beach, Ca
Posts: 3,500
Likes: 0
Received 0 Likes
on
0 Posts
Year: 2000
Model: Cherokee
Engine: 4.0 I6
Dude you scored!!! I was too busy upgrading my headlights to H4 and forgot to check ebay for the liberty bar!!!! Nice work I'm def using your method when I get one.
You think that light bar can handle more than 55w bulbs? Cuz my headlights are are 80/100w and stock 55w on light bar would be outshined by the headlights.
You think that light bar can handle more than 55w bulbs? Cuz my headlights are are 80/100w and stock 55w on light bar would be outshined by the headlights.
Trending Topics
04-02-2012, 10:49 PM
#8
CF Veteran
Join Date: Apr 2011
Location: Indianapolis
Posts: 4,825
Likes: 0
Received 2 Likes
on
2 Posts
Year: '99 and '91
Model: Cherokee
Looks good!
Ive been telling my pops I'm doing this if I ever see one at a junkyard. It looks clean and more aerodynamic than a metal light bar.
Also wanna see them at night.
Ive been telling my pops I'm doing this if I ever see one at a junkyard. It looks clean and more aerodynamic than a metal light bar.
Also wanna see them at night.
04-03-2012, 07:27 AM
#10
Senior Member
Thread Starter
Join Date: Nov 2010
Location: Cloquet, MN
Posts: 976
Likes: 0
Received 5 Likes
on
5 Posts
Year: 2000 Ltd.
Model: Cherokee
Engine: 4.0L I6
The lights are 55w Hellas. I don't know if they could handle higher wattage. Wiring is only 14 ga on the bar so I wouldn't push the wattage. I'm waiting for my lens to come back from Nikon for my SLR before taking the night shots. I have to get some pics of my switches too.
04-03-2012, 09:17 AM
#11
Newbie
Join Date: Mar 2012
Location: Northern California
Posts: 19
Likes: 0
Received 0 Likes
on
0 Posts
Year: 1991
Model: Cherokee
Engine: 4.0 HO
This is really neat! Good job!
So do you think the angle would be ok if you mount them right up front above the windshield?
So do you think the angle would be ok if you mount them right up front above the windshield?
04-03-2012, 12:00 PM
#13
CF Veteran
Join Date: Feb 2011
Location: Long Beach, Ca
Posts: 3,500
Likes: 0
Received 0 Likes
on
0 Posts
Year: 2000
Model: Cherokee
Engine: 4.0 I6
Originally Posted by BotakBeng
Nice job!
Thx for the pics!!!
Those light bar aren't cheap huh?
Thx for the pics!!!
Those light bar aren't cheap huh?
04-03-2012, 12:10 PM
#14
Senior Member
Thread Starter
Join Date: Nov 2010
Location: Cloquet, MN
Posts: 976
Likes: 0
Received 5 Likes
on
5 Posts
Year: 2000 Ltd.
Model: Cherokee
Engine: 4.0L I6
Maybe. I think it would still need some sort of shimming, but I wasn't able to bolt it down tight to see where it would end up. It would definately help, but I would suspect some sort of riser (though smaller for sure) would need to be used on the back. The main reason I mounted it where I did was that it fit the contour of the roof the best. it's going to have to bend and be formed more to fit the leading edge of the roof.