Smittybilt XRC rear bumper & Tire Carrier Install and Review
 03-28-2014, 04:03 PM
#1
CF Veteran
Thread Starter
Join Date: Aug 2011
Location: San Jose
Posts: 1,994
Likes: 0
Received 7 Likes
on
7 Posts
Year: 89
Model: Cherokee
Engine: 4.0 I6
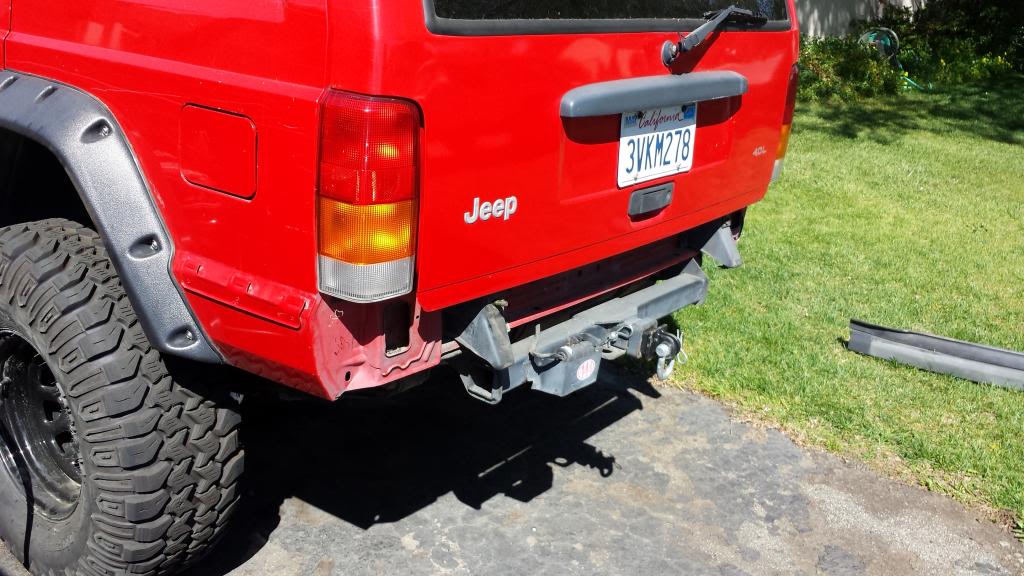
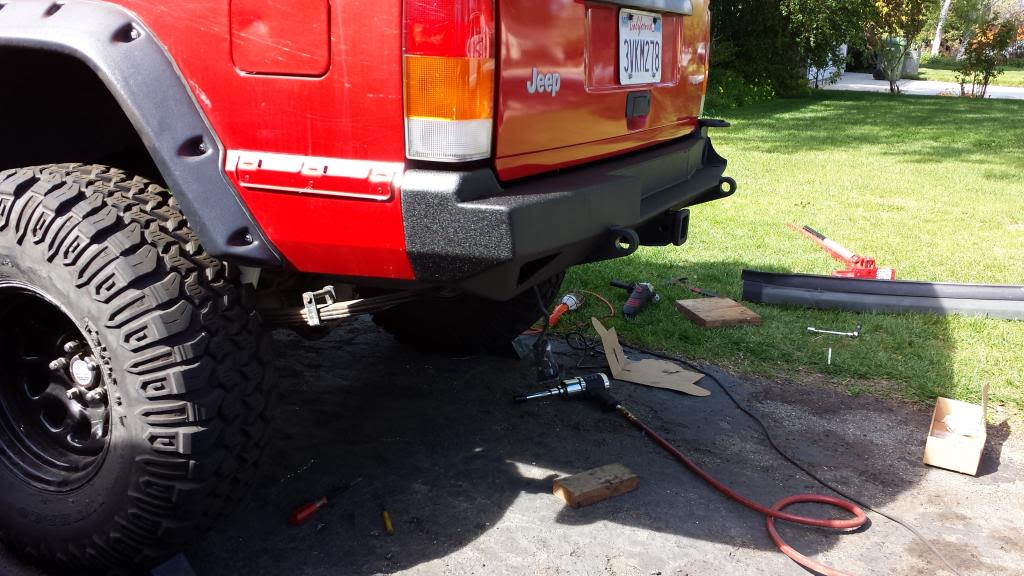
This is a review regarding the Smittybilt Xrc rear bumper and tire carrier on a 97 Jeep Cherokee sport. I am not endorsed by Smittybilt, or any of its affiliates in any way. I bought the product and installed it, here's what i have to say about it. I highly recommend having air tools for this installation. It took me about 5 and a half hours to install the entire bumper, except for the quarter panel guards which come with it. This installation was my experience with this bumper. Your situation may be different, so please follow the instructions supplied with your bumper for proper installation.
Step 1: Remove your bumper and bumper end-caps, along with the stock bumper mounts. save the bolts for the mounting brackets, as you will use them to mount the new bumper.
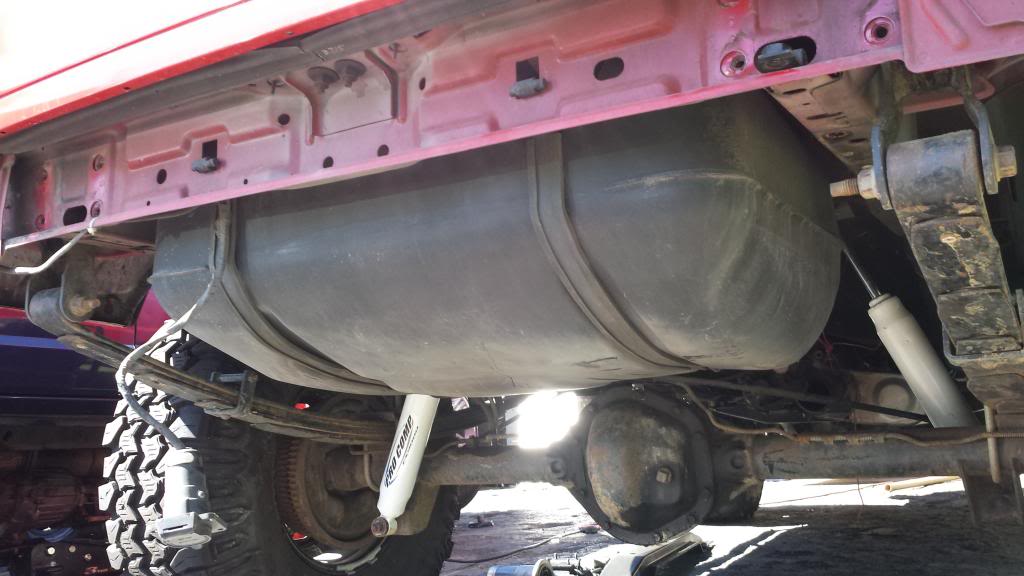
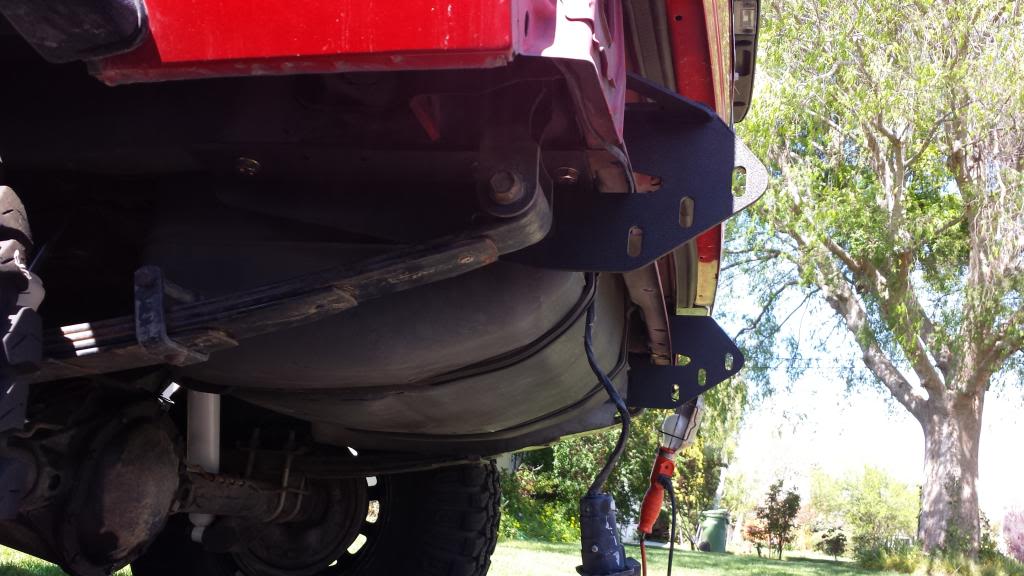
step 2: Remove your hitch and nut strips. this also requires you remove your exhaust hangar on the passenger side, and also the cover for the gas fill lines on the drivers side. On the passenger side, the OE exhaust hangar mounts with studs, which are easily removed
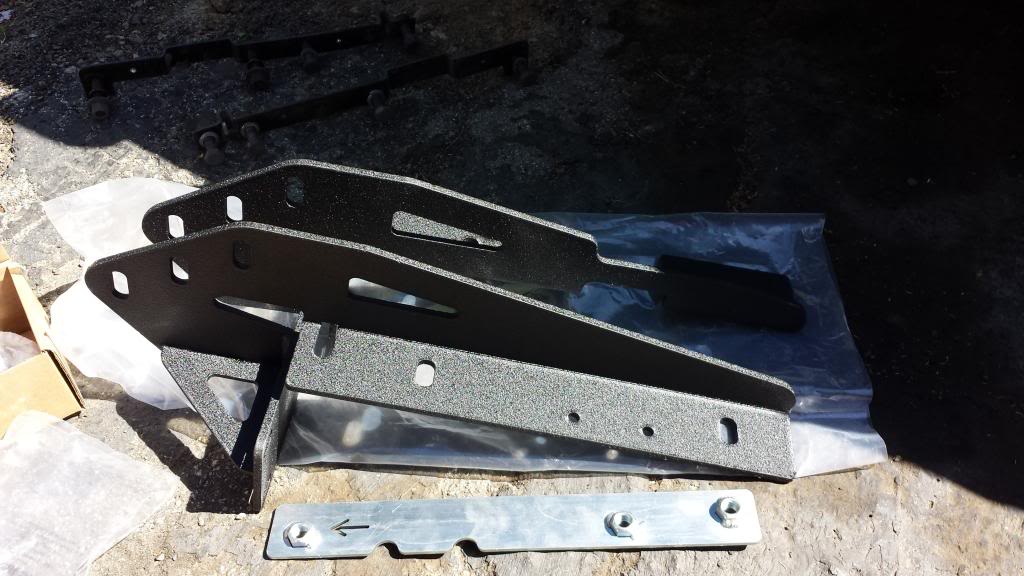
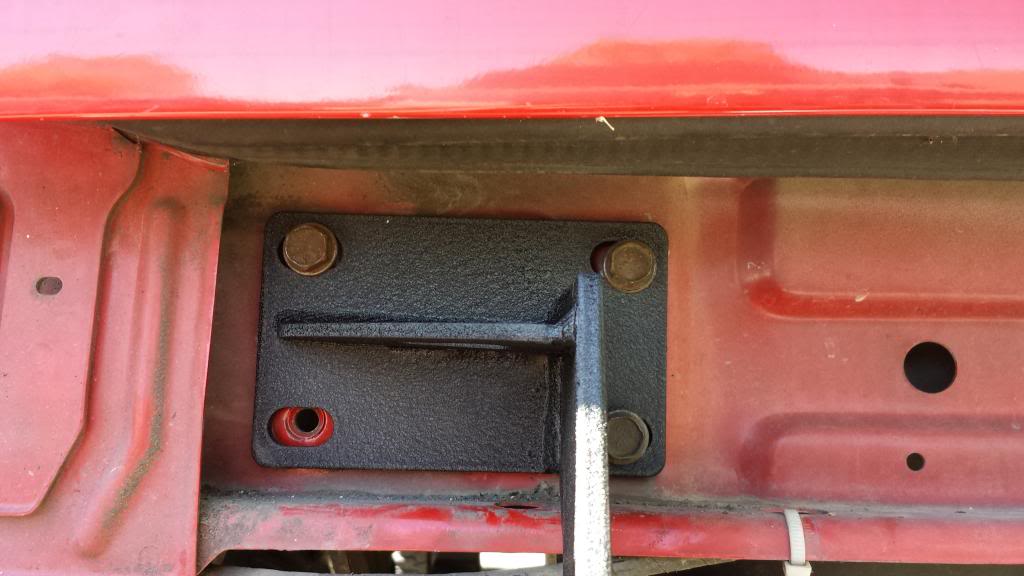
step 3: Place the new nut strips into the frame rails. on the passenger side, I had to clear some metal so the strip would fit all the way inside, for some reason the hole in my jeep was a little small. In this picture below, you see the driver side nut strip, and also the brackets which will attach to the nut strips.
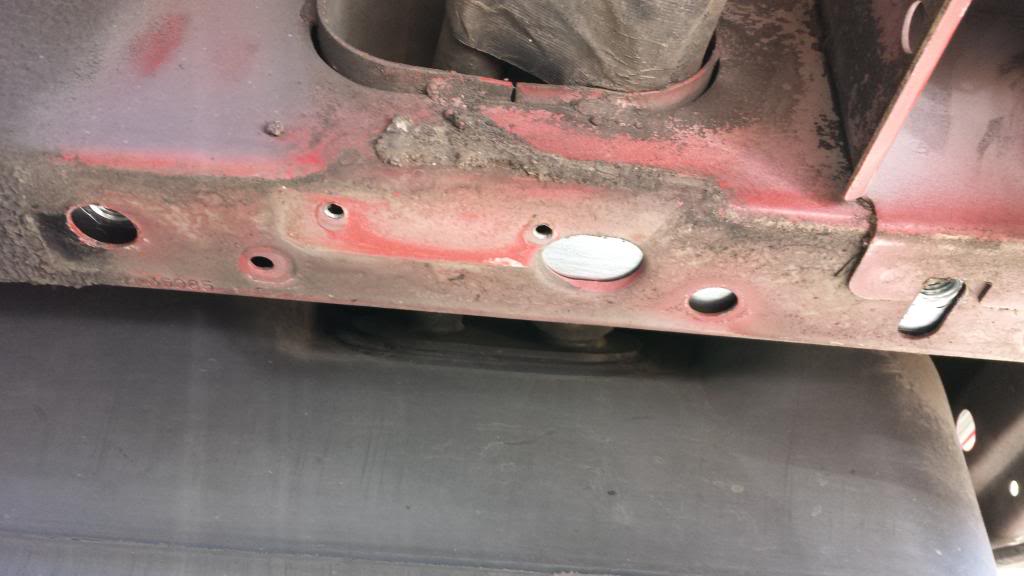
Here's something I ran into that was less than satisfactory. the factory nut strips are bent to accomodate the little dimple hole here, the new ones from smittybilt are not, so the strip sits on top of them, somewhat cantilevered. once the bumper sinches those down, the strip will be bent.
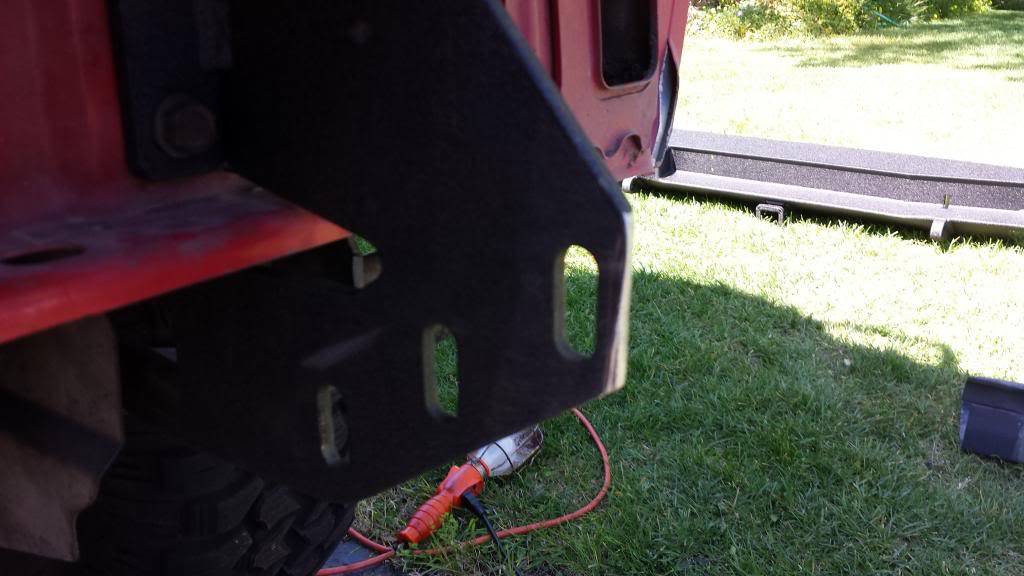
step 4: Install the brackets using the stock bumper retaining bolts, as well as the ones supplied for the nut strips. Due to the sizing of the holes in the new brackets, I had a hard time getting everything in place. Once all the bolts had been started, there was little room for movement of the brackets, so it was very difficult for me to achieve the 34" between the inside of the brackets. leave the bolts snug, but not fully tightened yet in case you want to make adjustments.
Another thing to take note of. I, along with other xj's have issues with one of the OE bumper bracket bolts hitting the shackle on up travel. So react accordingly. In my case, I had already removed the bolt, so there was nothing to put in its place anyway.
Step 5: Install the latch pin, and little rubber jobbies into the bumper before raising it into place, it only gets harder once the bumper is on. then raise the bumper into place, secure it with one bolt per side and check the fit. once the bumper was lightly bolted, I used a hi lift to lift the bumper into its final position. Make adjustments to the brackets as neccessary, then completely tighten everything into its final posititon.
I had an issue with one of the brackets hitting a weld on the back of the passenger side d-ring tab, so I had to cut off a bunch of the material to get it to fit properly. (bad picture)
Step 6: install the tire carrier. You'll need to put one of the stainless steel washers underneath the carrier so it doesn't scrape everything as it rotates into position. there wasn't enough clearance normally, so I took my angle grinder and took off the powder coating on the top and bottom of the carrier hinge. Yes, lining up the carrier, and the washer so the hinge pin can go in is a huge pain. I bent the washer several times, but the top of the carrier and a hammer makes truing it pretty easy. I didn't get any pictures of this step. I also had to remove the large washer from the latch pin, it was hitting the carrier before engaging the latch.
Step 7: assemble the tire mount, and install in your preferred position. I flipped the lug nuts over and used a washer to draw in the studs. I like air ratchets haha that would have sucked without one. once that's all assembled get it all tightened then mount your tire.
Step 8: make sure all your nuts and bolts are tight, install the quarter panels and find somewhere to mount your trailer wiring. you'll also have to relocate your license plate so its somewhere visible.
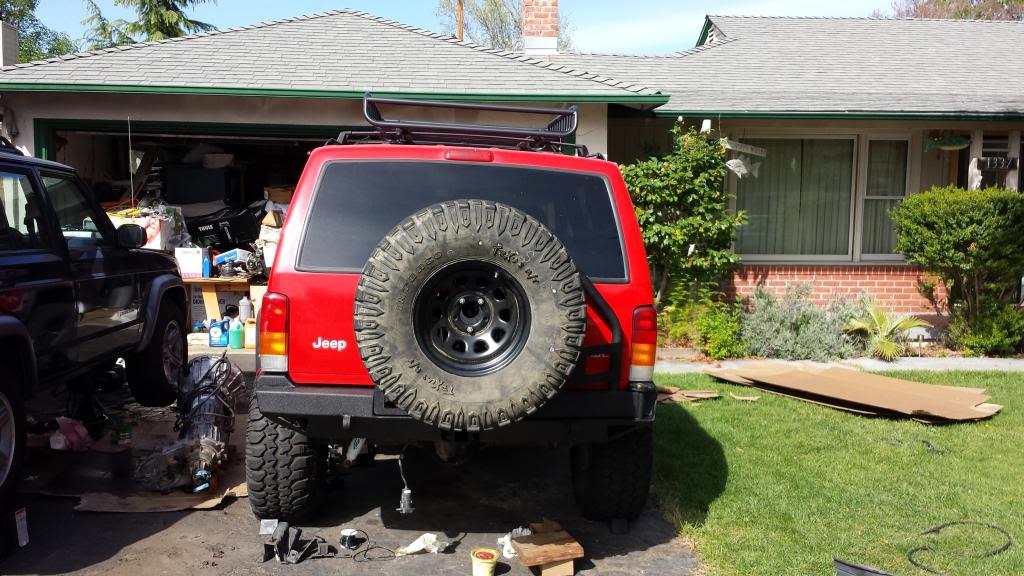
Id give this product a 7 or 8 out of 10. the powdercoating, bracketry, and fit of things is kind of wonky. But for the price, it has a lot of goodies: tire carrier, jerry can mount, high lift mount, and quarter panel guards.
Step 1: Remove your bumper and bumper end-caps, along with the stock bumper mounts. save the bolts for the mounting brackets, as you will use them to mount the new bumper.
step 2: Remove your hitch and nut strips. this also requires you remove your exhaust hangar on the passenger side, and also the cover for the gas fill lines on the drivers side. On the passenger side, the OE exhaust hangar mounts with studs, which are easily removed
step 3: Place the new nut strips into the frame rails. on the passenger side, I had to clear some metal so the strip would fit all the way inside, for some reason the hole in my jeep was a little small. In this picture below, you see the driver side nut strip, and also the brackets which will attach to the nut strips.
Here's something I ran into that was less than satisfactory. the factory nut strips are bent to accomodate the little dimple hole here, the new ones from smittybilt are not, so the strip sits on top of them, somewhat cantilevered. once the bumper sinches those down, the strip will be bent.
step 4: Install the brackets using the stock bumper retaining bolts, as well as the ones supplied for the nut strips. Due to the sizing of the holes in the new brackets, I had a hard time getting everything in place. Once all the bolts had been started, there was little room for movement of the brackets, so it was very difficult for me to achieve the 34" between the inside of the brackets. leave the bolts snug, but not fully tightened yet in case you want to make adjustments.
Another thing to take note of. I, along with other xj's have issues with one of the OE bumper bracket bolts hitting the shackle on up travel. So react accordingly. In my case, I had already removed the bolt, so there was nothing to put in its place anyway.
Step 5: Install the latch pin, and little rubber jobbies into the bumper before raising it into place, it only gets harder once the bumper is on. then raise the bumper into place, secure it with one bolt per side and check the fit. once the bumper was lightly bolted, I used a hi lift to lift the bumper into its final position. Make adjustments to the brackets as neccessary, then completely tighten everything into its final posititon.
I had an issue with one of the brackets hitting a weld on the back of the passenger side d-ring tab, so I had to cut off a bunch of the material to get it to fit properly. (bad picture)
Step 6: install the tire carrier. You'll need to put one of the stainless steel washers underneath the carrier so it doesn't scrape everything as it rotates into position. there wasn't enough clearance normally, so I took my angle grinder and took off the powder coating on the top and bottom of the carrier hinge. Yes, lining up the carrier, and the washer so the hinge pin can go in is a huge pain. I bent the washer several times, but the top of the carrier and a hammer makes truing it pretty easy. I didn't get any pictures of this step. I also had to remove the large washer from the latch pin, it was hitting the carrier before engaging the latch.
Step 7: assemble the tire mount, and install in your preferred position. I flipped the lug nuts over and used a washer to draw in the studs. I like air ratchets haha that would have sucked without one. once that's all assembled get it all tightened then mount your tire.
Step 8: make sure all your nuts and bolts are tight, install the quarter panels and find somewhere to mount your trailer wiring. you'll also have to relocate your license plate so its somewhere visible.
Id give this product a 7 or 8 out of 10. the powdercoating, bracketry, and fit of things is kind of wonky. But for the price, it has a lot of goodies: tire carrier, jerry can mount, high lift mount, and quarter panel guards.
 03-30-2014, 01:59 PM
#3
Newbie
Join Date: Jan 2014
Location: Oklahoma
Posts: 6
Likes: 0
Received 0 Likes
on
0 Posts
Year: 86. 94. 95. 00
Model: Cherokee
Engine: CNG 4.0
Nice write up. Im planning on ordering mine today or tomorrow for my 94 xj. Where did you order it from? Best price i can find including shipping is from Quadratech for 774.97 delivered. Also i have JK sahara wheels on my xj and was curious about the bolt pattern on the tire carrier, do you thik i could relocate the studs or would i need another wheel adapter to bolt up my spare? looks great on yours and im excited to se it on mine.
03-30-2014, 10:20 PM
#4
CF Veteran
Thread Starter
Join Date: Aug 2011
Location: San Jose
Posts: 1,994
Likes: 0
Received 7 Likes
on
7 Posts
Year: 89
Model: Cherokee
Engine: 4.0 I6
Thanks!
Ill grab one tonight, though they're not installed yet. My flares are in the way and I can't find the tool I need to remove them.
Thanks!
I ordered it through seriousoffroadproducts.com Frank is one hell of a guy, and I would be surprised if you could find better customer service from an online source. It was a gift, so I can't speak on the price, but trust me your money is well spent at serious off-road.
Regarding the wheel studs, they aren't attached when you get the bumper. It has holes to accommodate several bolt patterns, so you just put the studs in the holes you want and tighten the crap out of them (without your wheel on there) till they're flush in the back.
Post a pic here when you get it!
Ill grab one tonight, though they're not installed yet. My flares are in the way and I can't find the tool I need to remove them.
Nice write up. Im planning on ordering mine today or tomorrow for my 94 xj. Where did you order it from? Best price i can find including shipping is from Quadratech for 774.97 delivered. Also i have JK sahara wheels on my xj and was curious about the bolt pattern on the tire carrier, do you thik i could relocate the studs or would i need another wheel adapter to bolt up my spare? looks great on yours and im excited to se it on mine.
I ordered it through seriousoffroadproducts.com Frank is one hell of a guy, and I would be surprised if you could find better customer service from an online source. It was a gift, so I can't speak on the price, but trust me your money is well spent at serious off-road.
Regarding the wheel studs, they aren't attached when you get the bumper. It has holes to accommodate several bolt patterns, so you just put the studs in the holes you want and tighten the crap out of them (without your wheel on there) till they're flush in the back.
Post a pic here when you get it!

 06-07-2014, 02:53 PM
#7
Seasoned Member
Join Date: Jul 2011
Posts: 375
Likes: 0
Received 0 Likes
on
0 Posts
Model: Cherokee
I just installed this exact bumper, and I would never recommend this bumper to my worst enemy. The frame bracket holes were off, the hinge mount was out of spec, the swing sagged and rubs when I close it. I may just have a lemon, but I am not happy. The design is horrible either way. they didn't take into account that you can't ever have a gas tank skid with this bumper, and there is only one available hole for the exhaust hanger. You also can't use shackle relocation mounts that tie into the frame. There is a reason this bumper is cheap. It's mass produced in China and the quality control is obviously not that great. I would rather have saved up the difference for a Hanson or JCR bumper.
The only thing I like about it, is that it looks great, holds my tire, high lift jack, and if I had them, jerry cans. I am in the process of warranting the bumper and either getting a new one, or my money back.
The only thing I like about it, is that it looks great, holds my tire, high lift jack, and if I had them, jerry cans. I am in the process of warranting the bumper and either getting a new one, or my money back.
Trending Topics
06-07-2014, 05:00 PM
#8
CF Veteran
Thread Starter
Join Date: Aug 2011
Location: San Jose
Posts: 1,994
Likes: 0
Received 7 Likes
on
7 Posts
Year: 89
Model: Cherokee
Engine: 4.0 I6
My inbox is full so ill respond here. I have not yet relocated my license plate, though when I do I plan to either zip tie it to the wheel, or put a little bracket off of the jerry can area and mount it to that so it is flat across the back. As for the hinge, I ground off the powder coat from the top and bottom of the hinge on the carrier. Then I was able to fit just one of the washers under the hinge which kept things from hittting. After using this bumper for a couple of months, I would have rather ponied up and got a different bumper made in the u s of a with quality design and materials.
 06-07-2014, 09:31 PM
#10
CF Veteran
Thread Starter
Join Date: Aug 2011
Location: San Jose
Posts: 1,994
Likes: 0
Received 7 Likes
on
7 Posts
Year: 89
Model: Cherokee
Engine: 4.0 I6
I never posted a picture of the quarter panel armor, which I had to trim heavily to fit my panels after installing Napier v2 flares, youd never know, the flares hide the cut.
01-12-2015, 10:14 PM
#11
Newbie

Join Date: Sep 2014
Posts: 6
Likes: 0
Received 0 Likes
on
0 Posts
Model: Cherokee
Just got this bumper and love the looks and utility. I have a 99 xj with skid plate and 4wheels parts installed it in about 8 hours. Can't say anything bad about it yet but then again I didn't bust my knuckles installing it!
01-12-2015, 11:46 PM
#12
CF Veteran
Thread Starter
Join Date: Aug 2011
Location: San Jose
Posts: 1,994
Likes: 0
Received 7 Likes
on
7 Posts
Year: 89
Model: Cherokee
Engine: 4.0 I6
Nice. Keep an eye on the latch pin, mine damn near fell out on the trail. And did you also put on the quarter panel guards? Don't trust the rivets, one good hit and that plate is coming off.
01-13-2015, 05:18 AM
#13
CF Veteran
Join Date: Feb 2010
Location: Missoula, MT
Posts: 3,353
Likes: 0
Received 1 Like
on
1 Post
Year: 1999
Model: Cherokee
Engine: Golen 4.6 Stroker, AFE Headers, 62mm TB, 24 LB Injectors, Brown Dog kit, HF Cat, 3" Exhaust
If what the one guy said is true and you can no longer have a gas tank skid, it will be my deciding factor to go with the JCR
Last edited by Ianf406; 01-13-2015 at 05:21 AM.
01-13-2015, 07:04 AM
#14

The bumper was designed using an XJ that did not have a gas tank skid, but that does not mean it can't be used with a skid. You will have to do some modifications to run the factory or after-market skid (no I haven't done it myself).
01-13-2015, 12:18 PM
#15
CF Veteran
Thread Starter
Join Date: Aug 2011
Location: San Jose
Posts: 1,994
Likes: 0
Received 7 Likes
on
7 Posts
Year: 89
Model: Cherokee
Engine: 4.0 I6
Did your gas tank skid plate fit? I noticed you said " with skid plate" but didn't really clarify which one... I assume the gas tank skid as it is the only applicable one in this thread but you never know lol. Any pics of those mounts next to the skid.
If what the one guy said is true and you can no longer have a gas tank skid, it will be my deciding factor to go with the JCR

