
 09-21-2015, 04:08 PM
Last edit by: IB Advertising
See related guides and technical advice from our community experts:
Browse all: Exterior
- Jeep Grand Cherokee WJ 1999 to 2004 How to Replace Side Mirror
Step by step instructions for do-it-yourself repairs.
Browse all: Exterior

Rear Quarter Pannel Replacement
05-07-2011, 11:51 PM
#1
Junior Member
Thread Starter

Join Date: Feb 2011
Location: Charleston
Posts: 45
Likes: 0
Received 0 Likes
on
0 Posts
Year: 1999
Model: Cherokee
Engine: 4.0
Intro:
I did a lot of research before doing this job and found that no one has any step by step how to for rear quarter replacement.
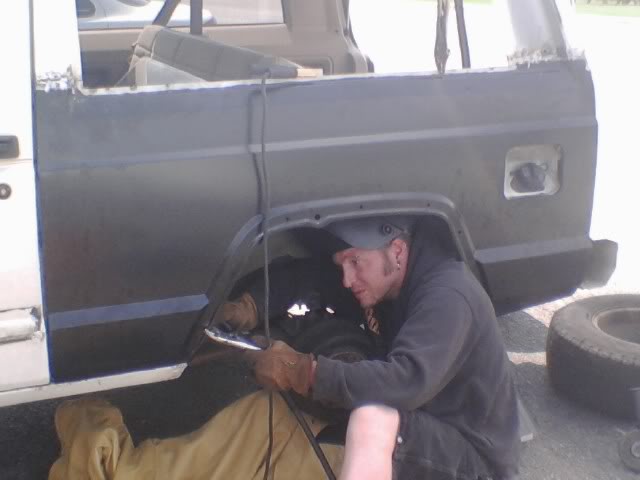
First off this is a two person job and is a lot of work. It took me and my friend 24 hours total work time over a period of three days. If you have some what decent mechanical ability's you should be able to accomplish this job. Remember to be patient, this is not a job you want to rush.
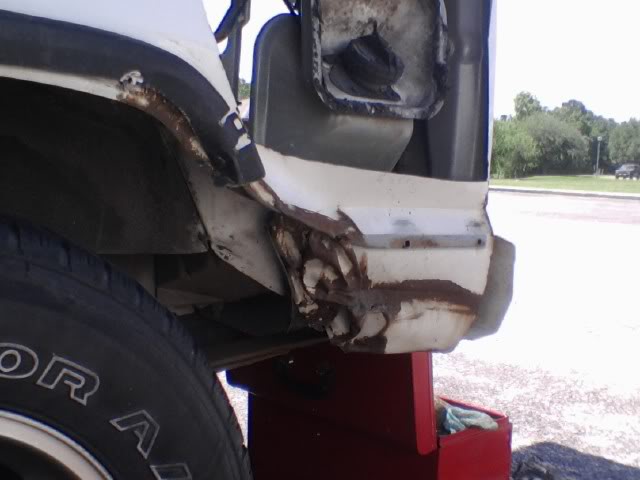
Reason for a new quarter:
Tools required:
Ball Ping Hammer
Cold Chisel
Angle Grinder
Couple Cutting Wheels (For Grinder)
Couple Grinding Wheels (For Grinder)
Vice Grips (X2 preferably)
Socket Set
Some Decent 20 Gauge Rope
Screw Driver Set (not the crappy kind with interchangeable bits.)
Welder
Sander
Body filler
Info to know:
The rear quarter panel for an older style Cherokee (84-96) will fit the newer style Cherokee (97-01) The only difference is three holes for the rear bumper corner cover, which can be easily drilled if you plan on keeping the original fender flares like myself.
My Jeep Is a 99 2 door. The process for a four door is the same except the rear quarter is smaller.
I ordered my rear quarter panel from Raybuck Autobody Parts. On their picture for the drivers side quarter panel it shows no gas tank. I guess they just got lazy and flipped the picture of the passenger side, because it does have the gas tank cut out. I can't speak for the 4Dr rear quarter but the 2Dr rear quarter fits like a glove
Now to the business:
Prep:
1 - Remove the tail light
2 - Remove Gas tank door
3 - Remove the plastic interior trim around the window
4 - Remove the plastic molding by the window
5 - Remove the Window, This can be done without cutting the seal Carefully pry the seal (from the outside) around the window out from underneath glass with a flat head screw driver while a friend holds the glass. Work the seal from behind the glass until the window is free. Remove window and seal.
6 - Remove The fender flare and bumper corner piece
7 - Remove the fender flair retaining bracket by unbolting it from the bracket (warning you are most likely going to break the bolts off these darn things they are so brittle.
8 - Cover the Interior with something thick and fire retardant ( I didn't do this and now I have little burnt holes in my carpet from the slag of welding.)
9 - Cover the mirror of the side you will be working on ( I also failed to do this and my mirror is now etched with little pieces of metal.)
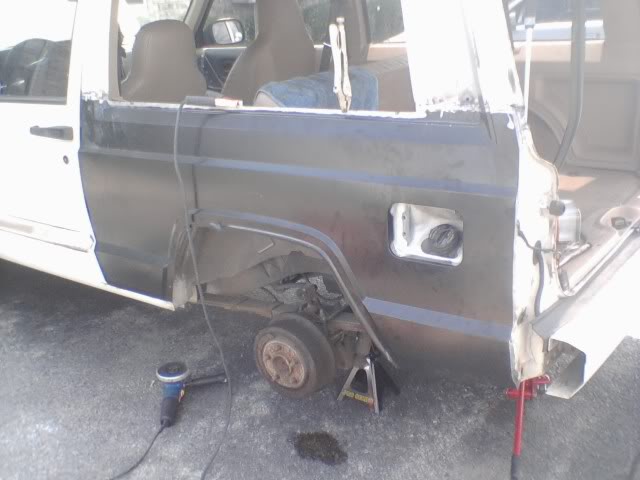
10- Remove the tire and put a jack stand underneath the vehicle
Note: If the panel is being replaced on the drivers side you will need to remove the metal cover over the gas tank fill lines.
The Main Event:
Alright here's the big part
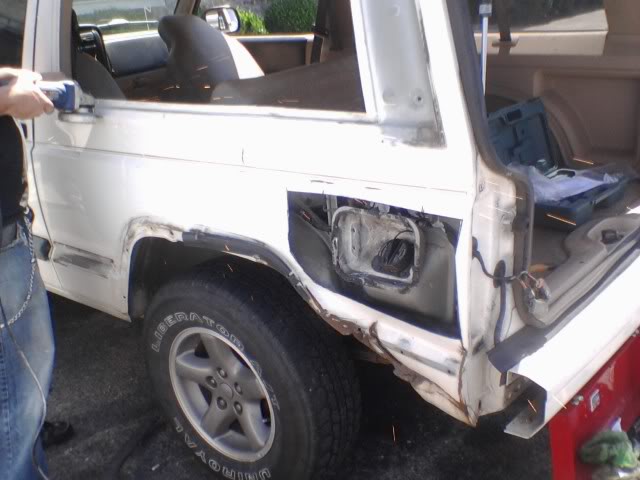
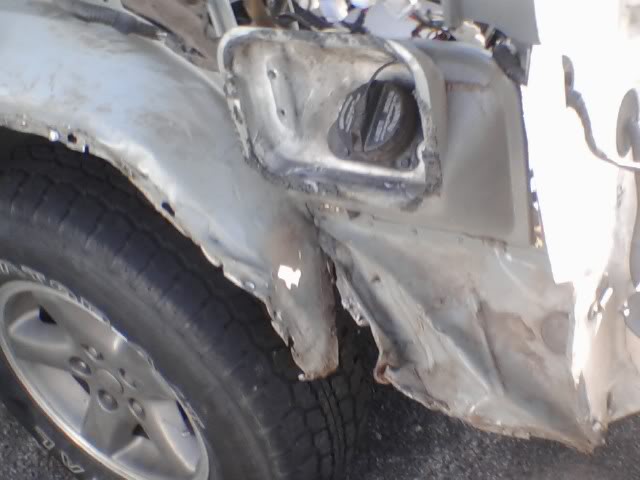
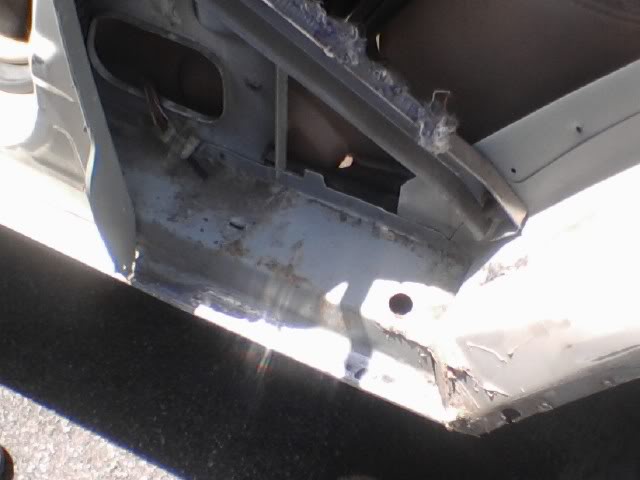
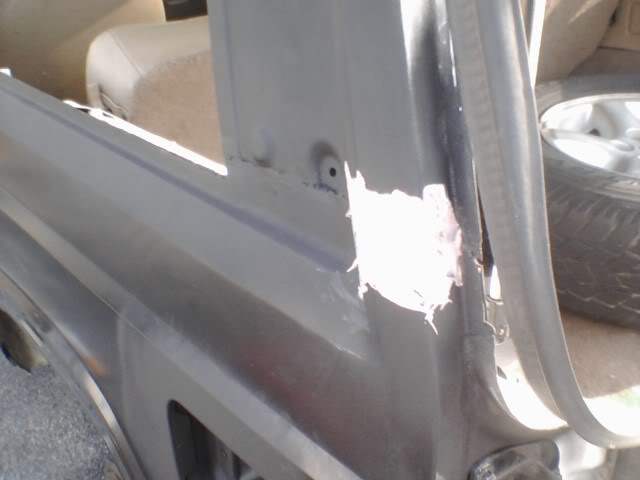
1 - Start out by putting a cutting wheel on that grinder. (this is the fun part). Cut around all edges of the rear quarter leaving an inch of comfort room around all edges (I started with the gas tank door.) Shown below.
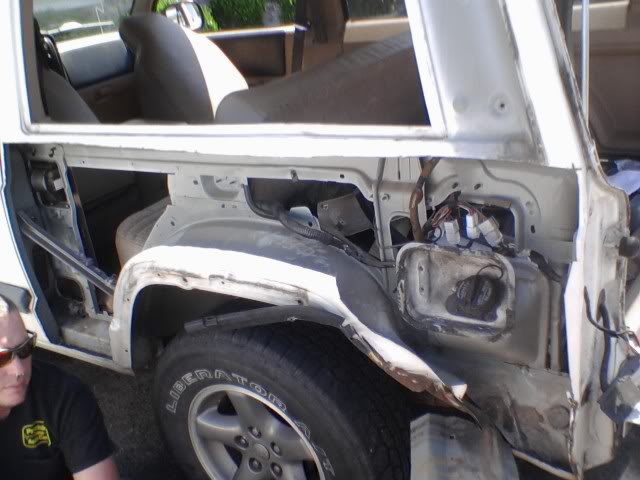
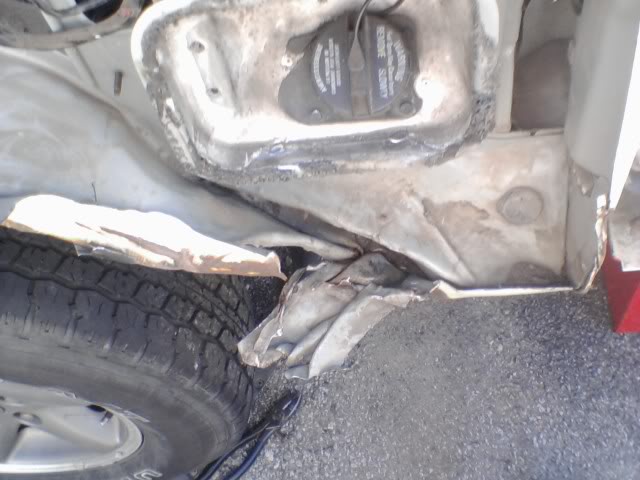
2 - If your rear quarter is damaged (Which I suspect it is considering most people don't change a rear quarter for fun.) You'll have to remove the damaged metal... That's the time consuming part, the metal on mine was folded 3 times over.Remove the mangled nonsense... I cant really tell you how to do because I haven't seen the damage. (Hopefully it's not as bad as mine was).
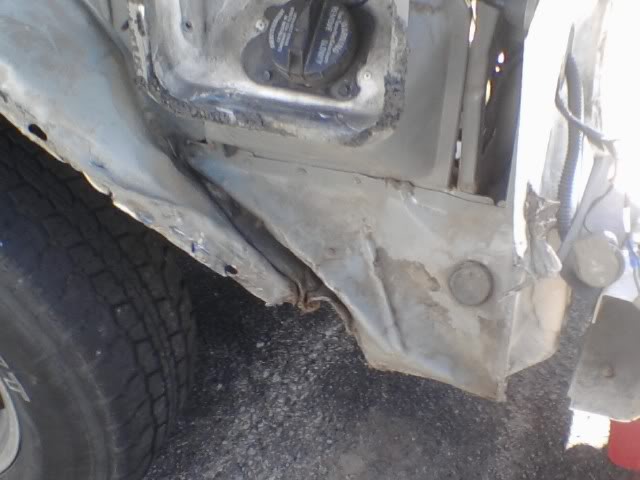
3 - Now Change that cutting wheel to a grinding wheel on that grinder and get grinding. Grind all the tack welds on the outer edges of the quarter panel. (The thinner you grind it down the easier it will be to pop the tack welds off.)
4 - It's Hammer Time! Take the Cold chisel and ball ping hammer and wedge the chisel in between the two layers of steel above each tack weld and hammer out the welds. Be careful not to damage the inner side of the metal you'll need it for the new panel.
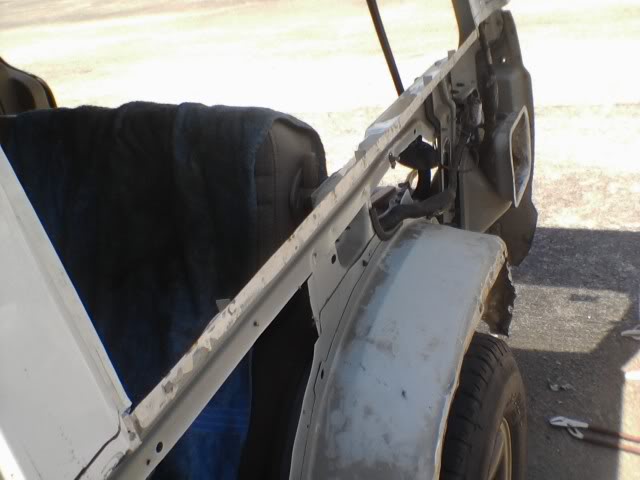
5 - Now you need to clean up the the old welds on all the outer edges where the panel used to be. Including the back side of the wheel well. These areas need to be bare metal so the welds will stick.
6 - Take the new panel and sand the edges that will make contact with the body off the Jeep. These need to be bare metal so the welds will stick.
Unfortunately I forgot to take pictures of this
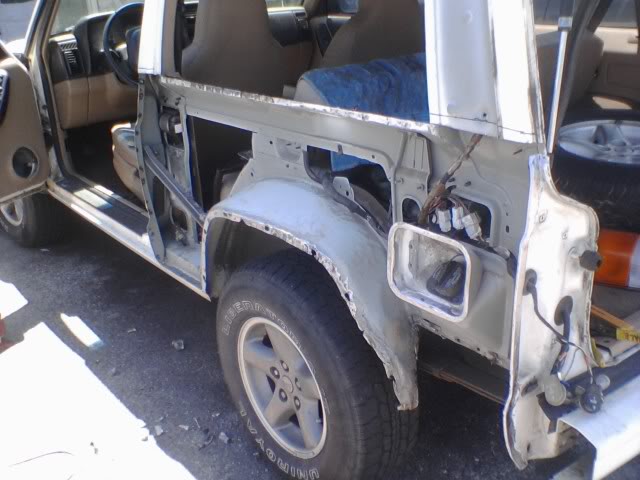
7 - Place the new panel up against the Jeep and vice grip it down wear the window used to be. Take a sharpie and mark where the top of the panel meets the rest of the body of the car.
8 - Remove the panel and cut the excess metal off, sand around it so that the welds will stick.
9 - Apply sealant around the edges of the gas cap to prevent gas fumes from entering the vehicle.
10a-Note: (2dr Models) From the factory the bottom of the panel just aft of the door is tack welded several times. It is nearly impossible to get a welder stinger in there so you'll need some JB Weld to do the job for you.
(2dr Models) Apply a generous amount of JB weld on the under side of the bottom of the panel closest to the door
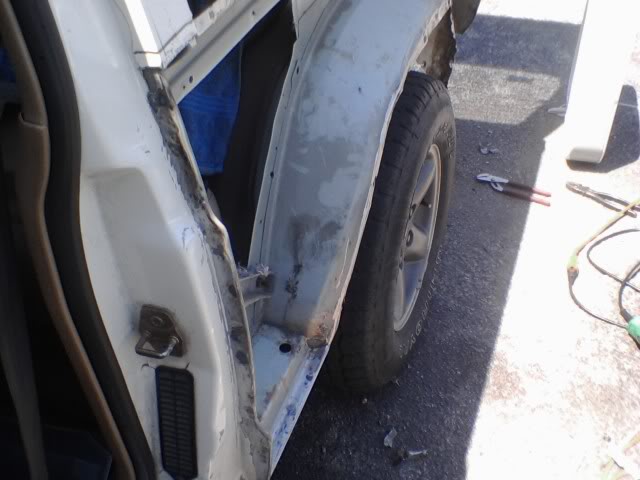
10- Place the panel against the jeep making sure all the folds line up and the inner lip is in the gas cap cavity. Hold the panel in place with a few vice grips wear the window used to be.
11- Tack weld the panel in place and remove the vice grips. Tack weld along all the edges to secure the panel permanently
12- Tack weld inside the wheel well
13- Weld a bead along the top of the panel wear it meets the rest of the vehicle. (Unfortunately neither me or my friend are great welders and we didn't have gas so our welds were ugly which meant more cleaning up.)
14- Grind down the welds to make them smooth
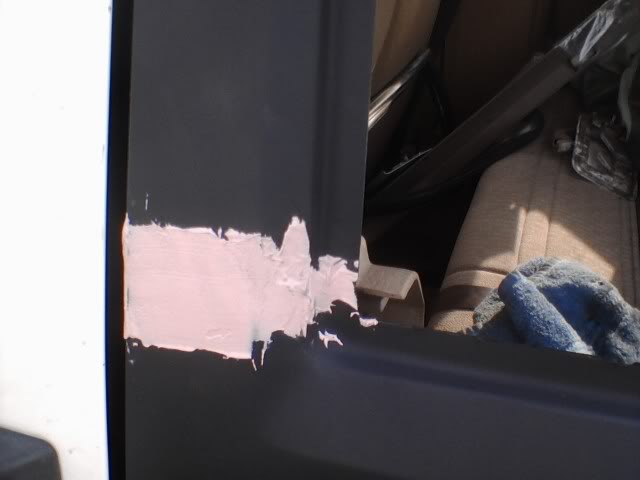
15- Paint over the bare metal with either a self etching primer or a rust protecting primer. I used black Rustoleum primer.
16- If your welds are as ugly as mine on the seams you may need to apply some body filler. I'm sure you can read a can of Bondo so I'll leave that to you.
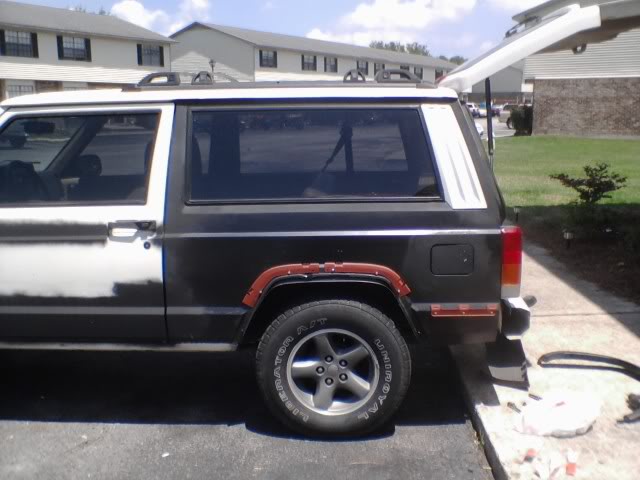
17- Now the panel is done. No more hideous dent. No more people asking you what happened.

Rapping up:
Put the tire back on. If you want to keep the original fender flares and corner bumper covers then you'll need to reinstall the retaining brackets. For the corner bumper cover you'll have to drill three holes for the small clip and rivet it in. For the fender flare if you broke the bolts off you'll have to grind the old ones out (they are tack welded in) and replace the hardware.

I know its in the picture above but you have to put everything back together... I will explain how to reinstall the window because many people don't know how.
Window Install:
1 - Take the seal and place it around the window
2 - Take the 20 gauge rope and place it inside the back side of the seal
3 - Place the window against the vehicle from the inside pull the rope inward this will draw the seal into the car. You will have to work it pretty good. Soaking the seal in soapy water will help (just messy)
Close:
I think that is every thing and I hope this is helpful. Once done if done correctly it will look like nothing ever happened. Good Luck!
I did a lot of research before doing this job and found that no one has any step by step how to for rear quarter replacement.
First off this is a two person job and is a lot of work. It took me and my friend 24 hours total work time over a period of three days. If you have some what decent mechanical ability's you should be able to accomplish this job. Remember to be patient, this is not a job you want to rush.
Reason for a new quarter:
Tools required:
Ball Ping Hammer
Cold Chisel
Angle Grinder
Couple Cutting Wheels (For Grinder)
Couple Grinding Wheels (For Grinder)
Vice Grips (X2 preferably)
Socket Set
Some Decent 20 Gauge Rope
Screw Driver Set (not the crappy kind with interchangeable bits.)
Welder
Sander
Body filler
Info to know:
The rear quarter panel for an older style Cherokee (84-96) will fit the newer style Cherokee (97-01) The only difference is three holes for the rear bumper corner cover, which can be easily drilled if you plan on keeping the original fender flares like myself.
My Jeep Is a 99 2 door. The process for a four door is the same except the rear quarter is smaller.
I ordered my rear quarter panel from Raybuck Autobody Parts. On their picture for the drivers side quarter panel it shows no gas tank. I guess they just got lazy and flipped the picture of the passenger side, because it does have the gas tank cut out. I can't speak for the 4Dr rear quarter but the 2Dr rear quarter fits like a glove
Now to the business:
Prep:
1 - Remove the tail light
2 - Remove Gas tank door
3 - Remove the plastic interior trim around the window
4 - Remove the plastic molding by the window
5 - Remove the Window, This can be done without cutting the seal Carefully pry the seal (from the outside) around the window out from underneath glass with a flat head screw driver while a friend holds the glass. Work the seal from behind the glass until the window is free. Remove window and seal.
6 - Remove The fender flare and bumper corner piece
7 - Remove the fender flair retaining bracket by unbolting it from the bracket (warning you are most likely going to break the bolts off these darn things they are so brittle.
8 - Cover the Interior with something thick and fire retardant ( I didn't do this and now I have little burnt holes in my carpet from the slag of welding.)
9 - Cover the mirror of the side you will be working on ( I also failed to do this and my mirror is now etched with little pieces of metal.)
10- Remove the tire and put a jack stand underneath the vehicle
Note: If the panel is being replaced on the drivers side you will need to remove the metal cover over the gas tank fill lines.
The Main Event:
Alright here's the big part
1 - Start out by putting a cutting wheel on that grinder. (this is the fun part). Cut around all edges of the rear quarter leaving an inch of comfort room around all edges (I started with the gas tank door.) Shown below.
2 - If your rear quarter is damaged (Which I suspect it is considering most people don't change a rear quarter for fun.) You'll have to remove the damaged metal... That's the time consuming part, the metal on mine was folded 3 times over.Remove the mangled nonsense... I cant really tell you how to do because I haven't seen the damage. (Hopefully it's not as bad as mine was).
3 - Now Change that cutting wheel to a grinding wheel on that grinder and get grinding. Grind all the tack welds on the outer edges of the quarter panel. (The thinner you grind it down the easier it will be to pop the tack welds off.)
4 - It's Hammer Time! Take the Cold chisel and ball ping hammer and wedge the chisel in between the two layers of steel above each tack weld and hammer out the welds. Be careful not to damage the inner side of the metal you'll need it for the new panel.
5 - Now you need to clean up the the old welds on all the outer edges where the panel used to be. Including the back side of the wheel well. These areas need to be bare metal so the welds will stick.
6 - Take the new panel and sand the edges that will make contact with the body off the Jeep. These need to be bare metal so the welds will stick.
Unfortunately I forgot to take pictures of this
7 - Place the new panel up against the Jeep and vice grip it down wear the window used to be. Take a sharpie and mark where the top of the panel meets the rest of the body of the car.
8 - Remove the panel and cut the excess metal off, sand around it so that the welds will stick.
9 - Apply sealant around the edges of the gas cap to prevent gas fumes from entering the vehicle.
10a-Note: (2dr Models) From the factory the bottom of the panel just aft of the door is tack welded several times. It is nearly impossible to get a welder stinger in there so you'll need some JB Weld to do the job for you.
(2dr Models) Apply a generous amount of JB weld on the under side of the bottom of the panel closest to the door
10- Place the panel against the jeep making sure all the folds line up and the inner lip is in the gas cap cavity. Hold the panel in place with a few vice grips wear the window used to be.
11- Tack weld the panel in place and remove the vice grips. Tack weld along all the edges to secure the panel permanently
12- Tack weld inside the wheel well
13- Weld a bead along the top of the panel wear it meets the rest of the vehicle. (Unfortunately neither me or my friend are great welders and we didn't have gas so our welds were ugly which meant more cleaning up.)
14- Grind down the welds to make them smooth
15- Paint over the bare metal with either a self etching primer or a rust protecting primer. I used black Rustoleum primer.
16- If your welds are as ugly as mine on the seams you may need to apply some body filler. I'm sure you can read a can of Bondo so I'll leave that to you.
17- Now the panel is done. No more hideous dent. No more people asking you what happened.
Rapping up:
Put the tire back on. If you want to keep the original fender flares and corner bumper covers then you'll need to reinstall the retaining brackets. For the corner bumper cover you'll have to drill three holes for the small clip and rivet it in. For the fender flare if you broke the bolts off you'll have to grind the old ones out (they are tack welded in) and replace the hardware.
I know its in the picture above but you have to put everything back together... I will explain how to reinstall the window because many people don't know how.
Window Install:
1 - Take the seal and place it around the window
2 - Take the 20 gauge rope and place it inside the back side of the seal
3 - Place the window against the vehicle from the inside pull the rope inward this will draw the seal into the car. You will have to work it pretty good. Soaking the seal in soapy water will help (just messy)
Close:
I think that is every thing and I hope this is helpful. Once done if done correctly it will look like nothing ever happened. Good Luck!


Thread
Thread Starter
Forum
Replies
Last Post
investinwaffles
Modified XJ Cherokee Tech
11
05-18-2021 12:02 PM
Currently Active Users Viewing This Thread: 1 (0 members and 1 guests)