Injector Swap for the 4.0L
 06-08-2011, 11:56 AM
#1
☠ CF Sheriff ☠
Thread Starter
A popular modification for the aging 4.0L engine is to replace the stock fuel injectors with some new ones that have 4 holes instead of one (yielding better throttle response and smoother idle - many report MPG/power gains as well from having clean injectors). Usually these care found in an early 90s dodge neons (as well as other vehicles). The model injector number you need depends on what year cherokee you are doing this on. This has been covered many times by other threads so I won't go into the possibilities in this writeup - just do a search for "injector swap"
This is a step-by-step to changing the fuel injectors on a 4.0L engine (the 2.5L engine is similar). This applies whether the injectors you choose to use are stock ones or upgrades as noted above.
So let's get rolling...
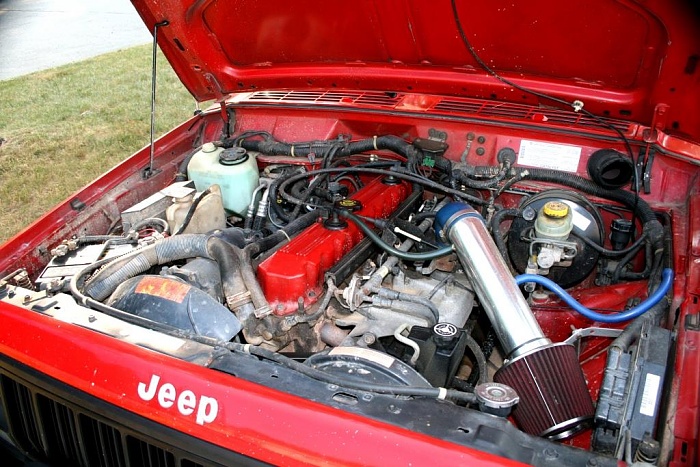
Here's the Guinea Pig - my 1995 Cherokee Sport with 244,ooo original miles on the engine (yes - it's time for new injectors). It still runs wonderfully but i wanted to clear up the bit of rough idle, and i swapped for the 4 hole injectors for the better throttle response.

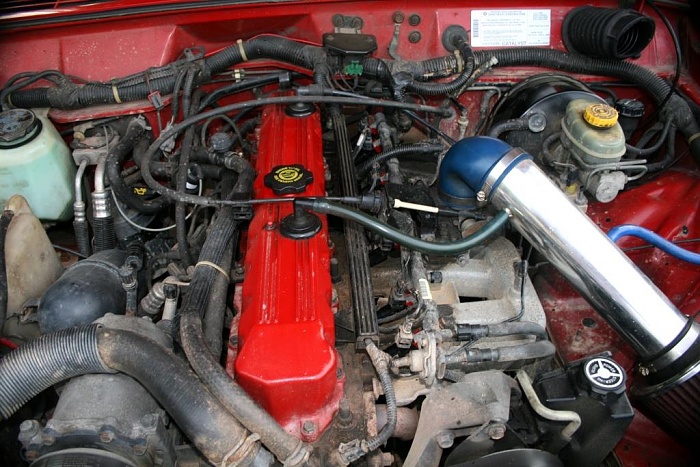
And here's the engine we will be tackling today - the 4.0L beast (your's may look a bit different)
Now, what you will need today is:
- A flat blade screwdriver
- Masking tape / Painters tape
- 6 new/rebuilt fuel injectors with new o-rings on each end
- petroleum jelly (Vaseline)
- a 10mm deep socket w/ ratchet and extension
- fuel line quick disconnect tool (for 1996 and up engines IIRC)
- a few rags
- 1 hour of time (+/-)
Onto the step-by-step!
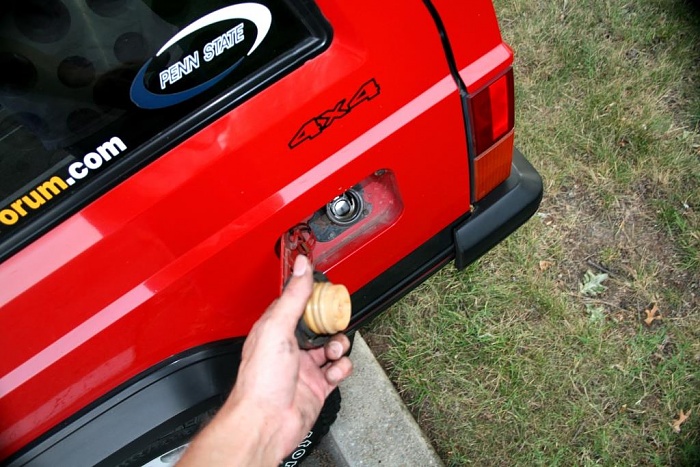
Step 1 - Remove the fuel filler cap
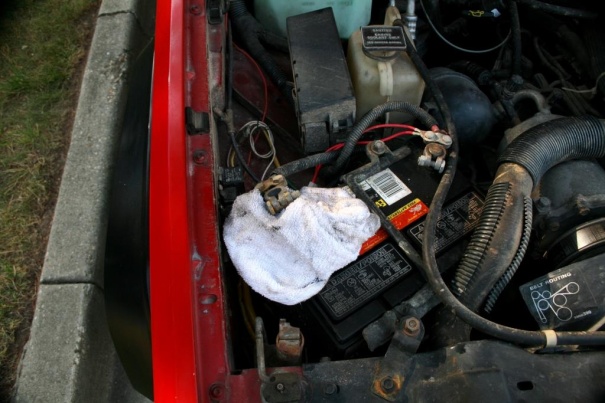
Step 2 - Disconnect the (-) battery cable (the black one), and keep it from touching the post with a thick rag or something non-conductive

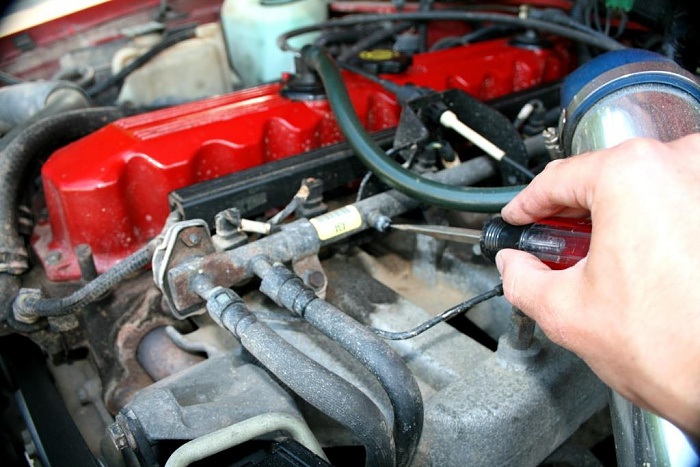
Step 3 - Unscrew the cap on the fuel rail test port. Place a rag beneath the port, and using the flat blade screwdriver, release the pressure inside the rail.
This is a step-by-step to changing the fuel injectors on a 4.0L engine (the 2.5L engine is similar). This applies whether the injectors you choose to use are stock ones or upgrades as noted above.
So let's get rolling...
Here's the Guinea Pig - my 1995 Cherokee Sport with 244,ooo original miles on the engine (yes - it's time for new injectors). It still runs wonderfully but i wanted to clear up the bit of rough idle, and i swapped for the 4 hole injectors for the better throttle response.

And here's the engine we will be tackling today - the 4.0L beast (your's may look a bit different)

Now, what you will need today is:
- A flat blade screwdriver
- Masking tape / Painters tape
- 6 new/rebuilt fuel injectors with new o-rings on each end
- petroleum jelly (Vaseline)
- a 10mm deep socket w/ ratchet and extension
- fuel line quick disconnect tool (for 1996 and up engines IIRC)
- a few rags
- 1 hour of time (+/-)
Onto the step-by-step!
Step 1 - Remove the fuel filler cap
Step 2 - Disconnect the (-) battery cable (the black one), and keep it from touching the post with a thick rag or something non-conductive
Step 3 - Unscrew the cap on the fuel rail test port. Place a rag beneath the port, and using the flat blade screwdriver, release the pressure inside the rail.

Last edited by dukie564; 04-28-2014 at 09:11 AM.
 04-28-2014, 09:00 AM
#2
☠ CF Sheriff ☠
Thread Starter
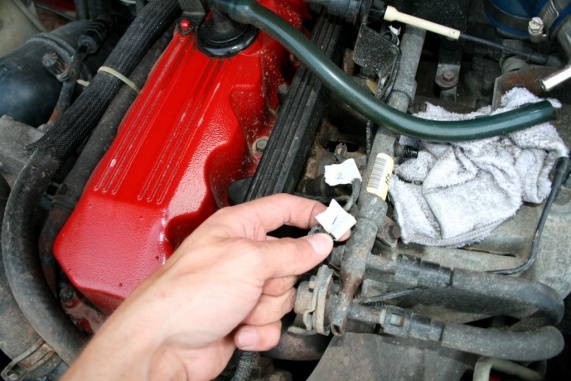
Step 4 - Using the masking tape, label the wires running to each injector 1-2-3-4-5-6 from front to back. It's very important to not mix these up.
Step 5 - Disconnect the vacuum line from the fuel pressure regulator - i disconnected mine at the manifold.
Step 6 - Time to disconnect the fuel lines. I will say this is optional, but a VERY good idea since the fuel hoses are not very flexy, and the lines break easily, and you'll like the freedom to pull on the fuel rail and remove as needed for the next steps. For pre-1996 engines, all you do is squeeze the white tabs together and CAREFULLY pull off the fuel line fitting. For 1996 and up engines, you will need a fuel line disconnect tool to separate the fittings (cheap at your local auto parts store). The fittings are different sizes so they can only go back on one way - no need to label them.

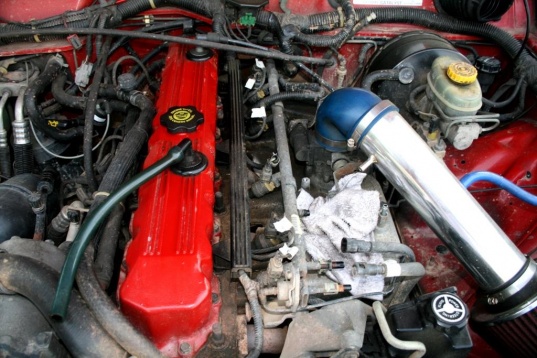
Step 7 - To make your life easier, remove the air intake tube from the throttle body, and stuff a rag in there to keep crud out.
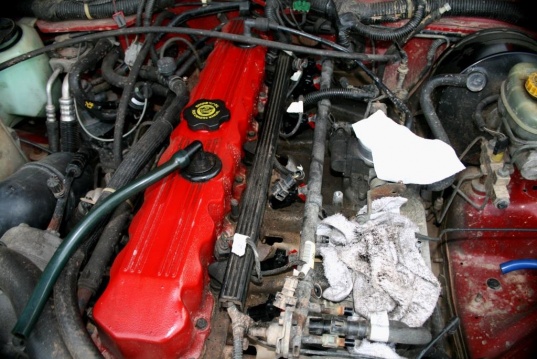
Step 8 - Remove the throttle cable (and for those with auto transmissions / cruise control - remove those cables also) from the throttle body linkage, unbolt the bracket, and set aside. Your engine should now look like this:

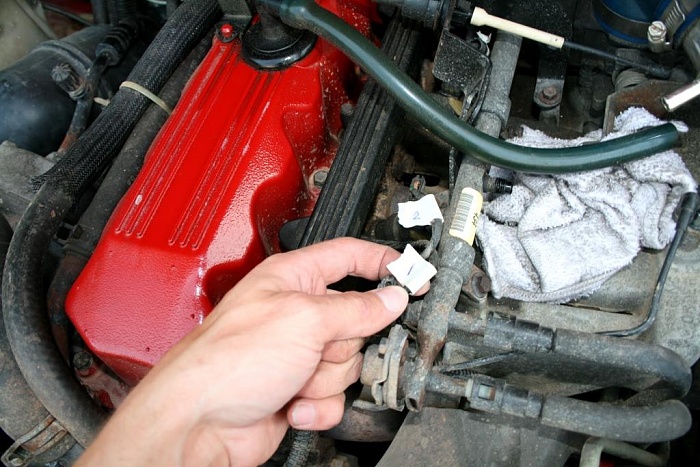
Step 9 - Disconnect the injector electrical connectors. 1999 and down you just have to wiggle and pull. 2000/2001 have locking clips that you need to disengage to pull the connector off.
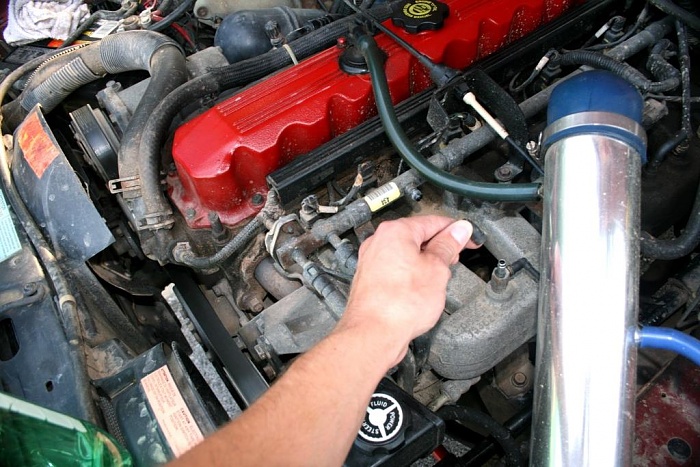
Step 10 - Unbolt the bolts holding the fuel rail to the intake manifold. The rear most bolt is actually a stud since it's used as a wire holder also (nut + stud w/ nut in middle). Remember this - it will need to go back in the same place during reassembly.
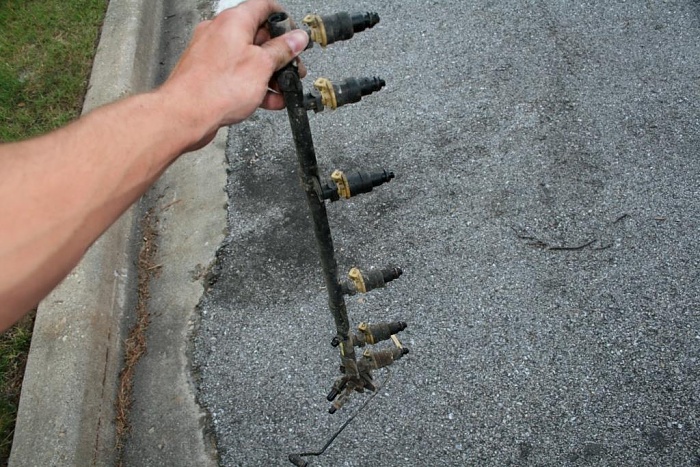
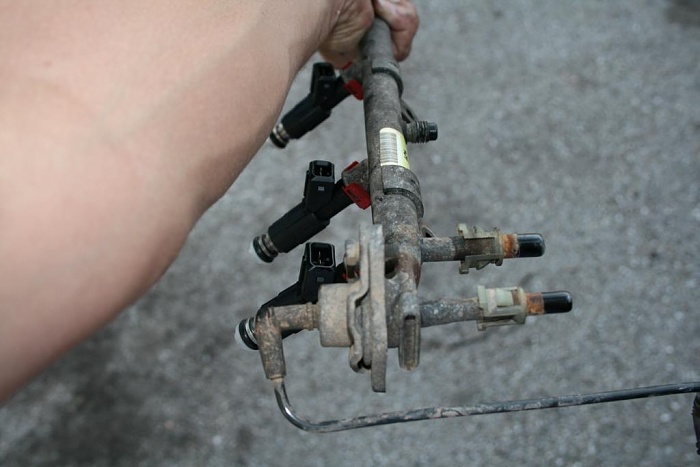
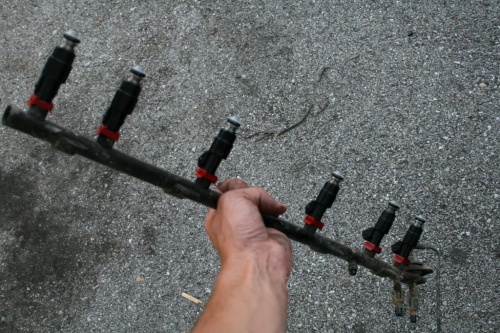
Step 11 - Remove the fuel rail and injectors. This will take some force to do, just wiggle the rail back and forth while pulling. Be careful not to bend the rail while doing this (ie - don't grab the middle of the rail and pull). The injectors will probably unseat suddenly so be ready. Carry it to the grass and empty out the fuel that remains in the rail (or into a container).
Victory!
Step 5 - Disconnect the vacuum line from the fuel pressure regulator - i disconnected mine at the manifold.

Step 6 - Time to disconnect the fuel lines. I will say this is optional, but a VERY good idea since the fuel hoses are not very flexy, and the lines break easily, and you'll like the freedom to pull on the fuel rail and remove as needed for the next steps. For pre-1996 engines, all you do is squeeze the white tabs together and CAREFULLY pull off the fuel line fitting. For 1996 and up engines, you will need a fuel line disconnect tool to separate the fittings (cheap at your local auto parts store). The fittings are different sizes so they can only go back on one way - no need to label them.

Step 7 - To make your life easier, remove the air intake tube from the throttle body, and stuff a rag in there to keep crud out.
Step 8 - Remove the throttle cable (and for those with auto transmissions / cruise control - remove those cables also) from the throttle body linkage, unbolt the bracket, and set aside. Your engine should now look like this:
Step 9 - Disconnect the injector electrical connectors. 1999 and down you just have to wiggle and pull. 2000/2001 have locking clips that you need to disengage to pull the connector off.
Step 10 - Unbolt the bolts holding the fuel rail to the intake manifold. The rear most bolt is actually a stud since it's used as a wire holder also (nut + stud w/ nut in middle). Remember this - it will need to go back in the same place during reassembly.
Step 11 - Remove the fuel rail and injectors. This will take some force to do, just wiggle the rail back and forth while pulling. Be careful not to bend the rail while doing this (ie - don't grab the middle of the rail and pull). The injectors will probably unseat suddenly so be ready. Carry it to the grass and empty out the fuel that remains in the rail (or into a container).
Victory!

Last edited by dukie564; 04-28-2014 at 09:14 AM.
04-28-2014, 09:01 AM
#3
☠ CF Sheriff ☠
Thread Starter
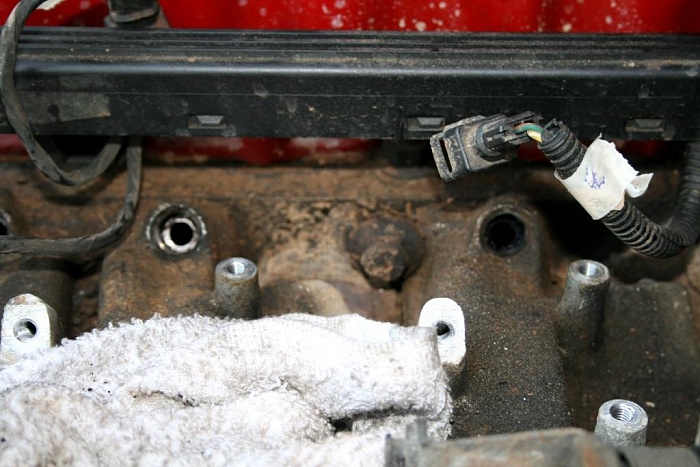
Step 12 - If any o-rings are still inside the holes in the head, use the screwdriver to carefully extract them. Inspect the openings to make sure all the o-rings are out, and there isn't a lot of crud in there. In my case, there was 244,ooo miles of crud in there, and i wasn't comfortable leaving it in there to gunk up my new injectors.
Crud:
A WORD OF CAUTION: If you choose to do this like I did, my must be EXTREMELY careful not to allow any crud to fall through the hole into the cylinders. This would be very bad. I used my small flat blade screwdriver one careful scrape at a time (READ: SCRAPE INSIDE TO OUT), cleaning off the screwdriver head after every scrape. Again, not a required step, but one you may wish to take if you are comfortable with it.
Cruddy hole vs cleaned out hole:
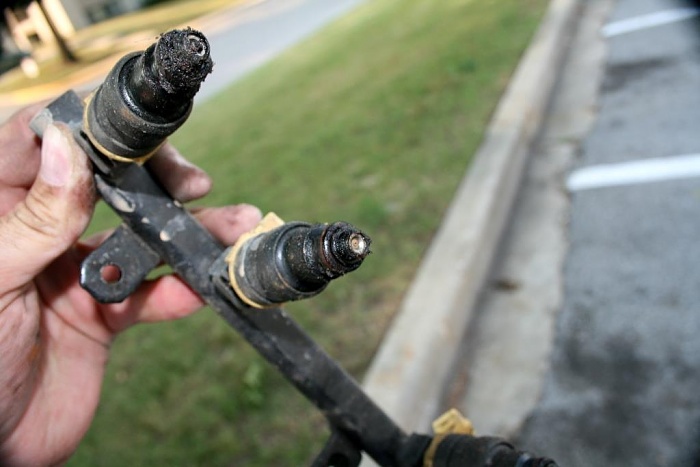
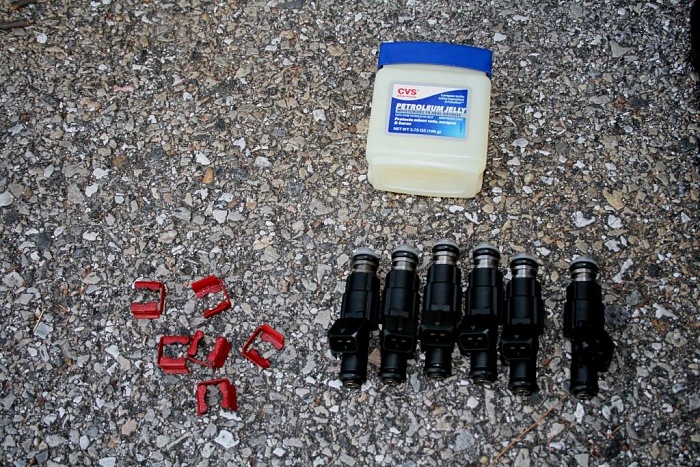
Step 13- Remove the old injectors from the fuel rail. There are metal "clip-nuts" that slide off the injector body where they attach to the rail. Use the flat blade screwdriver to pry them off. Make sure your new injectors came with new clip nuts before throwing these away, otherwise you will reuse them. Pull out each injector. Pry out the o-rings that will inevitably be still lodged in the rail.
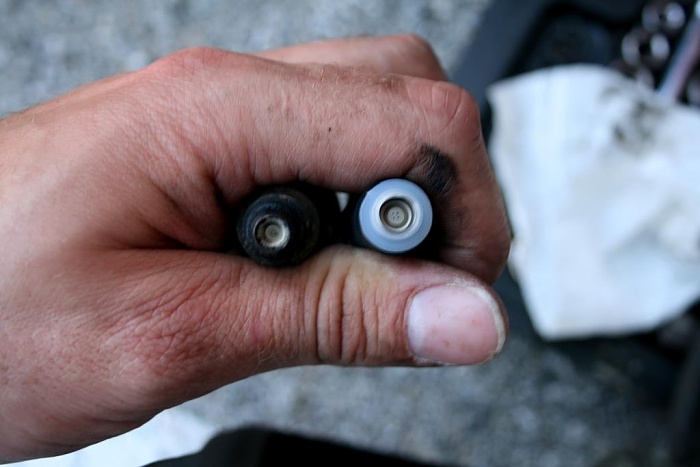
Step 14 - Grab your new injectors. The ones I am installing are Neon "703" injectors that I cleaned and rebuilt with new filters, o-rings, and pintle caps. They have about the same flow rate as the stock injectors, but instead of the one outlet hole, they have 4. This gives a better spray rather than a stream of fuel for a better atomization and burn.
Stock injector Left, New 4 hole right
Step 15 - Time to lube up! Grab your petroleum jelly, and lube up each o-ring, being careful to keep it away from the pintle holes.
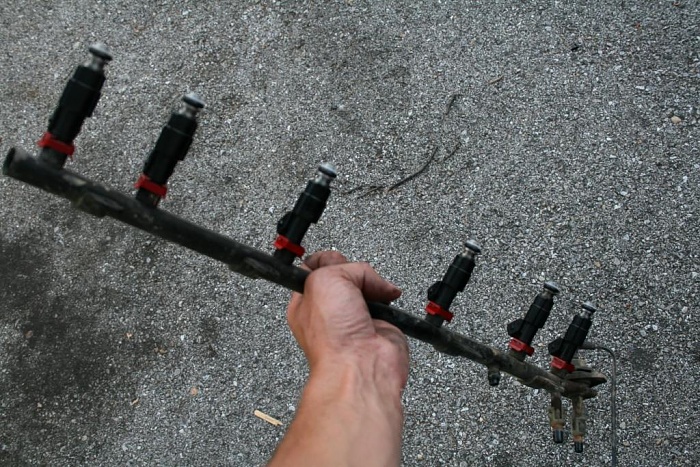
Step 16 - Push each fuel injector into the rail, making sure to push straight, wiggle a bit if you need to but KEEP THEM STRAIGHT. After they are all seated fully, make sure they are rotated the correct way install the clip nuts.
They should look like this:
Crud:

A WORD OF CAUTION: If you choose to do this like I did, my must be EXTREMELY careful not to allow any crud to fall through the hole into the cylinders. This would be very bad. I used my small flat blade screwdriver one careful scrape at a time (READ: SCRAPE INSIDE TO OUT), cleaning off the screwdriver head after every scrape. Again, not a required step, but one you may wish to take if you are comfortable with it.
Cruddy hole vs cleaned out hole:

Step 13- Remove the old injectors from the fuel rail. There are metal "clip-nuts" that slide off the injector body where they attach to the rail. Use the flat blade screwdriver to pry them off. Make sure your new injectors came with new clip nuts before throwing these away, otherwise you will reuse them. Pull out each injector. Pry out the o-rings that will inevitably be still lodged in the rail.
Step 14 - Grab your new injectors. The ones I am installing are Neon "703" injectors that I cleaned and rebuilt with new filters, o-rings, and pintle caps. They have about the same flow rate as the stock injectors, but instead of the one outlet hole, they have 4. This gives a better spray rather than a stream of fuel for a better atomization and burn.
Stock injector Left, New 4 hole right

Step 15 - Time to lube up! Grab your petroleum jelly, and lube up each o-ring, being careful to keep it away from the pintle holes.

Step 16 - Push each fuel injector into the rail, making sure to push straight, wiggle a bit if you need to but KEEP THEM STRAIGHT. After they are all seated fully, make sure they are rotated the correct way install the clip nuts.
They should look like this:

Last edited by dukie564; 04-28-2014 at 09:16 AM.
04-28-2014, 09:03 AM
#4
☠ CF Sheriff ☠
Thread Starter
BAM Done!
Step 17 - Reinstall injectors and fuel rail, making sure each injector is fully seated within the hole, and bolt the rail back up. The torque spec for the bolts is 20ft-lb, but I tightened to one grunt (snug tight) since I didn't feel like grabbing the torque wrench for this. Reattach the wiring connectors to the correct injectors. Reinstall the fuel lines making sure the clips re-lock when you press them on (give it the 'ol tug test). Reinstall the vacuum line to the fuel pressure regulator. Bolt the throttle cable bracket back up, and reattach the cables to the throttle linkage. Reinstall the air filter tube to the throttle body if you removed it.

Step 18 - Screw the cap back onto the fuel rail testing port, put your gas cap back on, and reattach the (-) battery terminal.
Everything hooked back up:
Step 19 - Look on the ground. Is there anything laying there that you should have put back on the truck? If not, good job you may continue to step 20. If so, go back and try again.
Step 20 - Go inside the truck and turn the key to "RUN" (do not start the engine). Go back to the engine bay and inspect for leaks around the injectors and the fuel lines. If no leaks, move on to step 21.
Step 21 - Moment of truth! Turn the key off, then turn it back to "RUN" for a few seconds to prime the fuel lines, then start the engine. It may take a few seconds to get the fuel to the engine - mine fired right up. The idle may be choppy for a few minutes but should smooth out as everything adjusts.
CONGRATULATIONS! You're Finished!
Note: If you experience running issues with the injectors, or very poor gas mileage, you may need to reset the PCM back to factory air/fuel trims. To do this, follow this procedure:
You will notice the engine running fairly rich for a few days of driving, but the PCM will quickly adjust.
Hope this all helps you guys out. Keep Jeepin'!
Step 17 - Reinstall injectors and fuel rail, making sure each injector is fully seated within the hole, and bolt the rail back up. The torque spec for the bolts is 20ft-lb, but I tightened to one grunt (snug tight) since I didn't feel like grabbing the torque wrench for this. Reattach the wiring connectors to the correct injectors. Reinstall the fuel lines making sure the clips re-lock when you press them on (give it the 'ol tug test). Reinstall the vacuum line to the fuel pressure regulator. Bolt the throttle cable bracket back up, and reattach the cables to the throttle linkage. Reinstall the air filter tube to the throttle body if you removed it.
Step 18 - Screw the cap back onto the fuel rail testing port, put your gas cap back on, and reattach the (-) battery terminal.
Everything hooked back up:

Step 19 - Look on the ground. Is there anything laying there that you should have put back on the truck? If not, good job you may continue to step 20. If so, go back and try again.
Step 20 - Go inside the truck and turn the key to "RUN" (do not start the engine). Go back to the engine bay and inspect for leaks around the injectors and the fuel lines. If no leaks, move on to step 21.
Step 21 - Moment of truth! Turn the key off, then turn it back to "RUN" for a few seconds to prime the fuel lines, then start the engine. It may take a few seconds to get the fuel to the engine - mine fired right up. The idle may be choppy for a few minutes but should smooth out as everything adjusts.
CONGRATULATIONS! You're Finished!
Note: If you experience running issues with the injectors, or very poor gas mileage, you may need to reset the PCM back to factory air/fuel trims. To do this, follow this procedure:
This very simple procedure will Erase the “Adaptive Memory” stored inside the PCM and allow a new “Adaptive Memory” to be developed.
After performing this procedure the PCM will re-learn and store into Adaptive Memory your engines performance characteristics.
Please perform these steps exactly as they are written, in the order they are written. This will cause the adaptive memory in the PCM to be erased and cause the PCM to go into Fast Learn Mode adaptive mode.
Disconnect the battery terminals and touch them together for 30 seconds. (This is to discharge the PCM capacitors, which maintain the Adaptive Memory.)
Reconnect the Battery Cables
Turn Ignition Switch to the “On” position but DO NOT start the engine
Turn Headlight “On”
Turn Headlights “Off”
Turn Ignition Key “Off”
The PCM Adaptive memory has now been flashed, or erased from the PCM.
When you start the engine it will be running off a set of pre-programmed tables that come with the PCM from the factory.
When you get the engine up to operating temperature the PCM will start to collect data for the “Adaptive Memory”.
The PCM will collect data for Adaptive Memory for the first 50 Warm-up Cycles.
Hope this all helps you guys out. Keep Jeepin'!
Last edited by dukie564; 04-28-2014 at 09:19 AM.

Thread
Thread Starter
Forum
Replies
Last Post
Travis88XJ
Stock XJ Cherokee Tech. All XJ Non-modified/stock questions go here
19
03-12-2016 07:26 AM
jhc7399
Engines/Tranny/T-Case
3
10-08-2015 01:40 PM
Currently Active Users Viewing This Thread: 1 (0 members and 1 guests)