Dash removal
 01-19-2010, 01:31 PM
#1
CF Veteran
Thread Starter
Join Date: Jul 2009
Location: Chico,ca
Posts: 2,158
Likes: 0
Received 10 Likes
on
9 Posts
Year: 89
Model: Cherokee
Engine: 4.0
First I would like to thank (Bluexj) and (Nick n ii) for there help,I am not the best with computers and without there help this would not have happened.
Recently I had to remove my dash to remove some glass from replacing my winshileld,there has been alot of questions about the dash and components like heater core,ignition switch,steering colum,etc.
I thought while the dash was out I would write a procedure on how to remove the dash and all the components that are associated with it,this will be written for those with no mechanical exsperience,I am sure it will help others also,it will be very specific.
As I go through this I will also explain what each component does and some of the issues it can cause.
If there is any questions please pm me and I will help as much as possible.
Just some of the things I will cover are,dash removal,heater core,headlight switch,pcm,if it has to do with the dash it will be covered here.
This will take several post to cover all items,they will titled dash 1,2,3,etc until completed.
This is for my 89,but no matter what year you have most things will be the same.
Note,removing the dash is not hard,if you take your time and have some patience it is easy,It takes about an hour for me to remove the dash,for someone that has never done it before you can remove it in about 2-3 hours.
The biggest issue is the unknown,i hope this procedure helps
Things to do to and to look out for.
1. First thing is to disconnect the battery,if you do not you will arc something removing the dash and possibly caused damage to the wiring.
2. Take pictures so you can go back and look at them.
3. Take your time and make sure you inspect everything before you put it back together,the engine will start just fine with the dash removed,so you can inspect all the vents,resistor,etc while the dash is out.
4. Make note of where the wires behind the dash wer routed,make sure when the dash is reinstalled that no wires are pinched.
5. Stop and make sure everything is working before you put it all back together,it is a pita to findout afterwards.
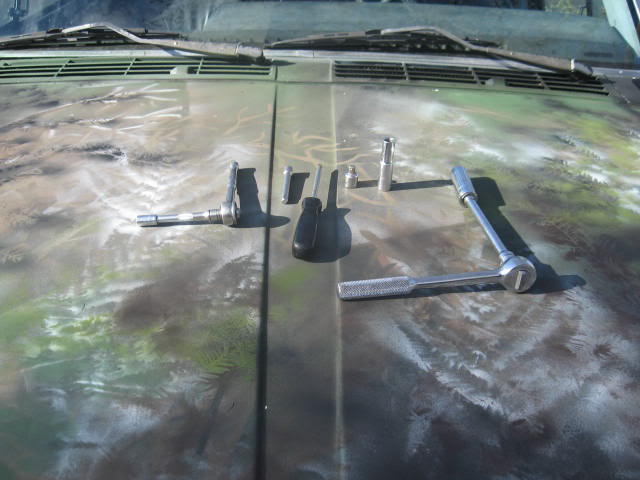
These are the tools I used,3/8,1/4" drive ratchets,3/8,1/4" exstensions,15mm,10mm,5/16" sockets. Flat tip and phillips head screw drivers,
Also it would be a good idea to have a magnet and/or mechanical fingers,things do drop in places hard to get to,it only matters when you are putting it back together,I actually through my keys on the dash and that was fun. Like I said,removing the dash is not a big deal,and it does not take many tools,there is only 8 bolts that need to be removed,the rest are screws.
Procedure
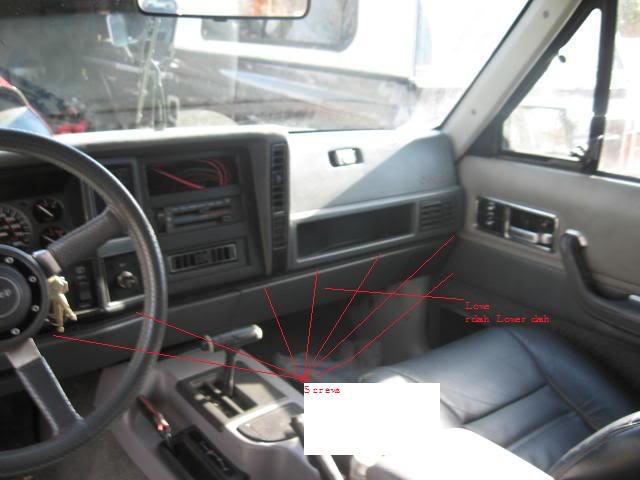
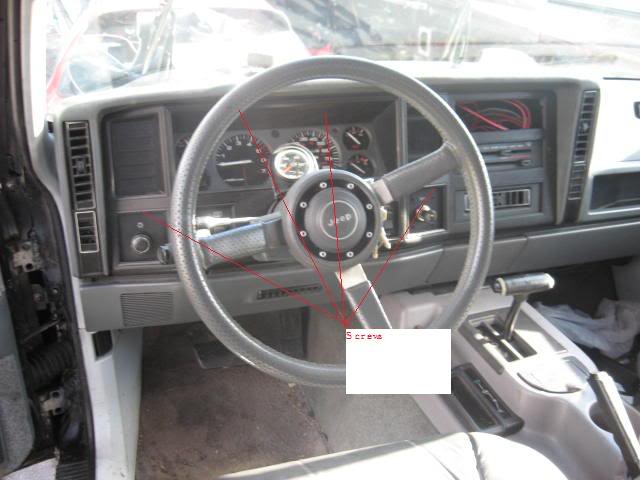
1. Remove the lower dash,there is phillips head screws between the upper and lower dash,there is also screws under the dash on each side next to courtesy lights,and one behind the ashtray.
2. Disconnect courtesy lights from each side of lower dash,they just twist out.
3. Disconect the light from the ash tray,it just slips into the blue holder.

4. disconnect tcu(transmission control unit) Just pull wires and leave tcu connected to lower dash,note,the transmission will not work in forward unless tcu is connected.
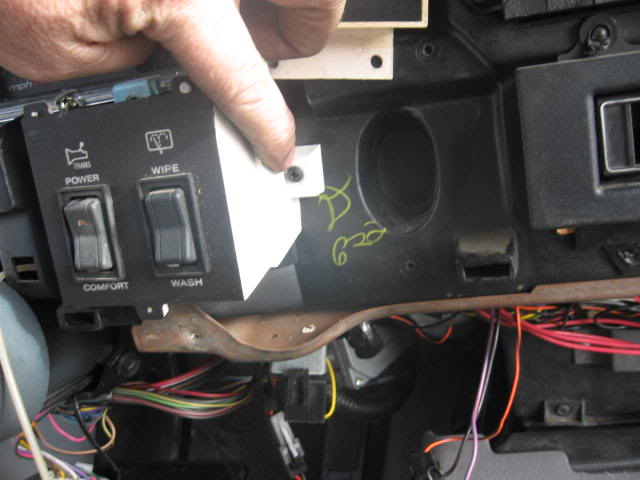
5. This is the wiper intermitent control unit,everything that has to do with the front wipers and winshield washer go through this module,if your wipers do not work,work on high,but not intermitent or low this is more than likely your problem. it is held on by velcro to the lower dash.
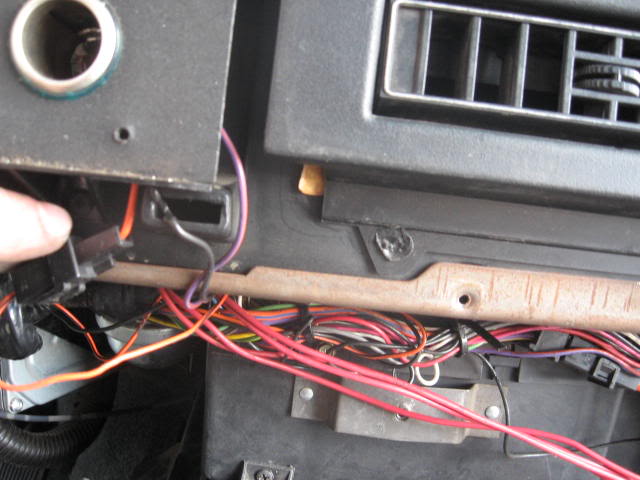
6. Loosen and remove the 2 15mm nuts that hold the steering colum to the dash,the colum is not attached to the dash,it is attached to the body,but it helps to have it out of the way,just let it hang down,it is supported by the 2 13mm bolts on the firewall.
6. remove plastic bezel from around guage cluster,there is 4 screws that hold it on,and tabs that hold it in place,be careful these can break very easy.
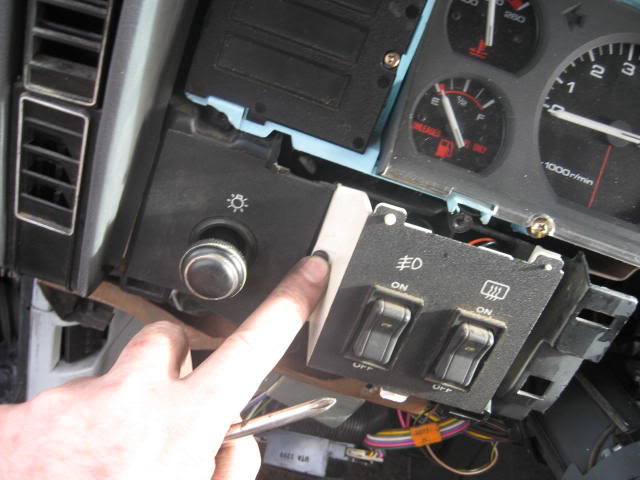
7. Remove switches on either side of steering wheel,the clock,cigar lighter,rear wiper and transmission control,on the left the rear defrost and fog lights,the are held in by phillips head screws.
clock and cigar lighter.
7. Transmission and rear wiper switches.
8. Bottom of cigar lighter.
9. Rear defrost and fog light switches.
Recently I had to remove my dash to remove some glass from replacing my winshileld,there has been alot of questions about the dash and components like heater core,ignition switch,steering colum,etc.
I thought while the dash was out I would write a procedure on how to remove the dash and all the components that are associated with it,this will be written for those with no mechanical exsperience,I am sure it will help others also,it will be very specific.
As I go through this I will also explain what each component does and some of the issues it can cause.
If there is any questions please pm me and I will help as much as possible.
Just some of the things I will cover are,dash removal,heater core,headlight switch,pcm,if it has to do with the dash it will be covered here.
This will take several post to cover all items,they will titled dash 1,2,3,etc until completed.
This is for my 89,but no matter what year you have most things will be the same.
Note,removing the dash is not hard,if you take your time and have some patience it is easy,It takes about an hour for me to remove the dash,for someone that has never done it before you can remove it in about 2-3 hours.
The biggest issue is the unknown,i hope this procedure helps
Things to do to and to look out for.
1. First thing is to disconnect the battery,if you do not you will arc something removing the dash and possibly caused damage to the wiring.
2. Take pictures so you can go back and look at them.
3. Take your time and make sure you inspect everything before you put it back together,the engine will start just fine with the dash removed,so you can inspect all the vents,resistor,etc while the dash is out.
4. Make note of where the wires behind the dash wer routed,make sure when the dash is reinstalled that no wires are pinched.
5. Stop and make sure everything is working before you put it all back together,it is a pita to findout afterwards.
These are the tools I used,3/8,1/4" drive ratchets,3/8,1/4" exstensions,15mm,10mm,5/16" sockets. Flat tip and phillips head screw drivers,
Also it would be a good idea to have a magnet and/or mechanical fingers,things do drop in places hard to get to,it only matters when you are putting it back together,I actually through my keys on the dash and that was fun. Like I said,removing the dash is not a big deal,and it does not take many tools,there is only 8 bolts that need to be removed,the rest are screws.
Procedure
1. Remove the lower dash,there is phillips head screws between the upper and lower dash,there is also screws under the dash on each side next to courtesy lights,and one behind the ashtray.
2. Disconnect courtesy lights from each side of lower dash,they just twist out.
3. Disconect the light from the ash tray,it just slips into the blue holder.
4. disconnect tcu(transmission control unit) Just pull wires and leave tcu connected to lower dash,note,the transmission will not work in forward unless tcu is connected.
5. This is the wiper intermitent control unit,everything that has to do with the front wipers and winshield washer go through this module,if your wipers do not work,work on high,but not intermitent or low this is more than likely your problem. it is held on by velcro to the lower dash.
6. Loosen and remove the 2 15mm nuts that hold the steering colum to the dash,the colum is not attached to the dash,it is attached to the body,but it helps to have it out of the way,just let it hang down,it is supported by the 2 13mm bolts on the firewall.
6. remove plastic bezel from around guage cluster,there is 4 screws that hold it on,and tabs that hold it in place,be careful these can break very easy.
7. Remove switches on either side of steering wheel,the clock,cigar lighter,rear wiper and transmission control,on the left the rear defrost and fog lights,the are held in by phillips head screws.
clock and cigar lighter.
7. Transmission and rear wiper switches.
8. Bottom of cigar lighter.
9. Rear defrost and fog light switches.
Last edited by Abovetimberline; 01-25-2010 at 12:25 PM.

The following users liked this post:
PPA (05-06-2022)
01-19-2010, 11:43 PM
#2
CF Veteran
Thread Starter
Join Date: Jul 2009
Location: Chico,ca
Posts: 2,158
Likes: 0
Received 10 Likes
on
9 Posts
Year: 89
Model: Cherokee
Engine: 4.0
10. Remove connectors and illumination lights from back of switches,be careful removing the lights,the tab that holds them in place break easy,when removing push in and turn out easly,if you do break one you can get more at the local jy,I have spliced in a few.
11. After all connectors and lights have been removed push the wires back through the dash.
12. Remove screws from climate controller and remove, push it back through the dash,you do not need to remove any of the wires or vacum lines from controller.
13. Reach under dash and unscrew speedo from cruise control speed input,if you do not have cruise control you will not have this device. The speedo can be disconected from the back of the guage cluster also but you have to pull out on the cluster and you take a chance of breaking the plastic tab that holds it to the cluster.
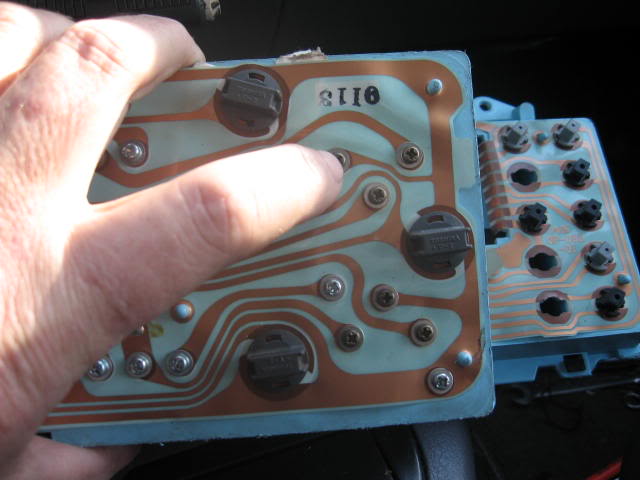
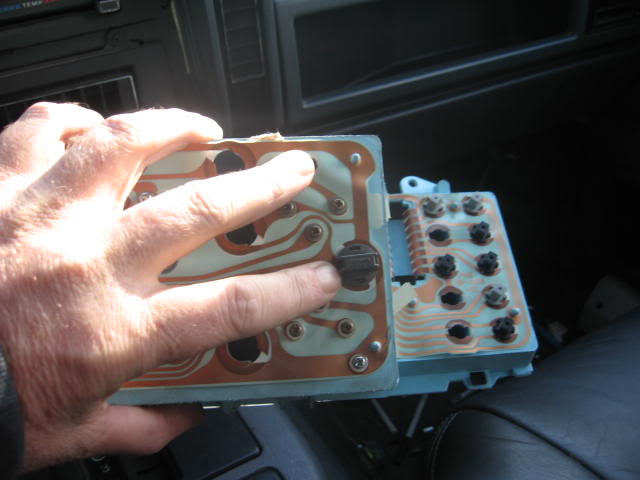
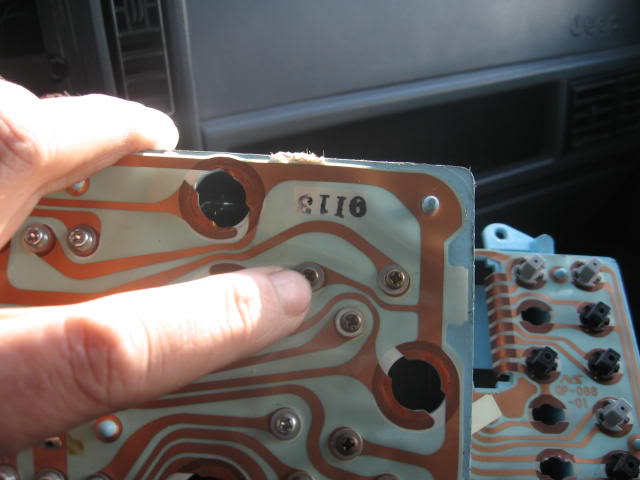
14. Remove screws from guage cluster,there is 6,then pull out on cluster and on the back disconect the wires,I just use a flat tip screw driver and depress the tab on top of the connector and remove it,be careful not to break the connector or rip the circuit board.

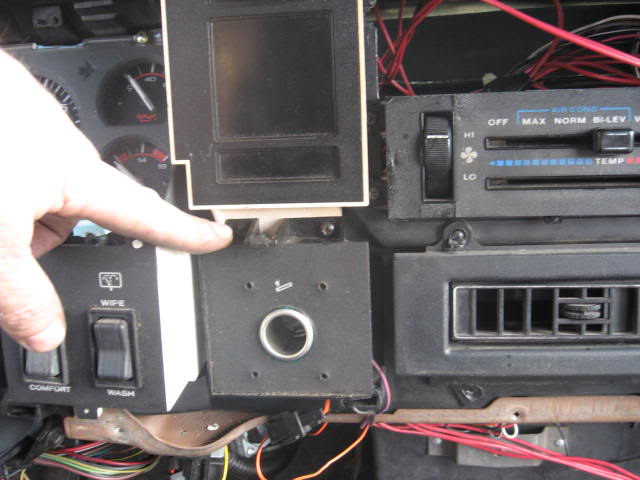
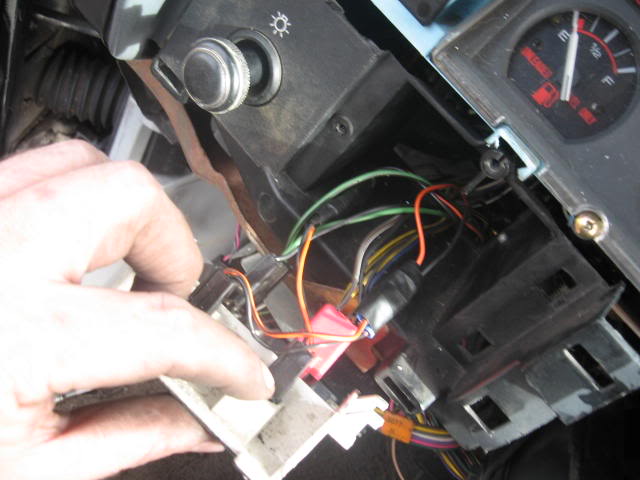
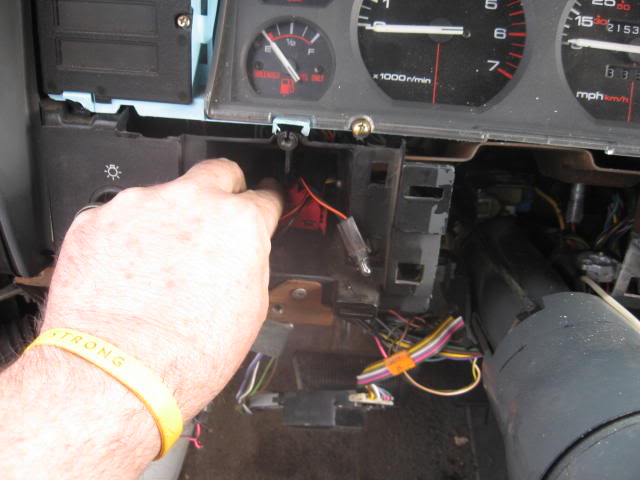
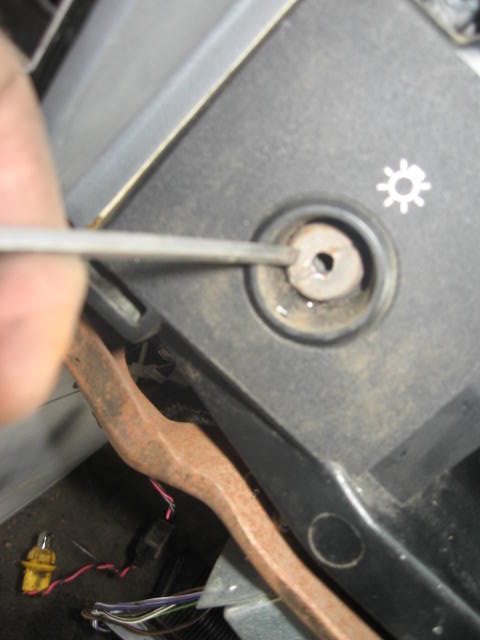
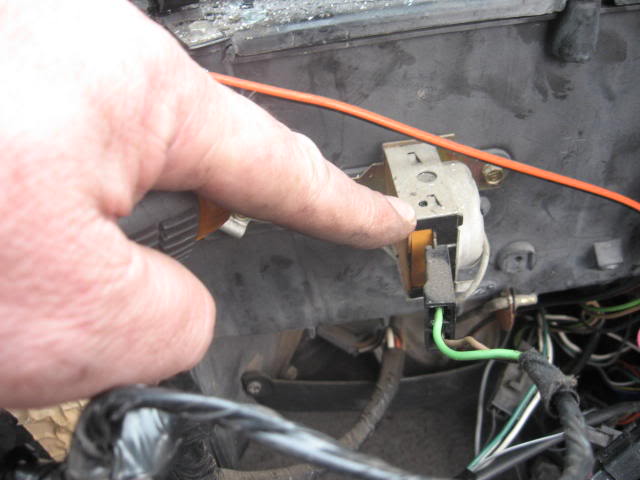
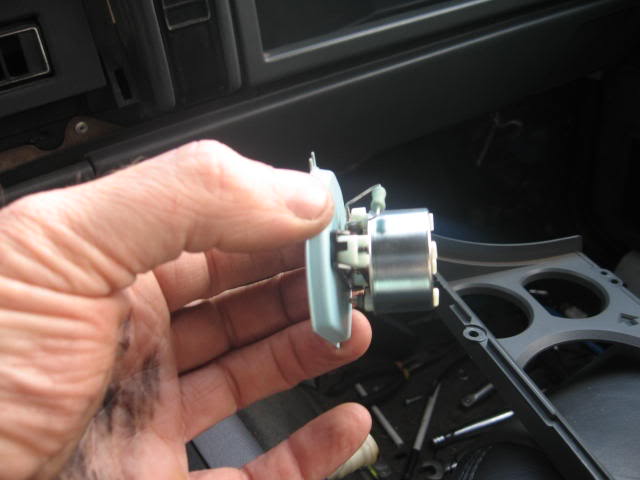
15. Reach under the dash and push on the button on the headlight switch and remove the handle,this is a spare switch I have,makes it easier to show the button. If you were going to remove the headlight switch the next 3 pics is all you need to do,other than removing the wires.
16. This is the switch with the handle removed.
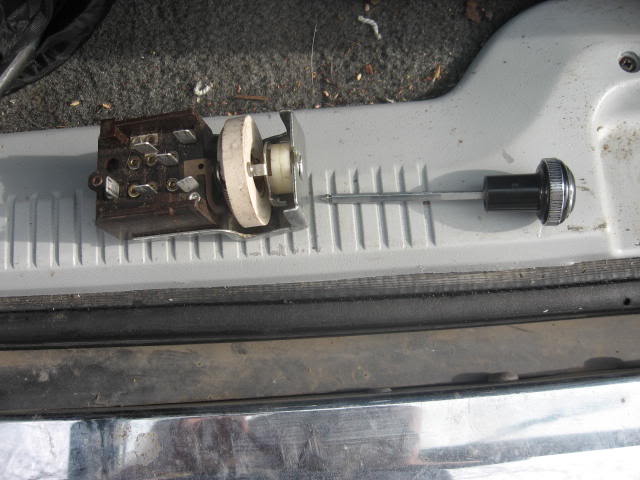
17. After handle has been removed unscrew the screw that holds it in place,just use a large flat tip screwdriver and remove.
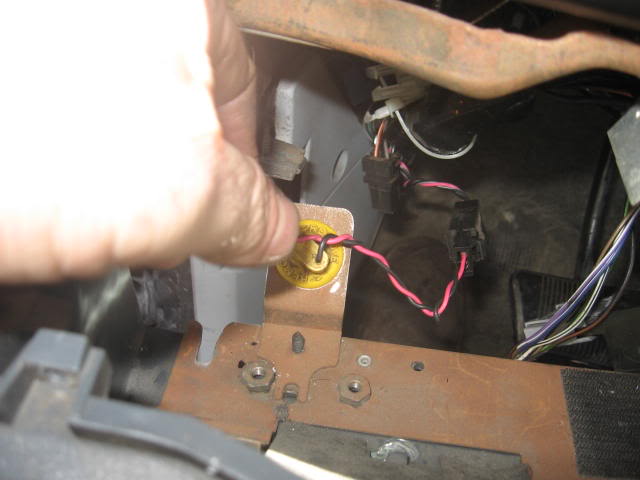
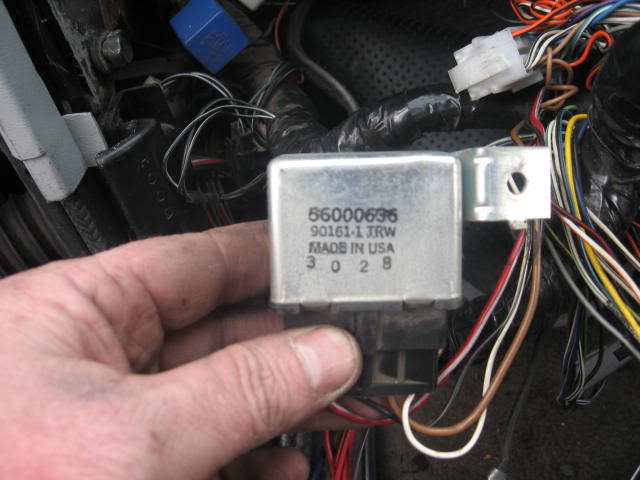
18. This is the headlight timer,it is what keeps your lights on after you turn the key off,it is located under the dash on the left side of colum,it is held by 5/16 hex head screw.
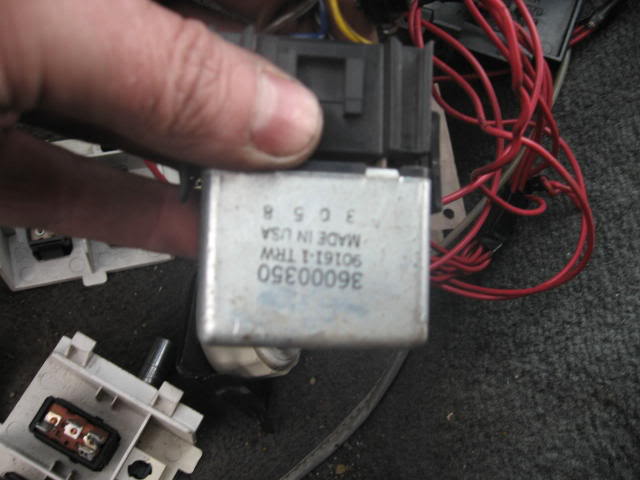
19. This is the rear defrost timer,turns defroster off after about 5 minutes,loacted under dash on right side of colum,held in by 2 5/16 hex head screws.
20. Ground wire located on the left side of dash,held on by 1 5/16 hex head screw.
11. After all connectors and lights have been removed push the wires back through the dash.
12. Remove screws from climate controller and remove, push it back through the dash,you do not need to remove any of the wires or vacum lines from controller.
13. Reach under dash and unscrew speedo from cruise control speed input,if you do not have cruise control you will not have this device. The speedo can be disconected from the back of the guage cluster also but you have to pull out on the cluster and you take a chance of breaking the plastic tab that holds it to the cluster.
14. Remove screws from guage cluster,there is 6,then pull out on cluster and on the back disconect the wires,I just use a flat tip screw driver and depress the tab on top of the connector and remove it,be careful not to break the connector or rip the circuit board.
15. Reach under the dash and push on the button on the headlight switch and remove the handle,this is a spare switch I have,makes it easier to show the button. If you were going to remove the headlight switch the next 3 pics is all you need to do,other than removing the wires.
16. This is the switch with the handle removed.
17. After handle has been removed unscrew the screw that holds it in place,just use a large flat tip screwdriver and remove.
18. This is the headlight timer,it is what keeps your lights on after you turn the key off,it is located under the dash on the left side of colum,it is held by 5/16 hex head screw.
19. This is the rear defrost timer,turns defroster off after about 5 minutes,loacted under dash on right side of colum,held in by 2 5/16 hex head screws.
20. Ground wire located on the left side of dash,held on by 1 5/16 hex head screw.
Last edited by Abovetimberline; 01-25-2010 at 12:31 PM.
The following users liked this post:
PPA (05-06-2022)
01-22-2010, 01:42 PM
#3
CF Veteran
Thread Starter
Join Date: Jul 2009
Location: Chico,ca
Posts: 2,158
Likes: 0
Received 10 Likes
on
9 Posts
Year: 89
Model: Cherokee
Engine: 4.0
21. This is the trim above the dash next to windshield,it is held in by 4 screws, one each side and two in the middle,just remove them and remove trim.
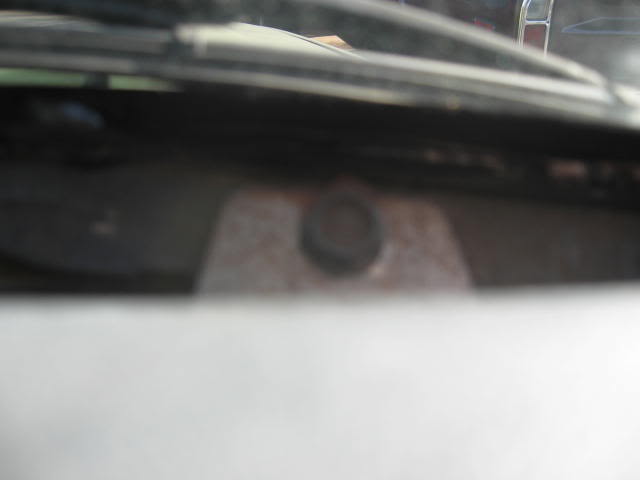
22. This is one of the 10mm bolts that hold the upper dash,there are 4,one each side and two in the middle.
23. This is one of the bolts that hold the bottom of the dash in place,they are 15mm and there is one each side behind the kick panels. Kick panels are held in by 2 screws,one in the middle and one on the trim on the rocker panel. At this point the dash is ready to come out,double check everything again,have a beer and double check again,destress,have another beer and check again,little humor. It is actually fairly easy to remove if you have an idea how.
24. One of the main reasons for removing the dash is to remove the heater core or ac evaperator,In my opinion the dash needs to be removed in order to easly replace the heater core,at least the right side of the dash needs to be removed,even with the dash out of the way the core has to be pulled back a bit to get to all the screws. If you had to remove the ac evaporartor,you would have remove the heater/ac module completley,and have the ac system evacuated, I did not have to do any work to my heater or ac but I will show what has to be done to repair it and show all the components associated with the heater core removal.ac evap removal,and the flow through the module.
This is how I would remove my heater core.
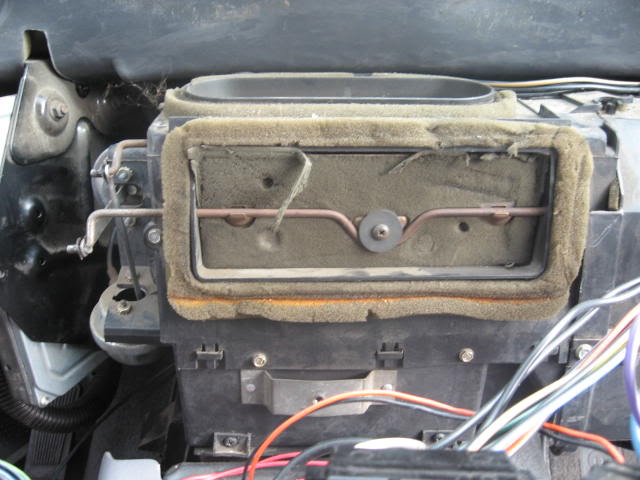
1. This shows the heater core in the jeep.
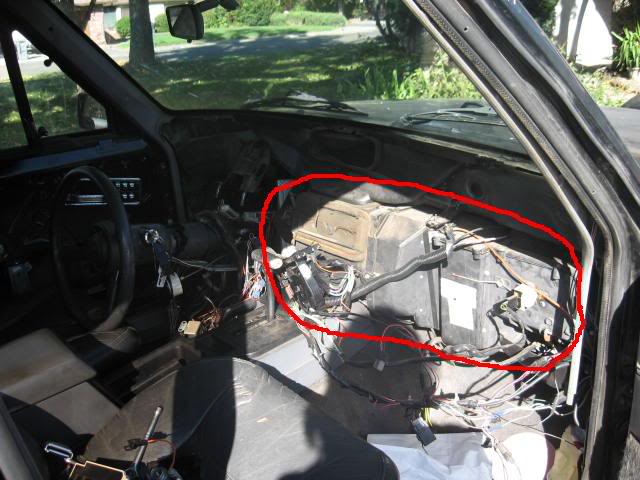
2. This is the spare module I have,this is the way it looks if you were looking at it in the jeep.
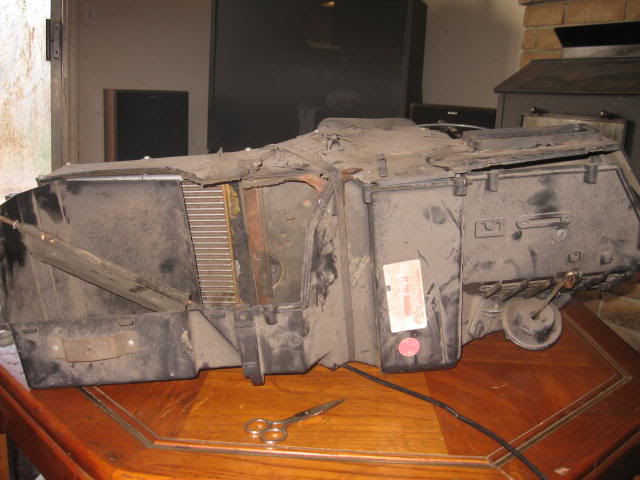
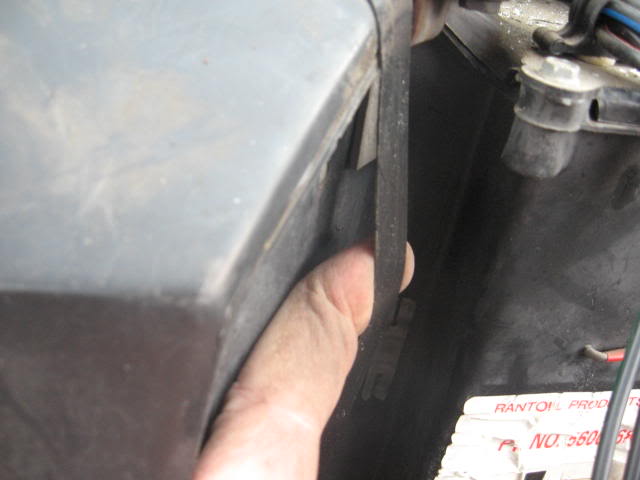
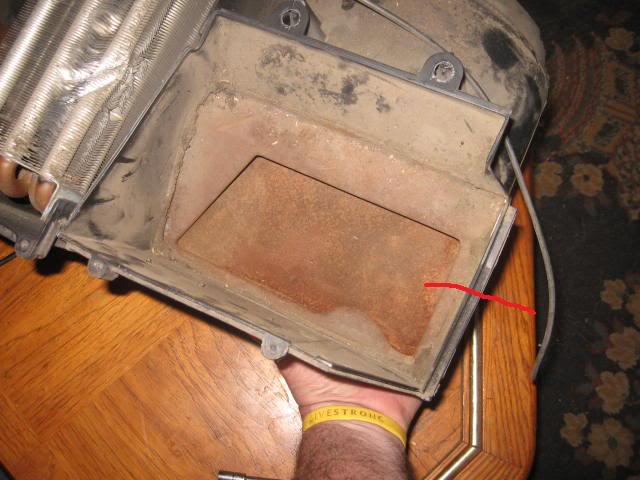
3. This is how the module looks from the engine side,the red circles are the studs that go through the firewall,if you look from the engine compartment you will see these sticking through and held on with nuts,the one on the left is under the coolant bottle on renix jeeps,the rest are easily seen,all these will have to be removed in order to get core out. The red line just shows the air inlet.
You can also see the heater hoses here,they need to be disconected.
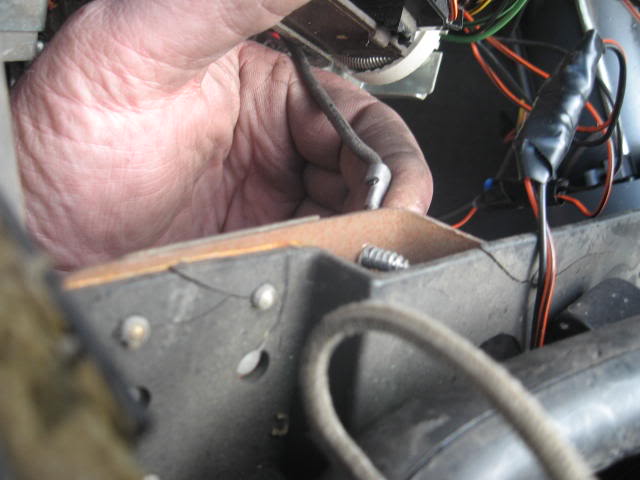
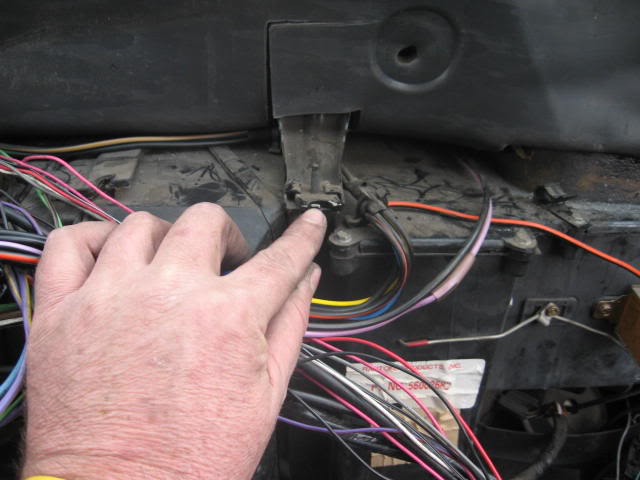
4. This screw holds the dash in the front inside,also just to the left of my finger you can see a plastic band,it helps to hold the module together,it has to be cut and removed,when replacing you can use wire or anything to replace the band.
Once everything is removed pull module out for enough to get to screws that hold the top of the module on. If your ac is charged you will be stuck with being able to only remove the module as far as the ac lines will let you,but you can get it out far enough to replace the core,if your ac is not charged I would suggest removing ac lines so you can remove the module far enough to make it easier. If the ac evaporator has to be removed because of a leak or debris on the inlet side,(covered later) you will need to have ac system evacuated,at that point I would strongly suggest having a shop do the work,most do not have the pump and tools to do the work.
This is the band you have to cut.
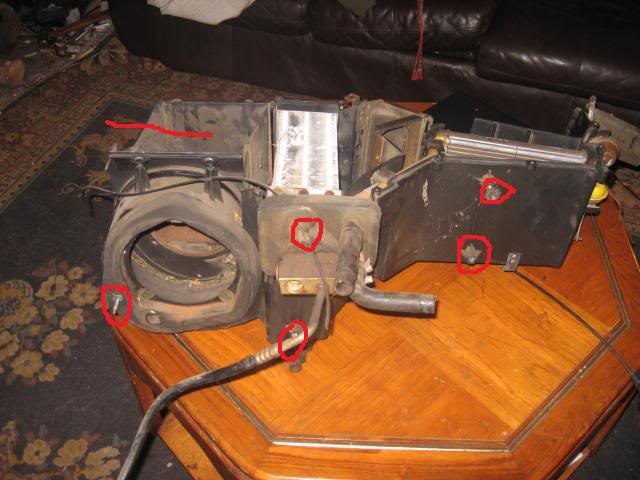
5. Once module has been removed far enough to get to the core,you will need to cut the plastic band,and remove the screws on top of the module,and on the sides,it is easy to see all them,I have circled a few here just to show where some are located.
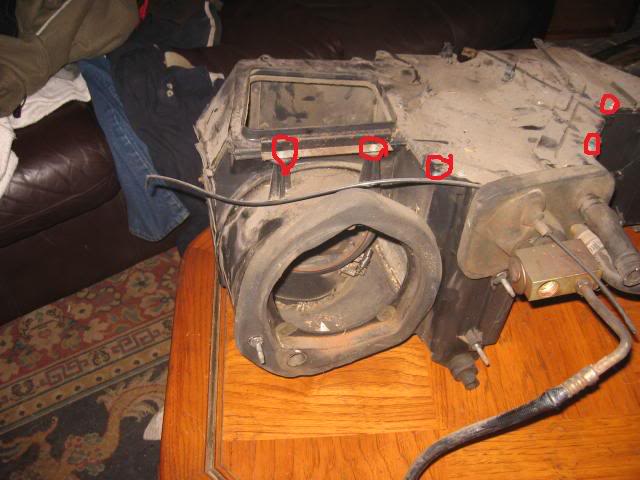
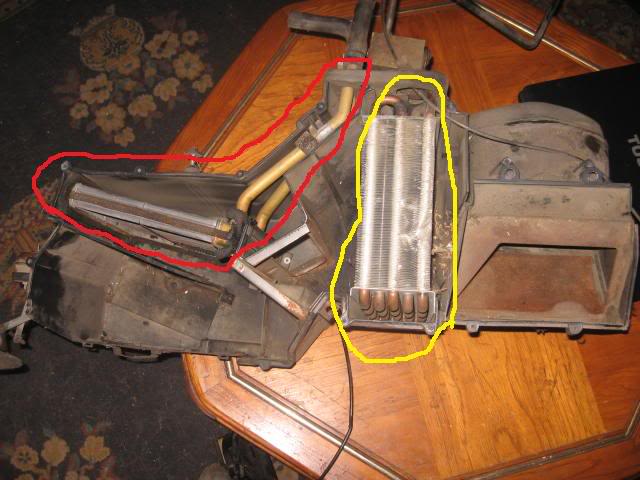
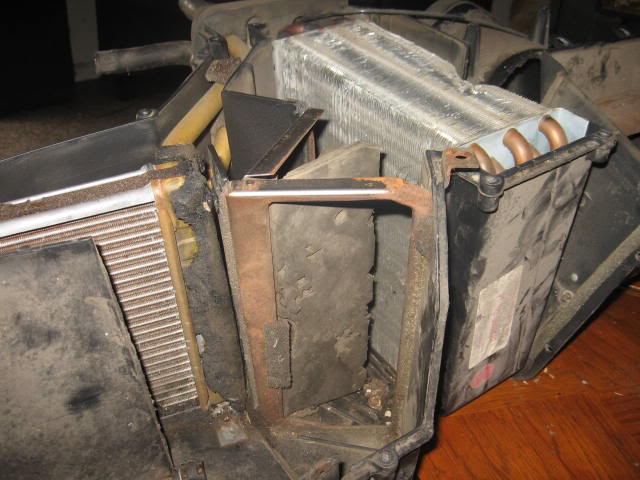
6. Once top has been removed it looks like this,the ac evaporator is loacted on the right circled in yellow,(not sure why I did not use blue)the heater core on the left circled in red.
To remove the core just lift it out and replace with the replacement. The ac evaporator just lifts out also,I am not going to cover much with the ac because outside of adding refrigerant from the autoparts,most all work needs to be done by a shop. At this point just reverse the procedure to reinstall. I can provide more pics if needed but it is pretty straight forward.
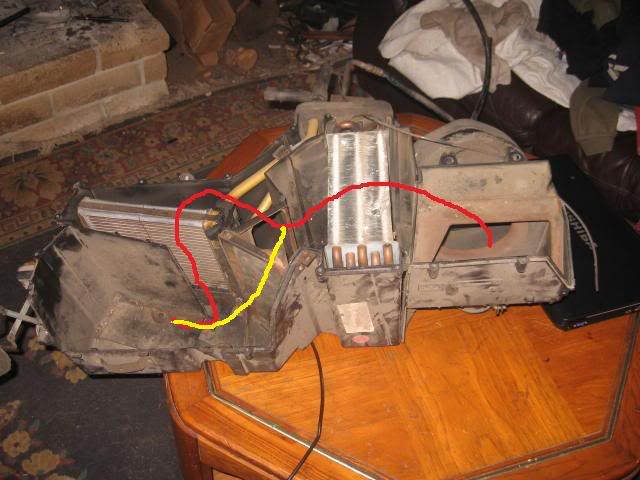
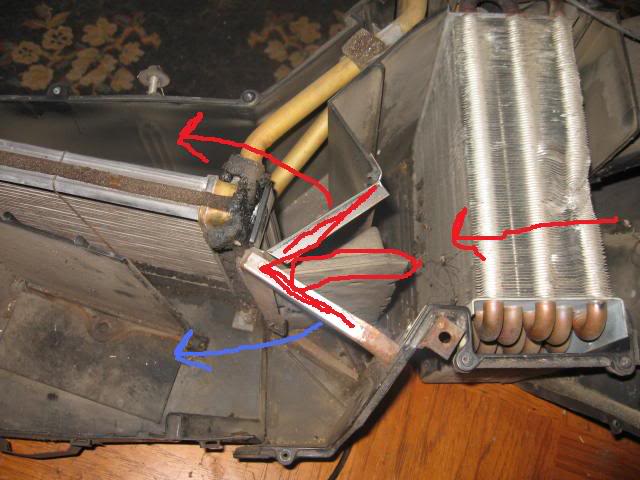
7. At this point I am going to explain how air flows through the module and the components.
Here you can see the airflow through the module,the opening on the right is the outside air inlet.it then flows through the ac evaporator and the the blend door,if you have the blend door move to the right all air will go through the heater core,shown by red line,you can also choose any position in between from the hottest,to the coldest and air will be diverted by how much the blend door id moved. I will show the blend door in the next section.
22. This is one of the 10mm bolts that hold the upper dash,there are 4,one each side and two in the middle.
23. This is one of the bolts that hold the bottom of the dash in place,they are 15mm and there is one each side behind the kick panels. Kick panels are held in by 2 screws,one in the middle and one on the trim on the rocker panel. At this point the dash is ready to come out,double check everything again,have a beer and double check again,destress,have another beer and check again,little humor. It is actually fairly easy to remove if you have an idea how.
24. One of the main reasons for removing the dash is to remove the heater core or ac evaperator,In my opinion the dash needs to be removed in order to easly replace the heater core,at least the right side of the dash needs to be removed,even with the dash out of the way the core has to be pulled back a bit to get to all the screws. If you had to remove the ac evaporartor,you would have remove the heater/ac module completley,and have the ac system evacuated, I did not have to do any work to my heater or ac but I will show what has to be done to repair it and show all the components associated with the heater core removal.ac evap removal,and the flow through the module.
This is how I would remove my heater core.
1. This shows the heater core in the jeep.
2. This is the spare module I have,this is the way it looks if you were looking at it in the jeep.
3. This is how the module looks from the engine side,the red circles are the studs that go through the firewall,if you look from the engine compartment you will see these sticking through and held on with nuts,the one on the left is under the coolant bottle on renix jeeps,the rest are easily seen,all these will have to be removed in order to get core out. The red line just shows the air inlet.
You can also see the heater hoses here,they need to be disconected.
4. This screw holds the dash in the front inside,also just to the left of my finger you can see a plastic band,it helps to hold the module together,it has to be cut and removed,when replacing you can use wire or anything to replace the band.
Once everything is removed pull module out for enough to get to screws that hold the top of the module on. If your ac is charged you will be stuck with being able to only remove the module as far as the ac lines will let you,but you can get it out far enough to replace the core,if your ac is not charged I would suggest removing ac lines so you can remove the module far enough to make it easier. If the ac evaporator has to be removed because of a leak or debris on the inlet side,(covered later) you will need to have ac system evacuated,at that point I would strongly suggest having a shop do the work,most do not have the pump and tools to do the work.
This is the band you have to cut.
5. Once module has been removed far enough to get to the core,you will need to cut the plastic band,and remove the screws on top of the module,and on the sides,it is easy to see all them,I have circled a few here just to show where some are located.
6. Once top has been removed it looks like this,the ac evaporator is loacted on the right circled in yellow,(not sure why I did not use blue)the heater core on the left circled in red.
To remove the core just lift it out and replace with the replacement. The ac evaporator just lifts out also,I am not going to cover much with the ac because outside of adding refrigerant from the autoparts,most all work needs to be done by a shop. At this point just reverse the procedure to reinstall. I can provide more pics if needed but it is pretty straight forward.
7. At this point I am going to explain how air flows through the module and the components.
Here you can see the airflow through the module,the opening on the right is the outside air inlet.it then flows through the ac evaporator and the the blend door,if you have the blend door move to the right all air will go through the heater core,shown by red line,you can also choose any position in between from the hottest,to the coldest and air will be diverted by how much the blend door id moved. I will show the blend door in the next section.
Last edited by Abovetimberline; 01-25-2010 at 12:38 PM.
The following users liked this post:
PPA (05-06-2022)
01-22-2010, 02:41 PM
#4
CF Veteran
Thread Starter
Join Date: Jul 2009
Location: Chico,ca
Posts: 2,158
Likes: 0
Received 10 Likes
on
9 Posts
Year: 89
Model: Cherokee
Engine: 4.0
8. This shows the inlet to the ac evaporator,seeings all airflow goes through the evaporator if you have an air restriction,it could be plugged with debris,if you work in an area where there is alot of airborn material like sawdust,dust,it can become plugged,I have seen them get plugged by rice hulls from pepole that work in mills,leaves,etc,also in this pic just to the right and under the stud is the evap drain,this is where the moisture from the evapaorator drains out on to the ground,it is located inside the engine compartment and has a rubber drain hose on it.
Just in front of the evaporator on the bottom you can see the The blower resistor,this is the what goes out alot and will either not allow the blower to come on,or only one speed most of the time high. It is mounted in the air stream to keep it cool,it does not since air,where it is mounted it always sees cool air.
This is also where the blower would sit,it is held on by 4 bolts,I think 8-10mm,it is located under the coolant bottle on the firewall.

9. This is the blower in the jeep,located under the coolant bottle for I think the screws are 8mm-10mm

10. When max air is selected weather it is ac or heat this is the actuator that close the door in the below pics,it is located on the right side,there is a little plastic cover that covers it,if you look under the dash you will see it,if max is not choosen then all air is from the outside,there is no halfway,it is either one or the other,when max is choosen it allows the air to be recirculated and provide the maximum cooling or heating,by recirculating the air the air does not come from the outside so air is just cooled or heated quicker,when air is coming from the outside it also contains moisture,that is why when defrost is selected the ac comp runs also to remove moisture from the air to keep moisture from building up on the winshield..
11. This shows the door shut,max position.
12. This shows the door open,normal position and air comes from the outside.

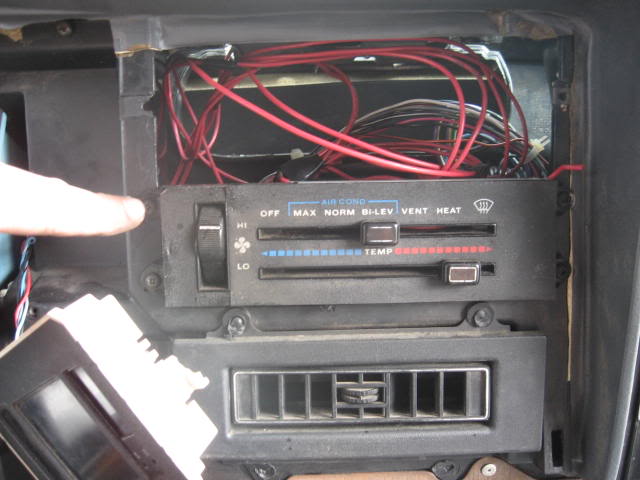
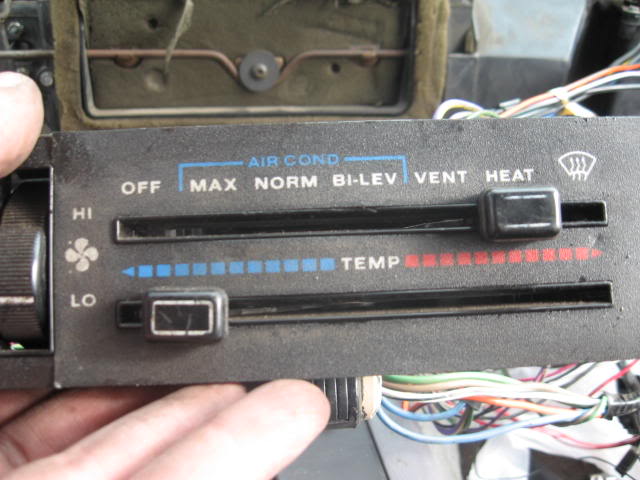
13.this is the climate controller and it controls all the actuators for heat,defrost,vents,and blend door,the bottom lever is for the blend door.
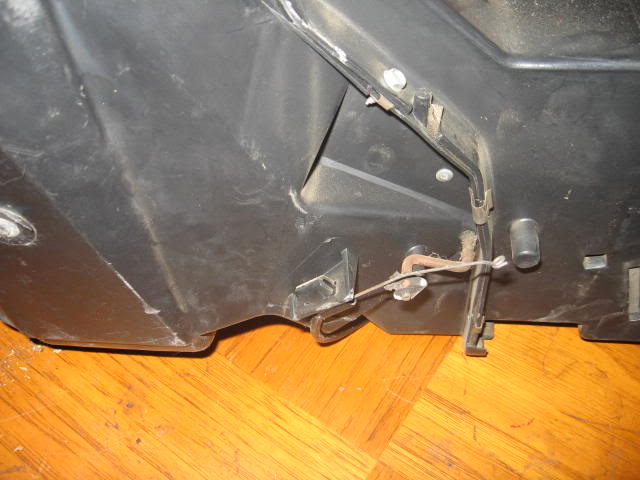
14. This is the cable that is attached to the blend door,it is impossible to get to with the heater core in place,unless you are very small and do not mind working upside down.
15. This is the blend door,the air enters from the ac evaporator,and can be diverted to the heater or block the flow to the heater,or blend the air to what you desire.
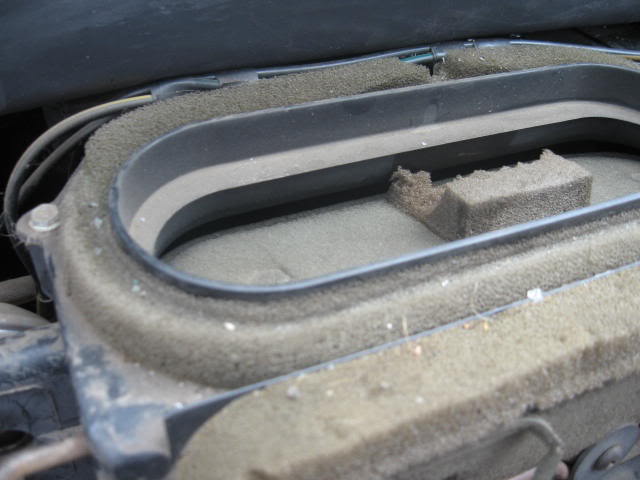
16. This is the blend door also,you can see the seals on each side,also the material on the door is just foam,as it gets worn the door is not as efficient.
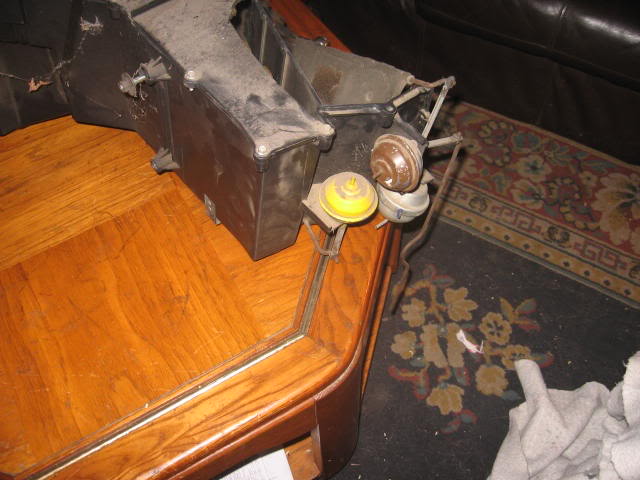
17. This is the vacum actuators for the doors,the yellow one if for the heater,the brown one is for the vent,and the silver one is for the defrost. the heater has a dual diaphram in it,when heat is choosen it will open the heat door,and the defrost slightly open,this is the only time it does this,see pic below.
these can be replaced with the dash in place,but it is not easy if your big.
18. This is the defrost door slightly open and heat is selected.
19. This is the vent door in front closed,you can see the defrost outlet just above,the door is just out of view.
20. This is the heater door on the bottom with the door closed.

Just in front of the evaporator on the bottom you can see the The blower resistor,this is the what goes out alot and will either not allow the blower to come on,or only one speed most of the time high. It is mounted in the air stream to keep it cool,it does not since air,where it is mounted it always sees cool air.
This is also where the blower would sit,it is held on by 4 bolts,I think 8-10mm,it is located under the coolant bottle on the firewall.
9. This is the blower in the jeep,located under the coolant bottle for I think the screws are 8mm-10mm
10. When max air is selected weather it is ac or heat this is the actuator that close the door in the below pics,it is located on the right side,there is a little plastic cover that covers it,if you look under the dash you will see it,if max is not choosen then all air is from the outside,there is no halfway,it is either one or the other,when max is choosen it allows the air to be recirculated and provide the maximum cooling or heating,by recirculating the air the air does not come from the outside so air is just cooled or heated quicker,when air is coming from the outside it also contains moisture,that is why when defrost is selected the ac comp runs also to remove moisture from the air to keep moisture from building up on the winshield..
11. This shows the door shut,max position.
12. This shows the door open,normal position and air comes from the outside.
13.this is the climate controller and it controls all the actuators for heat,defrost,vents,and blend door,the bottom lever is for the blend door.
14. This is the cable that is attached to the blend door,it is impossible to get to with the heater core in place,unless you are very small and do not mind working upside down.
15. This is the blend door,the air enters from the ac evaporator,and can be diverted to the heater or block the flow to the heater,or blend the air to what you desire.
16. This is the blend door also,you can see the seals on each side,also the material on the door is just foam,as it gets worn the door is not as efficient.
17. This is the vacum actuators for the doors,the yellow one if for the heater,the brown one is for the vent,and the silver one is for the defrost. the heater has a dual diaphram in it,when heat is choosen it will open the heat door,and the defrost slightly open,this is the only time it does this,see pic below.
these can be replaced with the dash in place,but it is not easy if your big.
18. This is the defrost door slightly open and heat is selected.
19. This is the vent door in front closed,you can see the defrost outlet just above,the door is just out of view.
20. This is the heater door on the bottom with the door closed.
Last edited by Abovetimberline; 01-25-2010 at 12:49 PM.
The following users liked this post:
PPA (05-06-2022)
01-22-2010, 03:33 PM
#5
CF Veteran
Thread Starter
Join Date: Jul 2009
Location: Chico,ca
Posts: 2,158
Likes: 0
Received 10 Likes
on
9 Posts
Year: 89
Model: Cherokee
Engine: 4.0
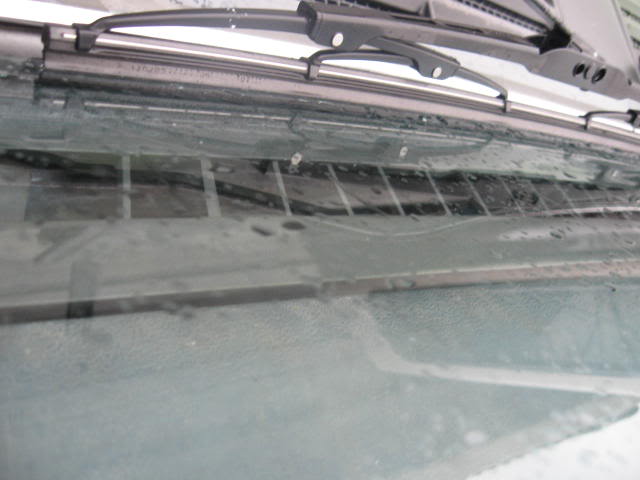
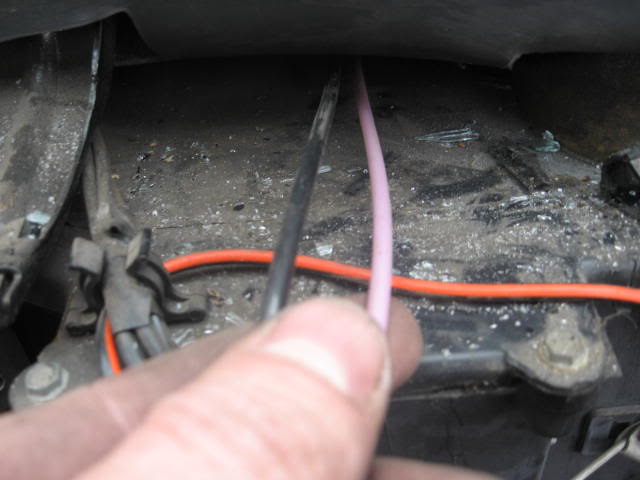
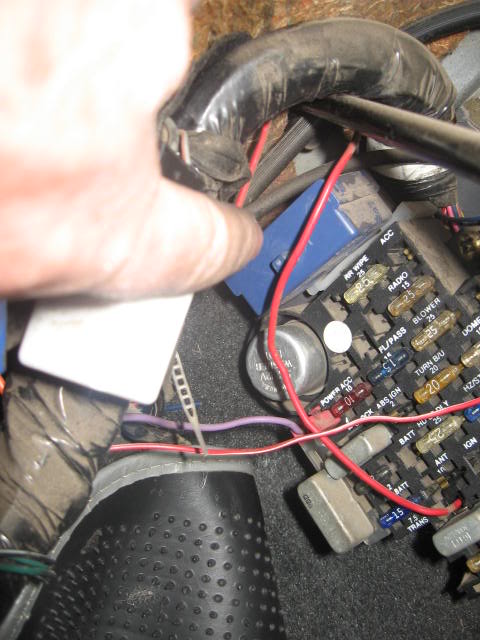
1. These are the vacum lines,the black one is from the vacum resevoir in the bumper,the pink one is going out to the heater control valve. The other vacum lines are not shown because if there is a leak on one of them you will need to at least partially remove the dash to get to them,from the vacum switch 4 lines go to the actuators for the vents,heater,defrost,and 2 go to the door for max ac.
You can also see the glass I needed to clean-up from replacing my winshield,do not use a sawsall to remove a windshield,one of my better ideas, use piano wire or something else.
2. This is the vacuum switch disconnected just to show what it looks like.
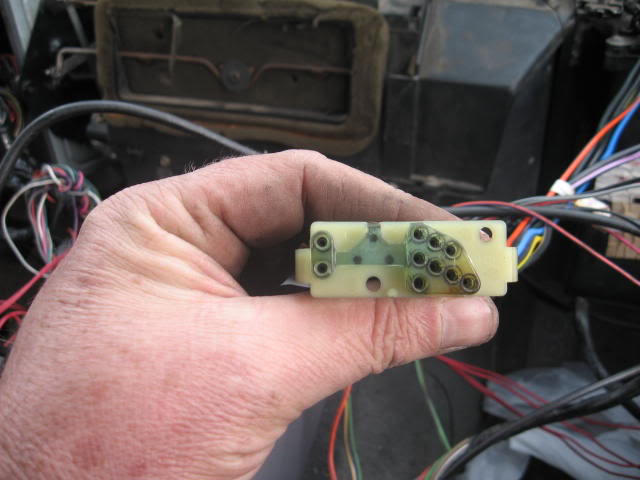
3. This is the back of the climate controller,the left side as you see it it the blower switch,the middle is the vacuum switch,the right side is the ac wiries. If you need to replace the blower switch after the climate controller is removed,just need to remove 2 1/4" hex head screws and replace switch.
4. This is the a/c temperature switch,it has a capillary tube that is connected to the evaporator that when the evap gets to cold and will cycle the compressor clutch,the way it works is the capillary tube is charged with refrigerant,when it gets cold the pressure in the tube decreases and opens the switch,when it gets warm the pressure expands and it closes the switch,if this switch goes bad your compressor may not cycle,if it fails open it will not come on,just another thing that can cause the compressor to not come on.
If it goes bad you have to remove the lower dash and reach up to remove the screws and pull capillary tube out of evap,then reinstall tube and new sensor
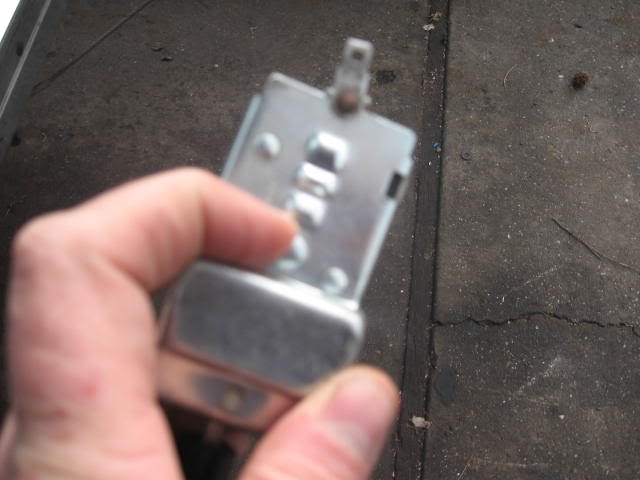
5. this is the blower resistor and is mounted behind the glove box. This is what generally happens when your blower will not work,or will only work on high. To replace it remove the lower dash and black cover under it, it is easy to get to.
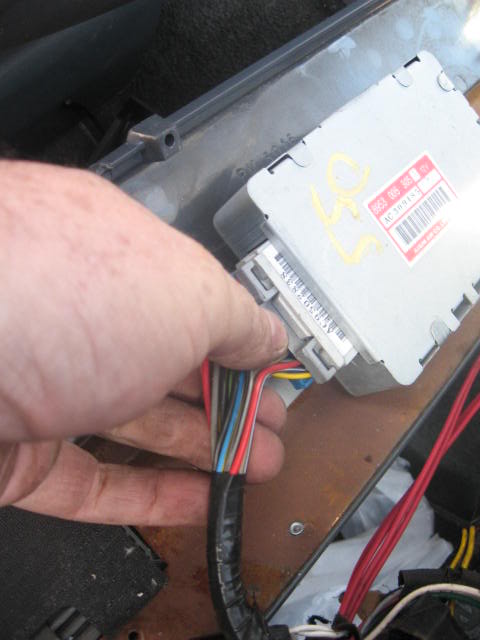
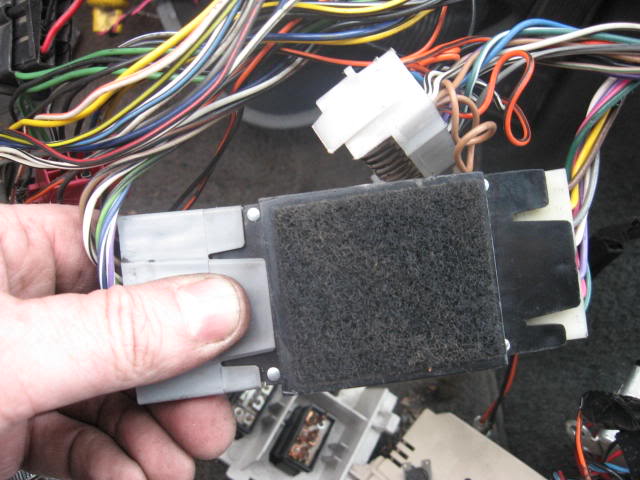
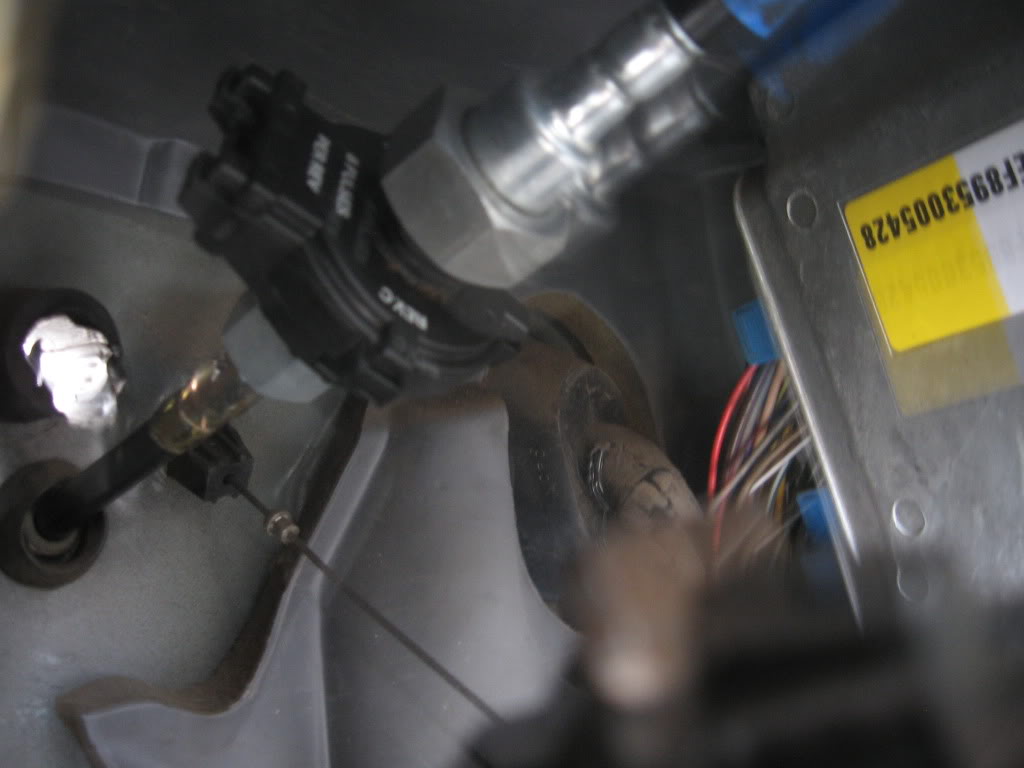
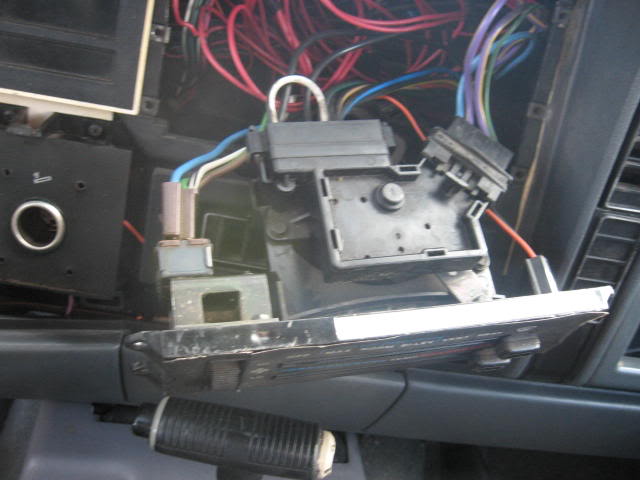
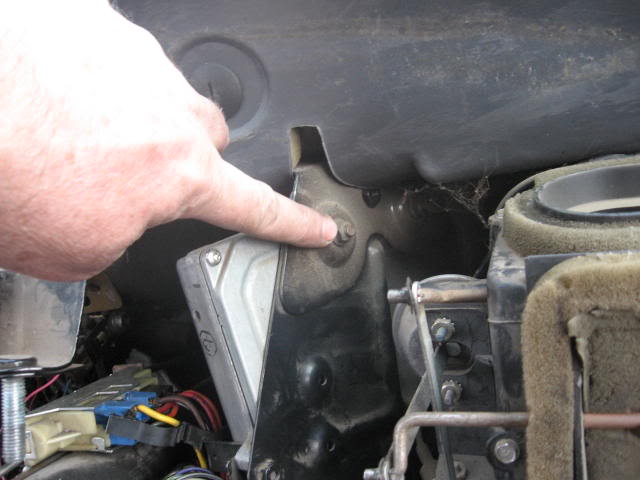
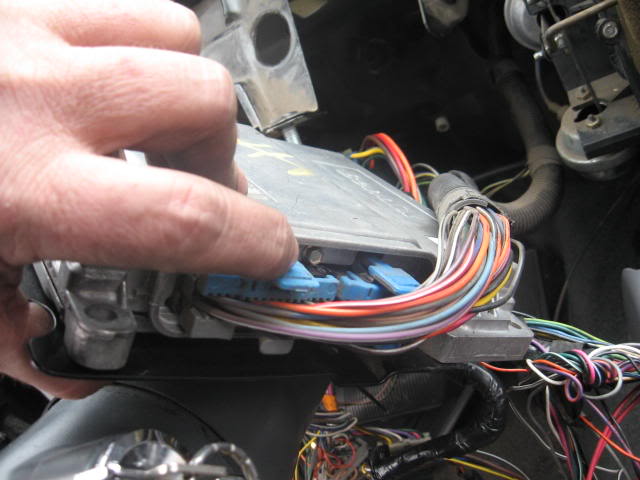
6. This is the pcm,the engines brains,it is located on the left side of the vacum actuators for the heat and a/c.
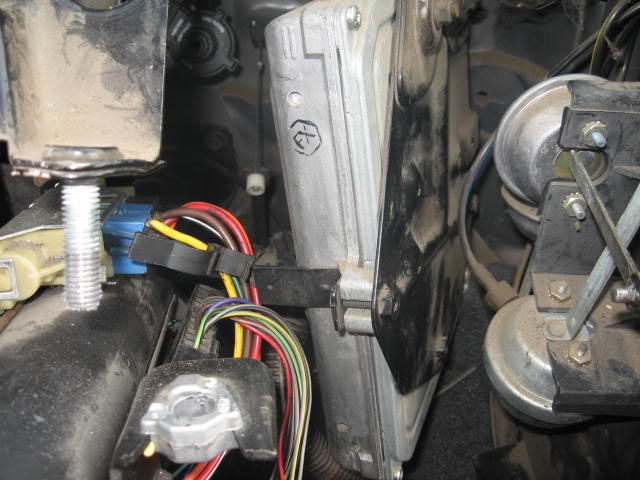
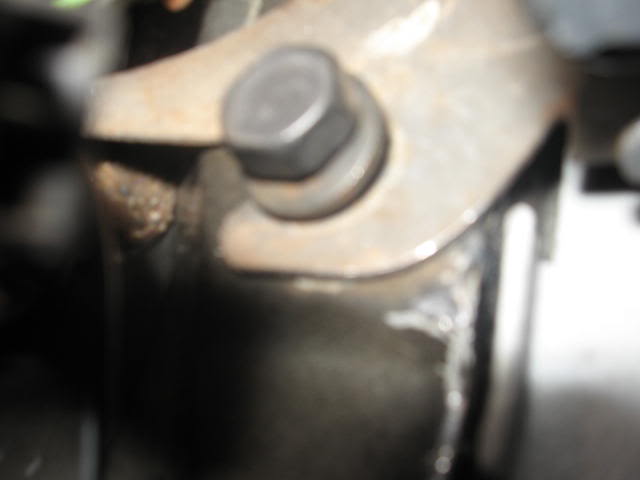
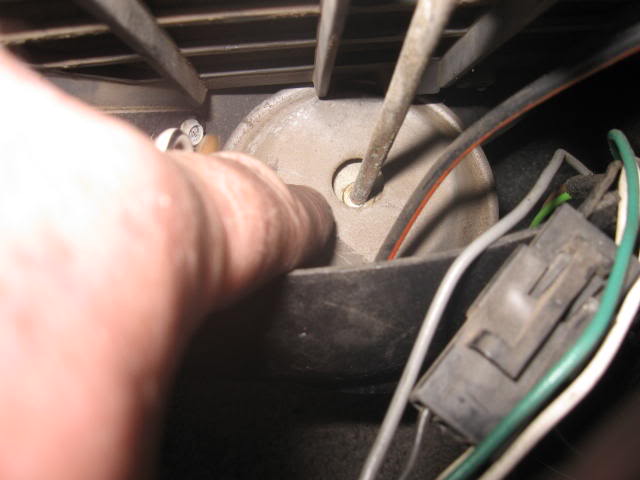
7. To replace it remove the lower dash and remove the 2 nuts, 1 shown here and another on the other side.
8. Then remove the connectors here,then just install the replacement in reverse.
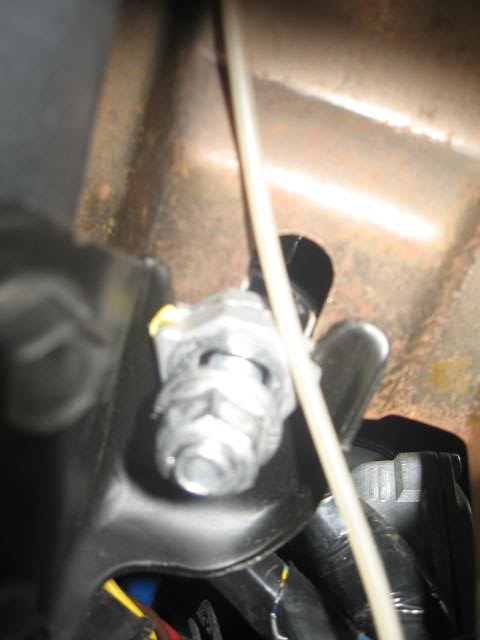
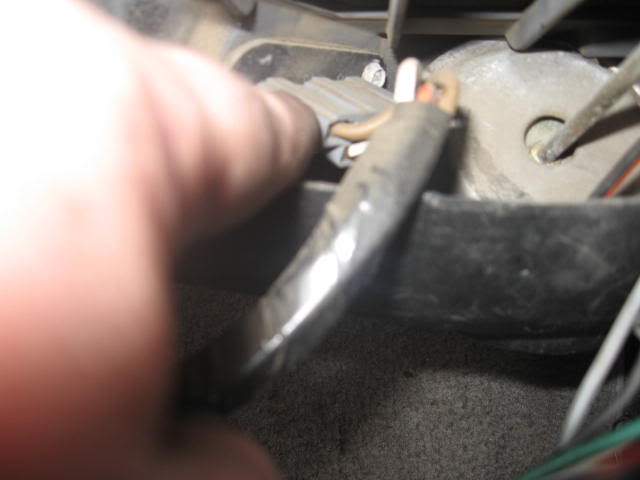
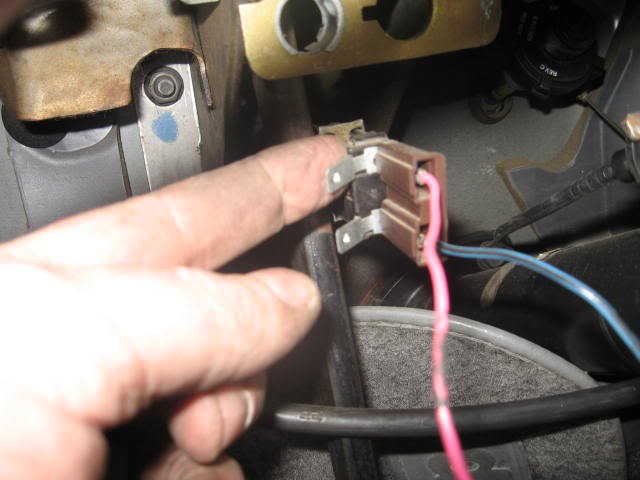
9. This is the brake switch,it is held in by a bolt and nut with plastic bushings,to replace just remove bolt and nut,replace with replacement,make sure it is lined up with pedal.
10. This is the chim module,makes noise.
You can also see the glass I needed to clean-up from replacing my winshield,do not use a sawsall to remove a windshield,one of my better ideas, use piano wire or something else.
2. This is the vacuum switch disconnected just to show what it looks like.
3. This is the back of the climate controller,the left side as you see it it the blower switch,the middle is the vacuum switch,the right side is the ac wiries. If you need to replace the blower switch after the climate controller is removed,just need to remove 2 1/4" hex head screws and replace switch.
4. This is the a/c temperature switch,it has a capillary tube that is connected to the evaporator that when the evap gets to cold and will cycle the compressor clutch,the way it works is the capillary tube is charged with refrigerant,when it gets cold the pressure in the tube decreases and opens the switch,when it gets warm the pressure expands and it closes the switch,if this switch goes bad your compressor may not cycle,if it fails open it will not come on,just another thing that can cause the compressor to not come on.
If it goes bad you have to remove the lower dash and reach up to remove the screws and pull capillary tube out of evap,then reinstall tube and new sensor
5. this is the blower resistor and is mounted behind the glove box. This is what generally happens when your blower will not work,or will only work on high. To replace it remove the lower dash and black cover under it, it is easy to get to.
6. This is the pcm,the engines brains,it is located on the left side of the vacum actuators for the heat and a/c.
7. To replace it remove the lower dash and remove the 2 nuts, 1 shown here and another on the other side.
8. Then remove the connectors here,then just install the replacement in reverse.
9. This is the brake switch,it is held in by a bolt and nut with plastic bushings,to replace just remove bolt and nut,replace with replacement,make sure it is lined up with pedal.
10. This is the chim module,makes noise.
Last edited by Abovetimberline; 01-25-2010 at 12:59 PM.
The following users liked this post:
PPA (05-06-2022)
01-24-2010, 07:25 PM
#6
CF Veteran
Thread Starter
Join Date: Jul 2009
Location: Chico,ca
Posts: 2,158
Likes: 0
Received 10 Likes
on
9 Posts
Year: 89
Model: Cherokee
Engine: 4.0
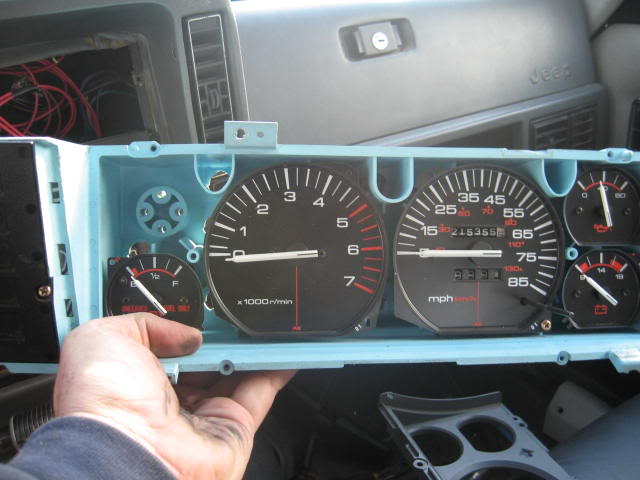
1. This is how you can change the guages,Remove these screws,there is 4,remove the plastic cover and plastic around guages.
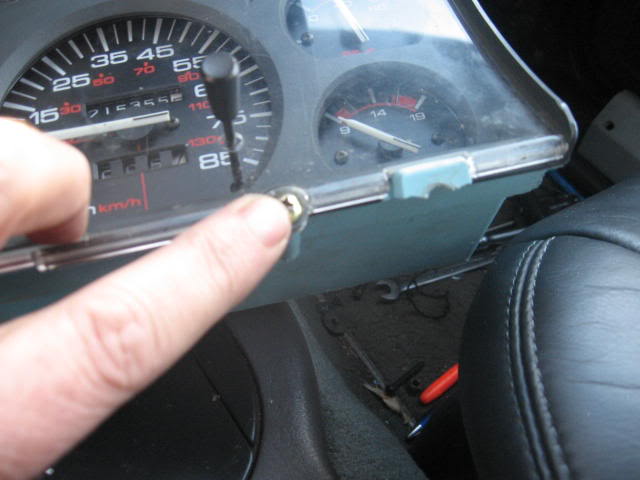
2. I am only going to remove the temp guage to show how to remove a guage,the rest are the sam may need to remove a little more. remove the 5 screws here and bulbs around the guage,be careful not to damage the circuit board.
3. Remove bulbs.
4. Remove these screws.
5. This is with the guage remove from the cluster.
6. This is the guage removed.
Last edited by Abovetimberline; 01-25-2010 at 01:00 PM.
The following users liked this post:
buckdj@gmail.com (12-18-2020)

Thread
Thread Starter
Forum
Replies
Last Post
NM-XJ
Stock XJ Cherokee Tech. All XJ Non-modified/stock questions go here
18
10-23-2018 04:21 PM
vegasXJ-Davey
Modified XJ Cherokee Tech
0
09-07-2015 09:30 PM
daddytuck
Stock XJ Cherokee Tech. All XJ Non-modified/stock questions go here
0
09-07-2015 05:51 PM
Currently Active Users Viewing This Thread: 1 (0 members and 1 guests)