The Unnamed
 07-06-2012, 02:41 PM
#1
Senior Member
Thread Starter
Join Date: Nov 2010
Location: Cloquet, MN
Posts: 976
Likes: 0
Received 5 Likes
on
5 Posts
Year: 2000 Ltd.
Model: Cherokee
Engine: 4.0L I6
Okay, so I've been working on my Jeep for nearly two years now and haven't gotten around to starting a build thread. Figured I should do it now that I'm out of a job and have some spare time on my hands.  I'll try and cover everything I've done to it as I get time.
It all started way back around Thanksgiving of 2010. My trusty Subaru decided to make out with the back of an SUV after I had just finished doing some extensive body work on it, so it was replaced with a 2000 Jeep Cherokee Limited with 109K miles.
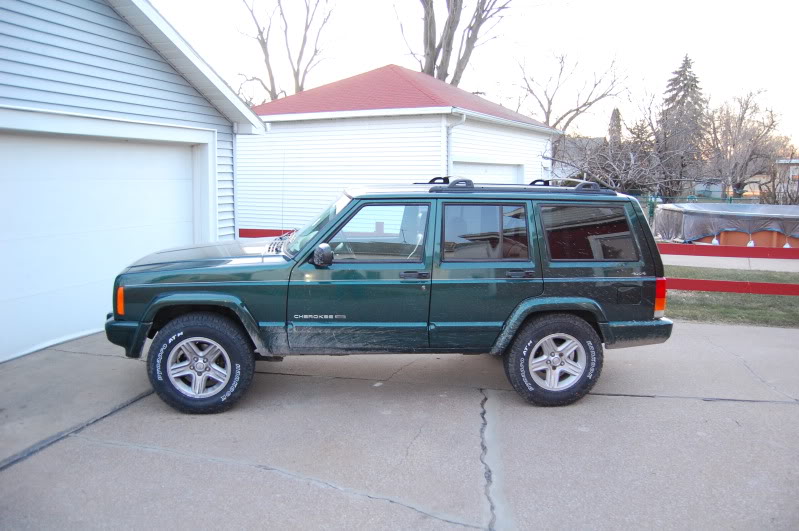
I don't have any pictures of it when I first got it, but this is what it looked like after I put 225/75-16 Hankook DynaPro ATM's on it.
I'll try and cover everything I've done to it as I get time.It all started way back around Thanksgiving of 2010. My trusty Subaru decided to make out with the back of an SUV after I had just finished doing some extensive body work on it, so it was replaced with a 2000 Jeep Cherokee Limited with 109K miles.
I don't have any pictures of it when I first got it, but this is what it looked like after I put 225/75-16 Hankook DynaPro ATM's on it.
 07-07-2012, 09:31 AM
#3
Senior Member
Thread Starter
Join Date: Nov 2010
Location: Cloquet, MN
Posts: 976
Likes: 0
Received 5 Likes
on
5 Posts
Year: 2000 Ltd.
Model: Cherokee
Engine: 4.0L I6
Ha, yeah. Though with a good set of snow tires it was impressive how much sand that Subi could go through!
I don't have pictures of everything I've done but I'll post them whenever possible. To start off these are some of the more maintenance things I've had to do. It's amazing how much money I've actually had to sink into this thing for maintenance! I track what I spend on it and going to my log is kind of ridiculous.
I replaced both headlights because they were dim. I was amazed at how much brighter new ones are than the old ones. I also replaced shortly after getting the Jeep:
I also found that the driver's door speaker wasn't working. Thought it was the speakers so I picked up a pair of cheap Pioneers at Walmart, only to find that the speaker wire that runs through the boot between the door and the a-pillar was fatigued in half. Fixed that and kept the speakers. I liked those speakers so I picked up a set for the rear too.
I have the Mopar trailer hitch, but had some generic (U-haul I think) pigtail. One day while I was at the JY I found the OEM tow package so I grabbed the tranny cooler and the OEM pigtail harness and put them on my rig. Now I just need a brake controller and I can use electric brakes!
I also had the infamous oil drip off the bell housing. That drove me crazy. Researching on here I found it was one of three things: the valve cover gasket, the rear main seal, or the o-ring on the oil filter adapter. I replaced the valve cover gasket because there was oil on the back side of the head. Didn't fix it. Pulled the oil pan off to change the rear main seal and found water in the oil! I think it was definitely a God thing that I pulled that apart because I wouldn't have found that the head gasket was blown otherwise. It was loosing coolant VERY slowly in the reservoir, but only enough to drop from hot to cold over about 900 or 1,000 miles.
That whole fiasco was a God thing too. In brief I ended up putting on a TUPY head from an '03 WJ that was decked and had all the valves re-cut, replaced the water pump and all required gaskets for $306. You can see in this picture were the gasket was leaking between cylinders 3 and 4 but the strange part is that a leak between cylinders shouldn't cause coolant to leak. I'm thinking that it was also leaking somewhere else between the water jacket and the cylinders because the head was checked and was good (guy that did the work on the TUPY head bought it from me).
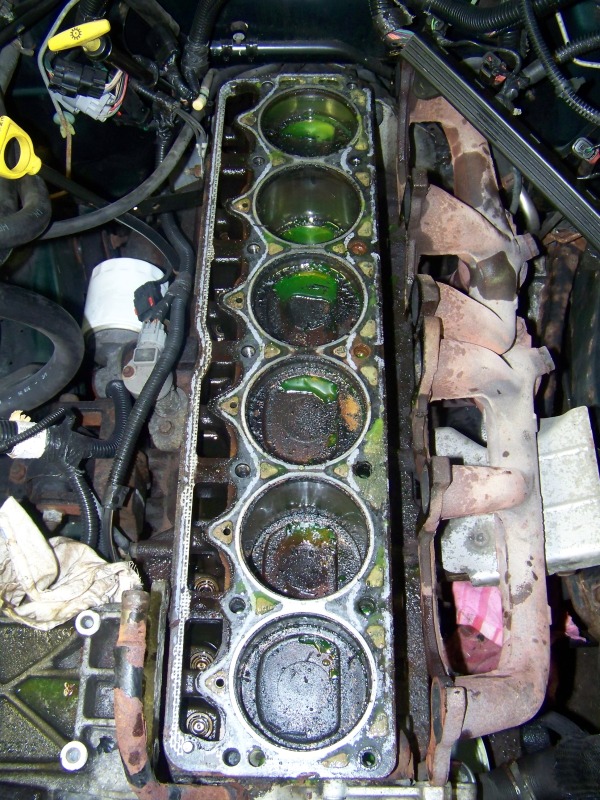
I got the engine back together only to find out oil was STILL leaking off the bell housing. Turns out it was the oil filter adapter o-ring all along! Go figure. But, if I hadn't dropped the oil pan it would have taken a while to find out I had water in the engine. I don't know how long it would have lasted as when I inspected the crank there was a film of water on EVERYTHING on in the inside of the engine. I caught it before it ate by bearings. Oil pressure is still about 50 psi off idle and about 20 psi at idle when warm.
I don't have pictures of everything I've done but I'll post them whenever possible. To start off these are some of the more maintenance things I've had to do. It's amazing how much money I've actually had to sink into this thing for maintenance! I track what I spend on it and going to my log is kind of ridiculous.
I replaced both headlights because they were dim. I was amazed at how much brighter new ones are than the old ones. I also replaced shortly after getting the Jeep:
- Ambient temp sensor
- rear hatch support
- air filter
- spark plugs
- adjusted steering box to tighen up slop
- reinstalled missing factory fog lamps (had everything for them, just no lights)
I also found that the driver's door speaker wasn't working. Thought it was the speakers so I picked up a pair of cheap Pioneers at Walmart, only to find that the speaker wire that runs through the boot between the door and the a-pillar was fatigued in half. Fixed that and kept the speakers. I liked those speakers so I picked up a set for the rear too.
I have the Mopar trailer hitch, but had some generic (U-haul I think) pigtail. One day while I was at the JY I found the OEM tow package so I grabbed the tranny cooler and the OEM pigtail harness and put them on my rig. Now I just need a brake controller and I can use electric brakes!
I also had the infamous oil drip off the bell housing. That drove me crazy. Researching on here I found it was one of three things: the valve cover gasket, the rear main seal, or the o-ring on the oil filter adapter. I replaced the valve cover gasket because there was oil on the back side of the head. Didn't fix it. Pulled the oil pan off to change the rear main seal and found water in the oil!
That whole fiasco was a God thing too. In brief I ended up putting on a TUPY head from an '03 WJ that was decked and had all the valves re-cut, replaced the water pump and all required gaskets for $306. You can see in this picture were the gasket was leaking between cylinders 3 and 4 but the strange part is that a leak between cylinders shouldn't cause coolant to leak. I'm thinking that it was also leaking somewhere else between the water jacket and the cylinders because the head was checked and was good (guy that did the work on the TUPY head bought it from me).
I got the engine back together only to find out oil was STILL leaking off the bell housing. Turns out it was the oil filter adapter o-ring all along! Go figure. But, if I hadn't dropped the oil pan it would have taken a while to find out I had water in the engine. I don't know how long it would have lasted as when I inspected the crank there was a film of water on EVERYTHING on in the inside of the engine. I caught it before it ate by bearings. Oil pressure is still about 50 psi off idle and about 20 psi at idle when warm.
07-07-2012, 09:43 AM
#4
Senior Member
Thread Starter
Join Date: Nov 2010
Location: Cloquet, MN
Posts: 976
Likes: 0
Received 5 Likes
on
5 Posts
Year: 2000 Ltd.
Model: Cherokee
Engine: 4.0L I6
Another fun fiasco I had was with the rear brakes. Even in the snow I had a very hard time getting them to lock up when I slammed on the brakes at low speed (slow to keep ABS from engaging). I ended up replacing the ENTIRE rear brake system from the ABS modulator back. The lines were rusted and broke when I tried to undo them and everything else got changed while I was in there. Still didn't really help. Ended up pulling the rubber "seal" that is the proportioning valve out of the proportioning valve assembly. Rear brakes work SO much better now. I actually picked up another part now that I'm thinking about it, just need to put it in.
I also had the front left caliper seize up on me. Changed that out after nearly setting my brakes on fire one day on the expressway. NOT fun.
Front pinion seal was leaking so I changed that.
The power windows for the passenger windows would only work part of the time so I took the child lock switch apart and fixed that. I did a write up here:
https://www.cherokeeforum.com/f51/ho...-switch-86322/
I didn't want to spend the $70 or what ever the parts store wan't for a new switch. If you're having this issue, check out how I fixed it. Been working perfectly since.
Another thing that drove me crazy was the growling/whirling sound I was getting from the T-case. Over the course of a couple months I had the thing apart three or four times. I changed the chain, didn't help. Original was still good. I ended up rebuilding the entire t-case which helped some, but didn't eliminate the noise. I had to succumb to the fact that that's normal and I can't do anything about it. At least now I know it won't explode anytime soon. I even went as far as replacing all the bushings on the shifter linkage, which again helped a little, but not as much as I wanted.
07-07-2012, 10:30 AM
#5
Senior Member
Thread Starter
Join Date: Nov 2010
Location: Cloquet, MN
Posts: 976
Likes: 0
Received 5 Likes
on
5 Posts
Year: 2000 Ltd.
Model: Cherokee
Engine: 4.0L I6
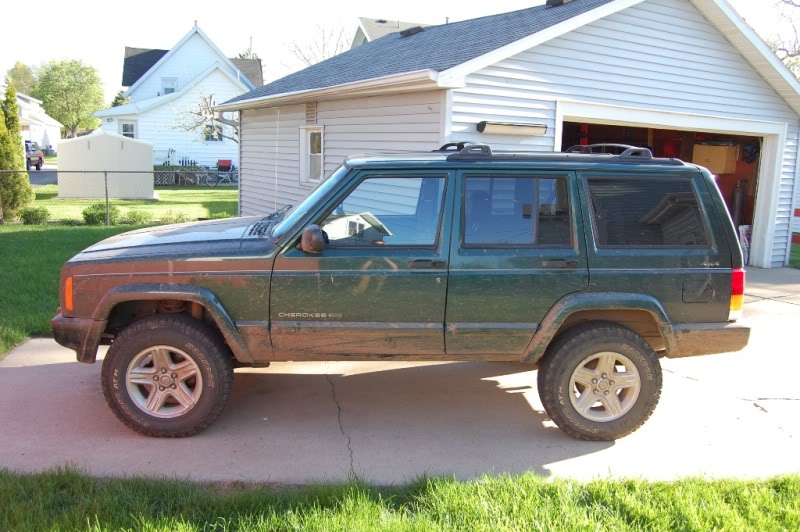
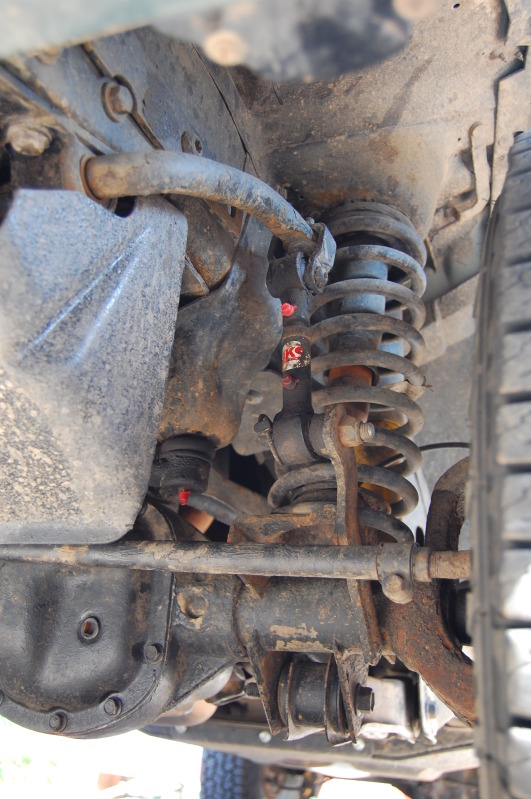
Then I picked up the OME suspension kit to put on. My goal for this Jeep is to keep it as a daily driver, but modify it to be the best compromise between street and off-road. The OME lift is 2-3 inches so I don't have to put monster tires on and it's supposed to be about the best riding lift out there (I don't have anything to compare with, but I do love it.) I put spring and shock on all the way around. Here's what we look like now.
I put on the HD leaf springs. According to the spring rate info I found they are actually lighter than the light duty springs, until you get to the overload springs. I think I probably loose a little flex, but they ride REALLY nice and I want to be able to tow heavy trailers.
I also put on JKS quick disconnects. An interesting thing to note is that I had to use the stock height disconnects. The ones for 2 inches of lift would pound up into the wheel well if/when the suspension bottomed out.
In the process of trying to get the rear spring bolts out I had to pull the hitch off. While doing so the nut strips in the frame rails didn't fair so well. They were pretty much toast (though I wouldn't recommend eating them) so I had to make new ones. I made after work one day out of 3/16 steel and welded flange nuts on. These babies aren't going anywhere any time soon!
I also had to remove the rear sway bar when I put the springs on because the clips that hold the spring packs together interfere with the sway bar. I didn't really want/need it anyway. I still have it if I ever find I need it with a heavy trailer (haven't hauled one yet) but I don't think it will ever put it back on.
07-07-2012, 10:51 AM
#6
Senior Member
Thread Starter
Join Date: Nov 2010
Location: Cloquet, MN
Posts: 976
Likes: 0
Received 5 Likes
on
5 Posts
Year: 2000 Ltd.
Model: Cherokee
Engine: 4.0L I6
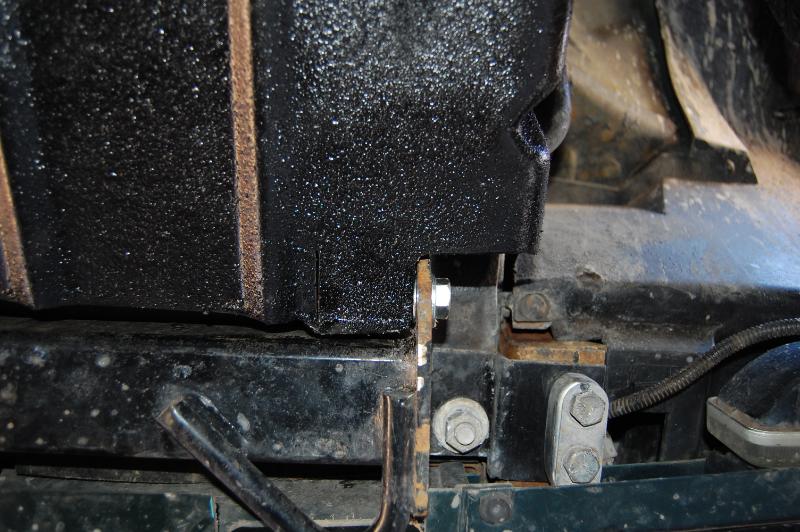
My air box bolts were broken off because they had rusted in place before I got the Jeep. I left them for a while, but then the back corner of the air box fatigued and broke off around the back bolt. I ended up knocking the weldnuts off and putting through bolts in place with fender washers below and above the mounts. I'll have to try and get a picture of this if I ever think about it.
I had to replace the alternator because mine was whining like crazy. I took it apart to try and rebuild it, but the armature was so worn it was junk. I ended up finding a used ones what was in good shape so I could keep the higher amp rating (124A if I remember correctly, vs 117A of all the aftermarket units.)
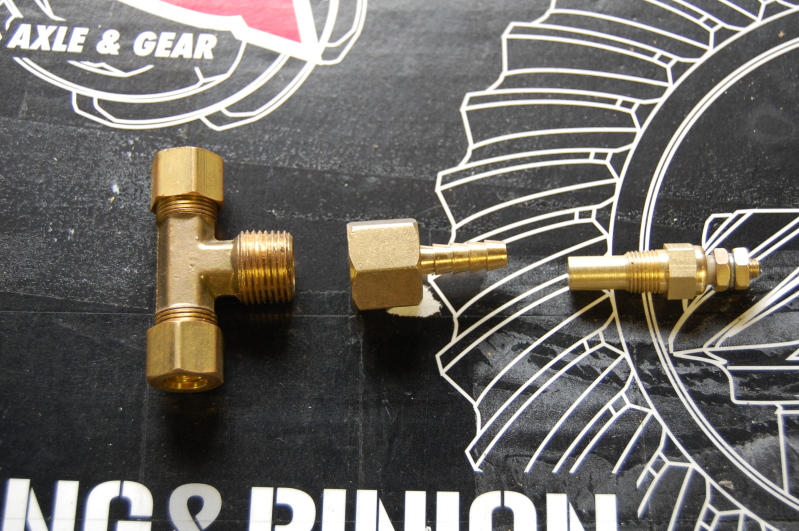
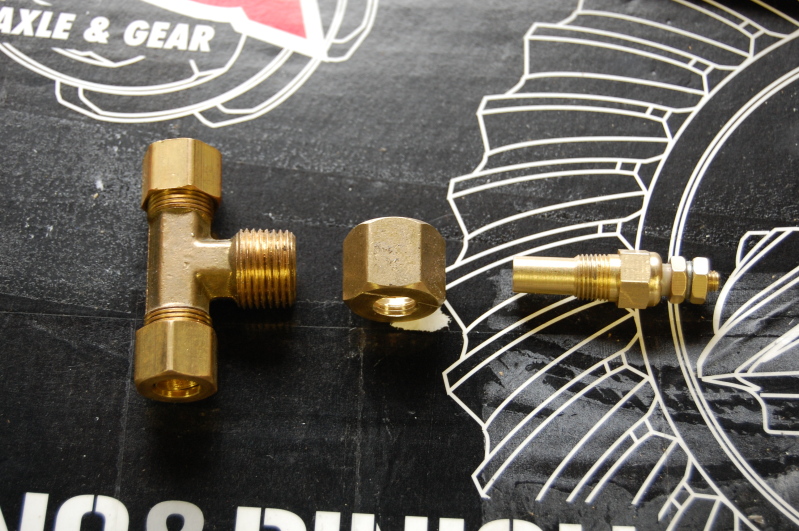
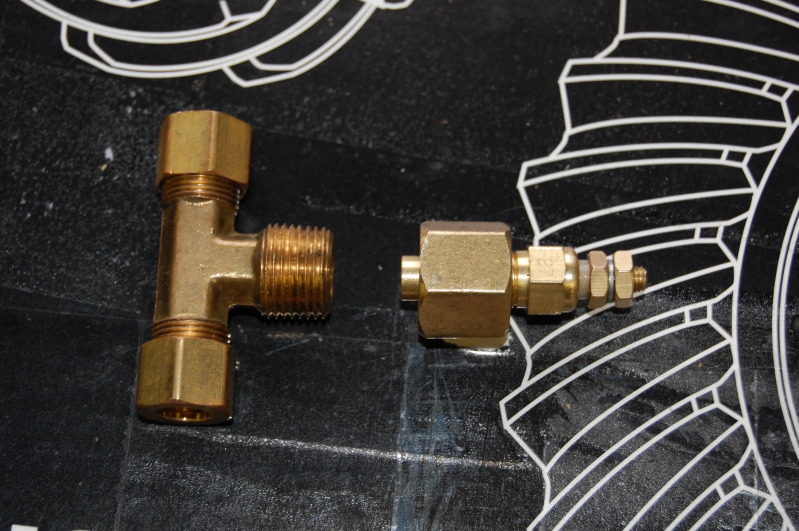
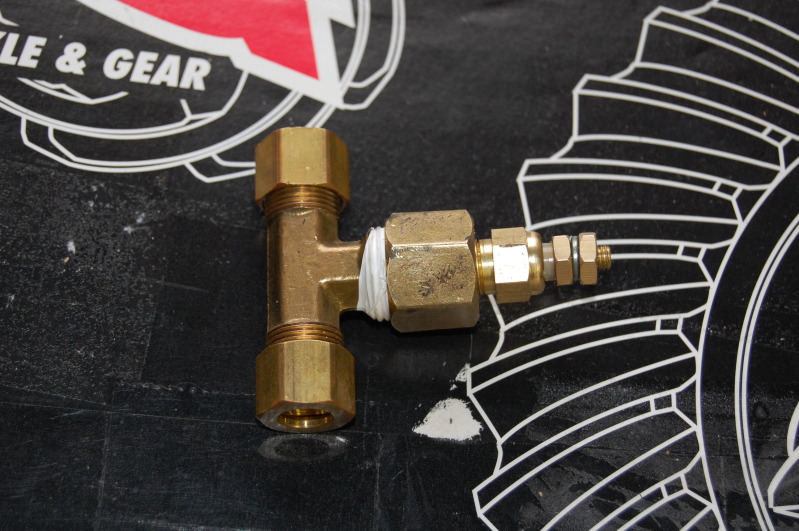
I had the tranny cooler installed but still wanted to be able to keep an eye on the temp so I installed a gauge. I installed the sensor in the line leaving the torque converter so I would know the max temp of the fluid. The rest of the transmission will run cooler that what the gauge is saying, but it help me to gauge how much I'm burning the fluid while towing or off-roading, if it gets that hot.
I used an Autometer 3849 because it has a green LED back light that matches the gauges very closely. I used a compression T fitting that had MPT on the base of it. I used used a hose barb fitting for the setup I took pictures (these pictures are for a second sensor I'm going to install in the return line) but the first sensor is the same concept. I cut off the barb and tapped it for the sensor. Then when I assembled everything the tip of the sensor is very close to the flow of oil in the line instead of being an inch away.
I put the gauge in front of the t-case shifter. It fits nicely and it works out so that when the shifter is in 2wd (it's in 4wd in the picture) the handle covers the center of the gauge but the needle and numbers are around the perimeter of the handle.
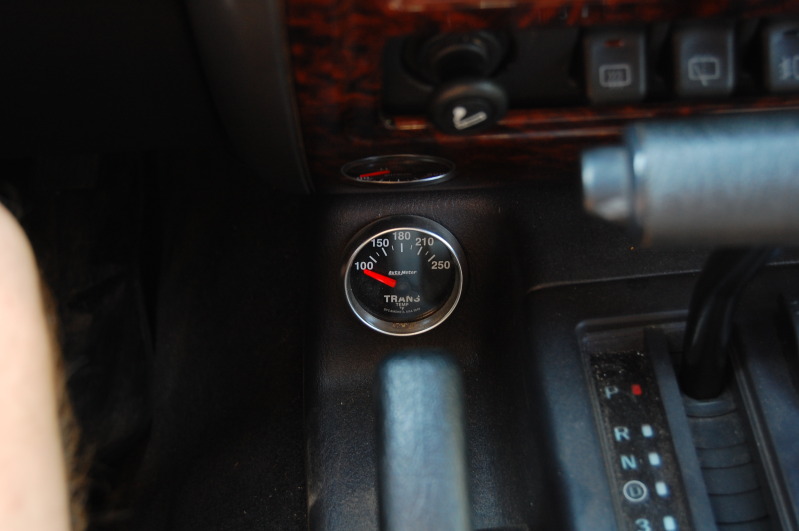
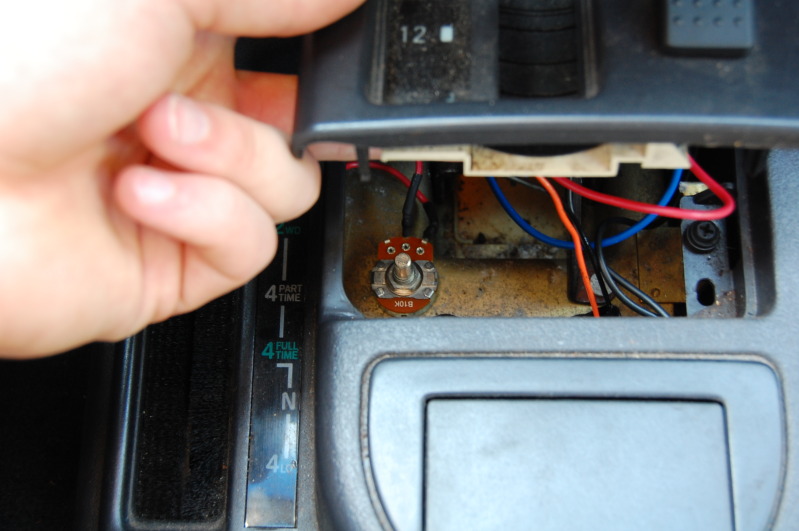
Once I got the gauge installed I found that it was made for daylight viewing. That bugger is BRIGHT! It will light up nice and green in the day, but at night it is blinding. My fix was to put a potentiometer in line with it so I could custom dim it to match the gauges. I also pulled power from the lights for the shifter bezels so when I dim the gauges this also dims.
I had to replace the alternator because mine was whining like crazy. I took it apart to try and rebuild it, but the armature was so worn it was junk. I ended up finding a used ones what was in good shape so I could keep the higher amp rating (124A if I remember correctly, vs 117A of all the aftermarket units.)
I had the tranny cooler installed but still wanted to be able to keep an eye on the temp so I installed a gauge. I installed the sensor in the line leaving the torque converter so I would know the max temp of the fluid. The rest of the transmission will run cooler that what the gauge is saying, but it help me to gauge how much I'm burning the fluid while towing or off-roading, if it gets that hot.
I used an Autometer 3849 because it has a green LED back light that matches the gauges very closely. I used a compression T fitting that had MPT on the base of it. I used used a hose barb fitting for the setup I took pictures (these pictures are for a second sensor I'm going to install in the return line) but the first sensor is the same concept. I cut off the barb and tapped it for the sensor. Then when I assembled everything the tip of the sensor is very close to the flow of oil in the line instead of being an inch away.
I put the gauge in front of the t-case shifter. It fits nicely and it works out so that when the shifter is in 2wd (it's in 4wd in the picture) the handle covers the center of the gauge but the needle and numbers are around the perimeter of the handle.
Once I got the gauge installed I found that it was made for daylight viewing. That bugger is BRIGHT! It will light up nice and green in the day, but at night it is blinding. My fix was to put a potentiometer in line with it so I could custom dim it to match the gauges. I also pulled power from the lights for the shifter bezels so when I dim the gauges this also dims.
07-07-2012, 11:29 AM
#7
Senior Member
Thread Starter
Join Date: Nov 2010
Location: Cloquet, MN
Posts: 976
Likes: 0
Received 5 Likes
on
5 Posts
Year: 2000 Ltd.
Model: Cherokee
Engine: 4.0L I6
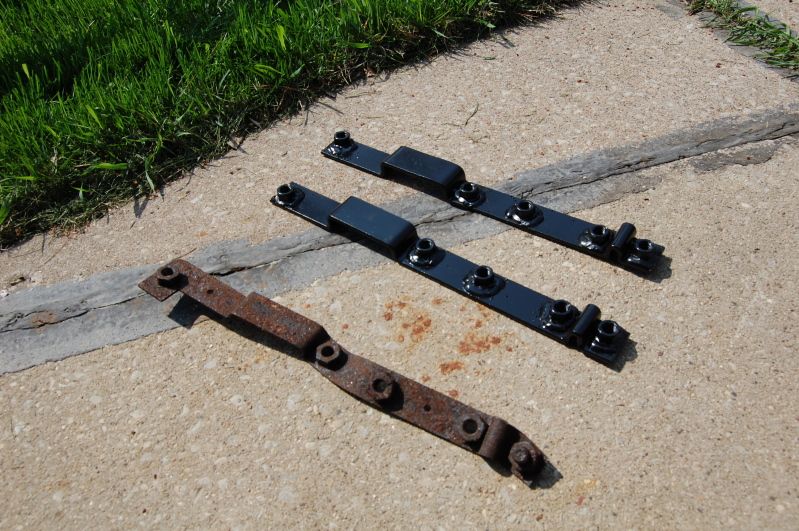
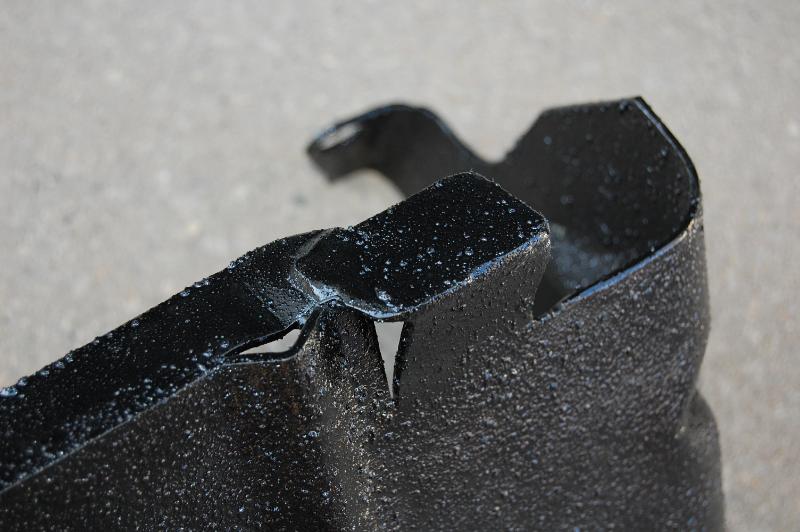
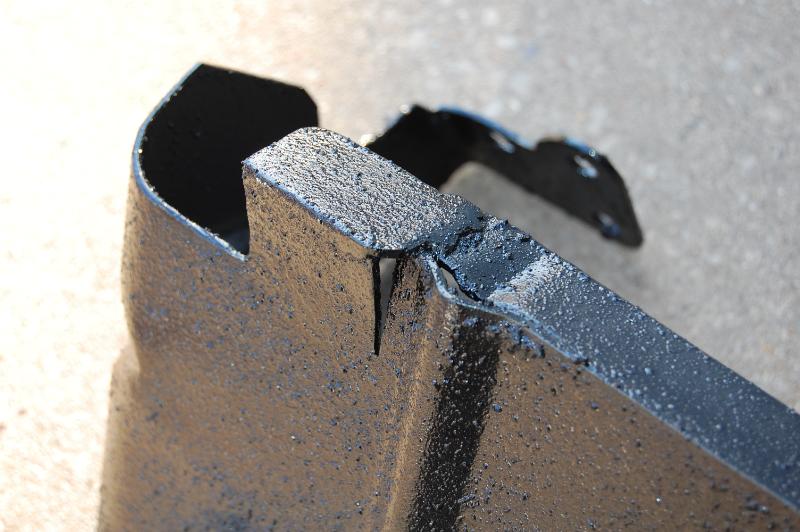
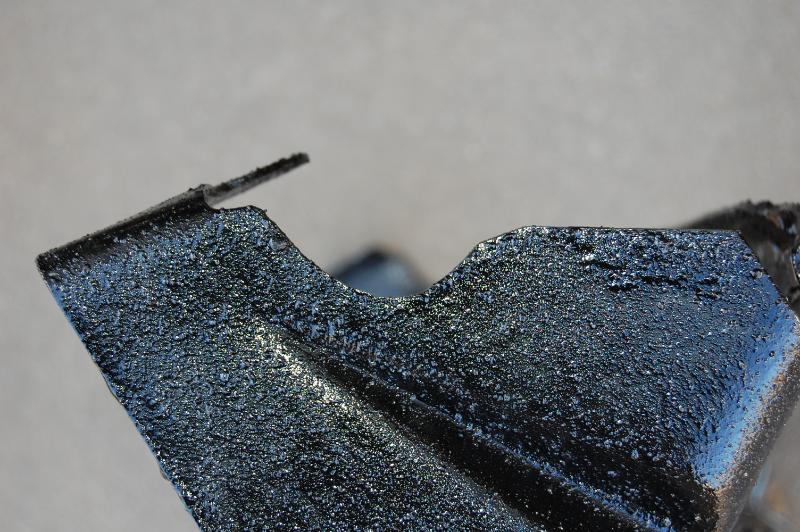
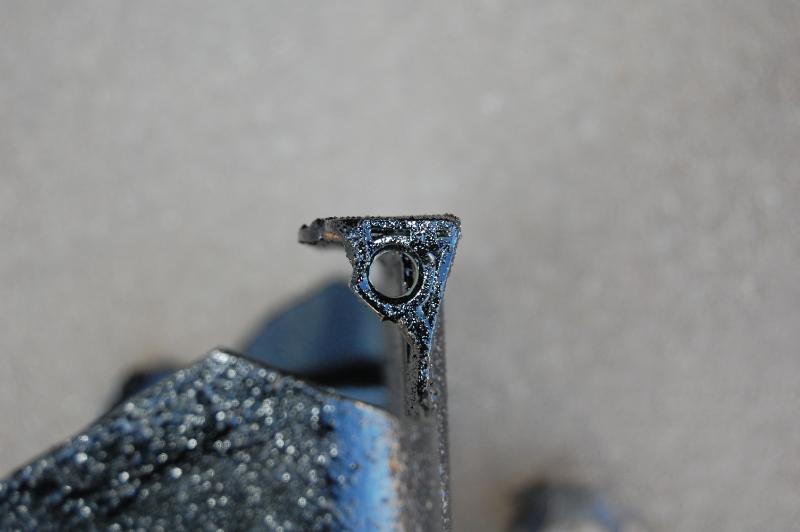
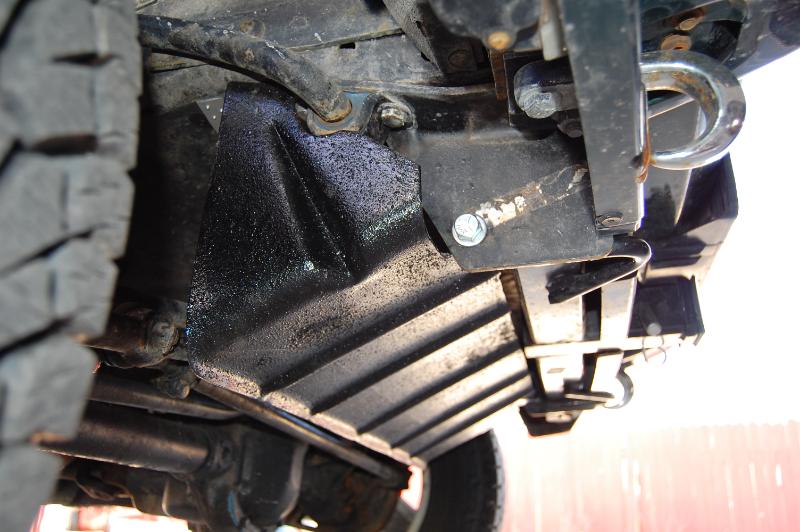
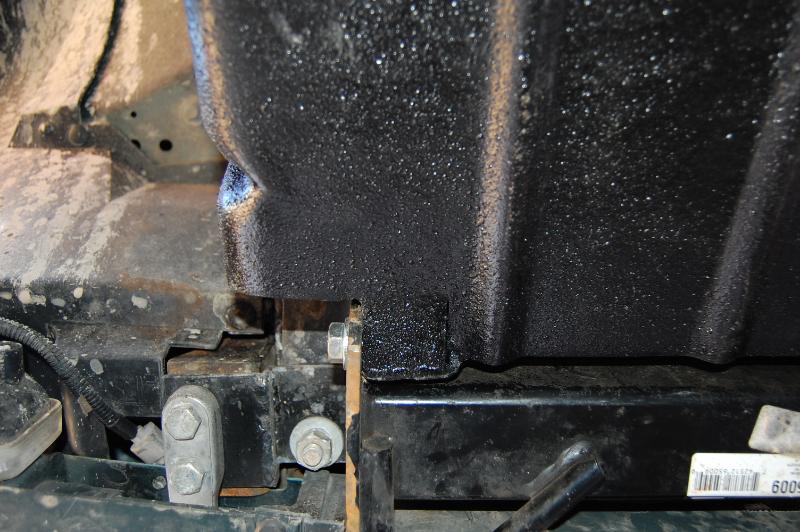
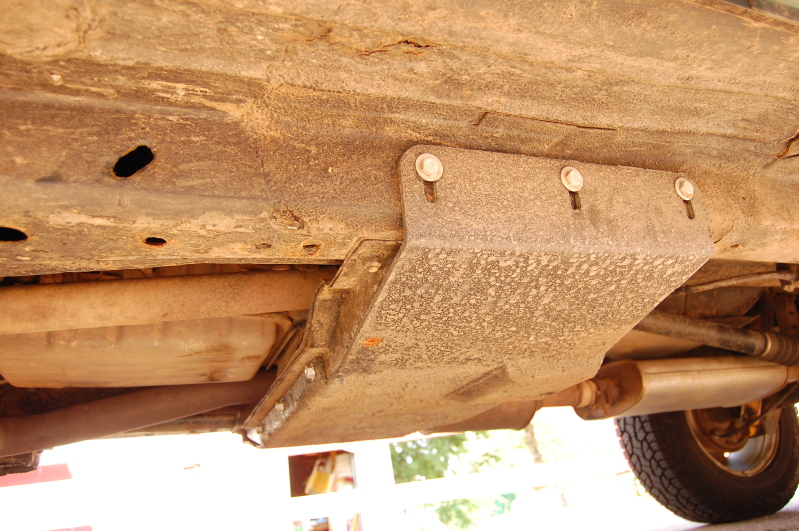
When I got the Jeep it didn't have any front recovery points. Planning ahead I decided to put a front hitch on since it would strengthen the front end by connecting the two sides of the unibody, and it would allow the use of a receiver mounted winch. I first installed the hitch, but then I found a set of OEM tow hook brackets at the JY so I put those on too. The OEM brackets have a brace that runs across and back the from the bracket and attaches to the frame. With the hitch in place I couldn't do this so I made my own bracket. I attached it to the front bolt of the hitch. You can see what I did if you look close in this picture.
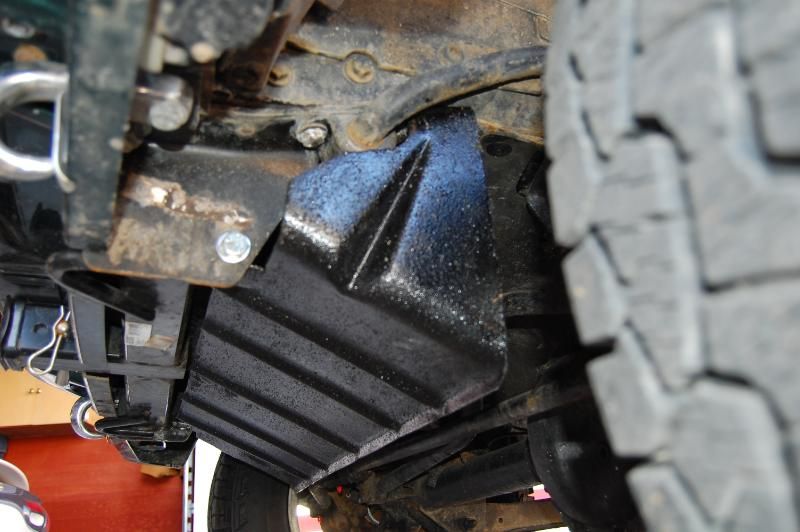
On the same MJ I pulled the tow hook bracket from I also snagged the front OEM skid plate for $15. Mounting it was a challenge with the hitch in place but I wanted to put it on. I started cutting and modifying it to fit. Walking though the entire process is going to be difficult so I'll just post the pictures of the final product. I cut the mounts off the front edge and mounted the skid to the holes that are on the back side of the hitch. I also welded a new angle to the bottom to stiffen it up. I solid welded it to seal the inside. The original trapped dirt and moisture in there and rotted it pretty bad. I welded a strip across the top to stiffen that.
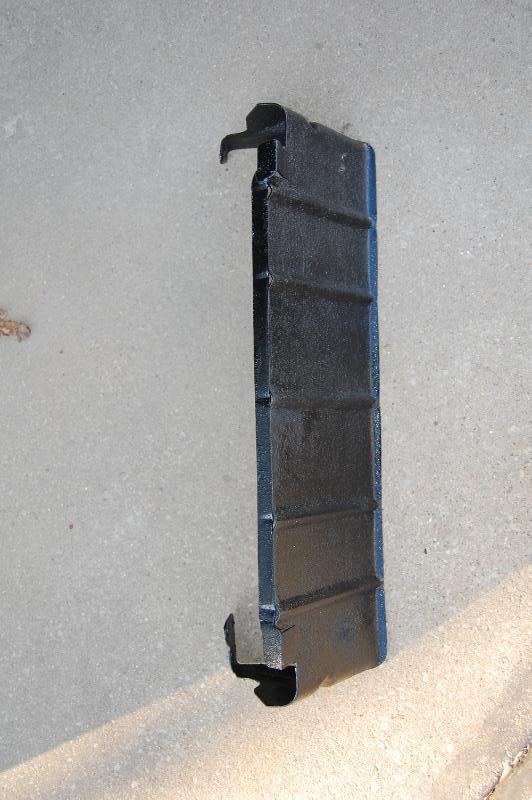

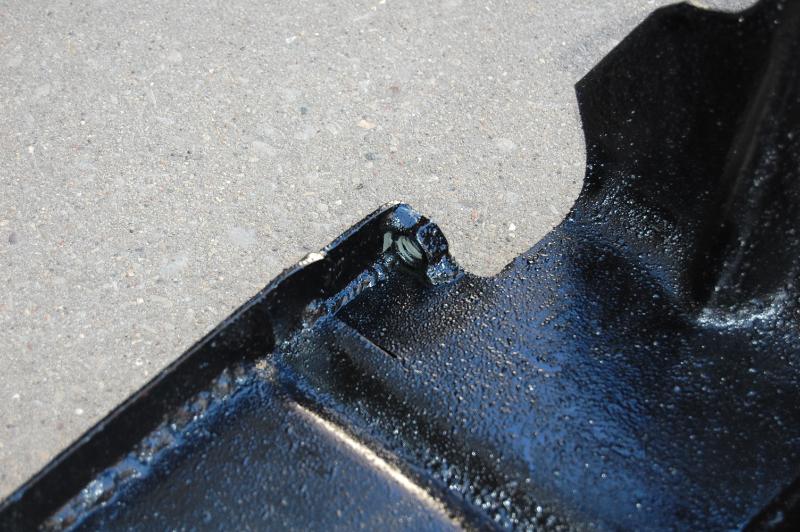
Here it is installed.
On the same MJ I pulled the tow hook bracket from I also snagged the front OEM skid plate for $15. Mounting it was a challenge with the hitch in place but I wanted to put it on. I started cutting and modifying it to fit. Walking though the entire process is going to be difficult so I'll just post the pictures of the final product. I cut the mounts off the front edge and mounted the skid to the holes that are on the back side of the hitch. I also welded a new angle to the bottom to stiffen it up. I solid welded it to seal the inside. The original trapped dirt and moisture in there and rotted it pretty bad. I welded a strip across the top to stiffen that.
Here it is installed.
Trending Topics
07-07-2012, 11:34 AM
#8
Senior Member
Thread Starter
Join Date: Nov 2010
Location: Cloquet, MN
Posts: 976
Likes: 0
Received 5 Likes
on
5 Posts
Year: 2000 Ltd.
Model: Cherokee
Engine: 4.0L I6
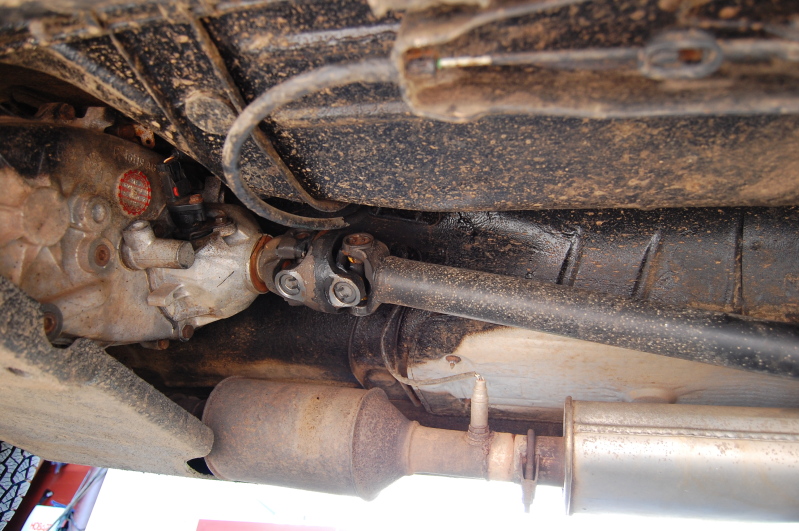
After the lift I had some vibes. I shimmed the pinion angle correctly, but had about 12 deg operating angles on the u-joints. Since I have the NP242 the best option I found short of doing a hack and tap myself was to do the Tom Woods SYE kit and a custom double cardon drive shaft. So, that's what I did. As it turns out without shims the pinion is 2.9 degrees below the output of the t-case with the HD OME springs.
I also put on a JCR Offroad skid plate. I was lucky and got one of the last ones that were still 0.25" think. The new ones are only 0.175".
I also put on a JCR Offroad skid plate. I was lucky and got one of the last ones that were still 0.25" think. The new ones are only 0.175".
07-07-2012, 11:45 AM
#9
Senior Member
Thread Starter
Join Date: Nov 2010
Location: Cloquet, MN
Posts: 976
Likes: 0
Received 5 Likes
on
5 Posts
Year: 2000 Ltd.
Model: Cherokee
Engine: 4.0L I6
No trail rig is complete without a CB, so I put one of those in too. I did more research on the antenna setup than I did on the radio. I picked the cheap Uniden unit because it's small, but more importantly has weather band and gives squelch and RF gain adjustments. It's about the best bang for the buck. I mounted the radio to the passenger side of the center console.
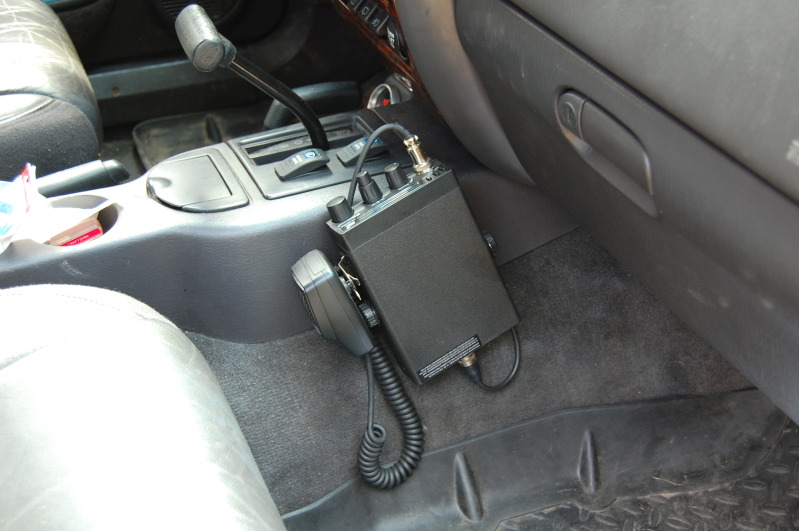

I couldn't decide what I wanted to do with the antenna. The best place for range is the center of the roof. I didn't want to minimize the range by putting it on the back corner of the Jeep because I would need a longer antenna and it would be harder to keep inside when not in use. I also had to have a quick disconnect because my garage door is only about 6 inches taller than the Jeep. I ended up picking up a Firestick Firefly 3' antenna and put it on a Hustler quick disconnect with the Firestick medium duty spring. The mount when on the roof. I decided I would just punch the hole and be done with it.
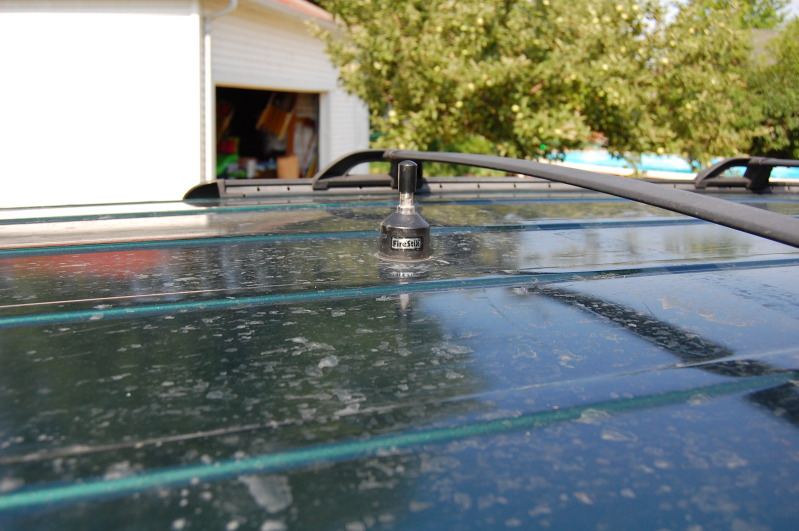
I don't have any pictures of the underside of the roof but it's mounted though the roof brace and bracket that hold either the overhead console, or the dome light (I have the overhead console.) I routed the cable back to the passenger side C-pillar, and then along the floor under the trim up to the dash. Power for the CB is supplied from the cigarette lighter outlet (not the power outlet) so that when the key if off, so is the CB. I haven't had any real issues with noise by not plugging directly to the battery, but I haven't gotten to use it much other than listening to trucker traffic on the expressway. Seems to work just fine though.
I couldn't decide what I wanted to do with the antenna. The best place for range is the center of the roof. I didn't want to minimize the range by putting it on the back corner of the Jeep because I would need a longer antenna and it would be harder to keep inside when not in use. I also had to have a quick disconnect because my garage door is only about 6 inches taller than the Jeep. I ended up picking up a Firestick Firefly 3' antenna and put it on a Hustler quick disconnect with the Firestick medium duty spring. The mount when on the roof. I decided I would just punch the hole and be done with it.
I don't have any pictures of the underside of the roof but it's mounted though the roof brace and bracket that hold either the overhead console, or the dome light (I have the overhead console.) I routed the cable back to the passenger side C-pillar, and then along the floor under the trim up to the dash. Power for the CB is supplied from the cigarette lighter outlet (not the power outlet) so that when the key if off, so is the CB. I haven't had any real issues with noise by not plugging directly to the battery, but I haven't gotten to use it much other than listening to trucker traffic on the expressway. Seems to work just fine though.
07-07-2012, 12:04 PM
#10
Senior Member
Thread Starter
Join Date: Nov 2010
Location: Cloquet, MN
Posts: 976
Likes: 0
Received 5 Likes
on
5 Posts
Year: 2000 Ltd.
Model: Cherokee
Engine: 4.0L I6
I decided one day that I needed more light for night driving. I picked up a set of driving lights from Mills Fleet Farm and haven't looked back since. I think this is the best mod for the money I've done. I think I have about $35 total including specialty switch, a relay, and the lights and wire. I did a comparison between the options I was look at in post #62 of this thread...
I put a relay on the firewall just below the hood on the passenger side in the engine compartment and then ran the wires through the grommet that the hood release goes through. The switch I mounted on the shift bezel.
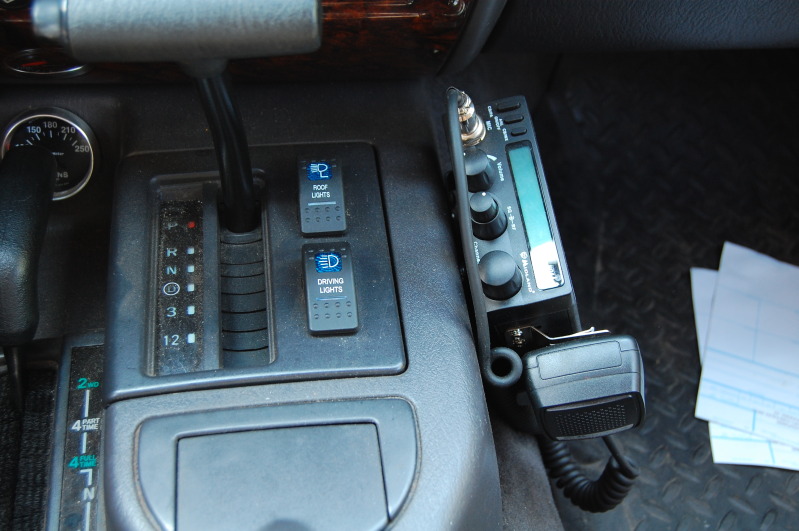
I wanted to put some roof lights on at the same time so I put a switch in for those at the same time.
The switches are from OTRATTW. I wired up the driving lights so that power is take from the high beam circuit and feeds the switch. When the switch is turned on (and the high beams are on) power flows through the little bar light (more like a slit) on the bottom of the rocker and lights that up to show that it's on and then feeds the relay for the lights. I did it this way because in WI it's illegal to use auxiliary lights with oncoming traffic. I want the lights mostly for night diving to see deer so this way when I hit the dimmer switch to turn the high beams off the driving lights also go off. With the switch though I can use the high beams only and not use the driving lights (like around town or something.) The main back light for the switches is powered like the trans temp gauge from the shift bezel back lights. The switches will dim when I dim the gauges.
Something else to note is that while these switches are blue, because they are incandescent bulbs that are more amber the switches light up more green at night. In fact they match the gauges almost perfectly. If I had gotten green switches they would probably be too green.
I put a relay on the firewall just below the hood on the passenger side in the engine compartment and then ran the wires through the grommet that the hood release goes through. The switch I mounted on the shift bezel.
I wanted to put some roof lights on at the same time so I put a switch in for those at the same time.
The switches are from OTRATTW. I wired up the driving lights so that power is take from the high beam circuit and feeds the switch. When the switch is turned on (and the high beams are on) power flows through the little bar light (more like a slit) on the bottom of the rocker and lights that up to show that it's on and then feeds the relay for the lights. I did it this way because in WI it's illegal to use auxiliary lights with oncoming traffic. I want the lights mostly for night diving to see deer so this way when I hit the dimmer switch to turn the high beams off the driving lights also go off. With the switch though I can use the high beams only and not use the driving lights (like around town or something.) The main back light for the switches is powered like the trans temp gauge from the shift bezel back lights. The switches will dim when I dim the gauges.
Something else to note is that while these switches are blue, because they are incandescent bulbs that are more amber the switches light up more green at night. In fact they match the gauges almost perfectly. If I had gotten green switches they would probably be too green.
07-07-2012, 12:18 PM
#11
Senior Member
Thread Starter
Join Date: Nov 2010
Location: Cloquet, MN
Posts: 976
Likes: 0
Received 5 Likes
on
5 Posts
Year: 2000 Ltd.
Model: Cherokee
Engine: 4.0L I6
Once upon a time there was this guy who was browsing CF and other Jeep forums looking at roof mounted lights. He happened across a thread where it was being discussed how the Liberty Renegade light bar could be mounted on an XJ. He say pictures of someone that mounted one on an MJ and thought it was a sweet idea. He proceeded to start researching that option and later that night happened across an eBay listing for a couple used ones for about $300. That was too much he thought to himself so he kept looking through the listings. That's when it happened! There it was. Complete. The housing, the lights, ALL FOUR COVERS, and it was less than $100 shipped! He thought about it for a few minutes while he researched other pricing options and then clicked on the buy it now button. 
So as you probably figured out, that guy is me. You can see how I mounted it here. It was a challenge because the Liberty has a sloped roof and the XJ is more flat. But the final product looks like this...
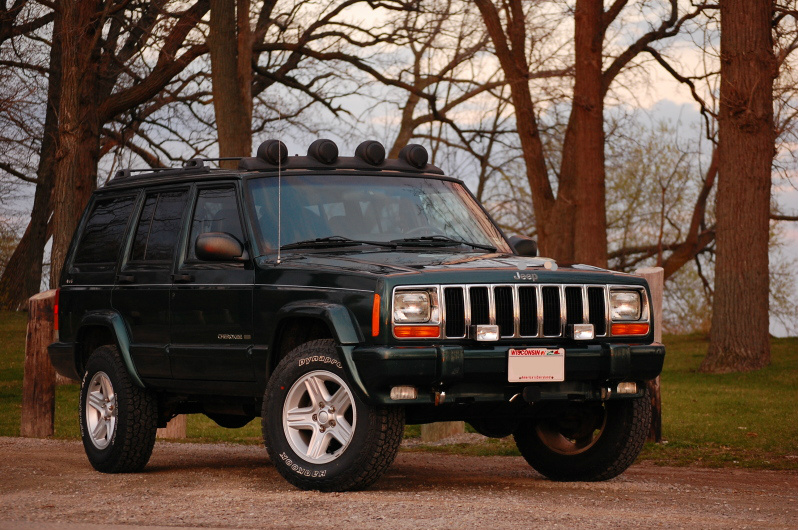
These lights are . My only gripe is that they can't be adjusted side to side. I did get a chance to use them on the trail at night a month ago (didn't get any pictures
  ) and they are sweet. Turns night into day. I'm going to have to get pictures.
The switch is shown in the post above. I wired it a little different than the driving lights though. It's pretty much the same, but I tapped into the power lead between the headlight switch and dimmer switch. This way I can turn them on with the high or low beams on, but when the lights get turned off, so do the roof lights. I don't have to worry about accidentally leaving them on.
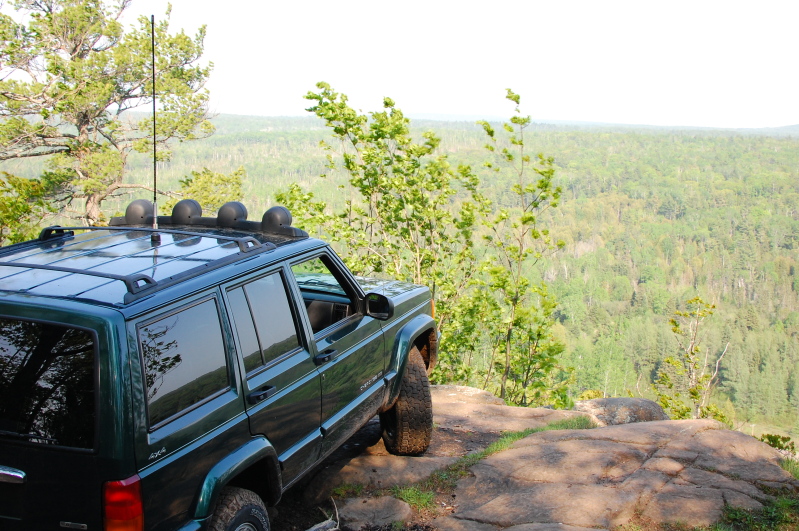
Here's another pic that shows the lights and CB antenna.
So as you probably figured out, that guy is me. You can see how I mounted it here. It was a challenge because the Liberty has a sloped roof and the XJ is more flat. But the final product looks like this...
These lights are
. My only gripe is that they can't be adjusted side to side. I did get a chance to use them on the trail at night a month ago (didn't get any pictures ) and they are sweet. Turns night into day. I'm going to have to get pictures. The switch is shown in the post above. I wired it a little different than the driving lights though. It's pretty much the same, but I tapped into the power lead between the headlight switch and dimmer switch. This way I can turn them on with the high or low beams on, but when the lights get turned off, so do the roof lights. I don't have to worry about accidentally leaving them on.
Here's another pic that shows the lights and CB antenna.
07-07-2012, 12:29 PM
#13
Senior Member
Thread Starter
Join Date: Nov 2010
Location: Cloquet, MN
Posts: 976
Likes: 0
Received 5 Likes
on
5 Posts
Year: 2000 Ltd.
Model: Cherokee
Engine: 4.0L I6
I have some rust starting to pop it's nasty head through on my front doors and the hatch. I bought a 98 Taurus from NV and had it rust proofed at Ziebart in Milwaukee and thought I would have the Jeep done so they could spray it with their rust eliminator. That was a BIG mistake. That shop did the worst job. I had to take both vehicles back to get them redone, and I found out after they did it that they couldn't spray the inside of the doors/hatch with the rust eliminator. That pissed me off because that what I specifically asked if they could do. Anyway, so the underside is undercoated, but they didn't prep it well enough and it's all flaking back off. They even sprayed the undercoating over the dirt that was caked on the underside of the rear quarter panel trim pieces. Hopefully the stuff will help keep the body from rotting as fast but I'm still going to have to repair the doors.
Enough of that rant.
I also had to replace the front axle u-joints. I noticed the steering getting jerky when returning to center and tracked it down to the front u-joints. Got those replaced and ended up doing the front hubs while I was in there since the driver side was a tad rough. Note to self: pay attention to where the ABS tone ring is when you're pressing in/out u-joints.
Not too long after that the radiator sprung an leak so a replacement went in. I needed one ASAP so I put an OEM replacement in. In hind sight I could have researched a two row or something but I haven't had any problems with overheating yet. Plus, I imagine they are a bit more pricey too.
About the same time I decided to also fix the last oil leak on the engine: the front timing cover seal. That was a job, but I got it done. It's amazing how much crap builds up on an engine when there's an oil leak.
07-07-2012, 01:11 PM
#15
Senior Member
Thread Starter
Join Date: Nov 2010
Location: Cloquet, MN
Posts: 976
Likes: 0
Received 5 Likes
on
5 Posts
Year: 2000 Ltd.
Model: Cherokee
Engine: 4.0L I6
The latest mod is the installation of Detroit Truetrac limited slip differentials in both axles with 3.73 gears. I've had open diffs and I've wanted to so something about that. I hate getting stuck in the snow and having two wheels spinning and getting stuck. I say snow because I've gotten stuck in that twice now, but haven't gotten stuck in dirt (yet) mostly due to only having wheeled in the summer a couple of times.
I've done quite a bit of research on this. I use the Jeep as a daily driver so I didn't want any type of locker in the front axle. Selectable lockers are way out of my budget. I thought about putting a spartan in the rear but don't like the idea of it clicking around corners, and am not sure how it will handle ice in the winter. The option for the front was a limited slip. That narrowed it down to the Truetrac. Problem was that I had 3.55 gears, and the D30 Truetrac was an addtional $200. If I went with the 3.73+ unit it was a more reasonable $390. That, and being able to tow easier through hills convinced me to start looking for 3.73 gears. I don't have any plans to put bigger tires on the Jeep right now as it's my DD. But, by putting a 3.73+ carrier in it gives me the option to regear for larger tires later if I ever make this more of a trail only rig.
The rear axle is the D35. I know everyone hates these, but the wife drives the XJ and I want to retain the ABS. I also am not planning on putting large tires on to overload the axle. I also am too afraid of breaking something to run the XJ very hard. I'm easy on the skinny pedal. But, knowing that the D35 leaves much to be desired, I decided a limited slip in the D35 would be much less abusive than a lunch box locker. I scored a D35 out of a TJ that had 3.73's for $25 from a guy at work that was putting D60's under his rig. That also gave me extra shafts if I break one! I found a used Truetrac for $260 to my door so I went that route instead of a new one. That left the front.
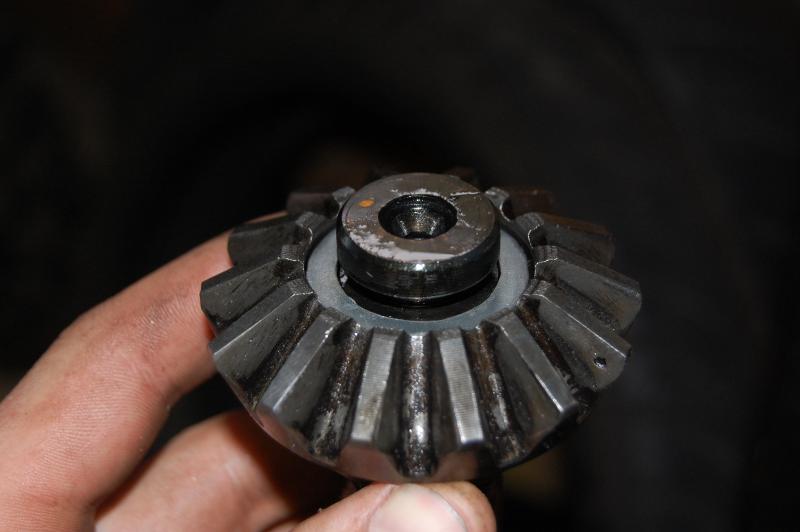
I found a set of Dana 3.73 D30 gears on eBay for like $50 so I picked those up. I decided to just regear the axles and run an open diff in the front since I was still on the fence about the performance and handling of a Truetrac in the front. I went ahead and regeared the rear axle and installed the true trac. It went fairly smooth, but I found once I had the axle shafts in, that there was 0.073" of end play in the axle shafts. This did NOT make me happy. I examined what I had and there was a gap between the shafts and the puck that goes into the diff to hold the shafts out.
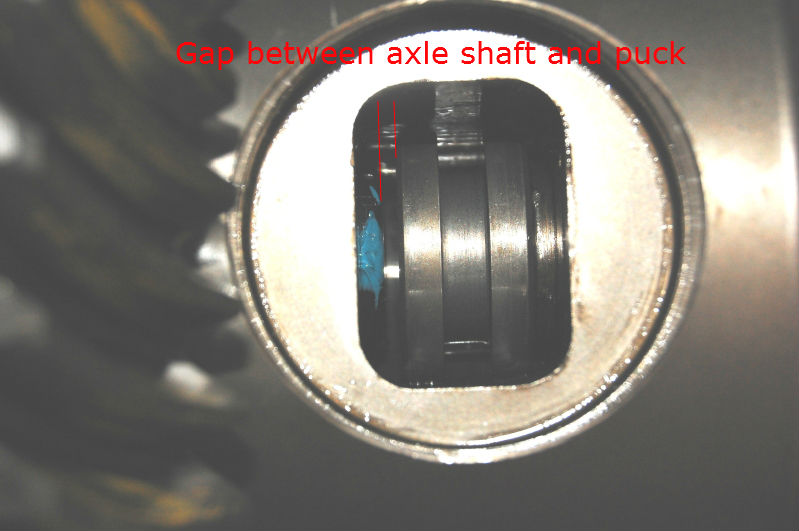
I did some research and found this is a common problem with the D35 Truetrac. Apparently there are two different diameters of cross shaft in the open carrier and the puck included with the diff is the smaller one. I went out and measured my shaft and it was actually the smaller one. Then I was really not impressed. I was not going to run the XJ with over 1/16 of an inch of end play in the axle shafts. I started to look into how I could fix it.
I didn't have easy access to tool steel to make a new spacer not did I want to pay someone to do it. Putting another spacer in of a lower quality steel would be bad because that puck is what keeps the shafts from pushing into the axle tube when cornering. It would be asking to wear a hole into a softer puck.
I looked at the wear marks on the axle shafts from the outer seals and found that almost all the play was due to the driver side shaft being pulled in too far. This gave me an idea. What I ended up doing was creating a spacer for the c-clip to pull the driver side shaft in closer to the puck.
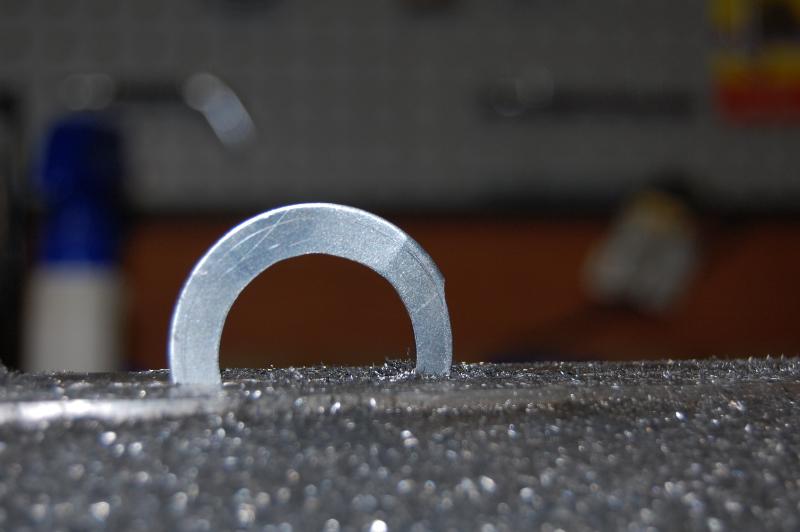
I used a fender washer that measured 0.056" thick. I bored it out to just slip over the axle shaft.
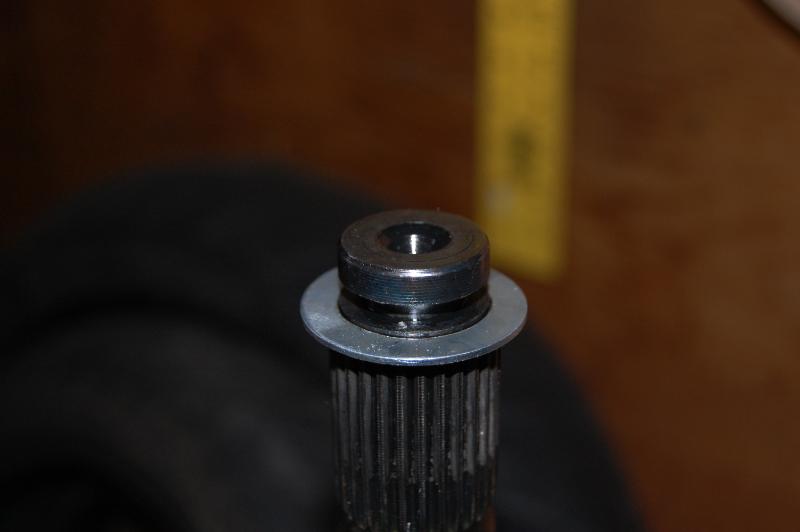
I cut the OD down to match the C-clip.
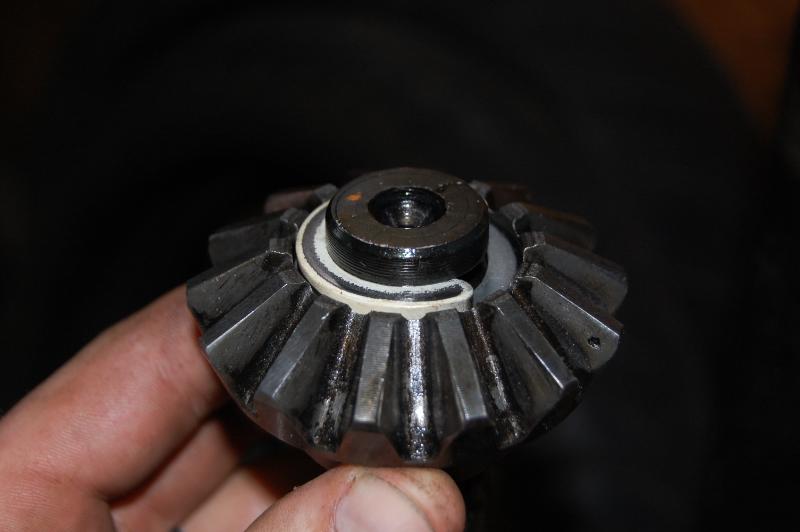
When I installed the spacer I had 0.017" of axial play. I read online that Dana recommended about 0.15" to allow for thermal expansion so I'm happy with what I ended up with.
I'm not worried about using a plain washer because the thing only sees compressive load between the spider gear and the c-clip. There's no relative motion unless the c-clip spins, but even then in order for the c-clip to rotate it can't be under load. I'll have to check it when I change the oil, but I think I'm good to go.
I've done quite a bit of research on this. I use the Jeep as a daily driver so I didn't want any type of locker in the front axle. Selectable lockers are way out of my budget. I thought about putting a spartan in the rear but don't like the idea of it clicking around corners, and am not sure how it will handle ice in the winter. The option for the front was a limited slip. That narrowed it down to the Truetrac. Problem was that I had 3.55 gears, and the D30 Truetrac was an addtional $200. If I went with the 3.73+ unit it was a more reasonable $390. That, and being able to tow easier through hills convinced me to start looking for 3.73 gears. I don't have any plans to put bigger tires on the Jeep right now as it's my DD. But, by putting a 3.73+ carrier in it gives me the option to regear for larger tires later if I ever make this more of a trail only rig.
The rear axle is the D35. I know everyone hates these, but the wife drives the XJ and I want to retain the ABS. I also am not planning on putting large tires on to overload the axle. I also am too afraid of breaking something to run the XJ very hard. I'm easy on the skinny pedal. But, knowing that the D35 leaves much to be desired, I decided a limited slip in the D35 would be much less abusive than a lunch box locker. I scored a D35 out of a TJ that had 3.73's for $25 from a guy at work that was putting D60's under his rig. That also gave me extra shafts if I break one! I found a used Truetrac for $260 to my door so I went that route instead of a new one. That left the front.
I found a set of Dana 3.73 D30 gears on eBay for like $50 so I picked those up. I decided to just regear the axles and run an open diff in the front since I was still on the fence about the performance and handling of a Truetrac in the front. I went ahead and regeared the rear axle and installed the true trac. It went fairly smooth, but I found once I had the axle shafts in, that there was 0.073" of end play in the axle shafts. This did NOT make me happy. I examined what I had and there was a gap between the shafts and the puck that goes into the diff to hold the shafts out.
I did some research and found this is a common problem with the D35 Truetrac. Apparently there are two different diameters of cross shaft in the open carrier and the puck included with the diff is the smaller one. I went out and measured my shaft and it was actually the smaller one. Then I was really not impressed. I was not going to run the XJ with over 1/16 of an inch of end play in the axle shafts. I started to look into how I could fix it.
I didn't have easy access to tool steel to make a new spacer not did I want to pay someone to do it. Putting another spacer in of a lower quality steel would be bad because that puck is what keeps the shafts from pushing into the axle tube when cornering. It would be asking to wear a hole into a softer puck.
I looked at the wear marks on the axle shafts from the outer seals and found that almost all the play was due to the driver side shaft being pulled in too far. This gave me an idea. What I ended up doing was creating a spacer for the c-clip to pull the driver side shaft in closer to the puck.
I used a fender washer that measured 0.056" thick. I bored it out to just slip over the axle shaft.
I cut the OD down to match the C-clip.
When I installed the spacer I had 0.017" of axial play. I read online that Dana recommended about 0.15" to allow for thermal expansion so I'm happy with what I ended up with.
I'm not worried about using a plain washer because the thing only sees compressive load between the spider gear and the c-clip. There's no relative motion unless the c-clip spins, but even then in order for the c-clip to rotate it can't be under load. I'll have to check it when I change the oil, but I think I'm good to go.