The Two Door Experience!
 04-04-2012, 01:38 PM
#1
Seasoned Member
Thread Starter
Join Date: Sep 2011
Location: Oregon
Posts: 278
Likes: 0
Received 0 Likes
on
0 Posts
Year: 1990
Model: Cherokee
Engine: Inline Six
So now that Im starting to do lots of work to my XJ I thought Id start a build thread to show her history from where shes been, where she stands now, and show the information Ive gained; so Ill start at the beginning.
So a few days before going to OSU my freshman year I bought my 1990 cherokee, which I had been saving up for alll summer long. It had a straight six, a little lift, and it was loud!
So a few days before going to OSU my freshman year I bought my 1990 cherokee, which I had been saving up for alll summer long. It had a straight six, a little lift, and it was loud!
Last edited by Nakedginger; 01-24-2013 at 12:36 AM.
 04-04-2012, 01:42 PM
#2
Seasoned Member
Thread Starter
Join Date: Sep 2011
Location: Oregon
Posts: 278
Likes: 0
Received 0 Likes
on
0 Posts
Year: 1990
Model: Cherokee
Engine: Inline Six
I then tore though the axles, replaced some parts and put it all back together. Once it was drivable and barrelly passed DEQ I started tearing through the electrical mess the owner before me left. The main portion of the mess was when they replaced the radio, so I made it look a bit cleaner and put in a AUX cored for my mp3.
04-05-2012, 07:59 PM
#4
Seasoned Member
Thread Starter
Join Date: Sep 2011
Location: Oregon
Posts: 278
Likes: 0
Received 0 Likes
on
0 Posts
Year: 1990
Model: Cherokee
Engine: Inline Six
Gresham, but go to OSU in corvallis for school. Are you around here? if so where do you go off roading???
Last edited by Nakedginger; 04-05-2012 at 09:06 PM.
04-05-2012, 08:24 PM
#5
Seasoned Member
Thread Starter
Join Date: Sep 2011
Location: Oregon
Posts: 278
Likes: 0
Received 0 Likes
on
0 Posts
Year: 1990
Model: Cherokee
Engine: Inline Six
The next project I attempted was to bring back a old favorite of my dads generation. So I bought a wolf whistle! A wolf whistle is something that uses vaccume to produce a high pitch whistle that you can fluctuate the tones to whistle at someone you know as you drive by them OR someone random you happen to see. Both are very fun. Anyways, I bought the wolf whistle from someone on ebay and was hoping it would be a easy bolt in and done project, but ended up having to redesign and relocate the valve and make my own stand.
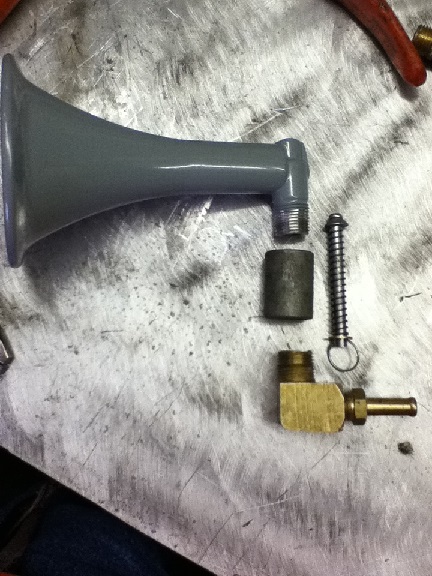
In this picture the bolt in the top of the whistle was where the old valve use to be. I then relocated it inside and above the brass 90 and drilled the bottom out of the 90. I then took a rod, drilled and tapped the center of one of the ends and mounted a coned seal on it. I cut it to a length allowing some of the rod to stick out past the brass 90. This will be where the bike cable will attach. As I assembled it, I also put a spring between the bottom of the seal and the inside bottom of the 9. This made it functional for being a wolf whistle. I then took a coupling and mounted both the 90 and the whistle to either end and snugged them down. I then welded a angle braket to it with one mounting hole drilled in the bottom that used a existing bolt on the manifold, and BAM she was done.
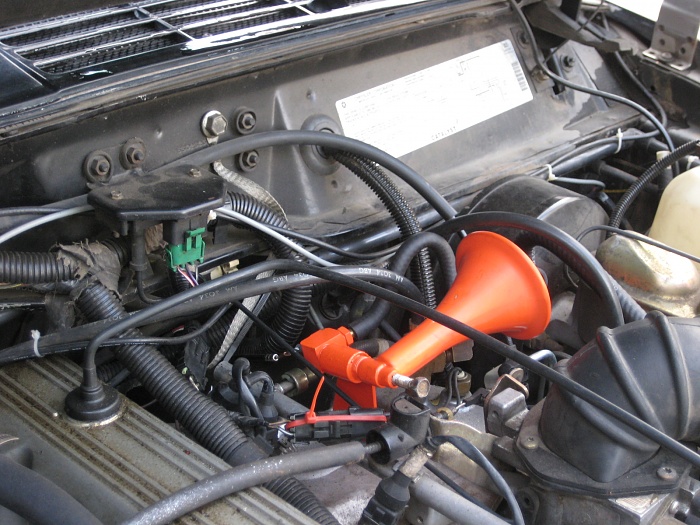
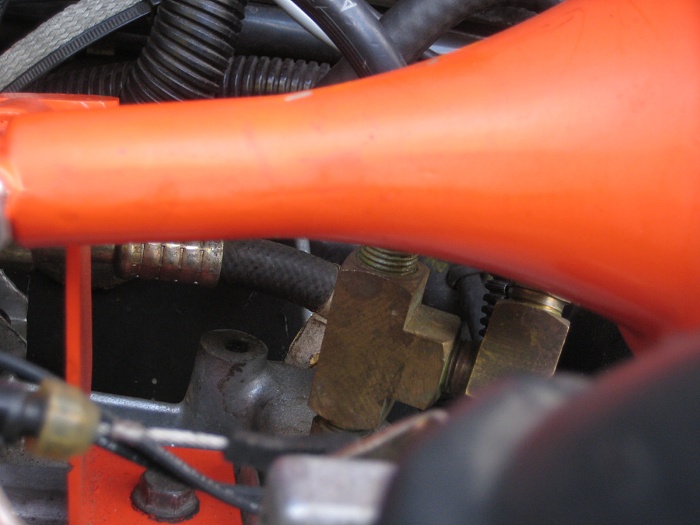
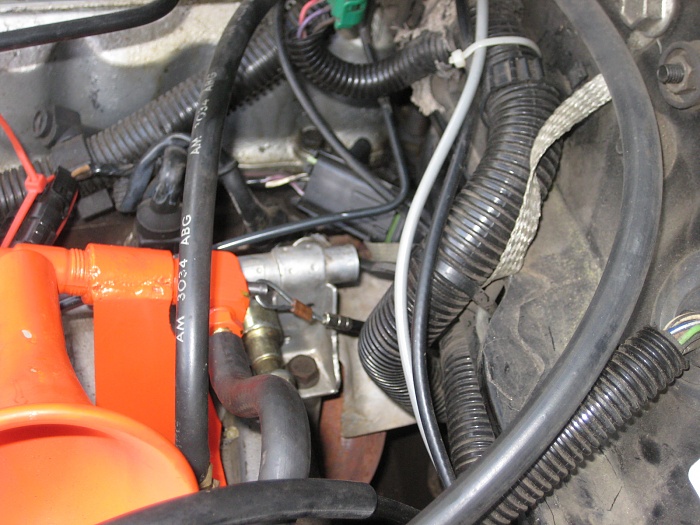
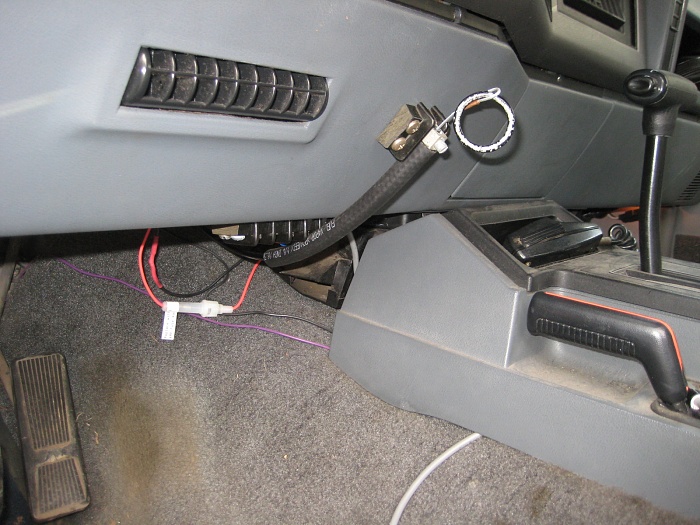
There is a threaded brass T and a 90 coming off of the intake manifold that supply the whistle with the vacuum it needs. The bottom of the T threads into the intake manifold, the top is for the vacuum tap that was already existing, and at the 90 is the hose running off of to the end of the wolf whistle (the brass end). To give control of the whistle, I ran a bike cable through the firewall and under the dash board on my right side with a little ring on the end. This allows me to adjust the tone of the whistle from my seat.
All in all it was a fun build and a GREAT addition to the jeep. Definitely makes it distinct.

In this picture the bolt in the top of the whistle was where the old valve use to be. I then relocated it inside and above the brass 90 and drilled the bottom out of the 90. I then took a rod, drilled and tapped the center of one of the ends and mounted a coned seal on it. I cut it to a length allowing some of the rod to stick out past the brass 90. This will be where the bike cable will attach. As I assembled it, I also put a spring between the bottom of the seal and the inside bottom of the 9. This made it functional for being a wolf whistle. I then took a coupling and mounted both the 90 and the whistle to either end and snugged them down. I then welded a angle braket to it with one mounting hole drilled in the bottom that used a existing bolt on the manifold, and BAM she was done.


There is a threaded brass T and a 90 coming off of the intake manifold that supply the whistle with the vacuum it needs. The bottom of the T threads into the intake manifold, the top is for the vacuum tap that was already existing, and at the 90 is the hose running off of to the end of the wolf whistle (the brass end). To give control of the whistle, I ran a bike cable through the firewall and under the dash board on my right side with a little ring on the end. This allows me to adjust the tone of the whistle from my seat.


All in all it was a fun build and a GREAT addition to the jeep. Definitely makes it distinct.
Last edited by Nakedginger; 01-26-2014 at 12:47 AM.
04-05-2012, 08:31 PM
#6
Seasoned Member
Thread Starter
Join Date: Sep 2011
Location: Oregon
Posts: 278
Likes: 0
Received 0 Likes
on
0 Posts
Year: 1990
Model: Cherokee
Engine: Inline Six
I then started building a front brush guard for my XJ. I didnt want to buy it and knew I would fab up a new front bumper so for the moment my dad and I got some electrical conduit and bent some angles and this is what we got. We also attached it to the stock bumper by welding plates to the end of the pipes and bolting it to the bumper. So far its been functional and is able to support well over my weight.
04-05-2012, 08:38 PM
#7
Seasoned Member
Thread Starter
Join Date: Sep 2011
Location: Oregon
Posts: 278
Likes: 0
Received 0 Likes
on
0 Posts
Year: 1990
Model: Cherokee
Engine: Inline Six
As I started driving her around more and more I ran into a problem that ALL other pre 91 XJ owners run into called the over flow tank. When I bought my XJ it had a stock plastic overflow tank that would ALWAYS blow the cap off and overflow causing my engine to overheat. So I ended up buying a steal dimond plated replacement tank with a Stant pressure release valve from Mac Radiators near by. Along with this I got a 92+ thermostat housing and Stant Superstat and installed both of them. The 92+ thermostat housing allowed me to put a valve on the front of the system that allows me to bleed air out of the engine with ease.
Trending Topics
04-05-2012, 08:49 PM
#8
Seasoned Member
Thread Starter
Join Date: Sep 2011
Location: Oregon
Posts: 278
Likes: 0
Received 0 Likes
on
0 Posts
Year: 1990
Model: Cherokee
Engine: Inline Six
Recently I had some time off of school so I attempted to lift my jeep Cherokee 4.25� all around. I first started with 3� in the front and 1.5� in the back as you can see in the first picture. I did some research and found a cheap way to lift my XJ using junkyard parts. I got two sets of 95 dodge Dakota back leaf springs, two front grand Cherokee (up country) coil springs, and two 2001 Grand Cherokee back sway bar links. Then from Napa I got 4 brand new U-bolts that were 6.75� long, inside dimension of 2.7� and a bolt diameter of 7/16�. I also bought some adjustable lower control arms from rough country to replace the stock ones.
So on with the build. I first started work on the front coil springs. To do this I lifted up the front of my XJ and took both tires off. I then put it up on stands and disconnected the shocks from both sides, this allowed me to jack up one side of the axle dropping the other side, decompressing the coil spring. Once I got to this point I had to make my own coil spring compressors, but you can buy them at any local auto store. My mentality is make it not buy it. Anyways, once you make/ buy your coil spring compressors you want to put them on the coil springs and compress them down until you can slide the coil out from under the bump stop.
Once you get it out decompress the stock spring and compress the new spring until it slides into the gap between the axle and the bump stop. Once it�s in, jack that side of the axle up until the spring starts to decompress more, take out your clamps, put the shocks back in, put the spring clip back in, and then that side is done. Repeat this for the other side. You may* have to take the lower control arms out or at least dismantle one side so that the axle can drop a bit more. I actually replaced my lower arms in the process of putting the springs in and put the rough country adjustable arms in. It did allow my axle to drop more so that I could put the spring in.
After doing the coil springs, I then made a transfer case drop of 1� spacers, since at this point I don�t have the money for a slip yoke eliminator. All I did for this was get a chunk of metal 1� thick, cut it to the width of the transfer case support member and made it about a 1.5� long. I then copied the bolt pattern of the existing bolts and drilled two holes, painted them chevy orange, and then bolted them in. This helps the geometry of the back driveline so that it won�t slip out of the transfer case. So far its worked pretty well. No real bad vibrations on highway.
Then I started work on the leaf springs. Because I didn�t have a level surface to work on I had to do one tire at a time since the emergency brake mainly only works in the back. So I started by jacking up the driver�s side of the XJ and put it up on a stand. Once I had done this I disconnected the back sway bar (just some bolts), and then proceeded to take the U-bolts off. Once I did that I lowered the drivers side of the back axle and took the center pin (bolt) out of the leaf pack. I did this by the use of a socket and some vice grips�oh and WD 40. Once I got them apart, I also took the Dakota leaf packs apart in the same manner. Once the center pin was out of the XJ pack I took the lower springs out and kept the main one on the body. From there I took the main leaf spring of the dodge Dakota, cut the ears off, and then put it up under the XJ main spring and marked where I needed to cut it for length. I did this by using two C-Claps to compress the two springs together and then marking where the XJ main leaf just started to bend up into its eyes (the end attachment points). I used a porta-band but you can also use a grinder or a hack saw if you want to get a arm workout! Anyways, once I cut the Dakota main leaf I got a new center pin from napa and arranged the springs to be XJ main, Dakota main, Dakota 2, XJ 2, Dakota 3, XJ 3; as seen in the picture. I put the center pin in, clamped them together and then slid them under the main leaf of the XJ and put everything back together. Again doing the same for the opposite side.
Last edited by Nakedginger; 04-05-2012 at 08:59 PM.
04-05-2012, 08:57 PM
#9
Seasoned Member
Thread Starter
Join Date: Sep 2011
Location: Oregon
Posts: 278
Likes: 0
Received 0 Likes
on
0 Posts
Year: 1990
Model: Cherokee
Engine: Inline Six
As you can see the arch that the XJ/Dakota springs gave me has greatly improved from where the stock ones sit.
Finally I had to make the front sway bar links. I took the Grand Cherokee links, and took the bracket that would hold them to the frame chopped them down to having a length of about 1�-1.5�, drilled a hole in the center and then put a 7/16 bolt with a locking washer and washer on the inside of the bracket, a normal washer on the other side and then to sit on top of the sway bar I put a washer and a nut. I then installed them, put the sway bar at a horizontal plane and marked how much of the middle rod I needed to chop. It came out to be about 1.5� So, I chopped it out, welded it back together at a offset and painted them with black hammerite paint. Then Bam She was done! Took her for a test drive and she does wonderfully, both in city and on highway. I still need to go off-roading though. The pics should help illustrate what I�m saying.
Finally I had to make the front sway bar links. I took the Grand Cherokee links, and took the bracket that would hold them to the frame chopped them down to having a length of about 1�-1.5�, drilled a hole in the center and then put a 7/16 bolt with a locking washer and washer on the inside of the bracket, a normal washer on the other side and then to sit on top of the sway bar I put a washer and a nut. I then installed them, put the sway bar at a horizontal plane and marked how much of the middle rod I needed to chop. It came out to be about 1.5� So, I chopped it out, welded it back together at a offset and painted them with black hammerite paint. Then Bam She was done! Took her for a test drive and she does wonderfully, both in city and on highway. I still need to go off-roading though. The pics should help illustrate what I�m saying.
09-02-2012, 02:20 AM
#11
Seasoned Member
Thread Starter
Join Date: Sep 2011
Location: Oregon
Posts: 278
Likes: 0
Received 0 Likes
on
0 Posts
Year: 1990
Model: Cherokee
Engine: Inline Six
Yep! I go to school at OSU and drive it around Corvallis. I just put a chevy orange skid pan on the front so it will be even easier to spot. Do you have a rig down there?
09-03-2012, 03:36 PM
#12
CF Veteran
Join Date: Aug 2012
Location: oregon
Posts: 1,592
Likes: 0
Received 0 Likes
on
0 Posts
Year: 1993
Model: Cherokee
Engine: 4.0 ho 99 intake ps pump 1" tb spacer 62mm bored tb eletric fans and more
lol lived of 15th and western for two years lol 93 black two door took my doors off when ever i could lol
09-04-2012, 04:40 PM
#13
Seasoned Member
Thread Starter
Join Date: Sep 2011
Location: Oregon
Posts: 278
Likes: 0
Received 0 Likes
on
0 Posts
Year: 1990
Model: Cherokee
Engine: Inline Six
Now looking at your pic on your profile, I totally know what jeep you have! I remember looking at it each time Id walk through that parking lot. do you have some locker in there? I could hear your tires skid a little when you made turns.
10-14-2012, 06:11 PM
#14
Seasoned Member
Thread Starter
Join Date: Sep 2011
Location: Oregon
Posts: 278
Likes: 0
Received 0 Likes
on
0 Posts
Year: 1990
Model: Cherokee
Engine: Inline Six
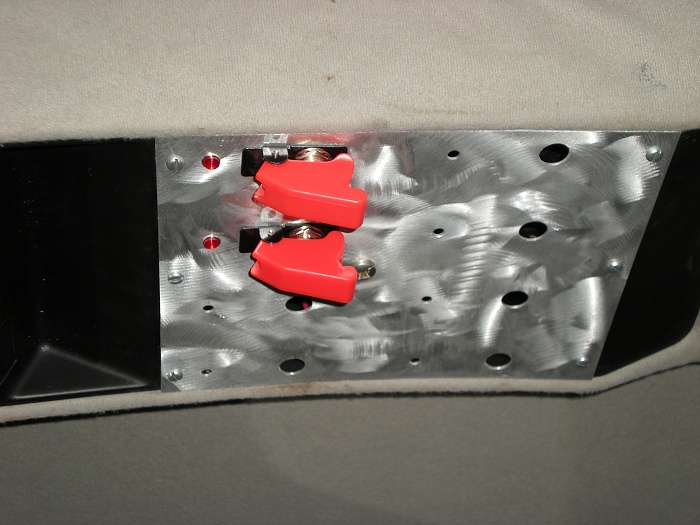
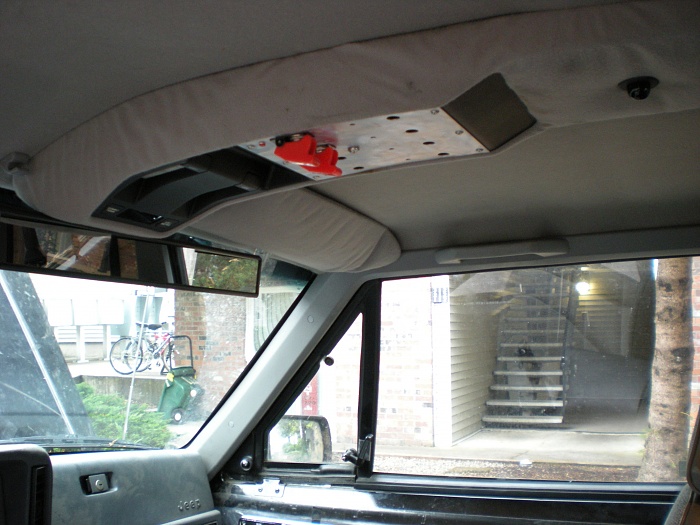
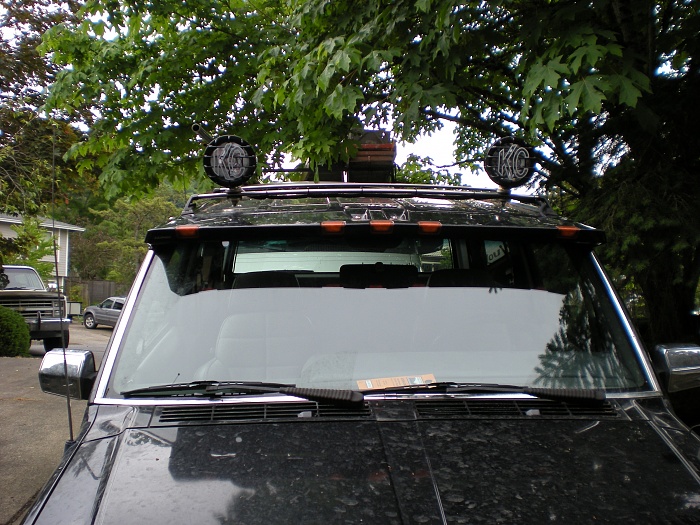
The most recent project I have been working on was putting in a control panel for a override AUX fan switch, and a switch for KC lights. In my XJ there was a overhead center console. It had two center compartments that I wasn't using. The first was a spot to put a garage opener, and the second was a spot for my sunglasses. I ripped both of those doors off creating a void. Then I took a piece of aluminum plate, and designed a switch pattern so that when I flipped the switch a LED light would turn on to show the circuit was working. I then drilled the pattern out, drilled a central ground bolt hole, brushed the aluminum with a wire wheel for looks, and then mounted it to the overhead console through the means of six button head phillips screws. Here's how it turned out.
The first switch goes to the KC lights, and the second is to the AUX fan relay. For the KC lights, I ran power to a power distribution block under my front dash using 10 guage wire from the battery.
I then ran power from the distribution block to the switch. Then continued through the roof using a grommet.
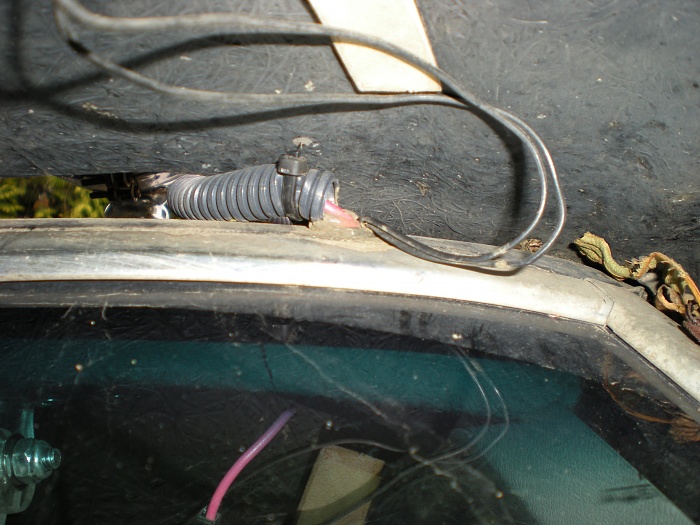
Once I had the power wire strung to the roof, I split it so that I could power each light. Then I brought power back to the main center bolt acting as my ground. They work great so far!
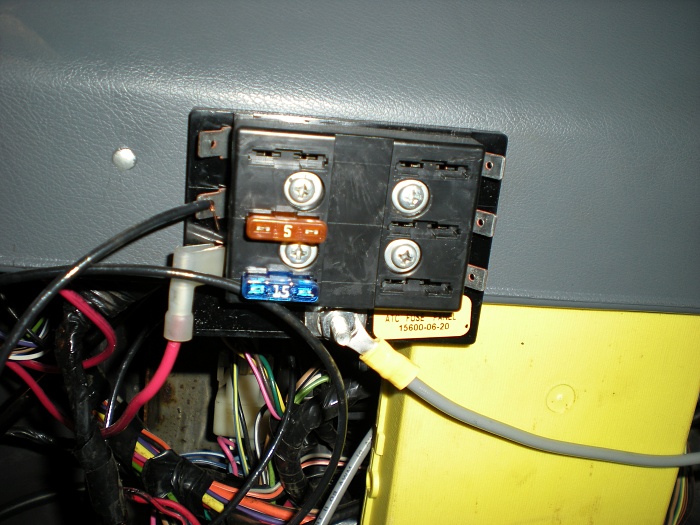
for the override fan switch, I ran a wire from the low power side of the fan relay to the switch in the control panel. From there I went from the switch to ground. This in turn makes the relay turn on and gives power to the AUX fan whenever I throw the switch.


The first switch goes to the KC lights, and the second is to the AUX fan relay. For the KC lights, I ran power to a power distribution block under my front dash using 10 guage wire from the battery.

I then ran power from the distribution block to the switch. Then continued through the roof using a grommet.

Once I had the power wire strung to the roof, I split it so that I could power each light. Then I brought power back to the main center bolt acting as my ground. They work great so far!

for the override fan switch, I ran a wire from the low power side of the fan relay to the switch in the control panel. From there I went from the switch to ground. This in turn makes the relay turn on and gives power to the AUX fan whenever I throw the switch.
Last edited by Nakedginger; 10-14-2012 at 06:23 PM.
01-22-2013, 06:25 PM
#15
CF Veteran
Join Date: Aug 2012
Location: oregon
Posts: 1,592
Likes: 0
Received 0 Likes
on
0 Posts
Year: 1993
Model: Cherokee
Engine: 4.0 ho 99 intake ps pump 1" tb spacer 62mm bored tb eletric fans and more
i like the wiring setup you have going. did something like it to mine one switch for the outer light one for the inner and one for the secondary puller fan. the other electric fan is on a relay and starts with the engine.

