Round 2
 07-28-2012, 12:47 AM
#61
CF Veteran
Thread Starter
Join Date: Nov 2011
Location: Las Vegas, NV - St. George, UT
Posts: 1,314
Likes: 0
Received 0 Likes
on
0 Posts
Year: 1996
Model: Cherokee
Engine: 4.0
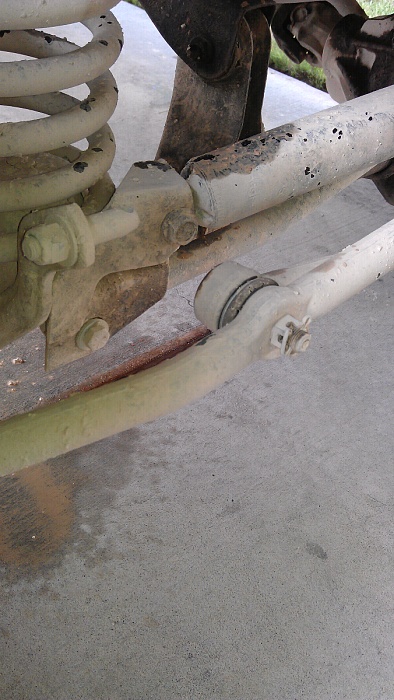
Replaced the spherical rod end on my RC track bar. Apparently they had a batch problem and shipped me out a new end and hardware. Props to them for their service.
My track bar would make a clunking sound over bumps or during turns. I disconnected the sway bars and it was still present on turns only. I know my RC sway bar discos are noisy, but the track bar needed to be addressed. Quick 15 minute fix to swap the ends, and I centered the axle and steering wheel. Took it for a spin and no noise, other than my discos.
My track bar would make a clunking sound over bumps or during turns. I disconnected the sway bars and it was still present on turns only. I know my RC sway bar discos are noisy, but the track bar needed to be addressed. Quick 15 minute fix to swap the ends, and I centered the axle and steering wheel. Took it for a spin and no noise, other than my discos.
 07-30-2012, 12:58 AM
#62
Senior Member
Join Date: May 2011
Location: Las Vegas, Nevada
Posts: 841
Likes: 0
Received 0 Likes
on
0 Posts
Engine: 4.0L
Replaced the spherical rod end on my RC track bar. Apparently they had a batch problem and shipped me out a new end and hardware. Props to them for their service.
My track bar would make a clunking sound over bumps or during turns. I disconnected the sway bars and it was still present on turns only. I know my RC sway bar discos are noisy, but the track bar needed to be addressed. Quick 15 minute fix to swap the ends, and I centered the axle and steering wheel. Took it for a spin and no noise, other than my discos.
My track bar would make a clunking sound over bumps or during turns. I disconnected the sway bars and it was still present on turns only. I know my RC sway bar discos are noisy, but the track bar needed to be addressed. Quick 15 minute fix to swap the ends, and I centered the axle and steering wheel. Took it for a spin and no noise, other than my discos.
Just my 2cents..
Pull the sway and links, and sell em, save 20 lbs. Didnt affect the on road handling of my last 3 xjs.
* wont affect the handling UNLESS you have a severly incorrect spring rate on your springs and shocks that are ready for retirement.
( then it just gets all kinds of fun rolling through corners

Last edited by sandfish88; 07-30-2012 at 01:02 AM.
07-31-2012, 02:46 PM
#63
CF Veteran
Thread Starter
Join Date: Nov 2011
Location: Las Vegas, NV - St. George, UT
Posts: 1,314
Likes: 0
Received 0 Likes
on
0 Posts
Year: 1996
Model: Cherokee
Engine: 4.0
Been running with the front disconnected for a while now. Shocks suck, like all the other generic white body shocks haha.
Ride is actually a lot better, with the exception of the shocks on small bumps.
Need to flex this thing out! I want to measure for bump stops.
Ride is actually a lot better, with the exception of the shocks on small bumps.
Need to flex this thing out! I want to measure for bump stops.
 07-31-2012, 11:57 PM
#67
CF Veteran
Thread Starter
Join Date: Nov 2011
Location: Las Vegas, NV - St. George, UT
Posts: 1,314
Likes: 0
Received 0 Likes
on
0 Posts
Year: 1996
Model: Cherokee
Engine: 4.0
Well, here goes the write up on the relay box. Hopefully all these pictures work!
I had my relays under the hood, ziptied and mounted to where ever they would fit. Yes, you can modify the factory box and use factory relays for this. But I prefer to be able to remove this box and run with it, should I ever find a reason to.
This project is a compilation of ideas and parts from multiple forums including, but not limited to: Jeep Forum, Cherokee Forum, Monte Carlo SS, Fitch VA (site is not longer valid). As well as multiple members from those forums. I combined ideas of what worked and what didn't for use in this build.
This is the box I started out with. I decided to use this size because I figured that 5 relays would fit inside perfectly... and they do.
Radio Shack 6"x4"x2" project box
You can use this size box. Or shoe box, tupperware, sock, shoes, potato chip bag... whatever it is, make sure you fuse the power wires accordingly. And if you are using a fuse block like below, make sure that power wire is fused as well. No need for electrical sparks and fires when they can be avoided.
I am using 5 relays and a fuse block. It is a very tight squeeze inside the project box, but I managed to get all the wires ran.
Relays are 40A SPDT 4-pin relays as there is no need for the 87a pin.
16-14AWG and 12-10AWG insulated flag connectors.
Wire colors of your choice in different gauges and lengths.
Proper tools, or tools of which you believe will do the job even though they are not the "proper" tool for the job. (Pliers are not wire crimpers but they may work for you)
I used velcro on the box and relays to keep everything secure. The red tape is used as a cushion so the relays do not rattle on the box. The 4 holes drilled are for the fuse block.

The fuse block is from my previous vehicle, which was used to control the valves for my air bags. It was mounted in the engine compartment for a couple years. These are available at most auto parts stores for around $7. I paid FREE.99 for a few of them several years ago.

Because I wanted to be able to remove the box for any reason, I decided to use connectors on the outside of the box. I drilled 3 holes and used grommets to protect the wire groups. One hole is for the power wire (4AWG), another for the switch wires (18AWG) and the accessory wires (10AWG).


I tested the fit with 4 relays. So far everything looked good.

I then decided to take a break from the hot garage, and drive my non air conditioned Jeep in the 110 degree Las Vegas heat up to the mountains for some hot, dusty air.

Came back home and continued working before the wet weather hit us.
Wired the grounds for the relays together (black wires). Wired the accessory pins to the fuse block (blue wires).


Red wires are to the switch (pin 86 or 85), for coil activation. Black wire is ground.

The connector on the above is a 6-pin Molex connector rated at 12A. Because the coil of a relay requires less than 200mA (per the12volt.com), this will be perfectly fine.
Blue wires are accessory (pin 30 or 87).

The connector above is a 2-pin Molex connector rated at 20A. Because each relay will be handling a maximum of 2 lights (130W max each), 20A is sufficient for the connector. Running a pair of 55W lights will require a minimum 10A fuse for the relay. Depending on your light setup, you may or may not be able to use these types of connectors.
I have the connectors as male and female on the box. The single blue wire is still waiting for a connector (2-pin as well), I just haven't had time to pick another one up. You will have to buy the male and female ends as they are sold individually. I used both on the box so I will not get confused when I disconnect it.
The box will be mounted under my front passenger seat. There is plenty of room for this box and the carpet is already cut for the wires (factory cut for power seats maybe??).
If you choose to go this route, I suggest getting a bigger box! And if you get the bigger box, get the pig tails for the relays! It will make connections and wiring so much easier. Unless you are like me, and prefer to challenge your mind and see how many wires you can stuff in there and make sure it closes tight.
Final picture for the day.
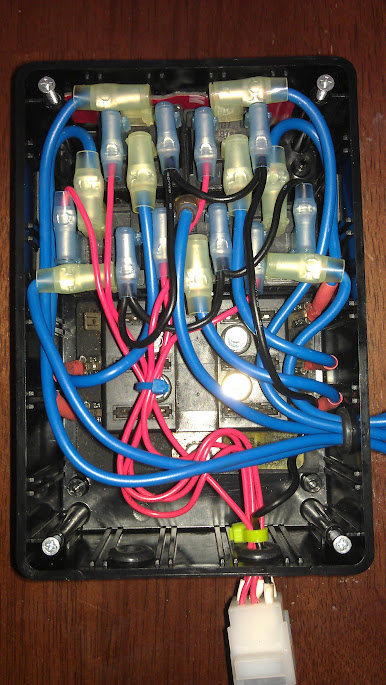
FYI, this box it not water tight. Especially after me drilling holes in it. I have seen numerous relay boxes mounted in the engine compartment that are completely custom, beyond my abilities, and are water tight.
Total cost for this was under $30 including connectors and relays. Depending on your skills at running wires in a confined space, this is a simple one day job. Just make sure you label which relay goes to which fuse slot. And which wire on each connector goes to which relay. Last thing you need to do is back track your wiring.
Next time will be the finished product installed. And my new dash switch panel from a previous post, finished with the correct switches mounted. Hopefully this weekend will be clear so I can finish this project!
I had my relays under the hood, ziptied and mounted to where ever they would fit. Yes, you can modify the factory box and use factory relays for this. But I prefer to be able to remove this box and run with it, should I ever find a reason to.
This project is a compilation of ideas and parts from multiple forums including, but not limited to: Jeep Forum, Cherokee Forum, Monte Carlo SS, Fitch VA (site is not longer valid). As well as multiple members from those forums. I combined ideas of what worked and what didn't for use in this build.
This is the box I started out with. I decided to use this size because I figured that 5 relays would fit inside perfectly... and they do.
Radio Shack 6"x4"x2" project box
You can use this size box. Or shoe box, tupperware, sock, shoes, potato chip bag... whatever it is, make sure you fuse the power wires accordingly. And if you are using a fuse block like below, make sure that power wire is fused as well. No need for electrical sparks and fires when they can be avoided.
I am using 5 relays and a fuse block. It is a very tight squeeze inside the project box, but I managed to get all the wires ran.
Relays are 40A SPDT 4-pin relays as there is no need for the 87a pin.
16-14AWG and 12-10AWG insulated flag connectors.
Wire colors of your choice in different gauges and lengths.
Proper tools, or tools of which you believe will do the job even though they are not the "proper" tool for the job. (Pliers are not wire crimpers but they may work for you)
I used velcro on the box and relays to keep everything secure. The red tape is used as a cushion so the relays do not rattle on the box. The 4 holes drilled are for the fuse block.
The fuse block is from my previous vehicle, which was used to control the valves for my air bags. It was mounted in the engine compartment for a couple years. These are available at most auto parts stores for around $7. I paid FREE.99 for a few of them several years ago.
Because I wanted to be able to remove the box for any reason, I decided to use connectors on the outside of the box. I drilled 3 holes and used grommets to protect the wire groups. One hole is for the power wire (4AWG), another for the switch wires (18AWG) and the accessory wires (10AWG).
I tested the fit with 4 relays. So far everything looked good.
I then decided to take a break from the hot garage, and drive my non air conditioned Jeep in the 110 degree Las Vegas heat up to the mountains for some hot, dusty air.
Came back home and continued working before the wet weather hit us.
Wired the grounds for the relays together (black wires). Wired the accessory pins to the fuse block (blue wires).
Red wires are to the switch (pin 86 or 85), for coil activation. Black wire is ground.
The connector on the above is a 6-pin Molex connector rated at 12A. Because the coil of a relay requires less than 200mA (per the12volt.com), this will be perfectly fine.
Blue wires are accessory (pin 30 or 87).
The connector above is a 2-pin Molex connector rated at 20A. Because each relay will be handling a maximum of 2 lights (130W max each), 20A is sufficient for the connector. Running a pair of 55W lights will require a minimum 10A fuse for the relay. Depending on your light setup, you may or may not be able to use these types of connectors.
I have the connectors as male and female on the box. The single blue wire is still waiting for a connector (2-pin as well), I just haven't had time to pick another one up. You will have to buy the male and female ends as they are sold individually. I used both on the box so I will not get confused when I disconnect it.
The box will be mounted under my front passenger seat. There is plenty of room for this box and the carpet is already cut for the wires (factory cut for power seats maybe??).
If you choose to go this route, I suggest getting a bigger box! And if you get the bigger box, get the pig tails for the relays! It will make connections and wiring so much easier. Unless you are like me, and prefer to challenge your mind and see how many wires you can stuff in there and make sure it closes tight.
Final picture for the day.
FYI, this box it not water tight. Especially after me drilling holes in it. I have seen numerous relay boxes mounted in the engine compartment that are completely custom, beyond my abilities, and are water tight.
Total cost for this was under $30 including connectors and relays. Depending on your skills at running wires in a confined space, this is a simple one day job. Just make sure you label which relay goes to which fuse slot. And which wire on each connector goes to which relay. Last thing you need to do is back track your wiring.
Next time will be the finished product installed. And my new dash switch panel from a previous post, finished with the correct switches mounted. Hopefully this weekend will be clear so I can finish this project!
Last edited by Driver X; 01-24-2015 at 09:59 AM.
08-03-2012, 10:56 PM
#68
CF Veteran
Thread Starter
Join Date: Nov 2011
Location: Las Vegas, NV - St. George, UT
Posts: 1,314
Likes: 0
Received 0 Likes
on
0 Posts
Year: 1996
Model: Cherokee
Engine: 4.0
Quick trail run after work. Cut it short when my coworker and I got called back a few hours after we clocked out!
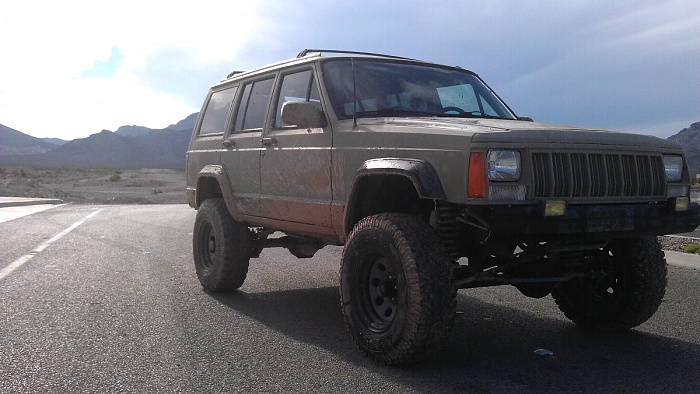
Tested the rock lights out at work. Both turn on then after a few seconds the driver side will turn off. Either a bad connection or bad bulb. Gonna check it tomorrow , try to get my relay box installed and wires ran as well.

Tested the rock lights out at work. Both turn on then after a few seconds the driver side will turn off. Either a bad connection or bad bulb. Gonna check it tomorrow , try to get my relay box installed and wires ran as well.
08-06-2012, 11:00 AM
#69
CF Veteran
Thread Starter
Join Date: Nov 2011
Location: Las Vegas, NV - St. George, UT
Posts: 1,314
Likes: 0
Received 0 Likes
on
0 Posts
Year: 1996
Model: Cherokee
Engine: 4.0
Fixed the rock lights. The cheap walmart lights have a weep hole to drain the water. The position of the lights make that hole face up, causing water to get in and shorting the bulb.
Removed the lights to clean and dry, and a quick seal using E6000 and now they are working like new.
Also, getting the Jeep ready for a Moab trip in October. Haven't been there for 5 years so this will be a fun trip. SYE, driveshaft, lockers, gears, skid plates... never ending!
Removed the lights to clean and dry, and a quick seal using E6000 and now they are working like new.
Also, getting the Jeep ready for a Moab trip in October. Haven't been there for 5 years so this will be a fun trip. SYE, driveshaft, lockers, gears, skid plates... never ending!
08-08-2012, 02:58 PM
#70
CF Veteran
Join Date: Feb 2011
Location: Henderson, NV
Posts: 1,944
Likes: 0
Received 0 Likes
on
0 Posts
Year: 1999
Engine: 4.0L

Can you do me a favor? I also did the ZJ tie rod upgrade. It looks like the TRE that connects to the drag link will make contact with the sway bar endlink bracket(the one thats welded to the axle). If you turn slightly to the right does it look like it would make contact with a little flex?
Also I like your idea for the relay box. I'm probably installing the Dirtbound Offroad triple fan kit and would love to do this.
Last edited by Photojared; 08-08-2012 at 03:17 PM.
08-08-2012, 03:53 PM
#71
CF Veteran
Thread Starter
Join Date: Nov 2011
Location: Las Vegas, NV - St. George, UT
Posts: 1,314
Likes: 0
Received 0 Likes
on
0 Posts
Year: 1996
Model: Cherokee
Engine: 4.0
Thanks man!
My drag link at the lower portion makes no contact with anything else. I will take some pictures after work... It's still covered in mud so hopefully they turn out okay lol.
Is any part of your steering bent? I did a ZJ upgrade on a friends TJ, and his drag link was bent causing it to rub on the sway bar axle mount.
If you need help with the relay box, let me know.
08-08-2012, 04:27 PM
#72
CF Veteran
Join Date: Feb 2011
Location: Henderson, NV
Posts: 1,944
Likes: 0
Received 0 Likes
on
0 Posts
Year: 1999
Engine: 4.0L
Thanks man!
My drag link at the lower portion makes no contact with anything else. I will take some pictures after work... It's still covered in mud so hopefully they turn out okay lol.
Is any part of your steering bent? I did a ZJ upgrade on a friends TJ, and his drag link was bent causing it to rub on the sway bar axle mount.
If you need help with the relay box, let me know.
My drag link at the lower portion makes no contact with anything else. I will take some pictures after work... It's still covered in mud so hopefully they turn out okay lol.
Is any part of your steering bent? I did a ZJ upgrade on a friends TJ, and his drag link was bent causing it to rub on the sway bar axle mount.
If you need help with the relay box, let me know.
I'm pretty sure nothing is bent, I'll take some pictures.
08-08-2012, 11:20 PM
#73
CF Veteran
Thread Starter
Join Date: Nov 2011
Location: Las Vegas, NV - St. George, UT
Posts: 1,314
Likes: 0
Received 0 Likes
on
0 Posts
Year: 1996
Model: Cherokee
Engine: 4.0
ZJ tie rod at drag link. It is far enough from the sway bar. Also, my ZJ TRE doesn't have a grease zerk fitting at the drag link, it is sealed. Purchased from AZ.
Wheels are straight in this pic.
I know Rustys tie rod upgrade, the grease fitting will hit the sway bar.
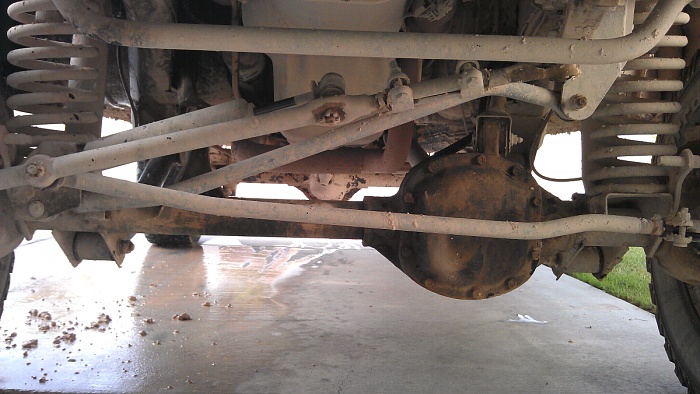
Wheels are straight in this pic.
I know Rustys tie rod upgrade, the grease fitting will hit the sway bar.

 08-08-2012, 11:22 PM
#74
CF Veteran
Thread Starter
Join Date: Nov 2011
Location: Las Vegas, NV - St. George, UT
Posts: 1,314
Likes: 0
Received 0 Likes
on
0 Posts
Year: 1996
Model: Cherokee
Engine: 4.0
Washed the mud off. Now the street is covered in sand and pebbles.
Playing in the mud is fun. Washing the mud off is not. Next time I will spray armor all or something like it on the under carriage prior to wheeling. Washes off so much easier.
Playing in the mud is fun. Washing the mud off is not. Next time I will spray armor all or something like it on the under carriage prior to wheeling. Washes off so much easier.
08-11-2012, 12:13 PM
#75
CF Veteran
Thread Starter
Join Date: Nov 2011
Location: Las Vegas, NV - St. George, UT
Posts: 1,314
Likes: 0
Received 0 Likes
on
0 Posts
Year: 1996
Model: Cherokee
Engine: 4.0
Installing the bump stop plates I got from Botak. Painted them "almond" lol. It's a light desert tan color. Then I coated them with high temp clear.
Upon removal of my passenger rear u-bolts, one of the bolts stripped the threads. Excuse to get new ones! Again.
Pics of the R&R will be up later. Time to find some 3" u-bolts at the auto store.
And I will be using my old rear bumpstops from my Silverado as a temporary bumpstop. Never needed them when I bagged it and I have been sitting on them for a while now.