Let the money spending begin
 06-25-2014, 06:34 AM
#16
Senior Member
Thread Starter

Join Date: May 2014
Location: Iroquois Ontario Canada
Posts: 946
Likes: 0
Received 0 Likes
on
0 Posts
Year: 1998
Model: Cherokee
Engine: 4.0
It has been raining here for the last little bit so I haven't done much to the XJ itself, but I have started collecting and pricing materials. Yesterday I picked up my 10 gauge steel for the frame repair. I had called in for a quote on a 12"x24" piece and was told $29+ taxes, not cheap but I needed it to fix the frame and I was getting twice as much as I needed just in case. Yesterday I went in and picked it up, turns out they misunderstood my quote and order. When I showed up it was a 24"x24" piece for $29 so now I have lots of 10 gauge steel to work with.
A 12' piece of 3/16" 2"x6" tube will cost me $139, and the 12' pieces angle iron and flat bar will cost me under $12 each. They will be ordered and cut into 6' pieces in 2 weeks so I have them when I am ready for them and not have to work around them while I do the frame repair and cut out the wheel openings.
Today I am going to pick up my welder. I have had it sitting at my brothers pretty much since I bought it. There is more room to work there and that is where I am working on my other car. The XJ is an at home, in the driveway job so I need it here till the work is done.
It is suppose to be nice tomorrow and through the weekend here so if that holds true I will put the drivers side up on ramps tomorrow morning and start cleaning up the section of frame I need to repair, and since I have 4 times the steel I need I am going to search the full frame again for any other spots that could need beefing up once I get the first spot fixed. Once I am happy with the frame repair I will start cutting out the fenders and rockers to get back to good metal.
I have decided that I will run the 2x6 from wheel opening to wheel opening, meaning I will be cutting a bit of front fender too. I just need to figure out exactly where to cut, but that should stand out plain as day once I get the rockers cut out and prep'd. I don't want to leave just a straight cut on the bottom of the front fender where it will meet the 2x6. so I will probably cut it long enough that I can fold it back on itself, to get some black edge trim to cover the bottom of it.
Hopefully I will have an actual update tomorrow, with pictures of what I have done.
 06-27-2014, 07:17 AM
#17
CF Veteran
Join Date: Dec 2010
Location: Rocket Country MI
Posts: 1,240
Likes: 0
Received 0 Likes
on
0 Posts
Year: 1999
Model: Cherokee
Engine: 4.0
sounds like a solid plan, also sounds like you're driving a Michigan xj with all the rust issues lol. I'm guessing they also use salt in winter in Ontario.
06-27-2014, 07:43 AM
#18
Senior Member
Thread Starter
Join Date: May 2014
Location: Iroquois Ontario Canada
Posts: 946
Likes: 0
Received 0 Likes
on
0 Posts
Year: 1998
Model: Cherokee
Engine: 4.0
If the salt trucks could run without the roads needing a bit of plowing I don't think they would plow at all here. They have already started stock piling the salt for next winter
I started work on the frame yesterday, I have a bit more cleaning up to do before I start bending metal and welding it in. I didn't have to cut out much to get to good steel again on the frame, about 8" in length and only on the bottom. There is one tiny spot just above the pinch weld, maybe 2" long and 1" high that I need to cut out, but I couldn't get into it with the angle grinder so I am going to have to go get my compressor and die grinder to finish that up. Once I am happy that I have all the bad rust cleaned up I am going to give the inside of the frame a good cleaning with a pressure washer while I have an 8"x4" drain hole in the frame. I will let it dry for 24 hours, hit it with some weld through primer and start welding in new steel. My plan of attack is to patch the small hole above the pinch weld from the inside, then bridge the bottom section from the inside with a few rosebud welds then cap the hole with new steel from the out side. I will be getting a set of 10 gauge frame stiffeners, same thickness as my patch steel and welding them in before I call the frame fully repaired, I will just cut the DS stiffener to butt up against my patch, weld them in and undercoat everything inside and out. Then I am on to the body repair/modifications.
I will try to get pictures of the repair on the frame, but I haven't been to successful taking pictures of the frame rust. So far only one has turned out
06-28-2014, 09:29 AM
#19
Senior Member
Thread Starter
Join Date: May 2014
Location: Iroquois Ontario Canada
Posts: 946
Likes: 0
Received 0 Likes
on
0 Posts
Year: 1998
Model: Cherokee
Engine: 4.0
Well today just turned into an exciting one for me, I found a place in Canada, next province over from me and only 1.5 hour drive, that I can buy quarters for my 98 XJ. Beter yet I can get both sides for roughly $70 than I could pick up a single quarter for, and they are the same manufactures part  I am not sure on the forums "deal spotting" policies and they are not on the vendors list so I wont mention where I found them
 If you are in Canada and need Quarters for your XJ Take a look at National 4wd, they have quarters for $138 each and shipping for me is only $11. $315 is a lot better than the $500 plus I was looking at before. The body parts are listed under the Armor & Protection / Body Parts, Roll Cages & Frames section near the bottom.
So next pay I could jump in the car and go buy them, or I could have them shipped to me for a measly $11 Canadian With gas prices the way they are I think I would go with delivery because there is no way I can drive there and back for less.
I am not sure on the forums "deal spotting" policies and they are not on the vendors list so I wont mention where I found them If you are in Canada and need Quarters for your XJ Take a look at National 4wd, they have quarters for $138 each and shipping for me is only $11. $315 is a lot better than the $500 plus I was looking at before. The body parts are listed under the Armor & Protection / Body Parts, Roll Cages & Frames section near the bottom.So next pay I could jump in the car and go buy them, or I could have them shipped to me for a measly $11 Canadian
With gas prices the way they are I think I would go with delivery because there is no way I can drive there and back for less.
Last edited by SG Mason; 06-28-2014 at 10:14 AM.
06-28-2014, 02:11 PM
#20
Senior Member
Thread Starter
Join Date: May 2014
Location: Iroquois Ontario Canada
Posts: 946
Likes: 0
Received 0 Likes
on
0 Posts
Year: 1998
Model: Cherokee
Engine: 4.0
3pm and so far I made a trip to the town compost site, cleaned up the rest of the rust where I am doing the patch in the frame, cut out a piece of steel to cap the hole in the frame, and marked out the piece of steel I am going to add inside the frame to bridge the hole. I doubt I will get any welding done today because I can't seem to find any weld through primer. As long as the weather holds I should be able to get it all patched up by the end of Monday, unless I find my primer while I am out on a dump run in a few minutes
06-28-2014, 03:55 PM
#21
Senior Member
Thread Starter
Join Date: May 2014
Location: Iroquois Ontario Canada
Posts: 946
Likes: 0
Received 0 Likes
on
0 Posts
Year: 1998
Model: Cherokee
Engine: 4.0
OK found some weld through primer, once I finish the prep work, need to do a little more cutting and sanding, I am good to start welding up the frame patch. If all goes well this time tomorrow the frame will be patched and I can start doing the prep work for the 3/16" 6X2 rocker panel/sliders. They wont be going in till I do the quarters, but it will be a good time to make sure I don't need to do anything other than welding in the angle iron and flat bar.
06-29-2014, 09:04 AM
#22
Senior Member
Thread Starter
Join Date: May 2014
Location: Iroquois Ontario Canada
Posts: 946
Likes: 0
Received 0 Likes
on
0 Posts
Year: 1998
Model: Cherokee
Engine: 4.0
Got some test welds done this morning already. My welds wont win any beauty prizes, but they are strong. I was doing 90� welds so i could beat the living crap out of them to try break them and all I managed to do in bend the steel flat and the welds didn't crack
I am dealing with 3 different thicknesses so I wanted to find the settings for my Century 100 wire feed I am bridging the inside of the frame hole with 10 gauge steel, and the frame itself is about half that thickness of what I was sold as 10g. The plan for the bridge is to drill some holes through the frame and spot weld the 10g bridge in with about a 6" overlap to the rear and a 3" overlap to the front. Then I have some .125" steel that I will but weld to close up the hole and grind smooth for when I get the frame stiffeners from Staang.
I also decided to see how well the fluxcore would do on some 22g steel I have. The chart in the welder say it can be done if I convert to MIG and run CO2. I was able to weld the 22g to the 10g with a feed setting of 2 and the amps set to A, or the lowest setting, and did not burn through. Still it is not pretty enough for doing the quarters when I get them. I will try 22g to 22g once I get the frame done and still have everything out. I am guessing the thicker 10g took the heat and saved the 22g, I expect if I try 22g-22g I will get burn through.
I really like my new auto darkening helmet, best $100 I have spent yet.
07-01-2014, 12:20 PM
#23
Senior Member
Thread Starter
Join Date: May 2014
Location: Iroquois Ontario Canada
Posts: 946
Likes: 0
Received 0 Likes
on
0 Posts
Year: 1998
Model: Cherokee
Engine: 4.0
Next week should be a big spending week, pay day, GST Credit, and Ontario Trillium Benefit all all in the same week. That means I can order just about everything I need to make the XJ street legal
I think the only things I will be missing is the Staang frame stiffeners and the MIG conversion for my welder. I am guessing about a week for everything to arrive and a couple of weeks to do the work on the parts I will have. That means I will get paid again while I am installing parts and I will be able to order the missing parts and have them here one I finish the other work.
I will still be about 4 weeks behind on my rebuild , but I will still have some summer left to play with it
I think the only things I will be missing is the Staang frame stiffeners and the MIG conversion for my welder. I am guessing about a week for everything to arrive and a couple of weeks to do the work on the parts I will have. That means I will get paid again while I am installing parts and I will be able to order the missing parts and have them here one I finish the other work.
I will still be about 4 weeks behind on my rebuild
, but I will still have some summer left to play with it
07-08-2014, 05:30 AM
#24
Senior Member
Thread Starter
Join Date: May 2014
Location: Iroquois Ontario Canada
Posts: 946
Likes: 0
Received 0 Likes
on
0 Posts
Year: 1998
Model: Cherokee
Engine: 4.0
Went out yesterday and dropped a bit of money, and amazingly the only parts for the XJ that I bought/ordered were a set of hinge pins for the drivers door. What I did spend my money on were some things I need to actually work on the XJ, a transmission adapter for a floor jack so I don't have to try drop the transmission using my chest. Did that once in my early 20s on a 1980 Camaro RS and it was a pain in more ways than one .
.
Then I picked up a 3 ton low profile speed lift floor jack to go with the adapter. I could have just borrowed my brothers floor jack and saved a couple hundred dollars, but I decided it would be nice to have a decent floor jack of my own. I went with a low profile one because of the Dodge Stealth, a standard floor jack just barely fits under it now at the factory ride height and I plan on dropping it 1.5"-2" this winter so the LP will come in handy if I ever need to get under it again
I also got a set of spot weld cutters and a nice inspection mirror to help find those hidden nuts and bolts the manufactures like so much . I do have an ace up my sleeve for working in those tight hidden spaces. I have a RC plane that is set up for FPV (some call them drones, I just don't like the term) flying. The little 600 TV line board camera will fit in just about any place the mirror will and I can broadcast the signal to a 7" monitor to see what I am doing
 I should feel just like the doctors that did my knee and elbow surgeries
 .
.
Today I plan on turning the XJ around in the driveway and pulling out all the interior pieces in the back in preparation of replacing the quarter panels I hope to order by the end of the week or early next week. I am just waiting on another check to come in to replenish my bank account. I could order them right now, but if the check gets delayed I would be left with no cash in case of an emergency.
This weekend I should be able to start and hopefully finish the flex plate replacement. The only iffy part will be the down pipe, I don't know if I will be able to get it out of the way without breaking some bolts/studs and if it is too rusty to reuse. If it turns out to be scrap I will have a loud XJ till next pay day. Considering that I only start it to move it around in the driveway right now that wont be a problem, I think
.Then I picked up a 3 ton low profile speed lift floor jack to go with the adapter. I could have just borrowed my brothers floor jack and saved a couple hundred dollars, but I decided it would be nice to have a decent floor jack of my own. I went with a low profile one because of the Dodge Stealth, a standard floor jack just barely fits under it now at the factory ride height and I plan on dropping it 1.5"-2" this winter so the LP will come in handy if I ever need to get under it again
I also got a set of spot weld cutters and a nice inspection mirror to help find those hidden nuts and bolts the manufactures like so much
. I do have an ace up my sleeve for working in those tight hidden spaces. I have a RC plane that is set up for FPV (some call them drones, I just don't like the term) flying. The little 600 TV line board camera will fit in just about any place the mirror will and I can broadcast the signal to a 7" monitor to see what I am doing I should feel just like the doctors that did my knee and elbow surgeries.Today I plan on turning the XJ around in the driveway and pulling out all the interior pieces in the back in preparation of replacing the quarter panels I hope to order by the end of the week or early next week. I am just waiting on another check to come in to replenish my bank account. I could order them right now, but if the check gets delayed I would be left with no cash in case of an emergency.
This weekend I should be able to start and hopefully finish the flex plate replacement. The only iffy part will be the down pipe, I don't know if I will be able to get it out of the way without breaking some bolts/studs and if it is too rusty to reuse. If it turns out to be scrap I will have a loud XJ till next pay day. Considering that I only start it to move it around in the driveway right now that wont be a problem, I think
07-09-2014, 04:35 PM
#25
Senior Member
Thread Starter
Join Date: May 2014
Location: Iroquois Ontario Canada
Posts: 946
Likes: 0
Received 0 Likes
on
0 Posts
Year: 1998
Model: Cherokee
Engine: 4.0
Changed out the upper hinge pin on the drivers door this afternoon. I had planned on doing both, but once I got the bolts loose on the top hinge I took a little break and when I came back I grabbed the wrong torx wrench (a 30 instead of a 40) and stripped out the head on a lower bolt
I had even gone as far as making a simple pin extractor to push the pins out once I ground off the heads, but it wouldn't fit one with the door in place It would have worked so well too. I even tried cutting up the extractor to make it fit, but there was no way to make it work in the space I had.
After 4 hours, start to cleaned up, I managed to get the one pin changed. The door is solid on the hinge now, so I didn't need to do the lower one
Tomorrow I am going to start the prep work for the quarter panel replacement. I am also going to give my spot weld cutters a test run. I should have time, what could go wrong with pulling out the cargo area interior trim and rear seats
I had even gone as far as making a simple pin extractor to push the pins out once I ground off the heads, but it wouldn't fit one with the door in place
It would have worked so well too. I even tried cutting up the extractor to make it fit, but there was no way to make it work in the space I had.After 4 hours, start to cleaned up, I managed to get the one pin changed. The door is solid on the hinge now, so I didn't need to do the lower one
Tomorrow I am going to start the prep work for the quarter panel replacement. I am also going to give my spot weld cutters a test run. I should have time, what could go wrong with pulling out the cargo area interior trim and rear seats
07-10-2014, 11:39 AM
#26
Senior Member
Thread Starter
Join Date: May 2014
Location: Iroquois Ontario Canada
Posts: 946
Likes: 0
Received 0 Likes
on
0 Posts
Year: 1998
Model: Cherokee
Engine: 4.0
Stripping out the interior from the back seats to the tailgate went smoothly and it was actually nice to see things were a lot better than I expected. No rust holes through the floor pan and the inner fenders were not even close to as bad as I was expecting.
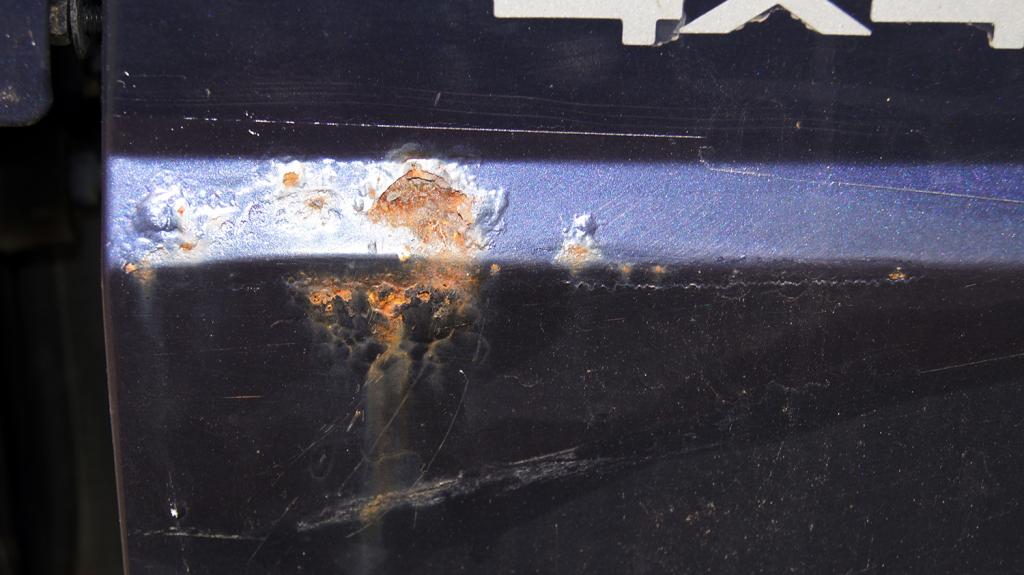
There was some rust on the floor near the fuller hose bulge, but it passed the hammer and screwdriver test. I take a Phillips screwdriver hold it point against the rust and hit it with a 3 pound cross peen hammer. I did not go through once so all that spot needs it to be cleaned up and hit with some POR-15.
The only trouble spot I can see is doing the fabrication under the filler neck. There is zero access from the inside so I am going to have to do most of the work with the quarter off and hope I don't have to tweak it too much to get the quarter and patch to meet up. The passenger side should be a breeze to work with in comparison.
Oh I actually took pictures this time
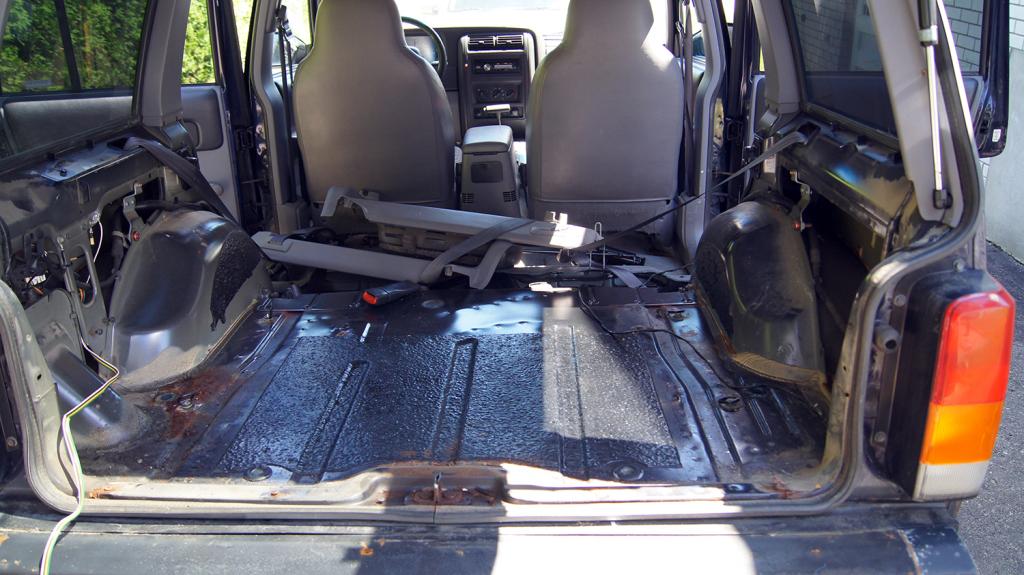
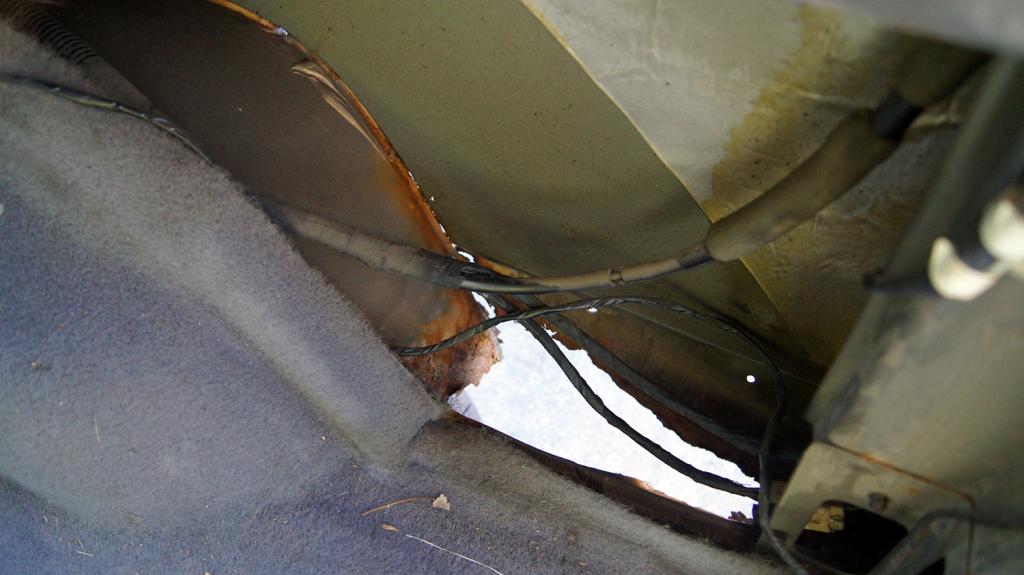
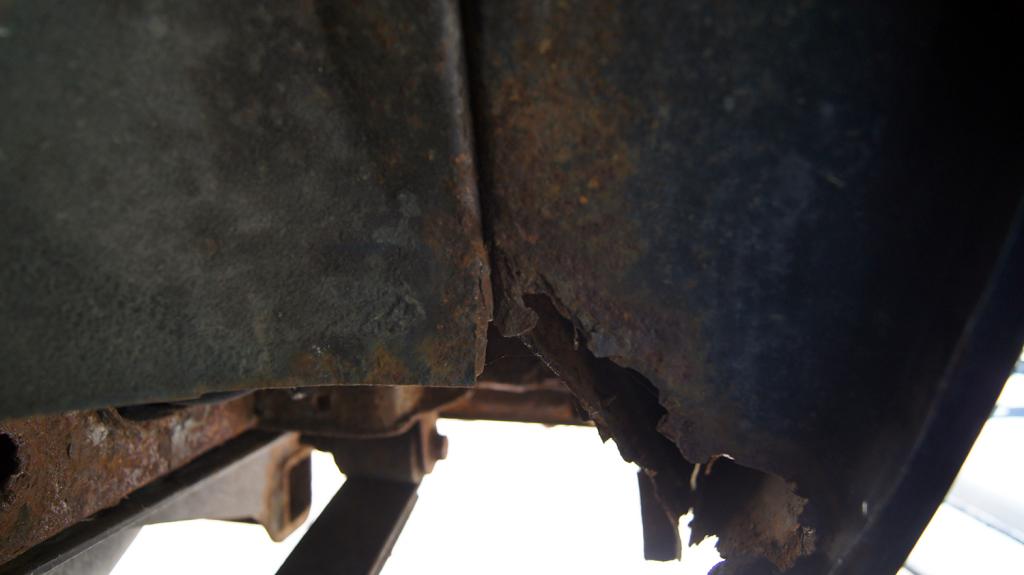
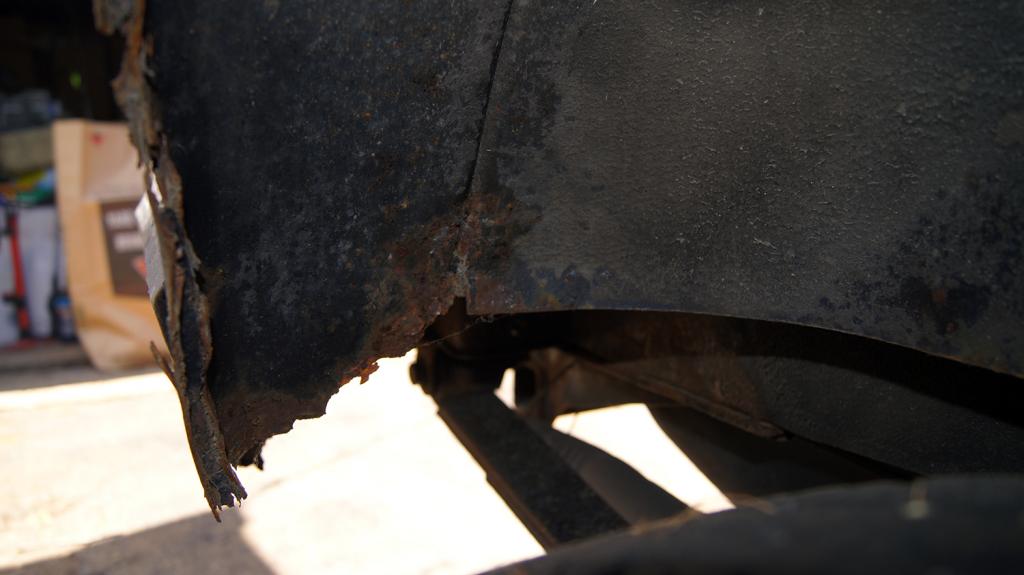
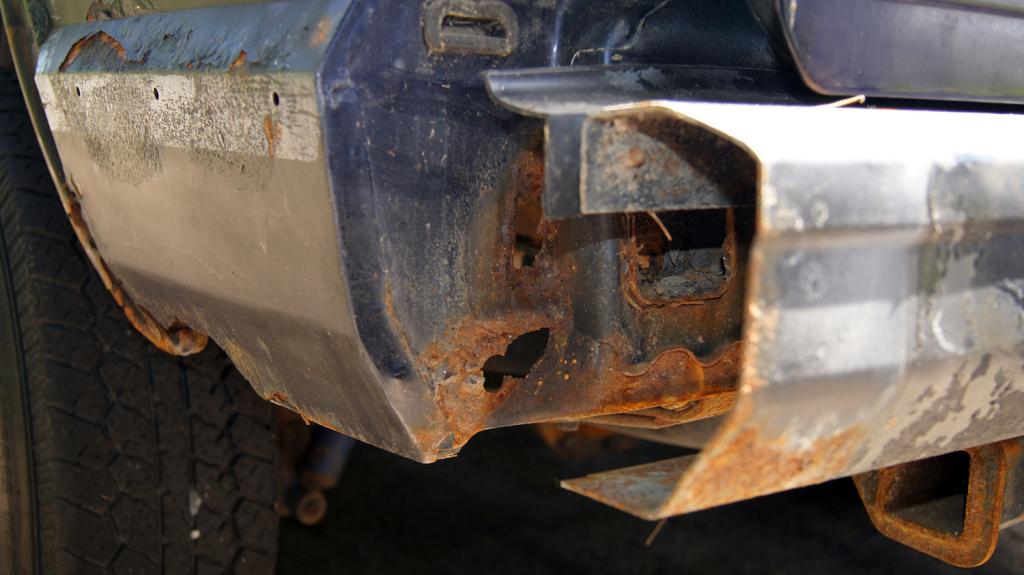
I was worried that this spot might be all the way through, but it looks like it can be saved and I can cut below the body line
I need to go cut the grass now, then if I have time I am going to try pull the rear bumper and the hitch so I have full access to the areas I will be working on.
The rear carpet was wet too so I need to find where the water is coming in. I know there are some poorly covered holes in the tailgate so I suspect that that is where it came from. I will pull the trim off that and run the hose on the Jeep then go looking for water trails so I can fix the leak while I have the back end apart. the carpet is laying in the driveway drying out right now.
There was some rust on the floor near the fuller hose bulge, but it passed the hammer and screwdriver test. I take a Phillips screwdriver hold it point against the rust and hit it with a 3 pound cross peen hammer. I did not go through once so all that spot needs it to be cleaned up and hit with some POR-15.
The only trouble spot I can see is doing the fabrication under the filler neck. There is zero access from the inside so I am going to have to do most of the work with the quarter off and hope I don't have to tweak it too much to get the quarter and patch to meet up. The passenger side should be a breeze to work with in comparison.
Oh I actually took pictures this time
I was worried that this spot might be all the way through, but it looks like it can be saved and I can cut below the body line
I need to go cut the grass now, then if I have time I am going to try pull the rear bumper and the hitch so I have full access to the areas I will be working on.
The rear carpet was wet too so I need to find where the water is coming in. I know there are some poorly covered holes in the tailgate so I suspect that that is where it came from. I will pull the trim off that and run the hose on the Jeep then go looking for water trails so I can fix the leak while I have the back end apart. the carpet is laying in the driveway drying out right now.
Last edited by SG Mason; 07-10-2014 at 11:48 AM.
07-11-2014, 05:00 PM
#27
Senior Member
Thread Starter
Join Date: May 2014
Location: Iroquois Ontario Canada
Posts: 946
Likes: 0
Received 0 Likes
on
0 Posts
Year: 1998
Model: Cherokee
Engine: 4.0
Spent the day cursing and swearing at the trailer hitch and rear bumper, with some special choice words for the person that hacked and scrapped the hitch to the frame
Its a good thing I couldn't find the phone book because I may have called the wrecker to come take it away
Finally got the hitch off, and ended up having to take the bumper off the mounts and not the mounts of the jeep. Found some more frame rust I will need to take care of, but I don't feel safe welding near the gas tank so now I am going to have to drop that too
Done for the day, waiting on the charcoal then it time to cook some burgers and try forget about today. Tomorrow I get to go back to fighting with the bumper mounts, 3 bolts out, 5 to go. Are all bumper mounts fastened with a mix of 14mm 15mm and 16mm bolts I didn't think so
No pictures today, all this fighting with the hitch and bumper left me too frustrated to even think about taking pictures, maybe tomorrow I will snap a couple quick ones to show the progress or lack there of due to the new repair needs
Its a good thing I couldn't find the phone book because I may have called the wrecker to come take it away
Finally got the hitch off, and ended up having to take the bumper off the mounts and not the mounts of the jeep. Found some more frame rust I will need to take care of, but I don't feel safe welding near the gas tank so now I am going to have to drop that too
Done for the day, waiting on the charcoal then it time to cook some burgers and try forget about today. Tomorrow I get to go back to fighting with the bumper mounts, 3 bolts out, 5 to go. Are all bumper mounts fastened with a mix of 14mm 15mm and 16mm bolts
I didn't think soNo pictures today, all this fighting with the hitch and bumper left me too frustrated to even think about taking pictures, maybe tomorrow I will snap a couple quick ones to show the progress or lack there of due to the new repair needs
07-12-2014, 03:47 PM
#28
Senior Member
Thread Starter
Join Date: May 2014
Location: Iroquois Ontario Canada
Posts: 946
Likes: 0
Received 0 Likes
on
0 Posts
Year: 1998
Model: Cherokee
Engine: 4.0
Bumper and bumper mount are off, the inside of the frame has been pressure washed to blow out all the crap. No nut strip on the DS, but there were a few random bolts laying in there. Took a bit to fish them all out, but I got them.
The PS nut strip was still there and intact, so I will use it as a template to make up a new pair in 10g steel. I don't have the equipment to bend that heavy a gauge steel so the little rises will be made with a little cut stack and welding. Should be easy to do, just trace the original PS one cut it out and mark the holes to be drilled. Filp it over and do the same thing again to get the DS.
Well time to get back at it, I should have the nut strips made by tomorrow, going fishing this evening, and I will post pictures once they are cleaned up and ready to be installed, minus nuts
07-17-2014, 09:02 AM
#29
Senior Member
Thread Starter
Join Date: May 2014
Location: Iroquois Ontario Canada
Posts: 946
Likes: 0
Received 0 Likes
on
0 Posts
Year: 1998
Model: Cherokee
Engine: 4.0
Cleaned up the section of rear frame I thought might need patching and it turned out to be OK. I made my nut strips, but my welds looked horrible so no pictures I was getting a really bad stutter on the wire feed. I tried everything to get it to feed smoothly but the stutter kept coming back, it would feed smooth for a bit them start stuttering again. I got it figured out for the last weld, but the other 25 weld looked like someone spit the weld onto the steel
I have a Century 100 wire feed welder, so for the 10g steel I needed to do a double pass. Even with the ugly looking welds they held up fine and it is not like the nut strips are a structural piece, they just make it easier to place the nuts for the trailer hitch.
Things I went over to try fix the poor feed are, checked the tension on the spool, check the feed pulleys, pulled the liner to look for kinks, cleaned the tip, and finally the trigger. The trigger turned out to be the problem, it was a little loose and with my numb hands and the heavy welding gloves I couldn't feel it shifting and breaking the contact. Once I jerry rigged the trigger the feed was smooth as I could ask. With the trigger being the problem, not only was I getting a poor feed, but the power was cutting out too, hence the ugly yet strong welds.
The first strip took me the better part of a day with all the cutting and test fitting, the second one took 2 hours to complete. It is amazing how fast you can work once you have the pattern made, if it wasn't for the welder problems it would have been done in under an hour.
With the strips made I remounted the trailer hitch. Wow is it solid now instead of being held on with 3 loose fitting bolts it is now held in with 8 M12x1.75 8.8 bolts with lock washers, torqued to 90ft/lbs. The actual hitch install took about 20 minutes by myself. With the nuts held in place and properly lined up it couldn't have been easier
I was getting a really bad stutter on the wire feed. I tried everything to get it to feed smoothly but the stutter kept coming back, it would feed smooth for a bit them start stuttering again. I got it figured out for the last weld, but the other 25 weld looked like someone spit the weld onto the steelI have a Century 100 wire feed welder, so for the 10g steel I needed to do a double pass. Even with the ugly looking welds they held up fine and it is not like the nut strips are a structural piece, they just make it easier to place the nuts for the trailer hitch.
Things I went over to try fix the poor feed are, checked the tension on the spool, check the feed pulleys, pulled the liner to look for kinks, cleaned the tip, and finally the trigger. The trigger turned out to be the problem, it was a little loose and with my numb hands and the heavy welding gloves I couldn't feel it shifting and breaking the contact. Once I jerry rigged the trigger the feed was smooth as I could ask. With the trigger being the problem, not only was I getting a poor feed, but the power was cutting out too, hence the ugly yet strong welds.
The first strip took me the better part of a day with all the cutting and test fitting, the second one took 2 hours to complete. It is amazing how fast you can work once you have the pattern made, if it wasn't for the welder problems it would have been done in under an hour.
With the strips made I remounted the trailer hitch. Wow is it solid now
instead of being held on with 3 loose fitting bolts it is now held in with 8 M12x1.75 8.8 bolts with lock washers, torqued to 90ft/lbs. The actual hitch install took about 20 minutes by myself. With the nuts held in place and properly lined up it couldn't have been easier
07-29-2014, 11:09 AM
#30
Senior Member
Thread Starter
Join Date: May 2014
Location: Iroquois Ontario Canada
Posts: 946
Likes: 0
Received 0 Likes
on
0 Posts
Year: 1998
Model: Cherokee
Engine: 4.0
Been a while since an update, but that is because I had to do some work on my Stealth project and inclement weather making working in the driveway an uncomfortable adventure.
I started removing the interior so I could inspect the floors. I had the rear seat and carpet out for some time and they looked good with only a little surface rust near the filler neck area of the floor and the rear floor pans under the rear seats looked almost new. I started taking out the front seats and got rained out after the front two bolts on the drivers side and wasn't able to get back to it till today. The rear bolt, closest to the door, snapped off within a 1/4 of a turn I figure it was probably going to break on it own any how and I can just grab the part sticking out from the bottom with vise grips and spin it out that way so no biggy. The nut came off with no problems. With the seat out I could remove the lower panels and pull the carpet back a bit to get an idea of what I would be working with. some surface rust but only one small 1/4"x1/2" hole over the frame rail right where my left foot would sit while driving. The panel from the outside look almost new so I suspect many years of not knocking the salty slush from boots is the cause of the interior rust.
Next was the passenger seat, I sprayed them all down with PB Blaster the same day I started on the drivers side, and hit them again this morning while I was having my coffee. Front two bolts took a little effort to get out, had to hit things with PB blaster a second time and turn them back in before they would turn out smoothly. The nut spun off just as it should and I had to take my time to get the rear bolt out in one piece. Once I removed the lower panels and pealed back some carpet I saw pretty much the same thing as the drivers side, but the surface rust is a little heavier and no holes so far.
I am planning on a bit of time with the grinder and wire brush or flap wheel to get it all cleaned up and rust free, maybe a little media blasting for good measure. Then patch any little holes I find and a good coat of POR 15 or other anti rust coating and the floor is good to go. Once I get everything stripped out I will take some pictures of what I start with and how it finishes up. Since the one hole I have found is over the frame rail I just may open in up enough to do some closer inspection of the frame and remove any other crap I find in there.
I started removing the interior so I could inspect the floors. I had the rear seat and carpet out for some time and they looked good with only a little surface rust near the filler neck area of the floor and the rear floor pans under the rear seats looked almost new. I started taking out the front seats and got rained out after the front two bolts on the drivers side and wasn't able to get back to it till today. The rear bolt, closest to the door, snapped off within a 1/4 of a turn
I figure it was probably going to break on it own any how and I can just grab the part sticking out from the bottom with vise grips and spin it out that way so no biggy. The nut came off with no problems. With the seat out I could remove the lower panels and pull the carpet back a bit to get an idea of what I would be working with. some surface rust but only one small 1/4"x1/2" hole over the frame rail right where my left foot would sit while driving. The panel from the outside look almost new so I suspect many years of not knocking the salty slush from boots is the cause of the interior rust.Next was the passenger seat, I sprayed them all down with PB Blaster the same day I started on the drivers side, and hit them again this morning while I was having my coffee. Front two bolts took a little effort to get out, had to hit things with PB blaster a second time and turn them back in before they would turn out smoothly. The nut spun off just as it should and I had to take my time to get the rear bolt out in one piece. Once I removed the lower panels and pealed back some carpet I saw pretty much the same thing as the drivers side, but the surface rust is a little heavier and no holes so far.
I am planning on a bit of time with the grinder and wire brush or flap wheel to get it all cleaned up and rust free, maybe a little media blasting for good measure. Then patch any little holes I find and a good coat of POR 15 or other anti rust coating and the floor is good to go. Once I get everything stripped out I will take some pictures of what I start with and how it finishes up. Since the one hole I have found is over the frame rail I just may open in up enough to do some closer inspection of the frame and remove any other crap I find in there.