"The Blue Prius"
 10-03-2012, 11:44 PM
#166
CF Veteran
Thread Starter
Join Date: Nov 2011
Location: City of Trees, CA
Posts: 7,387
Likes: 0
Received 10 Likes
on
9 Posts
Year: 93 2 door
Model: Cherokee
Engine: 4.0
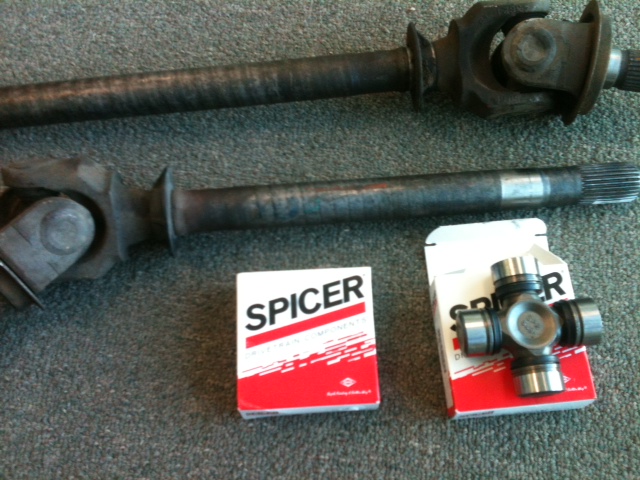
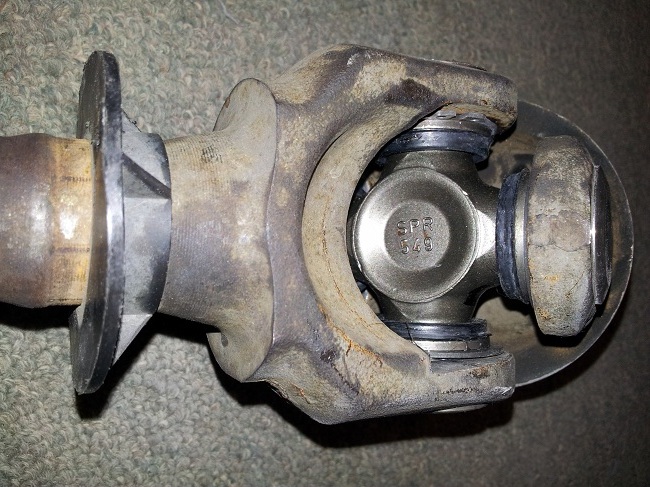
found some 297x dana 30 shafts last night. swooped them immediately
then I decided to do the 5-760x ujoint upgrade with full circle clips
this is a fairly decent upgrade from what I've read. $35 a piece for lifetime warranty ujoints from NAPA and $15 for eight full circle snap rings. peace of mind running locked 33's with spare shafts is priceless
Which Shafts?
297x shafts can be found in all dana 30's that are year 1995+
early model xj's with ABS also had 297x ujoints
Tools
flathead screwdriver
hammer
ujoint tool or bearing press or hammer and socket. take your pick
snap ring pliers
something to grind with
impact gun (optional)
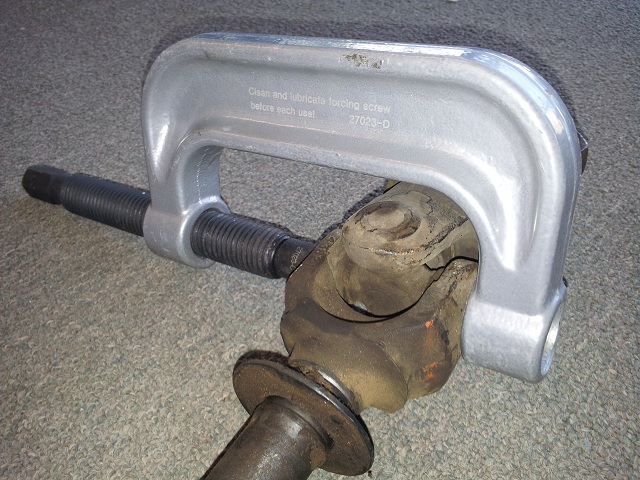
Remove the Retainer Clips
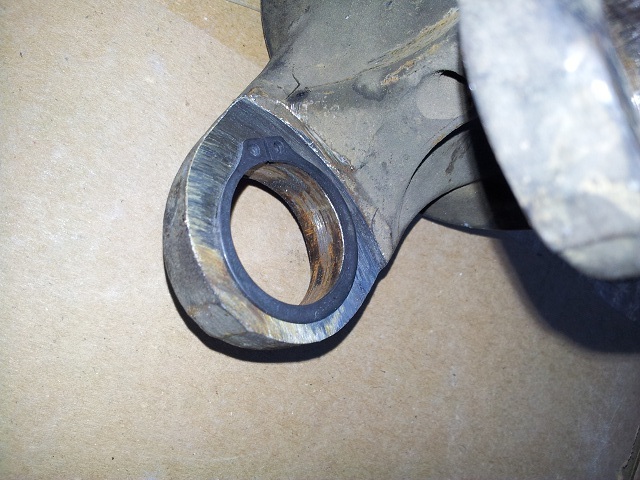
so first off you need to remove each retaining clip that holds on each of the 4 caps
they are located on the inside of the ear holing the inner side of the cap in place
a hammer and a screwdriver will do the trick. here they are all removed along with the ujoint
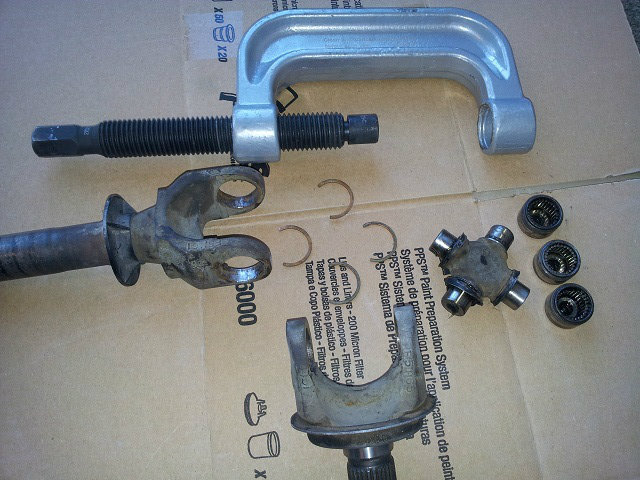
U-Joint Tool
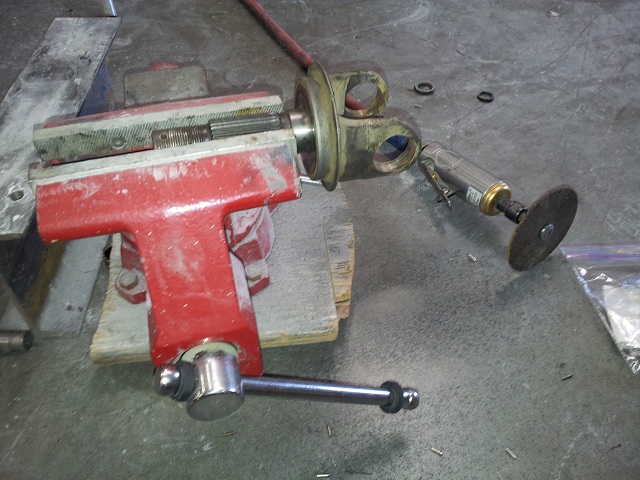
then the next thing to do is take that ujoint tool and pop out the ujoints
I rented mine from autozone (may also be bought for rather cheap at harbor freight).
they aren't the finest tools out there, but with some patience it will work
there are some other pieces that come in the ujoint tool kit. I did not use them as the ujoint just barely fits in the hole
use the impact gun to turn the other end of the tool and pop the ujoint to on side and remove the cap. reverse and repeat on each side
remove ujoint
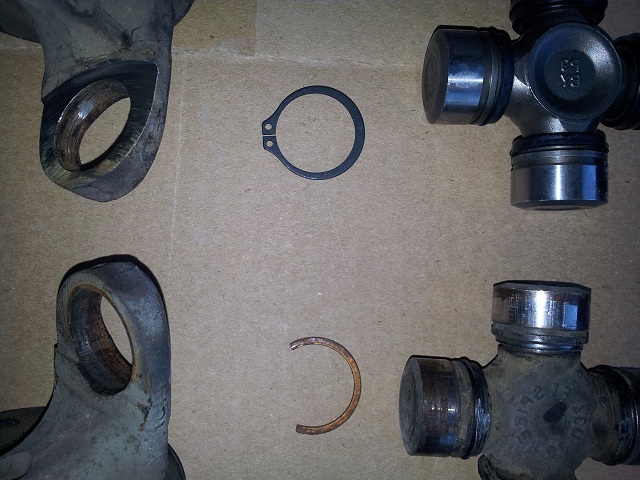
Grinding to Fit Full Circle Clips
now, I did not know what this meant at first. but after looking at the shafts and reading a write up it made perfect sense
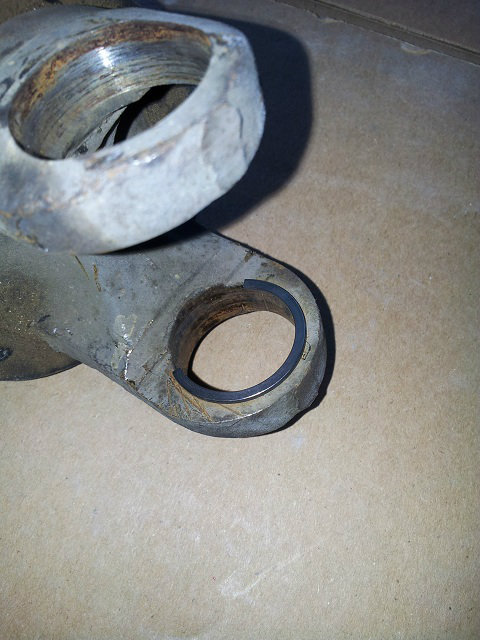
the retainer rings above only make about 3/4 of a circle and have a tendency to pop off
the full circle snap rings absolutely refuse to come off once installed (I found this out the hard way)
here is your stock shaft with the stock retainer
now the full circle clip shown with the grinded axle shaft. (I ground off too much. be careful not to grind the flat part with the hole in it!)
if you look closely, there is a small lip that would stop the full circle clip from fitting. this needs to be grinded back. I used a die grinder and a steady hand. make sure your shaft is held securely. my vice lost it's table but I still made it work. the write up I used said to also grind out the yoke for binding issues. I still need to go back and check this on my axles
shown again are the difference between each component
Installing Your New Ujoint
reinstallation starts out the same as removal. remove the caps and carefully place your ujoint in the shaft
BE SURE TO PUT YOUR SNAP RINGS ON NOW
remove the caps, place all snap rings on the ujoint
be careful not to move any of the small needles inside the ujoint out of place. if you do, don't worry they can all be put back in. if you can find them all...
the next part will take some patience
NOTE: BE SURE THAT YOU GRINDED OFF ENOUGH MATERIAL TO FIT ALL THE SNAP RINGS IN PLACE
CHECK ALL SNAP RINGS FOR CLEARANCE ISSUES BEFORE YOU BEGIN SNAPPING SOME OF THEM IN PLACE
and there it is. nice and strong
here is the original write up I used
http://www.therangerstation.com/Maga...t_snapring.htm
here is a video on how to remove your axle shafts
then I decided to do the 5-760x ujoint upgrade with full circle clips
this is a fairly decent upgrade from what I've read. $35 a piece for lifetime warranty ujoints from NAPA and $15 for eight full circle snap rings. peace of mind running locked 33's with spare shafts is priceless
Which Shafts?
297x shafts can be found in all dana 30's that are year 1995+
early model xj's with ABS also had 297x ujoints
Tools
flathead screwdriver
hammer
ujoint tool or bearing press or hammer and socket. take your pick
snap ring pliers
something to grind with
impact gun (optional)
Remove the Retainer Clips
so first off you need to remove each retaining clip that holds on each of the 4 caps
they are located on the inside of the ear holing the inner side of the cap in place
a hammer and a screwdriver will do the trick. here they are all removed along with the ujoint
U-Joint Tool
then the next thing to do is take that ujoint tool and pop out the ujoints
I rented mine from autozone (may also be bought for rather cheap at harbor freight).
they aren't the finest tools out there, but with some patience it will work
there are some other pieces that come in the ujoint tool kit. I did not use them as the ujoint just barely fits in the hole
use the impact gun to turn the other end of the tool and pop the ujoint to on side and remove the cap. reverse and repeat on each side
remove ujoint
Grinding to Fit Full Circle Clips
now, I did not know what this meant at first. but after looking at the shafts and reading a write up it made perfect sense
the retainer rings above only make about 3/4 of a circle and have a tendency to pop off
the full circle snap rings absolutely refuse to come off once installed (I found this out the hard way)
here is your stock shaft with the stock retainer
now the full circle clip shown with the grinded axle shaft. (I ground off too much. be careful not to grind the flat part with the hole in it!)
if you look closely, there is a small lip that would stop the full circle clip from fitting. this needs to be grinded back. I used a die grinder and a steady hand. make sure your shaft is held securely. my vice lost it's table but I still made it work. the write up I used said to also grind out the yoke for binding issues. I still need to go back and check this on my axles
shown again are the difference between each component
Installing Your New Ujoint
reinstallation starts out the same as removal. remove the caps and carefully place your ujoint in the shaft
BE SURE TO PUT YOUR SNAP RINGS ON NOW
remove the caps, place all snap rings on the ujoint
be careful not to move any of the small needles inside the ujoint out of place. if you do, don't worry they can all be put back in. if you can find them all...
the next part will take some patience
NOTE: BE SURE THAT YOU GRINDED OFF ENOUGH MATERIAL TO FIT ALL THE SNAP RINGS IN PLACE
CHECK ALL SNAP RINGS FOR CLEARANCE ISSUES BEFORE YOU BEGIN SNAPPING SOME OF THEM IN PLACE
and there it is. nice and strong
here is the original write up I used
http://www.therangerstation.com/Maga...t_snapring.htm
here is a video on how to remove your axle shafts
Last edited by Atmos; 10-03-2012 at 11:47 PM.
 10-04-2012, 12:11 AM
#168
CF Veteran
Thread Starter
Join Date: Nov 2011
Location: City of Trees, CA
Posts: 7,387
Likes: 0
Received 10 Likes
on
9 Posts
Year: 93 2 door
Model: Cherokee
Engine: 4.0
the new spicers? yes I think they are a bit beefier in the center section. and the are cold forged as opposed to hot forged. caps are the exact same size though. by the write up I looked at, they are supposed to add 10-15% and help handle 35" tires
It's not a fun upgrade, but necessary to have strong U's and spares
It's not a fun upgrade, but necessary to have strong U's and spares
10-04-2012, 11:38 PM
#170
Junior Member
Join Date: Nov 2011
Location: Sacramento, CA
Posts: 97
Likes: 0
Received 0 Likes
on
0 Posts
Year: 1992
Model: Cherokee
Engine: 4.0L I6
I'm definitely going to get some 297x shafts and these ujoints. The full circle snap rings are the way to go for sure. I haven't made much progress on my jeep. I've been busy with other things. I would've had it done by now I just don't have time. I got the rear of my jeep all unbolted. I just have to get the parts off the parts jeep and slap them on.
10-04-2012, 11:51 PM
#171
Junior Member
Join Date: Nov 2011
Location: Sacramento, CA
Posts: 97
Likes: 0
Received 0 Likes
on
0 Posts
Year: 1992
Model: Cherokee
Engine: 4.0L I6
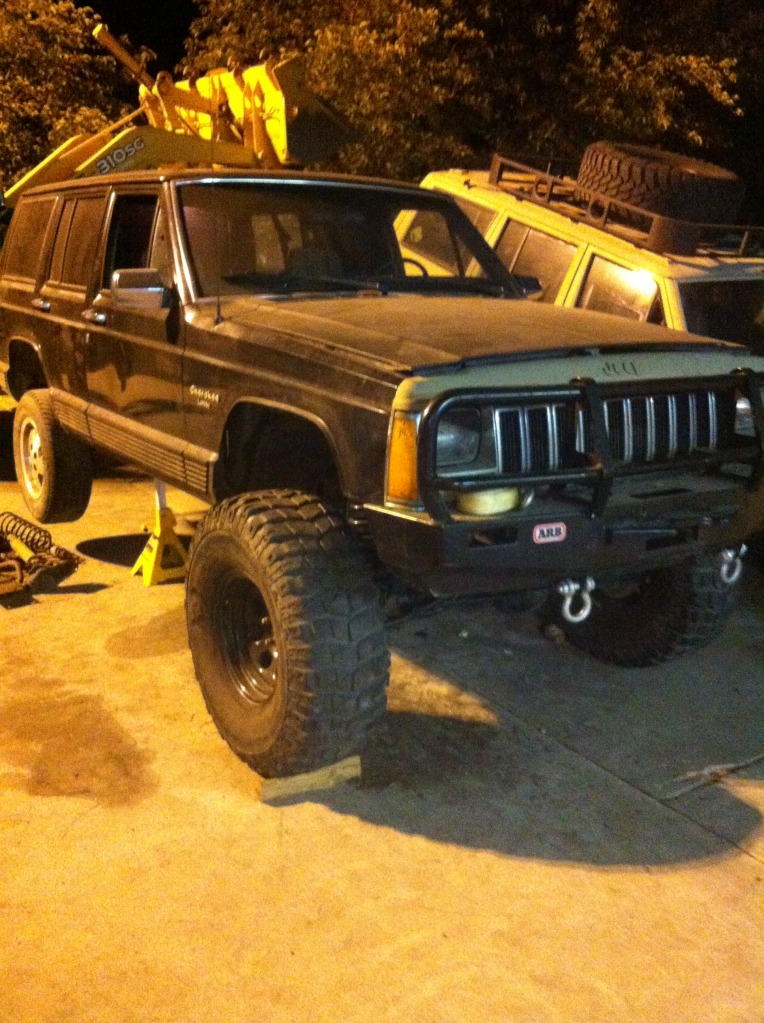
I took this a few nights ago. The front is sitting on its own weight and the rear is just about level on jackstands.
10-05-2012, 12:22 AM
#173
CF Veteran
Thread Starter
Join Date: Nov 2011
Location: City of Trees, CA
Posts: 7,387
Likes: 0
Received 10 Likes
on
9 Posts
Year: 93 2 door
Model: Cherokee
Engine: 4.0
 your jeep is looking good man you're definitely coming out wheeling with us some time
yes the white 89 is taking up space in the shop for now. I'm having fun wheeling, don't really feel like fixing my rollover damage right now.
10-05-2012, 12:25 AM
#174
CF Veteran
Join Date: Oct 2011
Location: Summerville, South Carolina
Posts: 2,613
Likes: 0
Received 0 Likes
on
0 Posts
Year: 99
Model: Cherokee
Engine: 4.0
Originally Posted by Atmos
yes the white 89 is taking up space in the shop for now. I'm having fun wheeling, don't really feel like fixing my rollover damage right now.
10-05-2012, 07:33 PM
#178
Junior Member
Join Date: Nov 2011
Location: Sacramento, CA
Posts: 97
Likes: 0
Received 0 Likes
on
0 Posts
Year: 1992
Model: Cherokee
Engine: 4.0L I6
Yeah I'll definitely wheel with you once I get the lift done. Do you think I'll do okay with 3.07's, open diffs, and a dana 35? Haha.
10-05-2012, 07:54 PM
#179
CF Veteran
Thread Starter
Join Date: Nov 2011
Location: City of Trees, CA
Posts: 7,387
Likes: 0
Received 10 Likes
on
9 Posts
Year: 93 2 door
Model: Cherokee
Engine: 4.0
depends on the tire size. those are 33's right? you should be totally fine. it's 90% driver. my friend with 4cyl wrangler 4.10's open/open d35 goes everywhere I go, and farther
10-06-2012, 01:39 AM
#180
Junior Member
Join Date: Nov 2011
Location: Sacramento, CA
Posts: 97
Likes: 0
Received 0 Likes
on
0 Posts
Year: 1992
Model: Cherokee
Engine: 4.0L I6
No those are 35s. It's 6.5" lift. I have a set of 33 ATs on another set of steelies that don't have all that much tread. Do you think I should just run the 33s until I have some money to beef the axles up? I know I really shouldn't be running 35s on jeep axles but how can I say no if I have a nice set of 35s sitting there. I wanted to have a 4" lift and 33s but I just happened to get a good deal on this. Do you think an 8.8 and beefed up Dana 30 will handle 35s okay?