Black Jack Jeep XJ 99 Build
 08-20-2010, 12:17 AM
#1
Seasoned Member
Thread Starter
Join Date: Aug 2010
Location: Grand Junction, CO
Posts: 330
Likes: 0
Received 0 Likes
on
0 Posts
Year: 1999
Model: Cherokee
Engine: 4.0L I-6
So, here goes...

I wish I had started this at stock, it may have saved me a lot of time and anguish as I built my Heep. I'd ask question here and there, but I always had to explain my steps up to the point of the questions. I hope to rectify this and hopefully provide some useful info to future Jeepers. I wish I had some pics of when she was still stock...but sadly I lost them in a house fire. 
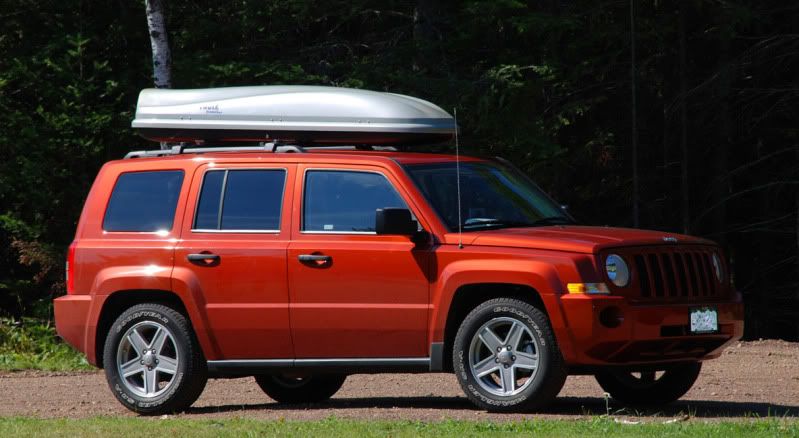
The very first "mod", if you will, was a set of heavy duty Thule roof racks with the bike carriers. It was nice, but I was getting some nasty wind howl at high speeds so I installed the fairing. It serves a purpose and also adds to the "sport ute" look I love.
At stock, I had an awful set of 235/75/15 BFG A/T's. They weren't awful because of traction, they were awful due to how out of round they were. This was the wife's grocery runner at the time so we tossed on a set of BFG Long Trail T/A's (225/75/15). I had another rig I was playing with at the time.
Shortly before our house fire my wife decided she wanted a minivan so the kids could get in and out of the vehicle easier. So we bought a used one for cheap, and parked this Jeep at my parents house for the time being. Then came the house fire.
WARNING: Learn something about house fires in this paragraph!
Here's the condensed version of the fire, Smoke Alarm (Yea, I know! That which is supposed to protect you from harm during a fire, CAUSES ONE! Who knew!) decided to go up in flames in the attic. I managed to get the fire out before the fire dept arrived. They made their run through and said to go stay with my parents and worry about it in the morning. They apparently missed an ember in their sweep...it smoldered until reigniting in the wee hours. A passerby called 911 after seeing flames inside our house. This second fire caused the all real damage in our home. Turns out that re-ignition of fires is fairly common! I really wish the FD had told us this before taking off. Maybe someone will read this and will hopefully keep an eye on their home after even a small fire. Six months later we had a near new house and a little cash left over to buy a new vehicle and ditch the old minivan.
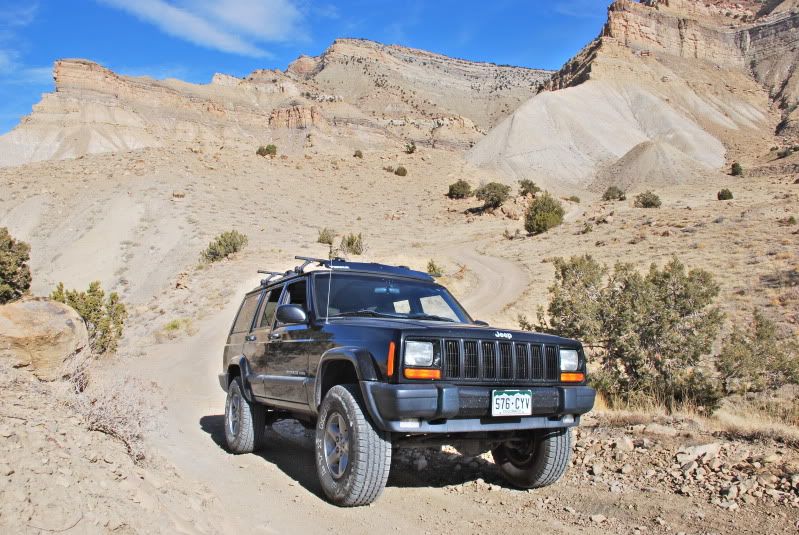
So we sold my rig and the minivan and I moved into BlackJack (99 Jeep Cherokee XJ 4x4, 242, D30 - 8.25). The wife...a new 08 Riot!

I got the itch to wheel and as capable as the XJ is, with 225's and no lift...I was pretty limited to where I could go. And what do we do in this situation boys and girls? LIFT IT, of course!
I had 2 inches on my previous rig and wanted to go a little higher, but stick with 31's. It seems like the sweet spot on Cherokee's without heavy modding. Plus, it makes the vehicle so much more capable. I scoured the internet and after reading Rock Lizards Budget Boost page 1,000 times I decided to combine it with the ideas on this page to reach my 3 to 3.5" goal.
I began the hunter/gatherer routine for all the parts I needed to lift. First thing I got was the Front Coils out of V8 ZJ off eBay. After perusing my local Craigslist I found a guy selling his old leaf springs so I snatched them up. As I was talking Jeeps with him after the sale he said he had something I might want. It was a set of Rubicon Express Gen II Quick Disco's brand new never installed for $35 off list price. Then he sells me his factory hitch for $50. Now that I look back I think this guy was one hell of a salesman! LOL
Now that I had what I needed to start the lift I ordered the Teraflex BB and the Monroe shocks listed on Rock Lizards site. Install was pretty straight forward, V8 coils fought like hell going in! Broke all but one upper shock bolt on the rear. I was barely able to break the rear Leaf spring bolt even with a hefty breaker bar. Also, the Teraflex kit had a longer shackle whose bolt vibrated on my exhaust turn down, I just shortened the tube and added a new turn down to fix the issue. But, one grueling weekend later and I was sitting 3 inches closer to the clouds. My first test drive showed me I was not as lucky as a select few. At 25MPH my drive shaft was trying to vibrate loose my fillings!

I went out and purchased some box tubing and fashioned my own little 1" Transfer Case drop. It helped substantially, but the vibes were still very much there. So I began reading about SYE's, pretty much the only option available to me on my Select-Trac was a Hack and Tap. I had to go the poor man's route...RE HnT with a front drive shaft from another Cherokee. All in all cost me about $155 after rebuilding all the U-joints. I followed Go-Jeeps write-up to install the HnT. If I'm honest, the thought of screwing this up really freaked me out. I was nearly done with the "tap" when I snapped the tapping screw off in the hole. Turns out I hit the back end of the hole and thankfully it broke off with enough sticking out that I could grab the end with some pliers. After wiping the torrent of sweat off my brow I continued on with install. Everything bolted up just fine and I was really pleased to be done with it...until the test drive. It was vibrating even worse now!!!
Turns out one of the C-clips worked it self out as I was installing the side opposite it. Once I fixed this it was smooth sailing!
Next came the Rubicon Express Gen II Quick Disconnects. I had found a website that showed how to install these...I had no manual since I only bought the parts. I found a site that detailed how to install them, but the site has since gone the way of the Dinosaurs. One thing I will recommend...USE LOCTITE!!! I lost a specialized bolt and it cost me like $30 buck to get it ordered ($15 for the bolt $15 for shipping). To make this kit work properly I had to re-drill my track-bar hole to center the axle. This was pretty self explanatory after reading these directions. Best piece of advice I got was to drill the front hole...line up the track-bar and drill the back hole through the bar to insure proper alignment of the bolt. I also used the steering stop washers idea on this page to keep my tires from rubbing.
Since the wheelin' season was almost over my choice of tire was aimed more at getting me to the ski resorts safely than for off-road prowess. I chose the Michelin LTX M/S 31x10.50x15. It actually does really well off-road on moderate trails. Plus, the tread lasts forever and a day.
With the 31's on I was really annoyed at the fact that I couldn't achieve full lock steering. Plus, even with 3 washers on the steering stops I was still rubbing something fierce. I contemplated some Rubicon Express LCA's but started reading about the LCA's from a WJ offering more room and a better ride. Since I'm all about saving cash where I can I looked into this further, turns out they work great! See my first write-up...for details on the install of both upper and lower CA's off a WJ. These worked great and really did improve my ride quality while also providing the full lock steering I wanted for parking lots!
So, what's next for my Jeep? I just scored a set of BFG M/T's with 40% tread remaining for $100. I plan to mount them up and do something I haven't done much of lately...WHEEL IT!!!!!
Thanks for reading! Post up questions or ideas...constructive ideas are always appreciated!
The very first "mod", if you will, was a set of heavy duty Thule roof racks with the bike carriers. It was nice, but I was getting some nasty wind howl at high speeds so I installed the fairing. It serves a purpose and also adds to the "sport ute" look I love.
At stock, I had an awful set of 235/75/15 BFG A/T's. They weren't awful because of traction, they were awful due to how out of round they were. This was the wife's grocery runner at the time so we tossed on a set of BFG Long Trail T/A's (225/75/15). I had another rig I was playing with at the time.
Shortly before our house fire my wife decided she wanted a minivan so the kids could get in and out of the vehicle easier. So we bought a used one for cheap, and parked this Jeep at my parents house for the time being. Then came the house fire.
WARNING: Learn something about house fires in this paragraph!
Here's the condensed version of the fire, Smoke Alarm (Yea, I know! That which is supposed to protect you from harm during a fire, CAUSES ONE! Who knew!) decided to go up in flames in the attic. I managed to get the fire out before the fire dept arrived. They made their run through and said to go stay with my parents and worry about it in the morning. They apparently missed an ember in their sweep...it smoldered until reigniting in the wee hours. A passerby called 911 after seeing flames inside our house. This second fire caused the all real damage in our home. Turns out that re-ignition of fires is fairly common! I really wish the FD had told us this before taking off. Maybe someone will read this and will hopefully keep an eye on their home after even a small fire. Six months later we had a near new house and a little cash left over to buy a new vehicle and ditch the old minivan.
So we sold my rig and the minivan and I moved into BlackJack (99 Jeep Cherokee XJ 4x4, 242, D30 - 8.25). The wife...a new 08 Riot!
I got the itch to wheel and as capable as the XJ is, with 225's and no lift...I was pretty limited to where I could go. And what do we do in this situation boys and girls? LIFT IT, of course!
I had 2 inches on my previous rig and wanted to go a little higher, but stick with 31's. It seems like the sweet spot on Cherokee's without heavy modding. Plus, it makes the vehicle so much more capable. I scoured the internet and after reading Rock Lizards Budget Boost page 1,000 times I decided to combine it with the ideas on this page to reach my 3 to 3.5" goal.
I began the hunter/gatherer routine for all the parts I needed to lift. First thing I got was the Front Coils out of V8 ZJ off eBay. After perusing my local Craigslist I found a guy selling his old leaf springs so I snatched them up. As I was talking Jeeps with him after the sale he said he had something I might want. It was a set of Rubicon Express Gen II Quick Disco's brand new never installed for $35 off list price. Then he sells me his factory hitch for $50. Now that I look back I think this guy was one hell of a salesman! LOL
Now that I had what I needed to start the lift I ordered the Teraflex BB and the Monroe shocks listed on Rock Lizards site. Install was pretty straight forward, V8 coils fought like hell going in! Broke all but one upper shock bolt on the rear. I was barely able to break the rear Leaf spring bolt even with a hefty breaker bar. Also, the Teraflex kit had a longer shackle whose bolt vibrated on my exhaust turn down, I just shortened the tube and added a new turn down to fix the issue. But, one grueling weekend later and I was sitting 3 inches closer to the clouds. My first test drive showed me I was not as lucky as a select few. At 25MPH my drive shaft was trying to vibrate loose my fillings!
I went out and purchased some box tubing and fashioned my own little 1" Transfer Case drop. It helped substantially, but the vibes were still very much there. So I began reading about SYE's, pretty much the only option available to me on my Select-Trac was a Hack and Tap. I had to go the poor man's route...RE HnT with a front drive shaft from another Cherokee. All in all cost me about $155 after rebuilding all the U-joints. I followed Go-Jeeps write-up to install the HnT. If I'm honest, the thought of screwing this up really freaked me out. I was nearly done with the "tap" when I snapped the tapping screw off in the hole. Turns out I hit the back end of the hole and thankfully it broke off with enough sticking out that I could grab the end with some pliers. After wiping the torrent of sweat off my brow I continued on with install. Everything bolted up just fine and I was really pleased to be done with it...until the test drive. It was vibrating even worse now!!!
Turns out one of the C-clips worked it self out as I was installing the side opposite it. Once I fixed this it was smooth sailing!
Next came the Rubicon Express Gen II Quick Disconnects. I had found a website that showed how to install these...I had no manual since I only bought the parts. I found a site that detailed how to install them, but the site has since gone the way of the Dinosaurs. One thing I will recommend...USE LOCTITE!!! I lost a specialized bolt and it cost me like $30 buck to get it ordered ($15 for the bolt $15 for shipping). To make this kit work properly I had to re-drill my track-bar hole to center the axle. This was pretty self explanatory after reading these directions. Best piece of advice I got was to drill the front hole...line up the track-bar and drill the back hole through the bar to insure proper alignment of the bolt. I also used the steering stop washers idea on this page to keep my tires from rubbing.
Since the wheelin' season was almost over my choice of tire was aimed more at getting me to the ski resorts safely than for off-road prowess. I chose the Michelin LTX M/S 31x10.50x15. It actually does really well off-road on moderate trails. Plus, the tread lasts forever and a day.
With the 31's on I was really annoyed at the fact that I couldn't achieve full lock steering. Plus, even with 3 washers on the steering stops I was still rubbing something fierce. I contemplated some Rubicon Express LCA's but started reading about the LCA's from a WJ offering more room and a better ride. Since I'm all about saving cash where I can I looked into this further, turns out they work great! See my first write-up...for details on the install of both upper and lower CA's off a WJ. These worked great and really did improve my ride quality while also providing the full lock steering I wanted for parking lots!
So, what's next for my Jeep? I just scored a set of BFG M/T's with 40% tread remaining for $100. I plan to mount them up and do something I haven't done much of lately...WHEEL IT!!!!!
Thanks for reading! Post up questions or ideas...constructive ideas are always appreciated!
Last edited by eggdashure; 03-15-2012 at 10:43 PM.
 08-20-2010, 12:25 AM
#2
Seasoned Member
Thread Starter
Join Date: Aug 2010
Location: Grand Junction, CO
Posts: 330
Likes: 0
Received 0 Likes
on
0 Posts
Year: 1999
Model: Cherokee
Engine: 4.0L I-6
Wow, I've been busy working on the Heep lately! 
First off, some (new to me) tires. BFG M/T 31x10.50X15 (40% Tread remaining, $100).
So Memorial Day weekend I take the plunge and finally got around to installing my ZJ Disc Conversion for the rear. Man...I think that if it were possible for one person to find all the possible way to have something go wrong, I'm a good candidate!
I went to a U-Pull and Save (First timer, none near me...had to go to the BIG city to get what I needed) and got pretty much everything. I already had the backing plates, just needed everything else. Pads and rotors had only 1K on them, so a good score to get everything for $75.
 Not going to do a write-up as there are already plenty out there, just my advice...take it or leave it. = )
Check out these pitiful drums...I didn't realize it, but the actual "Drums" can wallow out the stud holes. A little tough to see but, check out the top stud in the pic.
I really had to fight those stupid little washers that hold the drum in place! For whatever reason, I think mine were made of titanium! Literally couldn't break them and had to slowly screw them off. PITA
Once they were off including the drums, I had a look at the internals. Shoes were wearing funky, certain spots were hitting and not others. Guess I should have adjusted them every now and again!
Wow, that rear end was nasty! Took almost an entire can of Brake Cleaner to get it pur tee again.
Ok, now for the hardships:
1) Little bolt that holds the cross piece in the diff...started to round off on me. I was luckily able to get it out with a good socket once I got lined up to the rear most position.
2) The backing plates were really tough to machine down. I used a grinding wheel for my Dremel, but progress was so slow, watching paint dry is quicker! Then I tried some sanding drums with heavy duty sanding wheels. Nope! What finally worked for me, was getting a 10" file (half flat, half rounded) and just working around and around. I also had to use my angle grinder to prep the axle portion, it was all rusted.
3) The hard lines were almost completely seized to the old backing plates. I had doused them with Penetrating oil the previous day, but that didn't seem to help. I broke 2 wrenches trying to get them off! I went to Autozone to see if they had a tool or anything. Guy just hands me a 3/8th's inch wrench. But...it did work! Damn near broke my hand with the force I had to put into it. (Slammed it on the leaf spring when it finally gave.) Gotta love that painful euphoria!
4) I forgot to tighten the little cross piece bolt in the diff! Had to re-do the RTV, what a sloppy mess trying to get that stuff off! Stupid mistake on my part! "Your in much too much of a hurry!"
5) The pads I got from UPAS were all messed up. If you look at normal pads, one side is notched, the other allows you to slide the caliper on. For my lucky self, one set had notches opposite each other. So I couldn't get them to slide on! I beat on that caliper for 30 minutes before seeing the problem. I thought, (You dummy...this is on the wrong side!) Nope, no matter the orientation, it was always backwards. Finally got it on by setting the pad in place on the rotor and pushing the caliper over it. PITA!
6) No parts store had MORE than 4 ZJ Studs, I had to go to 3 different parts shops!
7) One of the UPAS calipers had a rounded bleeder screw. Nice to find that after everything was ready to be bled. Had to pull it off and hammer a smaller socket on, then head back to the parts store AGAIN for a new bleeder screw.
8) First test drive...(HOORAY!!!) "Scrap, scrap, scrap" Oh great...what now! The backing plate dust shield was bent on the drivers side. Pull it all back off and hammer the crap out of it where it was rubbing. Put it all back together.
After all that....fun....it was finally DONE!
Verdict:
I threw some dimes out on the street...but didn't stop on any. I think I need to bleed again, pedal felt squishy. But, after the initial quick starts and stops I did notice some unexpected surprises!
It used to be that whenever I put my Jeep in Reverse, I always had a "Ka-Clunk". This was gone! Also, when rolling up to a stop light, if it was a somewhat hard stop, the Jeep would clunk as it came to rest in the back. Also gone!
Braking is much more level, I don't feel as though I am lurched forward and down during hard braking.
I also had to try it out wheeling. I have some dunes about a mile from my place. It was cool being able to hold the Jeep on a steep incline. One hill in particular I would slowly slide down with brake pedal to the floor front would lock, but the rear kept rolling. Tonight, I was able to hold the hill without any problem.
So...what's next? My improvised exhaust hanger at very rear of my Jeep broke off while wheelin'. Now I can hear the pipe slamming on the hanger after large bumps. Might as well add another leaf from my donor pack to level things out front to rear. Also, I need to find the patience to work on the e-Brake setup. It wasn't priority, but I would like it to function...eventually. One of the WJ Upper Control Arms has a bad bushing that needs replacement. I'm also tossing around the idea of Control Arm Drop Brackets at the same time. Two birds...one stone!
First off, some (new to me) tires. BFG M/T 31x10.50X15 (40% Tread remaining, $100).
So Memorial Day weekend I take the plunge and finally got around to installing my ZJ Disc Conversion for the rear. Man...I think that if it were possible for one person to find all the possible way to have something go wrong, I'm a good candidate!
I went to a U-Pull and Save (First timer, none near me...had to go to the BIG city to get what I needed) and got pretty much everything. I already had the backing plates, just needed everything else. Pads and rotors had only 1K on them, so a good score to get everything for $75.
Check out these pitiful drums...I didn't realize it, but the actual "Drums" can wallow out the stud holes. A little tough to see but, check out the top stud in the pic.
I really had to fight those stupid little washers that hold the drum in place! For whatever reason, I think mine were made of titanium! Literally couldn't break them and had to slowly screw them off. PITA
Once they were off including the drums, I had a look at the internals. Shoes were wearing funky, certain spots were hitting and not others. Guess I should have adjusted them every now and again!
Wow, that rear end was nasty! Took almost an entire can of Brake Cleaner to get it pur tee again.
Ok, now for the hardships:
1) Little bolt that holds the cross piece in the diff...started to round off on me. I was luckily able to get it out with a good socket once I got lined up to the rear most position.
2) The backing plates were really tough to machine down. I used a grinding wheel for my Dremel, but progress was so slow, watching paint dry is quicker! Then I tried some sanding drums with heavy duty sanding wheels. Nope! What finally worked for me, was getting a 10" file (half flat, half rounded) and just working around and around. I also had to use my angle grinder to prep the axle portion, it was all rusted.
3) The hard lines were almost completely seized to the old backing plates. I had doused them with Penetrating oil the previous day, but that didn't seem to help. I broke 2 wrenches trying to get them off! I went to Autozone to see if they had a tool or anything. Guy just hands me a 3/8th's inch wrench. But...it did work! Damn near broke my hand with the force I had to put into it. (Slammed it on the leaf spring when it finally gave.) Gotta love that painful euphoria!
4) I forgot to tighten the little cross piece bolt in the diff! Had to re-do the RTV, what a sloppy mess trying to get that stuff off! Stupid mistake on my part! "Your in much too much of a hurry!"
5) The pads I got from UPAS were all messed up. If you look at normal pads, one side is notched, the other allows you to slide the caliper on. For my lucky self, one set had notches opposite each other. So I couldn't get them to slide on! I beat on that caliper for 30 minutes before seeing the problem. I thought, (You dummy...this is on the wrong side!) Nope, no matter the orientation, it was always backwards. Finally got it on by setting the pad in place on the rotor and pushing the caliper over it. PITA!
6) No parts store had MORE than 4 ZJ Studs, I had to go to 3 different parts shops!
7) One of the UPAS calipers had a rounded bleeder screw. Nice to find that after everything was ready to be bled. Had to pull it off and hammer a smaller socket on, then head back to the parts store AGAIN for a new bleeder screw.
8) First test drive...(HOORAY!!!) "Scrap, scrap, scrap" Oh great...what now! The backing plate dust shield was bent on the drivers side. Pull it all back off and hammer the crap out of it where it was rubbing. Put it all back together.
After all that....fun....it was finally DONE!
Verdict:
I threw some dimes out on the street...but didn't stop on any. I think I need to bleed again, pedal felt squishy. But, after the initial quick starts and stops I did notice some unexpected surprises!
It used to be that whenever I put my Jeep in Reverse, I always had a "Ka-Clunk". This was gone! Also, when rolling up to a stop light, if it was a somewhat hard stop, the Jeep would clunk as it came to rest in the back. Also gone!
Braking is much more level, I don't feel as though I am lurched forward and down during hard braking.
I also had to try it out wheeling. I have some dunes about a mile from my place. It was cool being able to hold the Jeep on a steep incline. One hill in particular I would slowly slide down with brake pedal to the floor front would lock, but the rear kept rolling. Tonight, I was able to hold the hill without any problem.
So...what's next? My improvised exhaust hanger at very rear of my Jeep broke off while wheelin'. Now I can hear the pipe slamming on the hanger after large bumps.
Might as well add another leaf from my donor pack to level things out front to rear. Also, I need to find the patience to work on the e-Brake setup. It wasn't priority, but I would like it to function...eventually. One of the WJ Upper Control Arms has a bad bushing that needs replacement. I'm also tossing around the idea of Control Arm Drop Brackets at the same time. Two birds...one stone!
Last edited by eggdashure; 03-18-2012 at 10:04 PM.
08-20-2010, 12:27 AM
#3
Seasoned Member
Thread Starter
Join Date: Aug 2010
Location: Grand Junction, CO
Posts: 330
Likes: 0
Received 0 Likes
on
0 Posts
Year: 1999
Model: Cherokee
Engine: 4.0L I-6
So my Saturday projects this week are as follows:
Install the longer YJ rear Brake hose.
Add another leaf to the rear end.

This turned out to be a bigger hassle than I anticipated. I figured, 3 things to unscrew at the axle, one on the frame side...done. Yea, not my luck. The little retaining clip that holds the hose in place at the frame side was ugly corroded and made for a 20 minute struggle to remove it.
Once it was off though, things went smooth from there. The 94 YJ hose adds another 2 3/4" length to the hose. Keeps it from stretching.
Re-bled the system and noticed an improvement in the brakes as well! (Not due to the hose mind you.) It's still not lock up when a feather falls on the pedal, but much, much improved over the drums!
I also added another leaf to my bastard pack. It just didn't look right saggin' in the rear. Not a fun job, but it's done. I also put some new "Anti-Friction Pads" between the leafs. I went to a spring shop and asked for the bushings that go between the leafs. "They're NOT bushings!!!! They are ANTI FRICTION PADS!!!" Ok, dang, take your job a little more seriously! LOL
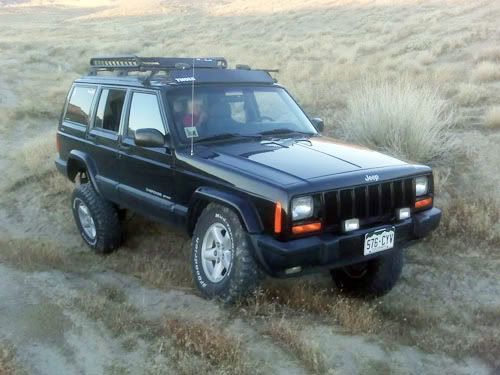
Anyway, the results were great! I had another inch of lift on the rear, less sway in the corners, and it actually rode better! Can't argue with results like that. See the before and after pics below.


Install the longer YJ rear Brake hose.
Add another leaf to the rear end.
This turned out to be a bigger hassle than I anticipated. I figured, 3 things to unscrew at the axle, one on the frame side...done. Yea, not my luck. The little retaining clip that holds the hose in place at the frame side was ugly corroded and made for a 20 minute struggle to remove it.
Once it was off though, things went smooth from there. The 94 YJ hose adds another 2 3/4" length to the hose. Keeps it from stretching.
Re-bled the system and noticed an improvement in the brakes as well! (Not due to the hose mind you.) It's still not lock up when a feather falls on the pedal, but much, much improved over the drums!
I also added another leaf to my bastard pack. It just didn't look right saggin' in the rear. Not a fun job, but it's done. I also put some new "Anti-Friction Pads" between the leafs. I went to a spring shop and asked for the bushings that go between the leafs. "They're NOT bushings!!!! They are ANTI FRICTION PADS!!!" Ok, dang, take your job a little more seriously! LOL
Anyway, the results were great! I had another inch of lift on the rear, less sway in the corners, and it actually rode better! Can't argue with results like that.
See the before and after pics below.
08-20-2010, 12:28 AM
#4
Seasoned Member
Thread Starter
Join Date: Aug 2010
Location: Grand Junction, CO
Posts: 330
Likes: 0
Received 0 Likes
on
0 Posts
Year: 1999
Model: Cherokee
Engine: 4.0L I-6
Ok, so I managed to tear out one of my upper shock mounts. I was so tired of dealing with them! First time the bolts broke off, so I drilled and tapped them. This time, the threads pulled right out. Enough was enough! I pulled up the rear cargo area carpet up and drilled through from underneath so I knew where to cut the floor. Then I went about cutting a small rectangle to give access to the welded nuts. I dropped a couple grade 8 bolts down. On the other side, I setup a BPE using an old rear sway bars U-Bolt connection. So I connected it to my "new to me" Bilstein 5100's and attached it to the bolts I ran from above. This is a REALLY solid setup and I can just disconnect the BPE bolt if I need to mess with my shocks again.


After buttoning up the carpet and rear shocks, I moved to the front. Up here I installed the OME 2" Medium weight Wrangler front coils. Gawd, this is ALWAYS a project. My WJ Control Arms were blocking some of my droop and this made fighting the coils that much harder until I figured out the issue. After that everything went smoothly! Sorry for the dark pic, didn't realize how backlight it was.

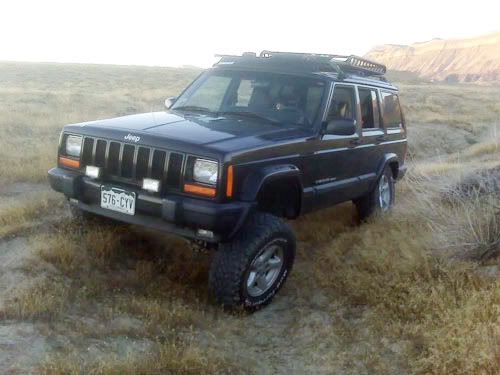
Then some poser shots with the rack. I need to move it back, but you get the idea.


The results of the TJ OME 2" Coils lent 2.5 inches of lift on my Cherokee. Keep in mind I'm running stock bumpers and stock engine. Might be less depending on weight. But, I was sitting at 21" hub to fender with ZJ V8 Coils and a 1.5 inch spacer. With the TJ OME 2" Coils I am sitting at 21.5", level with the rear.
After buttoning up the carpet and rear shocks, I moved to the front. Up here I installed the OME 2" Medium weight Wrangler front coils. Gawd, this is ALWAYS a project. My WJ Control Arms were blocking some of my droop and this made fighting the coils that much harder until I figured out the issue. After that everything went smoothly! Sorry for the dark pic, didn't realize how backlight it was.
Then some poser shots with the rack. I need to move it back, but you get the idea.
The results of the TJ OME 2" Coils lent 2.5 inches of lift on my Cherokee. Keep in mind I'm running stock bumpers and stock engine. Might be less depending on weight. But, I was sitting at 21" hub to fender with ZJ V8 Coils and a 1.5 inch spacer. With the TJ OME 2" Coils I am sitting at 21.5", level with the rear.
Last edited by eggdashure; 08-20-2010 at 02:02 AM.
08-20-2010, 02:52 PM
#6
Banned

Join Date: Oct 2009
Location: West Springfield, MA
Posts: 2,231
Likes: 0
Received 1 Like
on
1 Post
Year: 1999
Model: Cherokee
Engine: 4.0
if you use the proportioning valve from a zj with disc brakes you will also notice a difference because it is set up for the higher pressure of discs not our rear drums...and nice jeep
08-20-2010, 05:35 PM
#7
Seasoned Member
Thread Starter
Join Date: Aug 2010
Location: Grand Junction, CO
Posts: 330
Likes: 0
Received 0 Likes
on
0 Posts
Year: 1999
Model: Cherokee
Engine: 4.0L I-6
mcguyver_xj
Did I read improperly? I thought the ZJ Prop valve provided less pressure to the rear...
Everything I read said that if you are having problems with the rear brakes "locking up" to get the ZJ valve. I've never had any problems with it.
Did I read improperly? I thought the ZJ Prop valve provided less pressure to the rear...
Everything I read said that if you are having problems with the rear brakes "locking up" to get the ZJ valve. I've never had any problems with it.
Trending Topics
08-20-2010, 09:35 PM
#8
Banned
Join Date: Oct 2009
Location: West Springfield, MA
Posts: 2,231
Likes: 0
Received 1 Like
on
1 Post
Year: 1999
Model: Cherokee
Engine: 4.0
ohh i always read that in order for the rear discs to work properly you should use the prop. valve from a ZJ but idk but if you think about it drums require less pressure than disc so the stock ZJ is set up for rear discs with more pressure so it would be an advantege over XJ prop. valve set up for drum brakes with less pressure...
08-20-2010, 11:09 PM
#9
Seasoned Member
Thread Starter
Join Date: Aug 2010
Location: Grand Junction, CO
Posts: 330
Likes: 0
Received 0 Likes
on
0 Posts
Year: 1999
Model: Cherokee
Engine: 4.0L I-6
I've thought about pulling the O-ring off my XJ prop valve...I think that is another way to allow more fluid to reach the rear brakes. Honestly though, I don't want to bleed those be-stards again! 
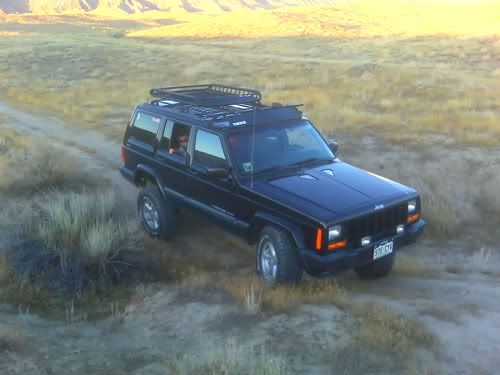
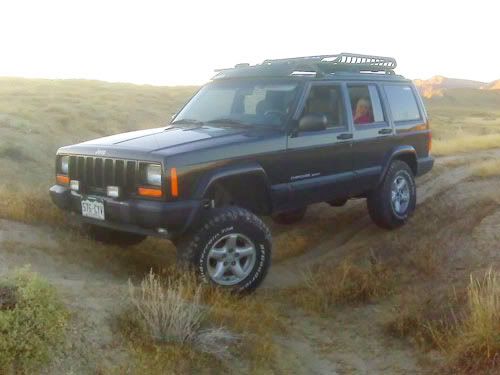
Wife was about ready to explode so I packed the kids into the Heep and went out into the dunes north of town...here's some pics (Sorry for the poor quality...Blackberry is only 3MP):


Wife was about ready to explode so I packed the kids into the Heep and went out into the dunes north of town...here's some pics (Sorry for the poor quality...Blackberry is only 3MP):
Just when I think it's safe to move up to 32's...that front tire is stuffed and only has like 1/8 of an inch of space before it rubs on the bumper end caps. Never did rub though.
I'm thinking I will need to move my sway bar discos. I'm running the Rubicon Express Gen II Quick Disco's and I think they were hitting the springs when in the stored position. I kept hearing a twang on the coils at heavy flex. Didn't have this issue with the V8 coils...This was the first time I wheeled with the new shocks and OME coils. The Jeep just floated over everything...well, everything but the gofer hole I hit doing 10MPH.
It's becoming intolerable how the upper CA on the drivers side clunks, I think the stealership sold me the wrong bushing. I replaced the one in the arm and after a month it started groaning and clunking. I've re-torqued it but no luck. Can't wait to find a set of RC Control Arm Drop Brackets, then I'll run the WJ upper arms again.
Last edited by eggdashure; 03-19-2012 at 09:47 PM.
 08-27-2010, 10:56 AM
#11
Seasoned Member
Thread Starter
Join Date: Aug 2010
Location: Grand Junction, CO
Posts: 330
Likes: 0
Received 0 Likes
on
0 Posts
Year: 1999
Model: Cherokee
Engine: 4.0L I-6
So far so good on the Bilsteins. I've got other issues to deal with before I see their full potential, but so far they've done great. They really shine off road for me.
Trust me, I've tried many different brands and Bils are worth the bills.
Monroe Sensatrac - crap
Skyjacker Nitros - felt like someone welded pieces of metal in place. Very stiff
Rancho 9000 Adjustables - Not bad...PITA to adjust though
Gabriels - Wore out after 5K
Trust me, I've tried many different brands and Bils are worth the bills.
Monroe Sensatrac - crap
Skyjacker Nitros - felt like someone welded pieces of metal in place. Very stiff
Rancho 9000 Adjustables - Not bad...PITA to adjust though
Gabriels - Wore out after 5K
 08-28-2010, 08:16 PM
#13
Senior Member
Join Date: Jun 2009
Location: Guilderland NY
Posts: 842
Likes: 0
Received 2 Likes
on
1 Post
Year: 2001
Model: Cherokee
Engine: 4.0L I6 w/ K&N and bored TB
I really like that Jeep. Almost wish I kept mine that clean looking. Nice to see you still wheel it a bit though.
As for brakes, you can yank the o ring but it is gonna nose dive like crazy. Get a proportioning valve from a ZJ and swap it in, thats what I did and I can stop on some dimes if I want to. Will lock up all 4 33's at any speed.
And you can run 32's no problem, if it rubs get extended bumpstops. Be prepared for a power loss though if you arent regearing. It might only be 1 inch but you will notice it will be more sluggish.
Last edited by Iant333; 08-28-2010 at 08:20 PM.