91 XJ Limited - SubZero Resurrection
 09-05-2011, 04:08 AM
#1
Seasoned Member
Thread Starter
Join Date: Jul 2011
Location: Interior of Alaska
Posts: 291
Received 0 Likes
on
0 Posts
Year: 1991
Model: Cherokee
Engine: 4.0 HO
OK guys, so here goes. Looks like everyone has alot of fun chronicling their builds, so I thought I would give it a shot.
Now that my daughter has turned 18 and is going to work full time, I decided that I wanted her to have my 4Runner. That means that I needed something to drive, and I thought 'what the hell' and walked out behind the garage. There she sat, my 1991 XJ Cherokee Limited. Parked and neglected since 2002. I figured that instead of getting a new car payment, I could spend that monthly money towards getting my XJ up and running as a DD and then maybe upgrading for some light to medium trailriding with the familiy.
So what is it gonna take to get her up and running? Well first some background on why I had to park the Black to begin with:
Here in the Interior of Alaska they used to have this thing called the 'Vehicle Emissions Program'. And sad to say that my beloved 91 XJ Limited had some under the hood issues. It would always pass at the tailpipe but there was some messiness on top of the engine, and your vehicle had to pass the 'visual' inspection as well.
On top of that my XJ was one of those that was cursed with the Bendix 9 ABS system. Even though I had the factory recall done in 2000, it was not even 18 months later that the ABS system failed again.
And by 'failed' I mean NO power assist on the brakes. It was a bit spooky.
Then I had some grasschewer pull out in front of me in his sub compact, which I then turned into a sub-sub compact. Which also caused my tilt column to loosen and basically come unstuck.
All of this eventually led to me parking the Black out behind the garage for the next 8 1/2 years. Now I didn't leave her completely neglected for that whole time. I did start her up like 3 or 4 times.
So to start....
First I put a fresh battery in, spun on a new oil filter, dropped in a new air filter, put a half a can of Sea Foam in the crankcase and the second half in the gas tank, topped off with 5 gallons of fresh fuel. She turned over but wouldnt quite start, so I pulled all the plugs, which were slightly gunked up. I cleaned and re-gapped them. Also I had to fix one of the plug wire ends, recrimping the end on the plug. Then, after sitting without starting for more than 3 years....vaaroom!
Let her idle for 15 minutes, aired up the front tires and pulled her around to the front of the house. Time to get a look at her in the sunlight.
What a mess.
So here she sits.....note that awesome Chrysler paint job......

Notice the foilage?

EW....it got even worse on the other side.

Here's the damage to the front. Minor from a driving point of view, causes a little tire rub when the wheel is turned hard over.

This is the real damage from that accident. Caused my tilt steering to loosen up and go KA-POW.

Plus my steering wheel has the 'black sticky death' leaking out of it. Yuck.

So that's the begining.
Now that my daughter has turned 18 and is going to work full time, I decided that I wanted her to have my 4Runner. That means that I needed something to drive, and I thought 'what the hell' and walked out behind the garage. There she sat, my 1991 XJ Cherokee Limited. Parked and neglected since 2002. I figured that instead of getting a new car payment, I could spend that monthly money towards getting my XJ up and running as a DD and then maybe upgrading for some light to medium trailriding with the familiy.
So what is it gonna take to get her up and running? Well first some background on why I had to park the Black to begin with:
Here in the Interior of Alaska they used to have this thing called the 'Vehicle Emissions Program'. And sad to say that my beloved 91 XJ Limited had some under the hood issues. It would always pass at the tailpipe but there was some messiness on top of the engine, and your vehicle had to pass the 'visual' inspection as well.
On top of that my XJ was one of those that was cursed with the Bendix 9 ABS system. Even though I had the factory recall done in 2000, it was not even 18 months later that the ABS system failed again.
And by 'failed' I mean NO power assist on the brakes. It was a bit spooky.
Then I had some grasschewer pull out in front of me in his sub compact, which I then turned into a sub-sub compact. Which also caused my tilt column to loosen and basically come unstuck.
All of this eventually led to me parking the Black out behind the garage for the next 8 1/2 years. Now I didn't leave her completely neglected for that whole time. I did start her up like 3 or 4 times.
So to start....
First I put a fresh battery in, spun on a new oil filter, dropped in a new air filter, put a half a can of Sea Foam in the crankcase and the second half in the gas tank, topped off with 5 gallons of fresh fuel. She turned over but wouldnt quite start, so I pulled all the plugs, which were slightly gunked up. I cleaned and re-gapped them. Also I had to fix one of the plug wire ends, recrimping the end on the plug. Then, after sitting without starting for more than 3 years....vaaroom!
Let her idle for 15 minutes, aired up the front tires and pulled her around to the front of the house. Time to get a look at her in the sunlight.
What a mess.
So here she sits.....note that awesome Chrysler paint job......
Notice the foilage?
EW....it got even worse on the other side.
Here's the damage to the front. Minor from a driving point of view, causes a little tire rub when the wheel is turned hard over.
This is the real damage from that accident. Caused my tilt steering to loosen up and go KA-POW.
Plus my steering wheel has the 'black sticky death' leaking out of it. Yuck.
So that's the begining.
Last edited by ColdWarrior; 05-06-2013 at 04:39 PM. Reason: Title change
 09-05-2011, 05:07 AM
#2
Seasoned Member
Thread Starter
Join Date: Jul 2011
Location: Interior of Alaska
Posts: 291
Received 0 Likes
on
0 Posts
Year: 1991
Model: Cherokee
Engine: 4.0 HO
When I first decided to resurrect the Black I started combing the Web for the problems that had put her in the back 40 to begin with. After hours of reading and searching I always seemed to come back to the CherokeeForum.
You guys have done so much and are so willing to share, it's amazing. And now I didnt have to reinvent the wheel, so to speak. Seems like every one of my problems had already happened to someone and there was some kind of fix for it. It was so awesome to see both the detailed write ups and the fixes you guys had come up with.
Ok, first I had a short under the dash that burned up the pigtail that went to the starter switch. It was a real mess and after I moved it the short was even worse and melted down one of the connector ends. I pulled a pigtail from an 89 XJ in the JY and spliced it in.
Wrecking yard donor:

Spliced in *Shiny* : (Man I love yellow electricians tape LOL)

Then I moved on to the next problem.....cleaning. I don't have any before/after pics of this because I am embarassed. That thing was a friggin pig pen. I had used it to store some stuff for awhile, but there was stuff in there I don't even remember putting in. Like the six pack of Pepsi in the back that had gone through God knows how many -45 degree winters. 4 of the 6 cans were split and empty. Still not sure where the soda went. And when I lifted the back seat.......**shudder**. Now I know why I don't let my kids eat in my car anymore. Have you ever seen what a chicken nugget looks like after 8 years? Well....it looks pretty much like it did when you bought it....I mean who really eats that stuff?
Ok, so now it was pretty clean. Still needs a good shampoo job and thorough cleaning of the hard surfaces but at least the stuff was off the carpet. On to the next chore.
Im a big guy. Nearly 6ft and 300lbs big. I bought this XJ at about 5 years old with only 50k on the ticker now she's got over 200k and has been sitting all that time. Hauling my fat butt in and out of her had given my driver side seat the 'gangsta lean'. You know what I mean.....it looks like this:

Now thanks to Winston427 and his thread (https://www.cherokeeforum.com/f51/84...acement-23010/) on replacing the seat bottoms I was ready to tackle my problem seat. So I dug in.
(The disassembly is covered in Winston's thread so lets go straight to the post mortem.)
Not good.
First of all, I had more problems that just my bottom pan. My whole seat back was rocking off towards the passenger side, and here's why.

That's right....that bracket in my hand was supposed to still be welded between those two seatback uprights.
But then I noticed more, two more breaks, one where the seat bottom pan bolts to the seatback and then a crack leading away from it.


On the plus side the power mechanism looks in good shape and works perfectly.

Now on to the bottom pan. Looked ok with the cover on. So lets pull it off.


Oh hell.....it's a big crack. So big there's actually a loose piece just attached with the foam. Gonna be alot of fab work to get this tied together.


And here's the beginning of another crack on the opposite side.

So here are my options. I can go to my welding buddy and have him fix the seatback upright bracket, and he can probably fix the cracks in the back as well. But then I am gonna have to get some steel strips similar to Wilson's repair and see I there's enough material left to pull it together. If this is the route I go I will be using rivets instead of sheetmetal screws so they have more purchase and are less likely to pull themselves out of the skin thin sheet metal. OR I can go to the JY where I picked up my pigtail and pull the two 89 XJ Limited gray leather seats out of that rig. Only $75 a piece and that would give me extra parts for later.
I think I'll consult my buddy on Tuesday and see what he can do first before I shell out the $150.
I'll keep you guys posted. And thanks for all your help!
You guys have done so much and are so willing to share, it's amazing. And now I didnt have to reinvent the wheel, so to speak. Seems like every one of my problems had already happened to someone and there was some kind of fix for it. It was so awesome to see both the detailed write ups and the fixes you guys had come up with.
Ok, first I had a short under the dash that burned up the pigtail that went to the starter switch. It was a real mess and after I moved it the short was even worse and melted down one of the connector ends. I pulled a pigtail from an 89 XJ in the JY and spliced it in.
Wrecking yard donor:
Spliced in *Shiny* : (Man I love yellow electricians tape LOL)
Then I moved on to the next problem.....cleaning. I don't have any before/after pics of this because I am embarassed. That thing was a friggin pig pen. I had used it to store some stuff for awhile, but there was stuff in there I don't even remember putting in. Like the six pack of Pepsi in the back that had gone through God knows how many -45 degree winters. 4 of the 6 cans were split and empty. Still not sure where the soda went. And when I lifted the back seat.......**shudder**. Now I know why I don't let my kids eat in my car anymore. Have you ever seen what a chicken nugget looks like after 8 years? Well....it looks pretty much like it did when you bought it....I mean who really eats that stuff?
Ok, so now it was pretty clean. Still needs a good shampoo job and thorough cleaning of the hard surfaces but at least the stuff was off the carpet. On to the next chore.
Im a big guy. Nearly 6ft and 300lbs big. I bought this XJ at about 5 years old with only 50k on the ticker now she's got over 200k and has been sitting all that time. Hauling my fat butt in and out of her had given my driver side seat the 'gangsta lean'. You know what I mean.....it looks like this:
Now thanks to Winston427 and his thread (https://www.cherokeeforum.com/f51/84...acement-23010/) on replacing the seat bottoms I was ready to tackle my problem seat. So I dug in.
(The disassembly is covered in Winston's thread so lets go straight to the post mortem.)
Not good.
First of all, I had more problems that just my bottom pan. My whole seat back was rocking off towards the passenger side, and here's why.
That's right....that bracket in my hand was supposed to still be welded between those two seatback uprights.
But then I noticed more, two more breaks, one where the seat bottom pan bolts to the seatback and then a crack leading away from it.
On the plus side the power mechanism looks in good shape and works perfectly.
Now on to the bottom pan. Looked ok with the cover on. So lets pull it off.
Oh hell.....it's a big crack. So big there's actually a loose piece just attached with the foam. Gonna be alot of fab work to get this tied together.
And here's the beginning of another crack on the opposite side.
So here are my options. I can go to my welding buddy and have him fix the seatback upright bracket, and he can probably fix the cracks in the back as well. But then I am gonna have to get some steel strips similar to Wilson's repair and see I there's enough material left to pull it together. If this is the route I go I will be using rivets instead of sheetmetal screws so they have more purchase and are less likely to pull themselves out of the skin thin sheet metal. OR I can go to the JY where I picked up my pigtail and pull the two 89 XJ Limited gray leather seats out of that rig. Only $75 a piece and that would give me extra parts for later.
I think I'll consult my buddy on Tuesday and see what he can do first before I shell out the $150.
I'll keep you guys posted. And thanks for all your help!
09-08-2011, 01:49 AM
#3
Seasoned Member
Thread Starter
Join Date: Jul 2011
Location: Interior of Alaska
Posts: 291
Received 0 Likes
on
0 Posts
Year: 1991
Model: Cherokee
Engine: 4.0 HO
Ok…update on the ‘Gangsta Lean’ seat repair.
Well, the good news is….actually pretty damn good. My welding guy was awesome in his brutal honesty with me. I told him I could get replacement seats for $75/seat and he told me that there was no way he could even do the welding repairs on the seatback for that price. That would have still left me with the seatpan repair to finish. So…..
Tomorrow I’m heading over to my JY and pulling both those bad boys ASAP. I did alittle recon of the other wrecking yards around and found that my main source is really the only place with older XJ’s. So I’m gonna go get everything I can afford before someone else pulls those parts.
Thanks to some help from a fellow forum member I’m checking Craigslist for Anchorage (the next nearest city to my hometown, 360 miles away), and there are a few private sellers who are parting out their early 90 XJs. I guess I’ll be burning up the phones and giving the Post Office some money here for the foreseeable future.
On the LIFT situation:
Being born and raised in Alaska we’ve come to expect a certain premium on items shipped up from the states. I was very worried about getting a full leaf kit shipped up to me here. Then I discovered one of the fringe benefits of the forums, which is of course, our Vendors.
Following the directions of the vendor threads I contacted Grimus, who was kind enough to research the various shipping options for the 3x and 4.5x kits. But unfortunately, when it was all said and done the cheapest AAL kit was still more than $200 in shipping with the full spring pack up over $300.
So now I’m back to square one, watching CL and checking local vendors to see if someone can bring in a 4.5 full spring kit for a reasonable price.
Finally…
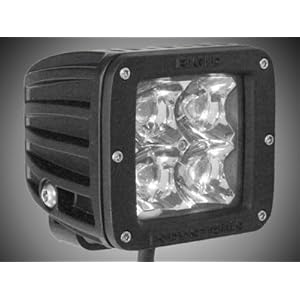
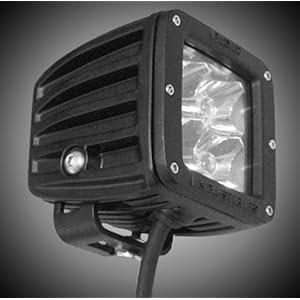
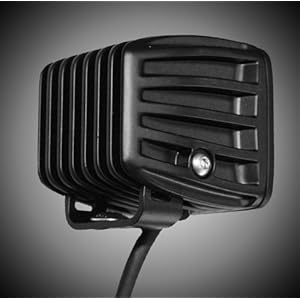
I talked to a local installer and we are working a swap on some of the new RIGID LED lights for my XJ. 4 lights on the roof rack(2 ditch and 2 driving) 2 backup (reverse) lights and a small 10 inch light bar above the front bumper. These lights look high speed, with heavy metal housings and THICK cabling and connectors. Plus all made in the USA.
Anyone have any experience with RIGID lights? If so let me know what you think.
More later…thanks guys!
Dutch
Well, the good news is….actually pretty damn good. My welding guy was awesome in his brutal honesty with me. I told him I could get replacement seats for $75/seat and he told me that there was no way he could even do the welding repairs on the seatback for that price. That would have still left me with the seatpan repair to finish. So…..
Tomorrow I’m heading over to my JY and pulling both those bad boys ASAP. I did alittle recon of the other wrecking yards around and found that my main source is really the only place with older XJ’s. So I’m gonna go get everything I can afford before someone else pulls those parts.
Thanks to some help from a fellow forum member I’m checking Craigslist for Anchorage (the next nearest city to my hometown, 360 miles away), and there are a few private sellers who are parting out their early 90 XJs. I guess I’ll be burning up the phones and giving the Post Office some money here for the foreseeable future.
On the LIFT situation:
Being born and raised in Alaska we’ve come to expect a certain premium on items shipped up from the states. I was very worried about getting a full leaf kit shipped up to me here. Then I discovered one of the fringe benefits of the forums, which is of course, our Vendors.
Following the directions of the vendor threads I contacted Grimus, who was kind enough to research the various shipping options for the 3x and 4.5x kits. But unfortunately, when it was all said and done the cheapest AAL kit was still more than $200 in shipping with the full spring pack up over $300.
So now I’m back to square one, watching CL and checking local vendors to see if someone can bring in a 4.5 full spring kit for a reasonable price.
Finally…
I talked to a local installer and we are working a swap on some of the new RIGID LED lights for my XJ. 4 lights on the roof rack(2 ditch and 2 driving) 2 backup (reverse) lights and a small 10 inch light bar above the front bumper. These lights look high speed, with heavy metal housings and THICK cabling and connectors. Plus all made in the USA.
Anyone have any experience with RIGID lights? If so let me know what you think.
More later…thanks guys!
Dutch
Last edited by ColdWarrior; 09-08-2011 at 03:59 PM. Reason: Broken picture
 09-28-2011, 02:37 AM
#6
Seasoned Member
Thread Starter
Join Date: Jul 2011
Location: Interior of Alaska
Posts: 291
Received 0 Likes
on
0 Posts
Year: 1991
Model: Cherokee
Engine: 4.0 HO
Taken awhile to get back�been a busy month or so. Finally got to the local JY and found an appropriate donor vehicle.
89 XJ Limited with the same grey leather interior mine has.

I don�t know why the JY doesn�t have a policy about stacking parts on the seats. I�m lucky that this fan didn�t punch through the leather. Had everything out in 30 minutes, including the entire power seat frame. (as a backup)

Seats were clean with no cracks, just a bit of rust in the frame rails.


So first I ground them off, blew them off and hit them with the self etching primer.

Then a coat of flat black for protection.

Now on to the seat pans. My donor had no cracks or even stress marks.

I thought at first I could pull the pan away from the foam on my original pan and use it with some rivets to reinforce the seat bottom. So I pulled off all the foam.

But once I tried to push the pans together I saw that they weren�t going to fit together well enough to make it a stronger whole.

So I went into the scrap metal box and came up with this straping.

Then I cut a template out of cardboard.

And then used it as a drill template.

I got some serious rivets, I wanted them to have plenty of surface area to pull against since the pan metal is SO thin.

After I cut and drilled the straps I bent them to match the seat pan.

The corners were too sharp and I was afraid they would go through the seat leather, so I rounded them off with my benchgrinder.

On the forward strap, I used two of the holes for securing the seat leather as guides for putting the first rivet in.


The hardest part was actually squeezing all the rivets down. I thought my brand new riveter would work, but I almost blew a blood vessel.

Once it was all done, I had to work the cover back on. The original screws were even long enough to hold through the strapping.


Once installed, viola! No more �gangsta lean�. (Sorry for the dark pics. Getting dark fast around here now).


Next onto the brakes and steering column.
Dutch
89 XJ Limited with the same grey leather interior mine has.
I don�t know why the JY doesn�t have a policy about stacking parts on the seats. I�m lucky that this fan didn�t punch through the leather. Had everything out in 30 minutes, including the entire power seat frame. (as a backup)
Seats were clean with no cracks, just a bit of rust in the frame rails.
So first I ground them off, blew them off and hit them with the self etching primer.
Then a coat of flat black for protection.
Now on to the seat pans. My donor had no cracks or even stress marks.
I thought at first I could pull the pan away from the foam on my original pan and use it with some rivets to reinforce the seat bottom. So I pulled off all the foam.
But once I tried to push the pans together I saw that they weren�t going to fit together well enough to make it a stronger whole.
So I went into the scrap metal box and came up with this straping.
Then I cut a template out of cardboard.
And then used it as a drill template.
I got some serious rivets, I wanted them to have plenty of surface area to pull against since the pan metal is SO thin.
After I cut and drilled the straps I bent them to match the seat pan.
The corners were too sharp and I was afraid they would go through the seat leather, so I rounded them off with my benchgrinder.
On the forward strap, I used two of the holes for securing the seat leather as guides for putting the first rivet in.
The hardest part was actually squeezing all the rivets down. I thought my brand new riveter would work, but I almost blew a blood vessel.
Once it was all done, I had to work the cover back on. The original screws were even long enough to hold through the strapping.
Once installed, viola! No more �gangsta lean�. (Sorry for the dark pics. Getting dark fast around here now).
Next onto the brakes and steering column.
Dutch
07-16-2012, 03:18 AM
#7
Seasoned Member
Thread Starter
Join Date: Jul 2011
Location: Interior of Alaska
Posts: 291
Received 0 Likes
on
0 Posts
Year: 1991
Model: Cherokee
Engine: 4.0 HO
Well it was a busy winter and cold as hell on top of it. -64 below at the house on and off for more than three weeks. And I don't have a garage so I didn't have anyplace to work on the XJ.
Sooooo......nothing really got done after October of last year.
Now here's the catch up.
Late June I got started on a couple of big changes. First I removed the Bendix ABS system and installed a doubly size Booster assembly and Master cylinder from a 96XJ. It was a pain in the *** to remove all the ABS stuff and I had a mechanic friend of mine across the street help me out on the biggest part of it.

Here's about half the stuff that I tore and threw away.

Once we got the new booster in and started bleeding the system, I found that the back brakes were roached. *sigh* Work never stops huh?


Also got to R&R the steering column, with the one from the donor JY rig. Pretty straight forward, although I had to buy another ignition switch as the one in the donor had the wrong plug pattern. But now everything is back to factory stock.

And if you look back you'll see the front of my XJ was pretty hammered on the passenger side.

I was able to tear it back down and then used a hilift jack and 2x4 to push the fender support back out.


You'll also see that the accident bent the crap out of the right front frame horn. Bent the tab over pretty good and dished the outside of the frame rail. I'm just hoping that the JCR Crusader Uniframe Reinforcement Kit will straighten most of this mess out.


Then I picked up a new header from the JY with a grill complete.

While I was at it I tried to swap an LED turn signal up front, but as you can see, it's not as bright as the normal bulb, and it caused my flasher to show the bulb was 'burned' out. So I swapped them back.

And the finished product


Finally, new plugs, wires, cap and rotor.

And finally, while I was out at the JY, I stumbled across a factory swing out tire carrier.....OMG....sweet! Pickin it tomorrow or the next day.

Now I'm fixing to take the Black down to a local detailer I have a swap with and have them do the complete interior of the rig. Shampoo, header and everything.
Next....gotta a Wilderness rack inbound, with shovel and jack holders. And I'm gonna start working on a fab-ing a front bumper. First the JCR reinforcement and then the bumper. Gonna base it on Matt's design... https://www.cherokeeforum.com/f58/my...-bumper-70232/
Now I've got new tags and registration, and added it to insurance....So tomorrow will be the first time I have driven the Black on the road in 11 years......my new DD!!
Till next time...
Dutch
Sooooo......nothing really got done after October of last year.
Now here's the catch up.
Late June I got started on a couple of big changes. First I removed the Bendix ABS system and installed a doubly size Booster assembly and Master cylinder from a 96XJ. It was a pain in the *** to remove all the ABS stuff and I had a mechanic friend of mine across the street help me out on the biggest part of it.
Here's about half the stuff that I tore and threw away.
Once we got the new booster in and started bleeding the system, I found that the back brakes were roached. *sigh* Work never stops huh?
Also got to R&R the steering column, with the one from the donor JY rig. Pretty straight forward, although I had to buy another ignition switch as the one in the donor had the wrong plug pattern. But now everything is back to factory stock.
And if you look back you'll see the front of my XJ was pretty hammered on the passenger side.
I was able to tear it back down and then used a hilift jack and 2x4 to push the fender support back out.
You'll also see that the accident bent the crap out of the right front frame horn. Bent the tab over pretty good and dished the outside of the frame rail. I'm just hoping that the JCR Crusader Uniframe Reinforcement Kit will straighten most of this mess out.
Then I picked up a new header from the JY with a grill complete.
While I was at it I tried to swap an LED turn signal up front, but as you can see, it's not as bright as the normal bulb, and it caused my flasher to show the bulb was 'burned' out. So I swapped them back.
And the finished product
Finally, new plugs, wires, cap and rotor.
And finally, while I was out at the JY, I stumbled across a factory swing out tire carrier.....OMG....sweet! Pickin it tomorrow or the next day.
Now I'm fixing to take the Black down to a local detailer I have a swap with and have them do the complete interior of the rig. Shampoo, header and everything.
Next....gotta a Wilderness rack inbound, with shovel and jack holders. And I'm gonna start working on a fab-ing a front bumper. First the JCR reinforcement and then the bumper. Gonna base it on Matt's design... https://www.cherokeeforum.com/f58/my...-bumper-70232/
Now I've got new tags and registration, and added it to insurance....So tomorrow will be the first time I have driven the Black on the road in 11 years......my new DD!!
Till next time...
Dutch
Last edited by ColdWarrior; 07-16-2012 at 03:33 AM. Reason: wrong pictures
Trending Topics
07-16-2012, 03:40 AM
#8
Seasoned Member
Thread Starter
Join Date: Jul 2011
Location: Interior of Alaska
Posts: 291
Received 0 Likes
on
0 Posts
Year: 1991
Model: Cherokee
Engine: 4.0 HO
Here is the next thing I'm adding. It's a 12v accessory block, it also has a USB charging port. I saw it on someones build here on CF and picked it up at Walmart.

But I'm having a hard time deciding where to place it. I am thinking about taking out the vertical vent in the middle of the dash and placing it in there. Not sure about the heat blowing on it though.

Any thoughts?
Dutch
But I'm having a hard time deciding where to place it. I am thinking about taking out the vertical vent in the middle of the dash and placing it in there. Not sure about the heat blowing on it though.
Any thoughts?
Dutch
07-16-2012, 11:39 AM
#9
Seasoned Member

Join Date: Nov 2009
Location: NJ
Posts: 301
Likes: 0
Received 0 Likes
on
0 Posts
Year: 1999 sport 4x4
Model: Cherokee
Engine: 4.0L
I am still stuck on the -64* .....everything after that was a blur....lol. I mean this with all do respect...but WHY live in -64* ???? 
07-17-2012, 02:49 PM
#10
Seasoned Member
Thread Starter
Join Date: Jul 2011
Location: Interior of Alaska
Posts: 291
Received 0 Likes
on
0 Posts
Year: 1991
Model: Cherokee
Engine: 4.0 HO

I could always put on another sweater.
Dutch
07-18-2012, 03:27 AM
#11
Seasoned Member
Thread Starter
Join Date: Jul 2011
Location: Interior of Alaska
Posts: 291
Received 0 Likes
on
0 Posts
Year: 1991
Model: Cherokee
Engine: 4.0 HO
Things are continuing on...talked to the Tire Guys today...looks like I'll have a set of 235x75x15 to put on the XJ in the short term before I get the lift squared away. I can swap them over to my 4Runner when I get the lift installed and bigger shoes.
Also stopped by the local JY for the Factory tire carrier there.


I sorted out some other stuff while I was there. Picked up the last pair of factory marker lenses that they had. Her is the ghetto pic of the day, check this out....previous owner had decided to fix this xj wiring with wire nuts.....

Plus I was able to swap out the vacuum reservoir from an 89 for the proper one with only one inlet and scored the deal of the day....In the back of one of the wrecks I found a factory rubber tray and they only charged me a whopping $5 for it. So sweet.....


So back at the house, got the markers in and relocated the vacuum reservoir back to where the ABS accumulator used to sit.

But onto the next problem that I discovered today. So real rattling from the rear when I hit a rough patch in the driveway. Got underneath and I've found that the bushings in the rear shocks are wiped out. The shocks seem to be ok, but since I'm gonna be putting the lift in soon, I'm not really interested in spending money on new shocks just to replace them again. NAPA has some universal bushings that I might try to make fit for now. Anyone else done anything like this before?
Waiting on word on the Wilderness rack......
Also stopped by the local JY for the Factory tire carrier there.
I sorted out some other stuff while I was there. Picked up the last pair of factory marker lenses that they had. Her is the ghetto pic of the day, check this out....previous owner had decided to fix this xj wiring with wire nuts.....
Plus I was able to swap out the vacuum reservoir from an 89 for the proper one with only one inlet and scored the deal of the day....In the back of one of the wrecks I found a factory rubber tray and they only charged me a whopping $5 for it. So sweet.....
So back at the house, got the markers in and relocated the vacuum reservoir back to where the ABS accumulator used to sit.
But onto the next problem that I discovered today. So real rattling from the rear when I hit a rough patch in the driveway. Got underneath and I've found that the bushings in the rear shocks are wiped out. The shocks seem to be ok, but since I'm gonna be putting the lift in soon, I'm not really interested in spending money on new shocks just to replace them again. NAPA has some universal bushings that I might try to make fit for now. Anyone else done anything like this before?
Waiting on word on the Wilderness rack......
07-23-2012, 02:11 AM
#12
Seasoned Member
Thread Starter
Join Date: Jul 2011
Location: Interior of Alaska
Posts: 291
Received 0 Likes
on
0 Posts
Year: 1991
Model: Cherokee
Engine: 4.0 HO
Got a new toy for my shop.

Haven't welded in 25 years, think it's time to start planning the new bumper. It will be based on this one:
https://www.cherokeeforum.com/f58/my-winch-bumper-70232/
Collecting steel now.
Haven't welded in 25 years, think it's time to start planning the new bumper. It will be based on this one:
https://www.cherokeeforum.com/f58/my-winch-bumper-70232/
Collecting steel now.
07-28-2012, 04:54 PM
#13
Seasoned Member
Thread Starter
Join Date: Jul 2011
Location: Interior of Alaska
Posts: 291
Received 0 Likes
on
0 Posts
Year: 1991
Model: Cherokee
Engine: 4.0 HO
After pulling the Black out of the back 40 the tires were not doing so hot. The backs (Cooper Discoverers) were good, but the fronts (Generals) were both suffering from serious dry rot. I drove it for about 300 miles and started having serious issues with vibration and then leakage. The rot was bad enough that the air was actually coming out the sidewall through the weather checking. Not a good (or safe) situation.
I am waiting on my RC4.5 lift which should be here and installed in the next 90 days, but these tires were getting dangerous to drive on, so its off to make a deal with my local 'Tire Guy'.
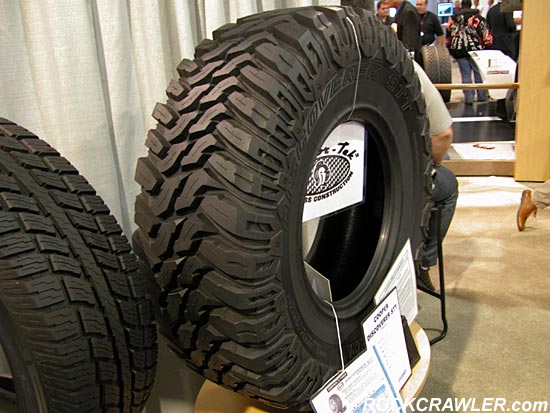
Went to Tire Distribution Systems and they treated me sweet! Worked out a deal for some brand new Bridgestones (235x75x15) for now and in a couple of months once lift is installed 5 new Cooper Discoverer STT 32x9.5.15's
plus D-windows.

When I get the lift I'll take the bridgestones and put them on my 4Runner(if I still have it) or another XJ that I'm looking to replace the 4Runner with.
What came off were 215x70x15s so the look is much 'beefier' and the ride is AWESOME!


Uh oh...Huston, we have a problem....larger size means it grabbed the loose front part of my inner fender liner. Gotta find a way to reattach it.

And finally a new mod that guaranteed to give me at least a 15hp increase... New name tag.

I am waiting on my RC4.5 lift which should be here and installed in the next 90 days, but these tires were getting dangerous to drive on, so its off to make a deal with my local 'Tire Guy'.
Went to Tire Distribution Systems and they treated me sweet! Worked out a deal for some brand new Bridgestones (235x75x15) for now and in a couple of months once lift is installed 5 new Cooper Discoverer STT 32x9.5.15's
plus D-windows.
When I get the lift I'll take the bridgestones and put them on my 4Runner(if I still have it) or another XJ that I'm looking to replace the 4Runner with.
What came off were 215x70x15s so the look is much 'beefier' and the ride is AWESOME!
Uh oh...Huston, we have a problem....larger size means it grabbed the loose front part of my inner fender liner. Gotta find a way to reattach it.
And finally a new mod that guaranteed to give me at least a 15hp increase...
New name tag.
Last edited by ColdWarrior; 07-28-2012 at 04:57 PM.
07-28-2012, 09:53 PM
#14
No, I don't lick fish.
Hey man, I'm diggin' the build and lovin' that license plate - most appropriate tag ever for a build like this!
07-29-2012, 01:21 AM
#15
Seasoned Member
Thread Starter
Join Date: Jul 2011
Location: Interior of Alaska
Posts: 291
Received 0 Likes
on
0 Posts
Year: 1991
Model: Cherokee
Engine: 4.0 HO
Thanks! Not so much of a 'build' yet except maybe for the brake conversion. But that's coming as the money and time permits. I'm really looking forward to the RC lift I've got coming. That'll change the whole picture.
Appreciate the comments, sometimes I think I'm all alone in here....
Appreciate the comments, sometimes I think I'm all alone in here....