Fire-Road Runner
 09-18-2014, 01:02 AM
#1
Member
Thread Starter
Join Date: Sep 2014
Location: Mountain Town, USA
Posts: 180
Likes: 0
Received 0 Likes
on
0 Posts
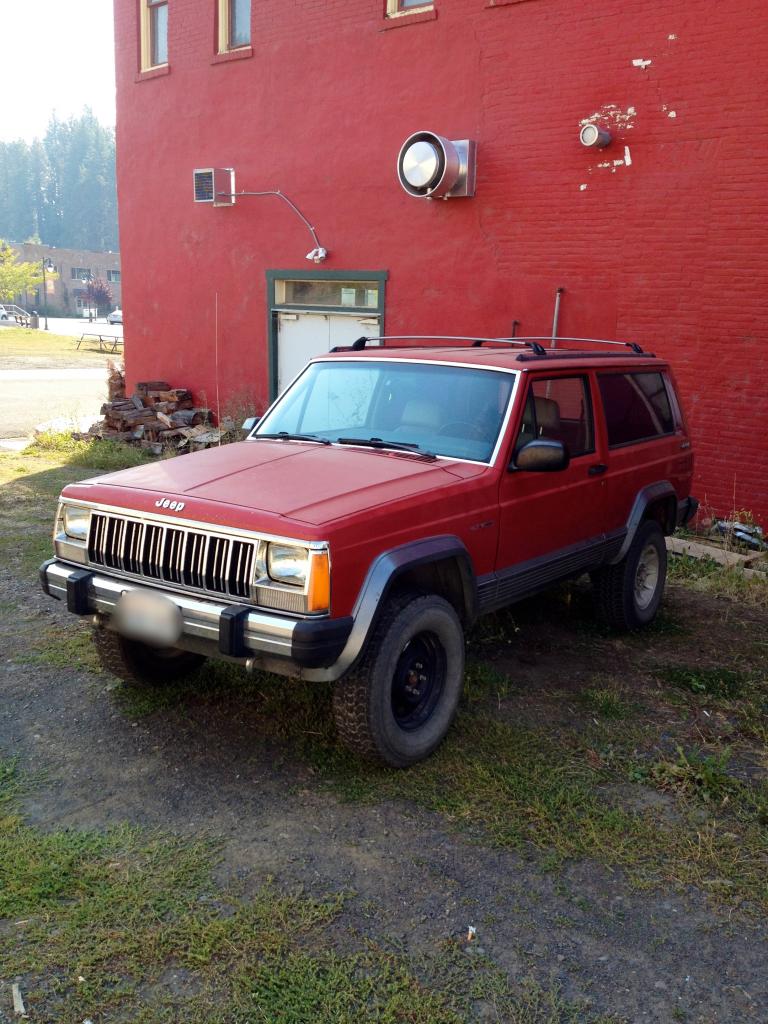
Year: 1991
Model: Cherokee (XJ)
Engine: 4.0 6 Cyl
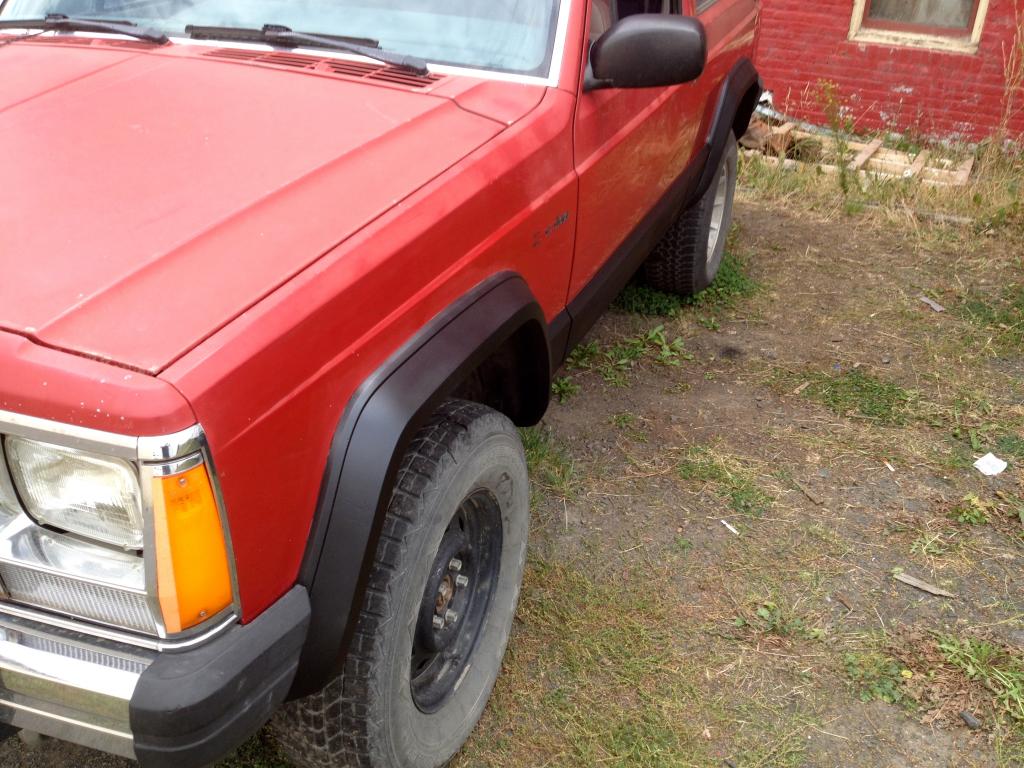
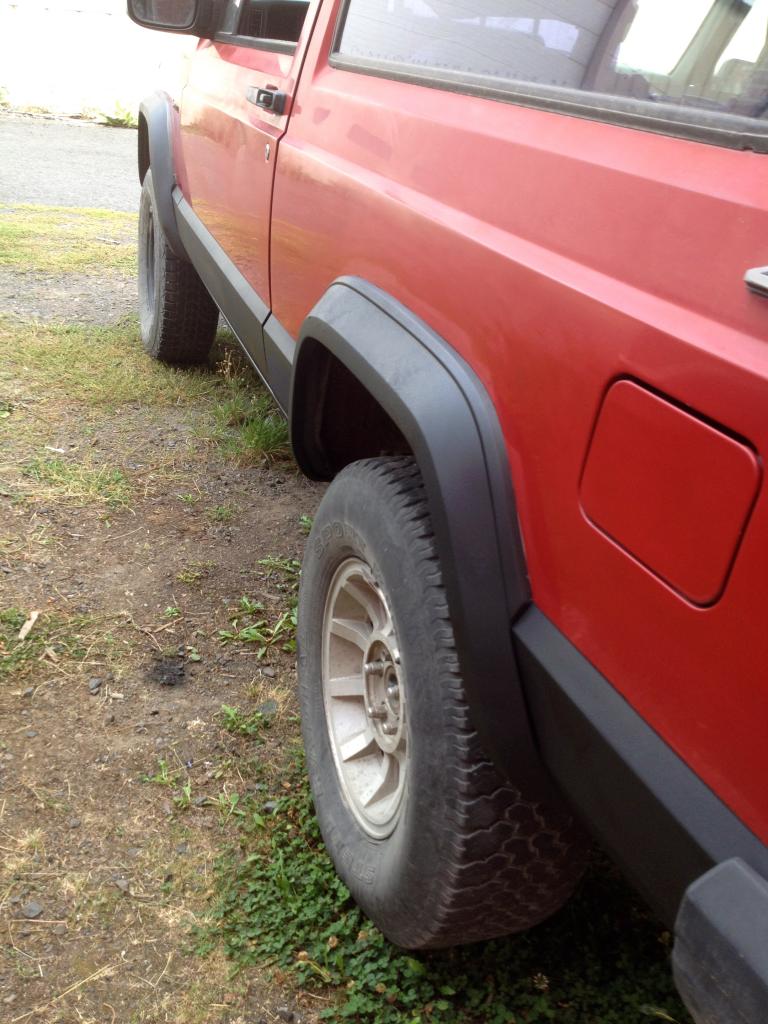
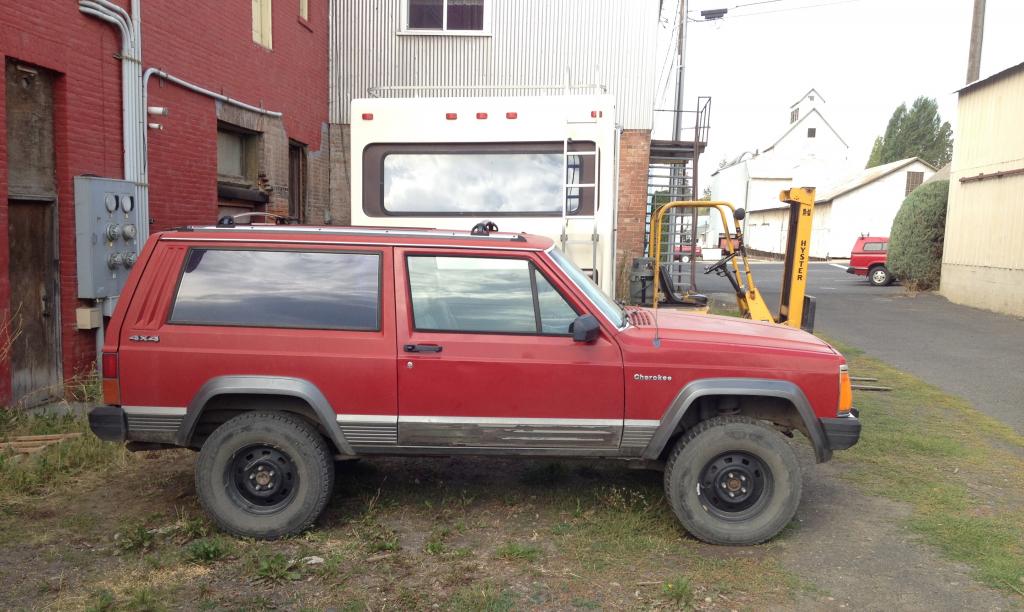
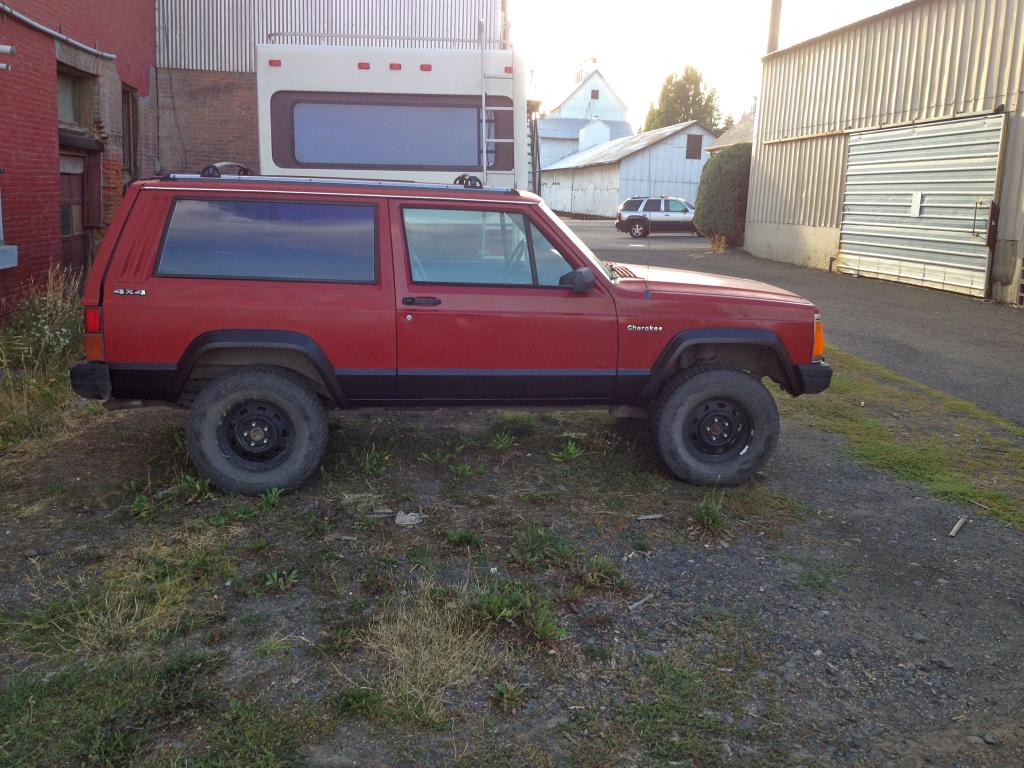
Ive been meaning to join and start a build thread ever since I got the Jeep 2 weeks ago, but on my time off I tried to get as much done as I could, so I apologize now for the lack of more detailed pics. After many months of searching and waiting I finally got another Jeep. This one is a 91 2 door with almost no rust and only 165K on the clock. (PO actually rebuilt the engine about 20k ago) From what I can gather, it does have the Upcountry add-ons, but someone removed the engine skid plate. It has the Upcountry 1" lift and 2" spacer/aal on 235/75/R15's. It actually rides and drives quite well for a 23 year old vehicle, but I will be upgrading to an actual 3" lift in the future.
Shortly after I got it:

A week after I got it I made a JY run (which is an hour away) and it was a HUGE success.
I found:
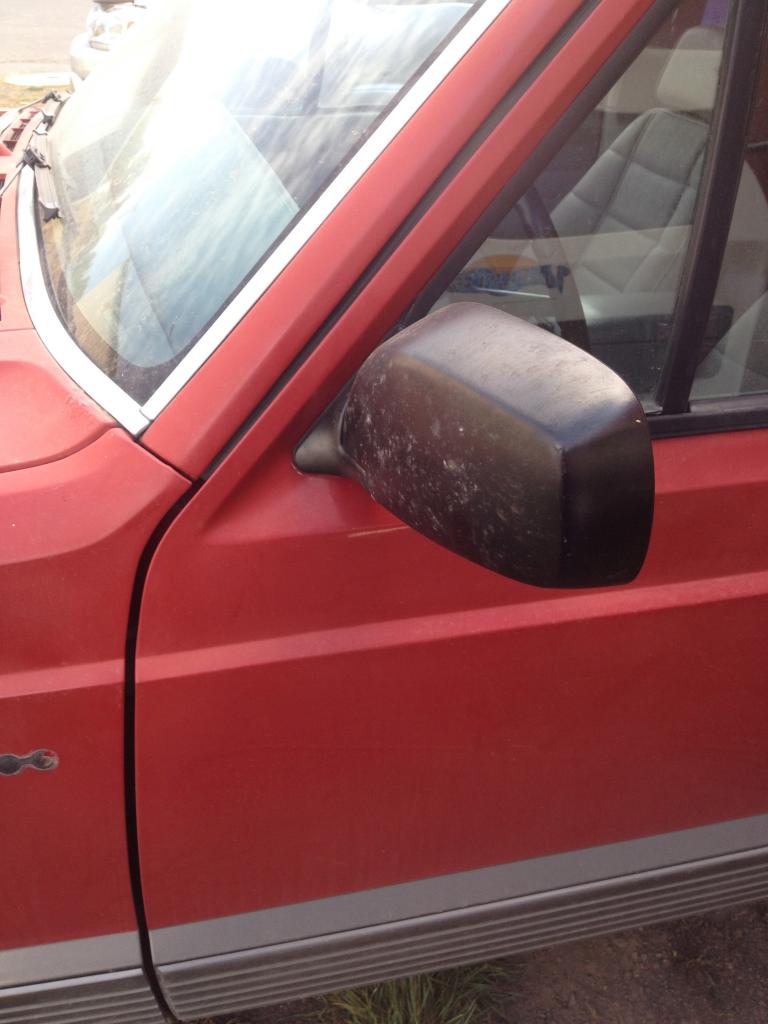
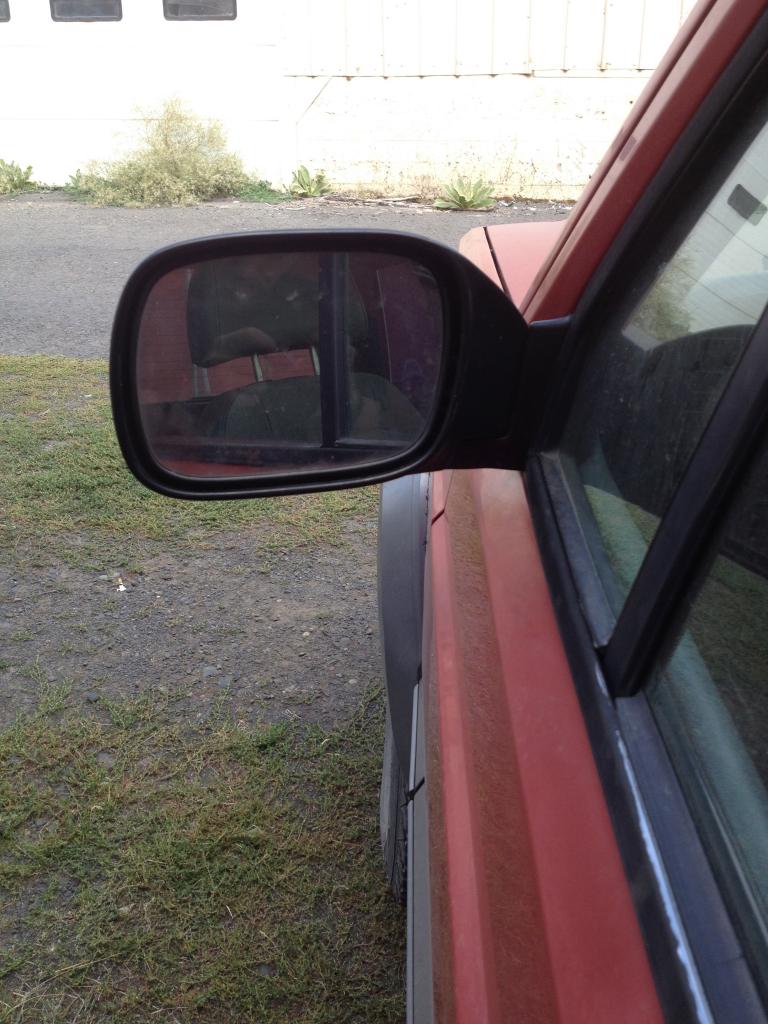
Driver & Passenger Mirror from a '98
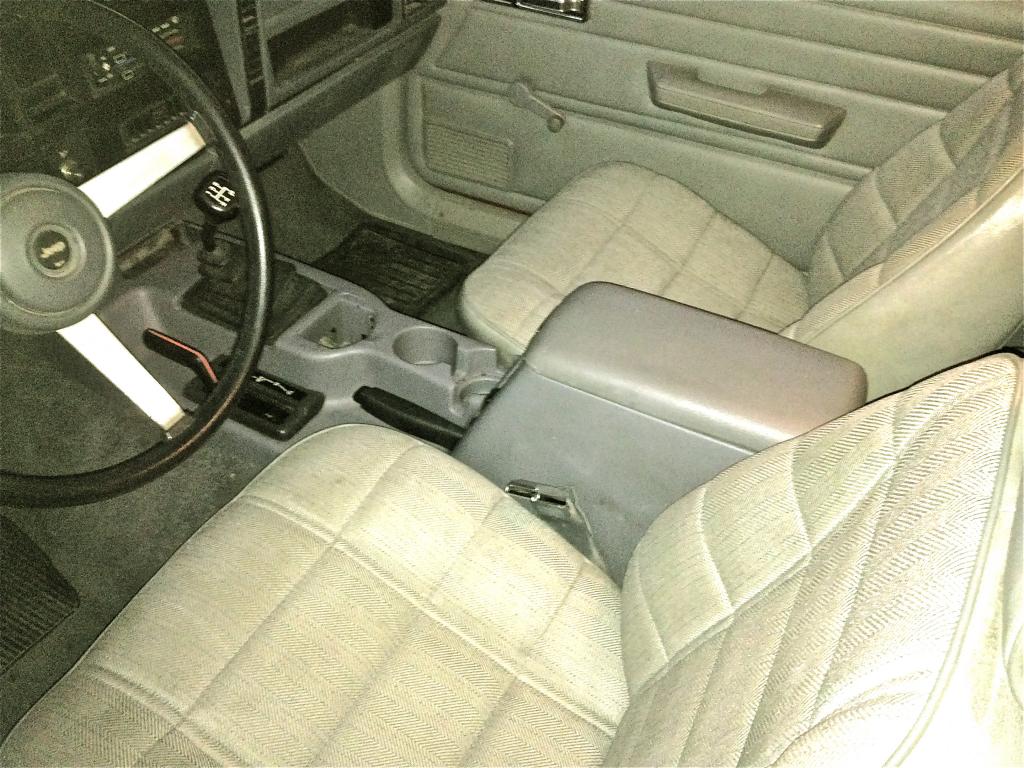
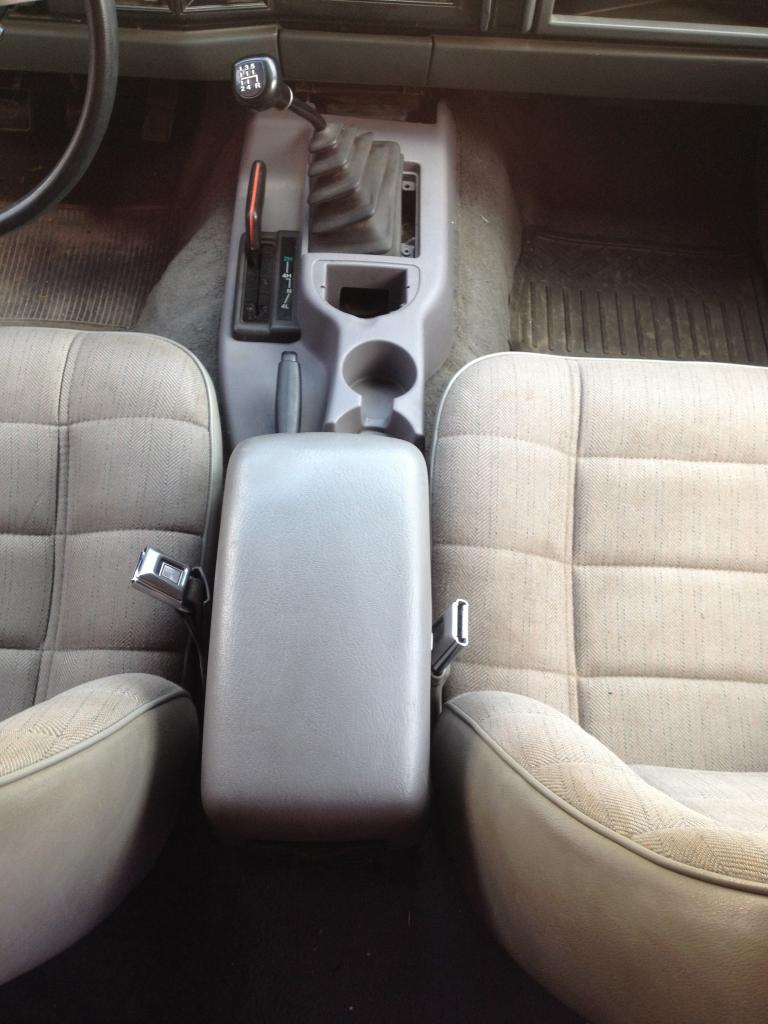
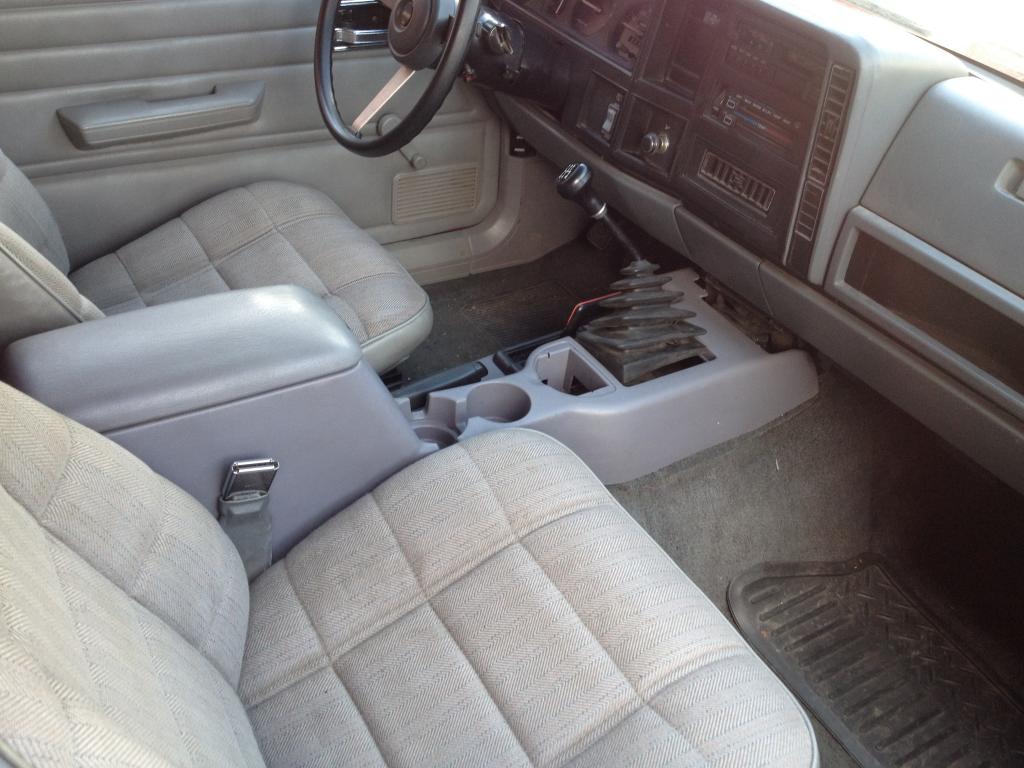
entire Center Console (lid, air duct, and bracket) from a '98
hand brake assembly from a '98
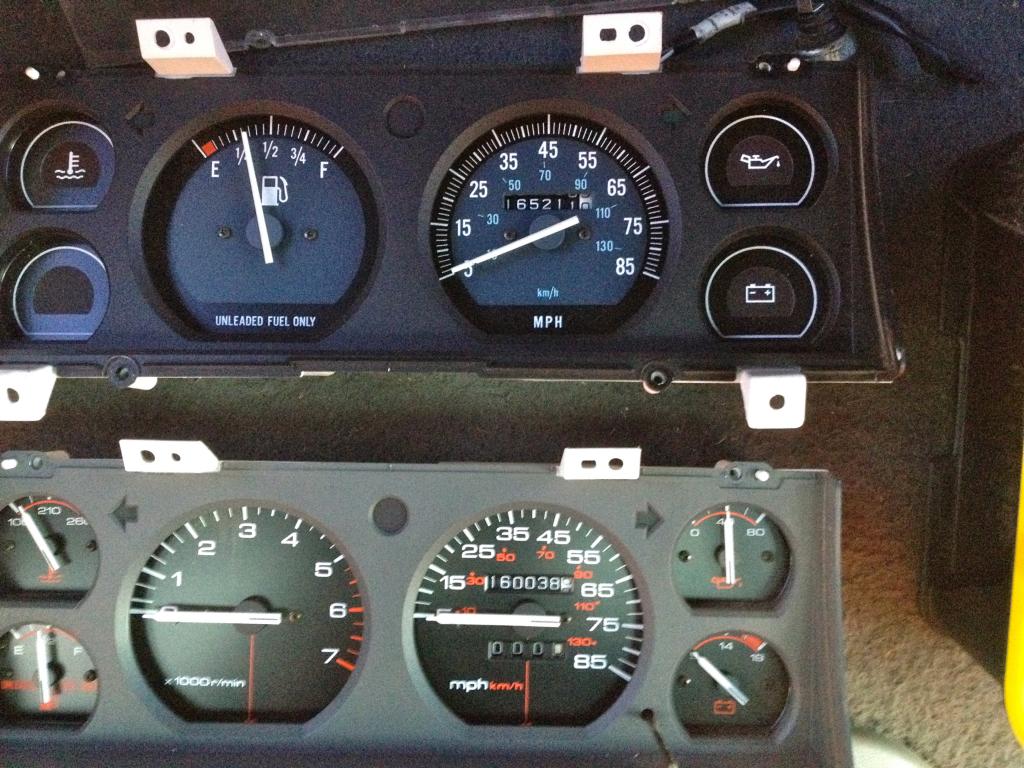
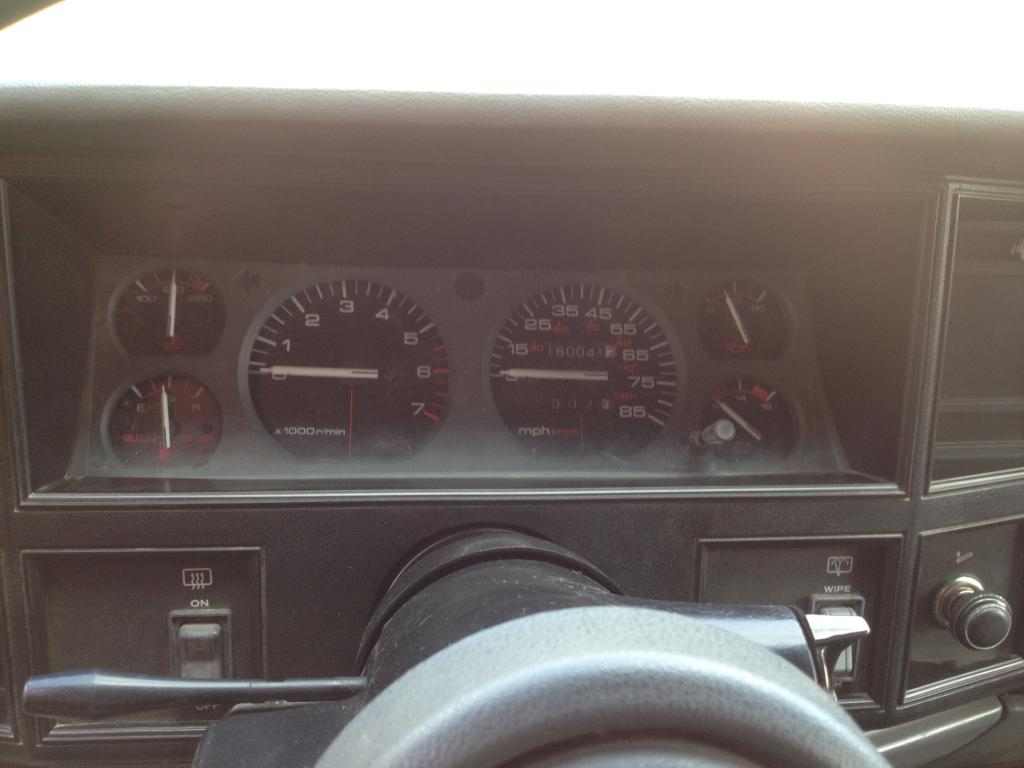
gauge cluster from a '91
oil pressure and temperature sensors from a '91
front passenger seat belt buckle
Grand Total? Only $68
My driver mirror was missing the glass when I bought it, and here it is with the bigger '98 mirror:
My next goal was to swap my idiot lights for actual gauges. I had read several threads on this and it actually was as straight forward as everyone says it is. I was even able to find one that was very close to my miles. The only problem I ran across was when I went to swap the temp sensor on the head, at some point in its past the connector and wire were cut and/or tore off. I was able to find the wire in the harness and make the necessary connections. Here are my two gauges side by side before the swap:
The factory hand brake was broken because the button no longer worked and when you pulled on the handle it would just slide back down. So since I found a full newer style console and hand brake assembly I just swapped both from my older style. So I now have a working hand brake AND the elusive cup holders (that don't look like they came from the discount cart ).
).
I still need to attach the front part of the old air duct to the new one so I don't have weak rear air. I also need to figure out the shift boot and the gap at the front of the console. As far as the newer style hand brake goes, I just used a small turnbuckle and attached it to the original linkage and it works great. Here is the (mostly) finished product:
I've gotta say.....I am extremely happy with all of the changes I've made so far and how well they look/work. I would recommend them to anyone with an older XJ that want some newer style upgrades.
![WARNING]!
This will be a fairly slow build because it will be based on how much time and money I have available. Also I don't have a garage or shop and since winter is fast approaching it may slow down even more.
My goals for this long term:
-budget minded
-31" max tire size
-only 3-4" of lift
-MILD build minded
-all simple, yet useful mods
-daily drive/weekend explore
-nothing I dont need, yet everything I do
-family minded
-able to handle the MASSIVE amount of fire roads/back wood trails of North Idaho, hence, the name of the build
and oh yeah.... BETTER PICS, MORE OFTEN!
Shortly after I got it:

A week after I got it I made a JY run (which is an hour away) and it was a HUGE success.
I found:
Driver & Passenger Mirror from a '98
entire Center Console (lid, air duct, and bracket) from a '98
hand brake assembly from a '98
gauge cluster from a '91
oil pressure and temperature sensors from a '91
front passenger seat belt buckle
Grand Total? Only $68
My driver mirror was missing the glass when I bought it, and here it is with the bigger '98 mirror:

My next goal was to swap my idiot lights for actual gauges. I had read several threads on this and it actually was as straight forward as everyone says it is. I was even able to find one that was very close to my miles. The only problem I ran across was when I went to swap the temp sensor on the head, at some point in its past the connector and wire were cut and/or tore off. I was able to find the wire in the harness and make the necessary connections. Here are my two gauges side by side before the swap:

The factory hand brake was broken because the button no longer worked and when you pulled on the handle it would just slide back down. So since I found a full newer style console and hand brake assembly I just swapped both from my older style. So I now have a working hand brake AND the elusive cup holders (that don't look like they came from the discount cart
). I still need to attach the front part of the old air duct to the new one so I don't have weak rear air. I also need to figure out the shift boot and the gap at the front of the console. As far as the newer style hand brake goes, I just used a small turnbuckle and attached it to the original linkage and it works great. Here is the (mostly) finished product:

I've gotta say.....I am extremely happy with all of the changes I've made so far and how well they look/work. I would recommend them to anyone with an older XJ that want some newer style upgrades.
![WARNING]!
This will be a fairly slow build because it will be based on how much time and money I have available. Also I don't have a garage or shop and since winter is fast approaching it may slow down even more.
My goals for this long term:
-budget minded
-31" max tire size
-only 3-4" of lift
-MILD build minded
-all simple, yet useful mods
-daily drive/weekend explore
-nothing I dont need, yet everything I do
-family minded
-able to handle the MASSIVE amount of fire roads/back wood trails of North Idaho, hence, the name of the build
and oh yeah....
BETTER PICS, MORE OFTEN!Last edited by TMC; 01-08-2015 at 12:06 AM.
 09-19-2014, 10:18 AM
#2
Member
Thread Starter
Join Date: Sep 2014
Location: Mountain Town, USA
Posts: 180
Likes: 0
Received 0 Likes
on
0 Posts
Year: 1991
Model: Cherokee (XJ)
Engine: 4.0 6 Cyl
Well I usually have the weekends off, so I havent had a chance to work on the Jeep this week but am planning on working on it tomorrow morning. Until that time, here are some shots of the work I did last weekend and posted the other day.
Here are some shots of the '98 mirror. As you can see, it lines up almost perfectly and has definitely more overall viewing surface than the older square style. The mirrors I found were power, but right now the wiring is just tucked away. I may still add it later on.
Those of you that know about/have installed the idiot light-to-gauge swap or already have gauges factory know what they look like. But for those of you who don't (or want to try it) it literally is plug and go other than swapping the oil pressure sensor near the oil filter and distributor and temperature sensor on the back of the head. Its one of my favorite mods so far.
As I stated in the previous post, I still need to extend the air duct under the new console, cover the small gap at the front (newer dash sticks out further), and either find a ash tray cover lid or make one. I also still need to either find a newer shift boot and bracket, or make an adapter for the older style. I actually felt like the console and e-brake swap was rather straight forward as long as you have the following:
newer console
newer air duct
newer console bracket
newer hand brake assembly
I feel like having the two factory cup holders and newer console design really made this swap worth it in the end.
Well thats all I have for now. Those of you who are following along (if anyone even is ) there should be some more in the next day or so.
Keep Jeepin'
Here are some shots of the '98 mirror. As you can see, it lines up almost perfectly and has definitely more overall viewing surface than the older square style. The mirrors I found were power, but right now the wiring is just tucked away. I may still add it later on.


Those of you that know about/have installed the idiot light-to-gauge swap or already have gauges factory know what they look like. But for those of you who don't (or want to try it) it literally is plug and go other than swapping the oil pressure sensor near the oil filter and distributor and temperature sensor on the back of the head. Its one of my favorite mods so far.

As I stated in the previous post, I still need to extend the air duct under the new console, cover the small gap at the front (newer dash sticks out further), and either find a ash tray cover lid or make one. I also still need to either find a newer shift boot and bracket, or make an adapter for the older style. I actually felt like the console and e-brake swap was rather straight forward as long as you have the following:
newer console
newer air duct
newer console bracket
newer hand brake assembly
I feel like having the two factory cup holders and newer console design really made this swap worth it in the end.


Well thats all I have for now. Those of you who are following along (if anyone even is
) there should be some more in the next day or so.Keep Jeepin'
09-19-2014, 11:48 AM
#3
CF Veteran
Join Date: Aug 2010
Location: Greensboro
Posts: 1,220
Received 0 Likes
on
0 Posts
Year: 1992
Model: Cherokee
Engine: 4.0L
Well I'm reading along haha. My work blocks photobucket so I cant see the pics but so far it sounds good. I'll check it out again when I get home so I can actually see it
09-20-2014, 02:41 PM
#4
Member
Thread Starter
Join Date: Sep 2014
Location: Mountain Town, USA
Posts: 180
Likes: 0
Received 0 Likes
on
0 Posts
Year: 1991
Model: Cherokee (XJ)
Engine: 4.0 6 Cyl
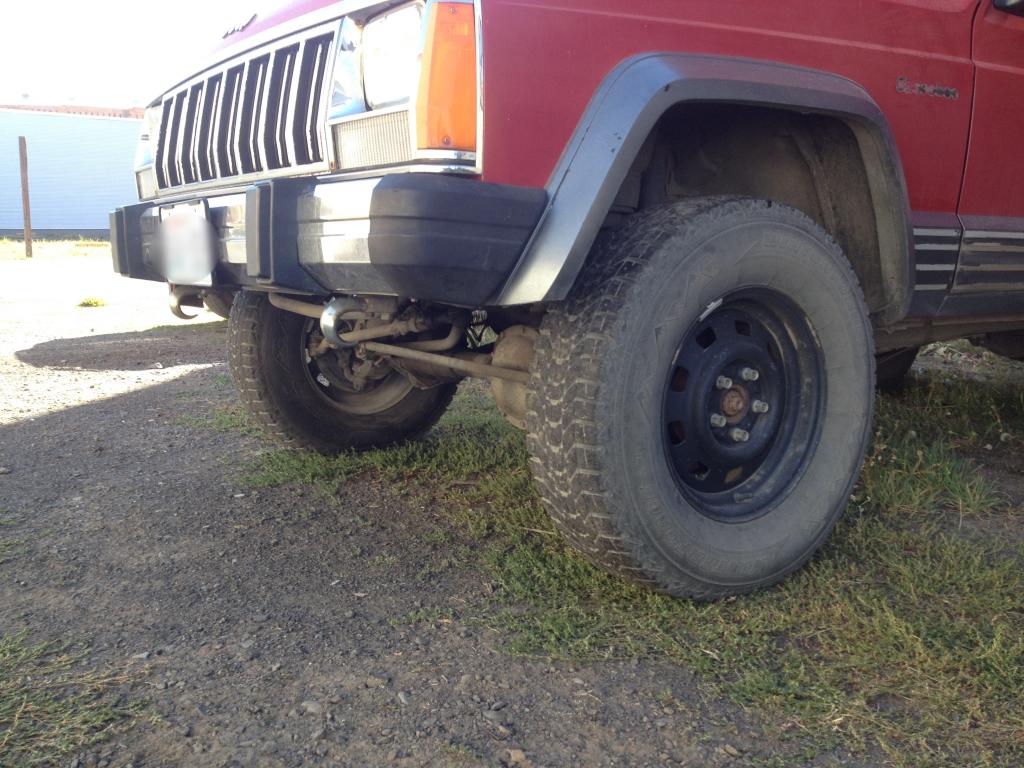
I wanted to work on removing my lower exterior trim and cleaning off the remains, but I ended up working on removing my front valance and trimming the front flares while my son played in the front seat.
There are several ways of removing the valance:
-removing the bumper, then unbolting the valance
-if your patient reaching up behind the bumper and unbolting it (through a 1" gap)
-use a reciprocating saw
-use a utility knife and cut it at the mounting points
-use a pry bar or screwdriver and pop the plastic off
-some have said they just pulled it off if broken/loose
Because of time constraints I didn't want to remove the front bumper however, mine had all 5 front bolts and 3 of the 4 side clips so I used a combination of the above. Well minus the reciprocating saw because I had the windows down and didn't want to scare my son.

So I first used the utility knife to cut around the 4 (3 in my case) side clips and tow hooks. Then I used a screwdriver to pop out the 3 clips as well as prying the valance over the 5 front bolts. I then removed the "center section" of the valance.
I then used the utility knife to trim the side and front of the flare as well as the rubber backing trim of the flare. When thats done you will notice the bracket for the valance hangs down. Here it can be seen to the right of the driver's side tow hook:

I was going to just unbolt the bracket, but in my case I realize it was bolted twice to the subframe and to the fender. So I just quickly used the reciprocating saw to cut just the vertical piece off.
After that just repeat the process on the other side. Heres a before and after:
BEFORE:
AFTER:
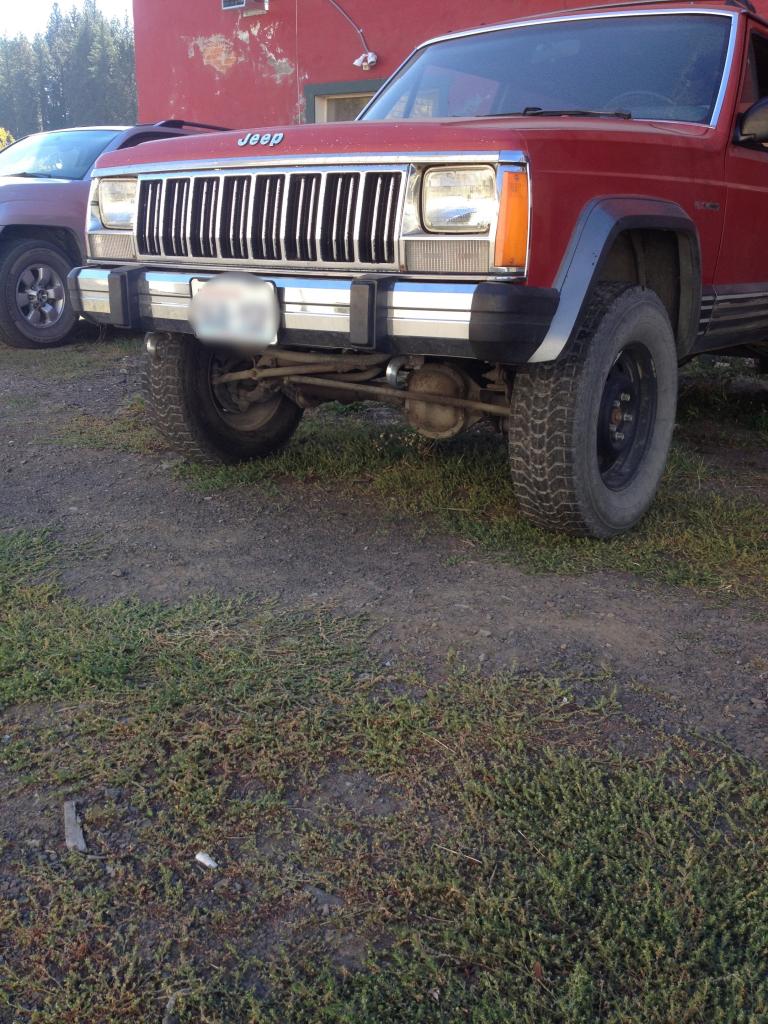
Despite the odd looking angles from the above pictures, I really feel like it makes the whole front of the Jeep look better. As well as improving the approach angle, even though the valance only hangs down about 2". I also feel it falls right in line with the "simple, yet useful" theme of this build.
Near future mods:
-install '98 passenger mirror
-finishing touches on console (air duct/shift boot/front gap)
-remove lower exterior trim and clean up residue/remains
-paint flares and lower body
-pickup the 2nd set of wheels/tires that came with Jeep
-misc. small details
Future mods:
-real 3" lift replacing spacers/AAL
-31" tire
-install rear hitch
-figure out how I want my winch setup i.e.: new bumper or winch mount? what kind of bumper? front hitch with winch mount?
Decisions, decisions, decisions......
I don't think anyone is even reading all this, but I feel like it helps show me what all I've done to the Jeep in 3 weeks. I work 50hrs/wk with weekends off, so only 4-8 hours a weekend at a time to work on it.
So.....who cares? I'm happy with it!

Keep Jeepin.......
There are several ways of removing the valance:
-removing the bumper, then unbolting the valance
-if your patient reaching up behind the bumper and unbolting it (through a 1" gap)
-use a reciprocating saw
-use a utility knife and cut it at the mounting points
-use a pry bar or screwdriver and pop the plastic off
-some have said they just pulled it off if broken/loose
Because of time constraints I didn't want to remove the front bumper however, mine had all 5 front bolts and 3 of the 4 side clips so I used a combination of the above. Well minus the reciprocating saw because I had the windows down and didn't want to scare my son.

So I first used the utility knife to cut around the 4 (3 in my case) side clips and tow hooks. Then I used a screwdriver to pop out the 3 clips as well as prying the valance over the 5 front bolts. I then removed the "center section" of the valance.


I then used the utility knife to trim the side and front of the flare as well as the rubber backing trim of the flare. When thats done you will notice the bracket for the valance hangs down. Here it can be seen to the right of the driver's side tow hook:

I was going to just unbolt the bracket, but in my case I realize it was bolted twice to the subframe and to the fender. So I just quickly used the reciprocating saw to cut just the vertical piece off.

After that just repeat the process on the other side. Heres a before and after:
BEFORE:
AFTER:

Despite the odd looking angles from the above pictures, I really feel like it makes the whole front of the Jeep look better. As well as improving the approach angle, even though the valance only hangs down about 2". I also feel it falls right in line with the "simple, yet useful" theme of this build.
Near future mods:
-install '98 passenger mirror
-finishing touches on console (air duct/shift boot/front gap)
-remove lower exterior trim and clean up residue/remains
-paint flares and lower body
-pickup the 2nd set of wheels/tires that came with Jeep
-misc. small details
Future mods:
-real 3" lift replacing spacers/AAL
-31" tire
-install rear hitch
-figure out how I want my winch setup i.e.: new bumper or winch mount? what kind of bumper? front hitch with winch mount?
Decisions, decisions, decisions......
I don't think anyone is even reading all this, but I feel like it helps show me what all I've done to the Jeep in 3 weeks. I work 50hrs/wk with weekends off, so only 4-8 hours a weekend at a time to work on it.
So.....who cares? I'm happy with it!
Keep Jeepin.......
Last edited by TMC; 08-27-2015 at 12:34 AM.
09-28-2014, 02:25 AM
#5
Member
Thread Starter
Join Date: Sep 2014
Location: Mountain Town, USA
Posts: 180
Likes: 0
Received 0 Likes
on
0 Posts
Year: 1991
Model: Cherokee (XJ)
Engine: 4.0 6 Cyl
Well I've gotta say, ........this weekend was a HUGE success because I got several things done on the Jeep.
First off, I got the center console air duct fixed so now I don't have weak rear air for any passengers. All I did was cut 1 1/2" off of the '91 air duct and attached it to the front of the '98.
 (sorry no pics)
I also replaced several bulbs that were out throughout the Jeep, as well as did some other routine maintenance.
NEXT:
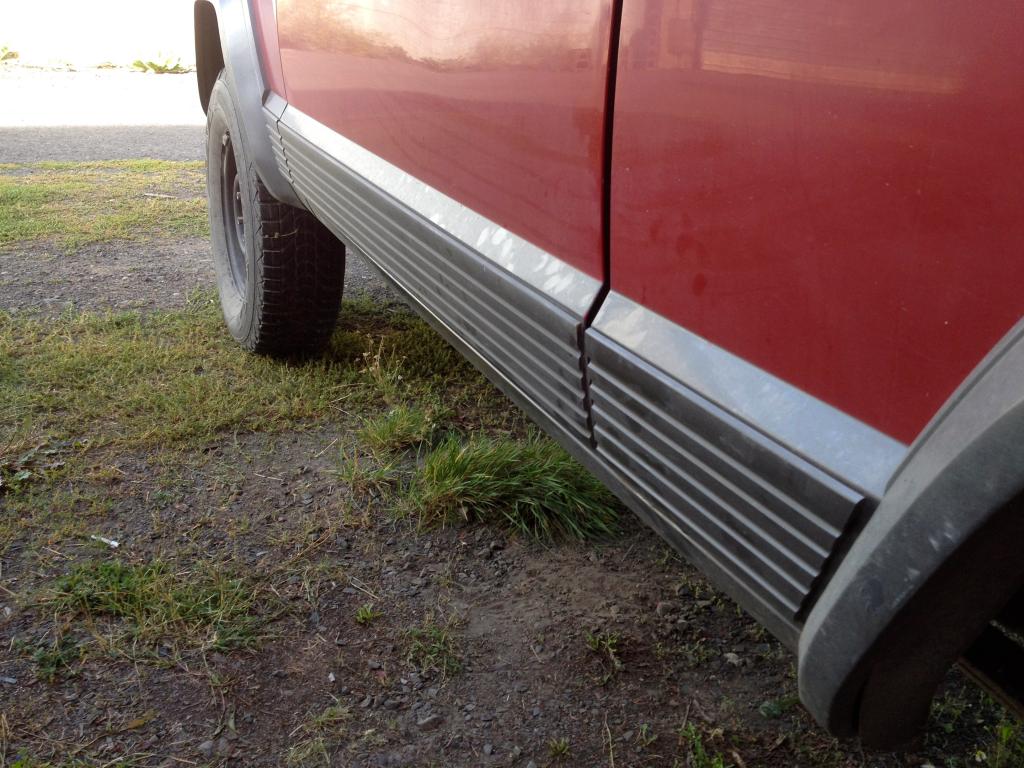
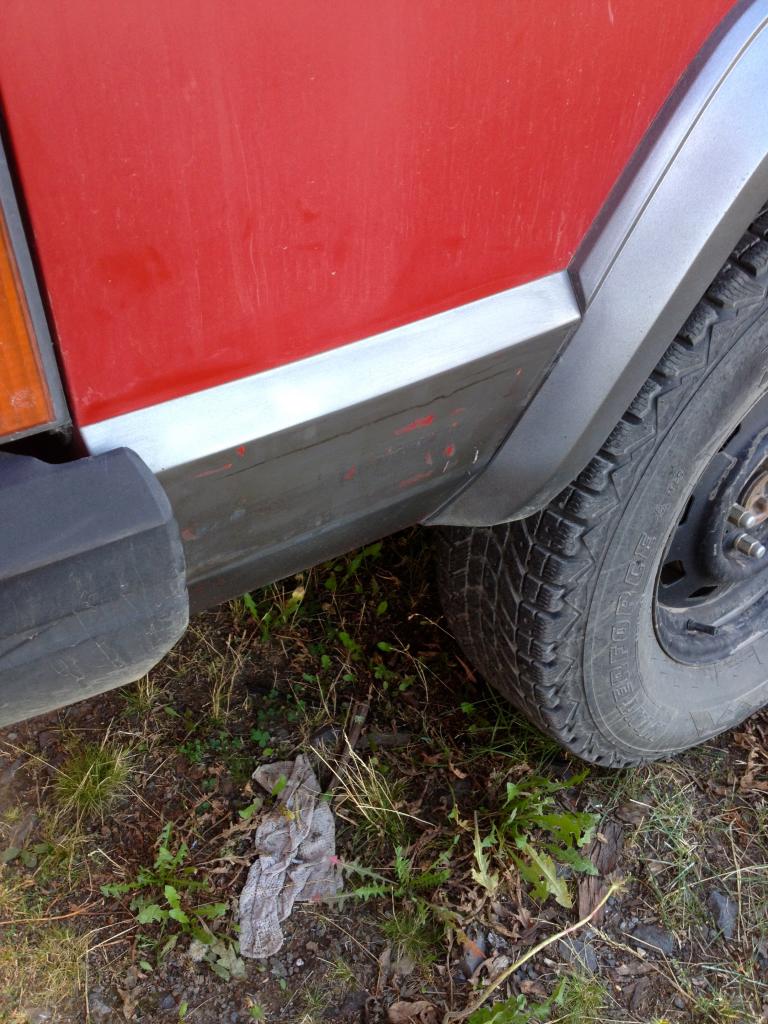
I started the lower body trim removal and cleaning. Here is a shot of my lower trim:
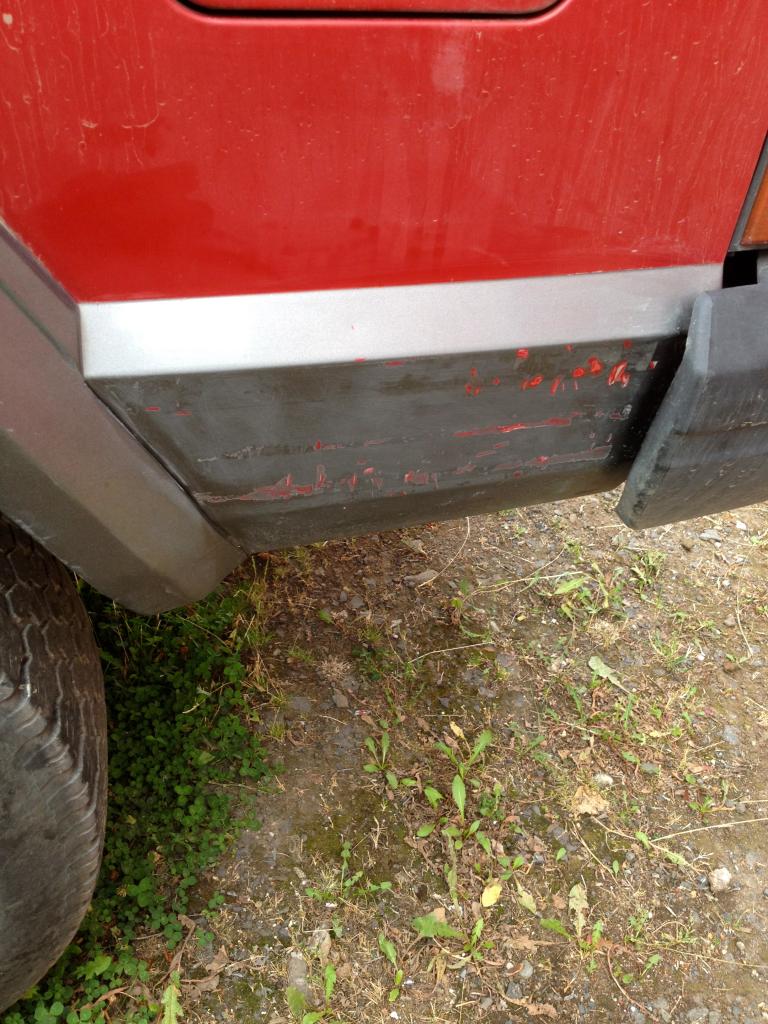
So when I purchased the Jeep the passenger door trim strip was off, but came with the Jeep. I thought, "well I could clean up the door and reattach it or I could do something else"......well guess what?! "Let her rip!"
You know, people say when removing the factory fender flares there is a chance you'll find some rust. Well its the same chance when you look under the trim. It's just the nature of the beast. I luckily didn't have any what so ever, but there was quite a bit of dried mud and muck next to the double sided tape lines and I'm sure doing this whole project helped ward off rust, on a vehicle that still doesn't have hardly any.
Anyway....
like most things on a Jeep, there are several ways of removing the trim:
-use a heat gun/hair dryer then remove the trim
-use fishing line to slide behind the trim
-pull the trim off by hand if loose or old
then:
-roll the old double sided tape (dst) on newer models
-use fishing line again on dst
-use goof off/goo gone to remove dst
-use a razor blade to remove dst
-use an automotive eraser wheel to remove dst and residue
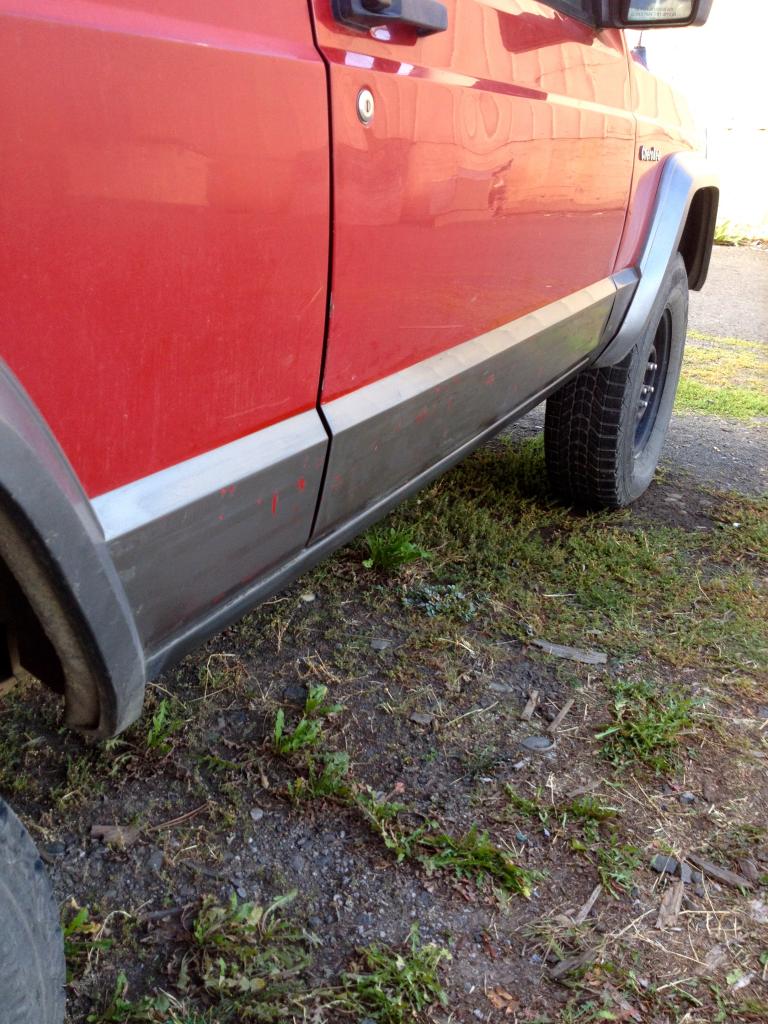
I went with 'pull trim off and razor blade' because I couldn't find an eraser wheel near me without having to special order it, and my trim was old/loose enough to just remove by hand. I did however use some goof off to help ease things up. My lower body is painted silver behind the trim pieces, so I knew I wanted to just get it all off and clean. Then I could prime/paint, bedline, plastidip or what have you. I gotta admit, my way probably wasn't the fastest or easiest, but it worked fine for what I had in mind. There were several spots where I did get into the paint layers, but like I said, I knew I'd have to sand and prime anyway.
I decided to go with Rustoleum Truck Bed Coating in black because I knew I wanted something that could hold up to the forest roads that are all over where I live. I scraped, then sanded, then added a light coat of primer, then the liner. I probably didn't need to sand or prime because it's suppose to stick no matter what, but better to be safe than sorry later on.

As you can see, I should have done a better job at first taping/covering more because there was overspray that got on the upper body, but I was able to come right behind and clean it off with a little bit of mineral spirits.
I used my recently learned knowledge and applied it to the other side.
Then I started the fun task of taping and masking. I just happen to have a year old 4WD Hardware catalog on hand.
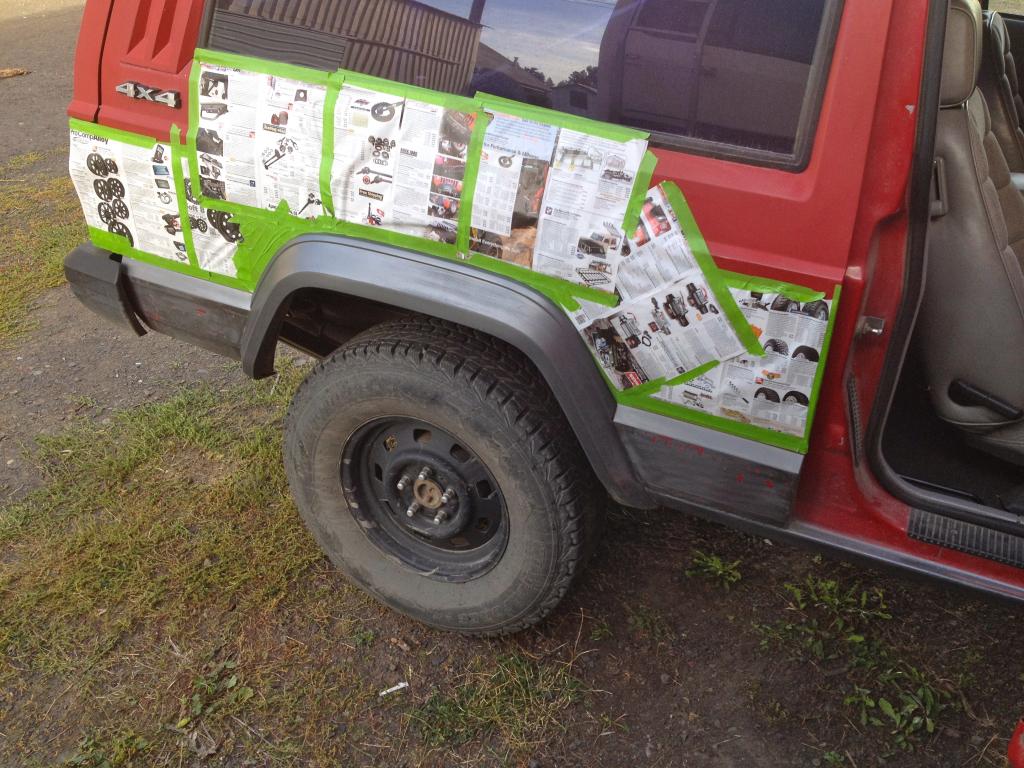
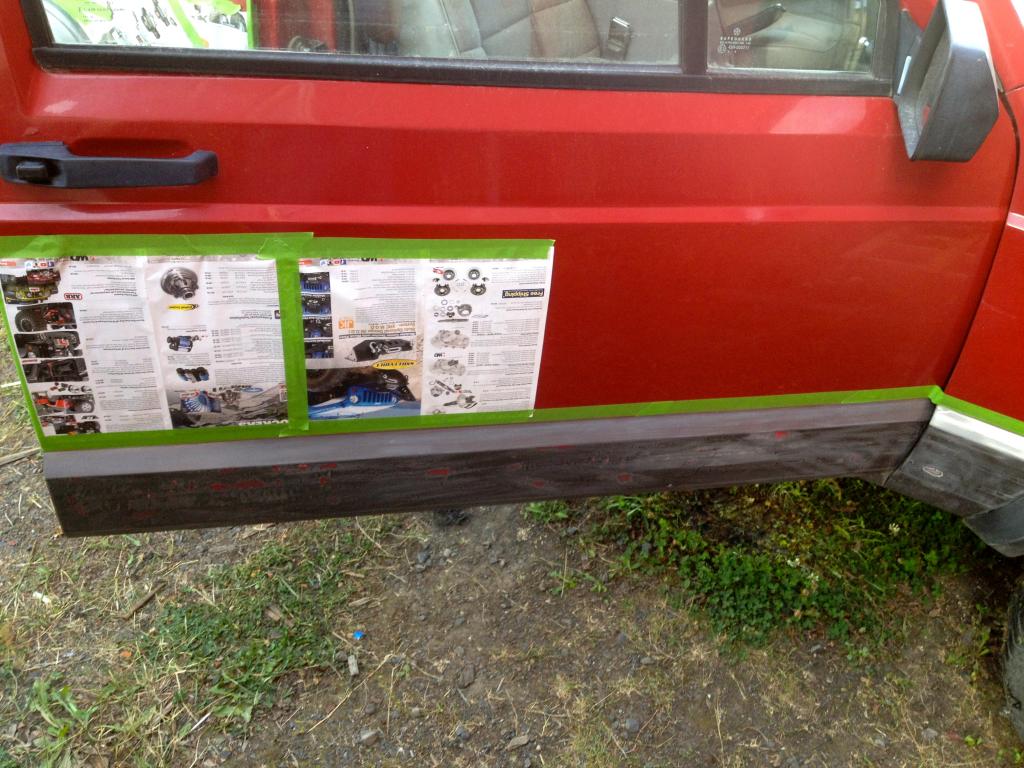
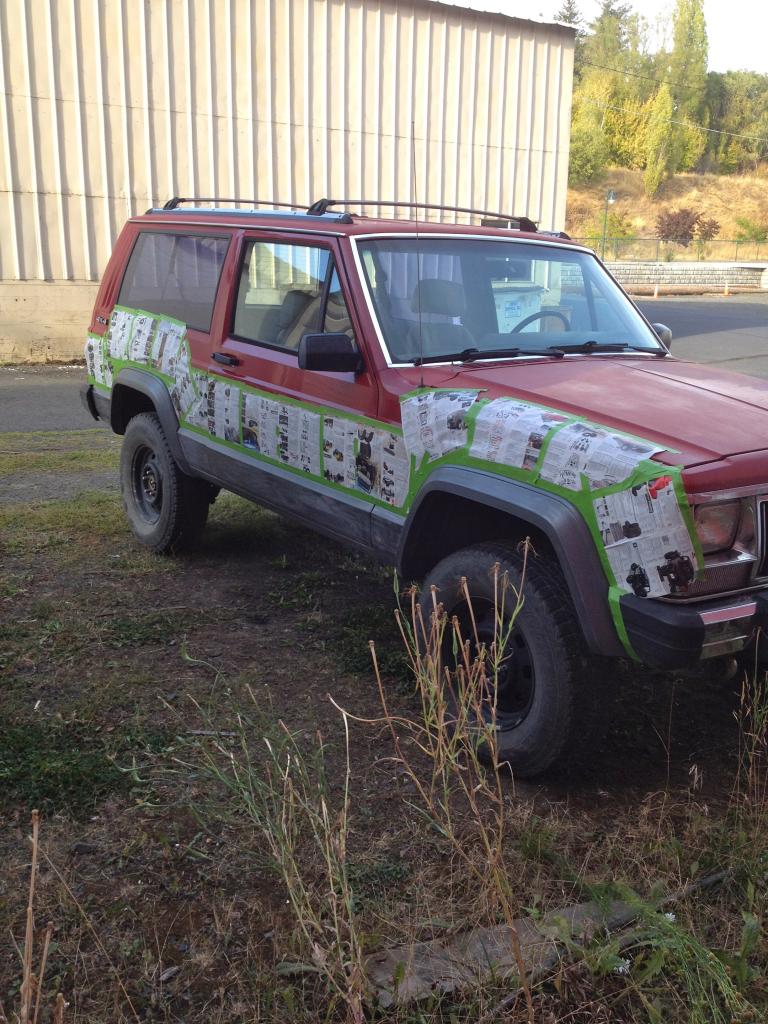
Then I sprayed two coats and then removed all of the tape and paper.
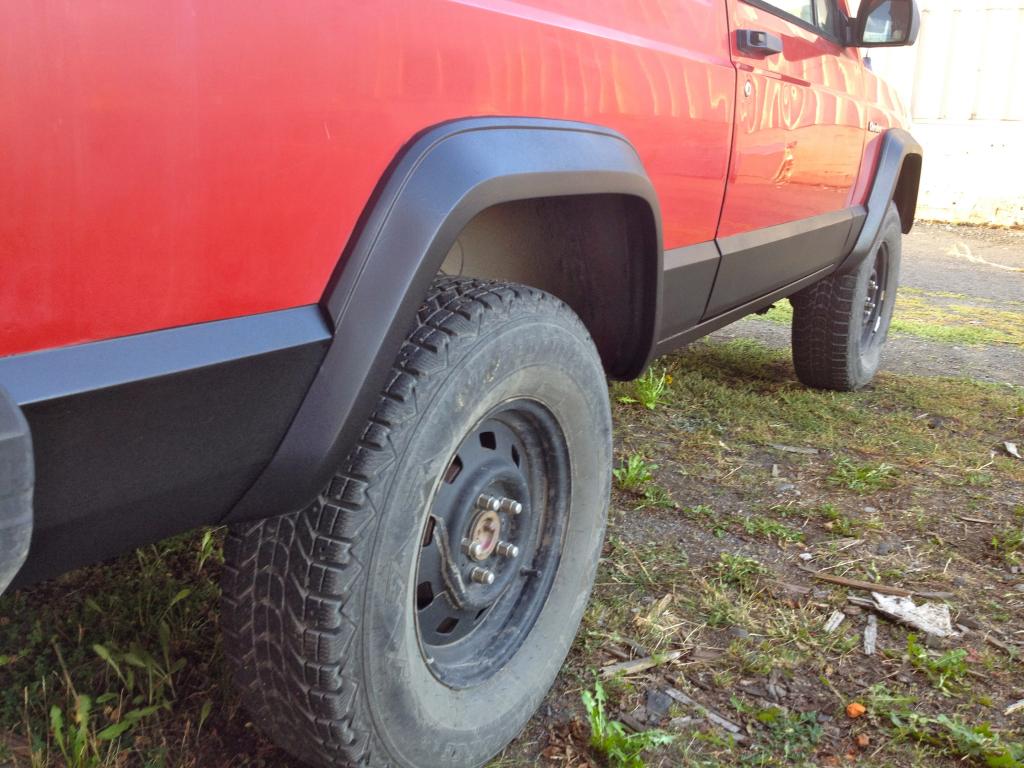

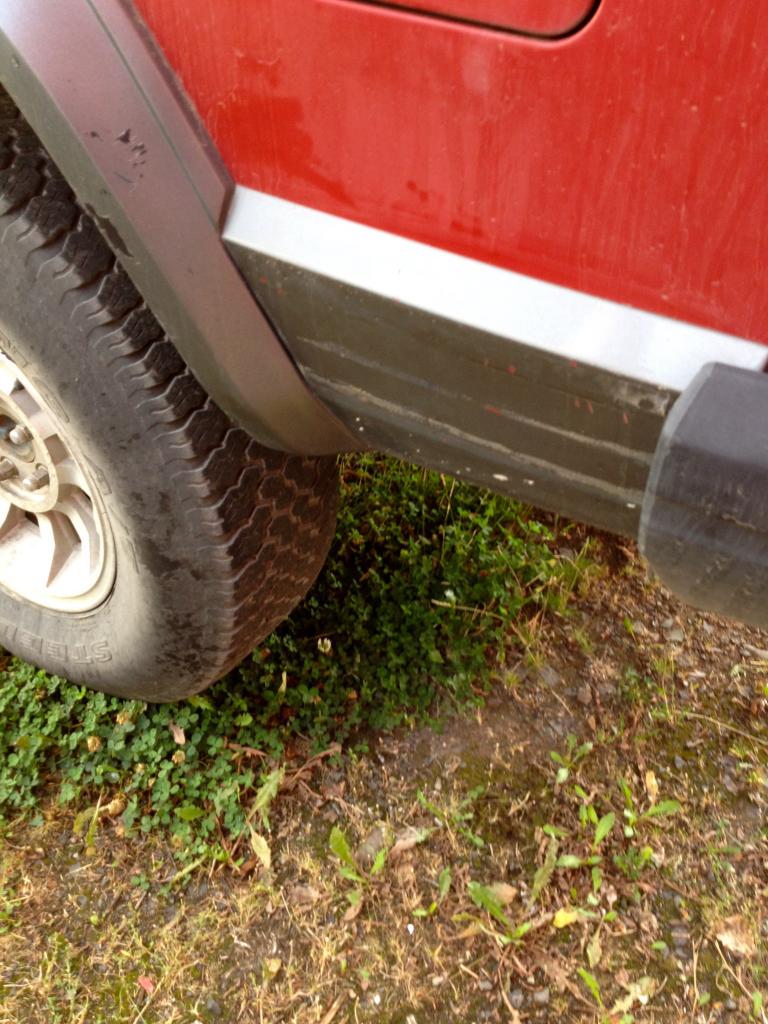
Well, you can't really tell from the pictures, but there are a few run spots and a couple of "off" lines near the flares, but all in all I am very pleased with how it turned out. Here is the before and after....is it just me or does it look taller?
BEFORE:
AFTER:
I have used Herculiner in the past in the bed of my old truck, but I really liked how the Rustoleum Truck Bed coating was not as rough as the Herc. Granted, the Herc liner was a roll on, but still I think it looks pretty sharp no matter how close or far you are standing. The whole project only took about 1 and a half cans, so this was all done fairly cheap. I also used one of the spray paint trigger caps. I didn't really feel a difference, but maybe I will on larger, future projects on the Cherokee.
Honestly, the more I look at it..........the more I like it.
NEXT!
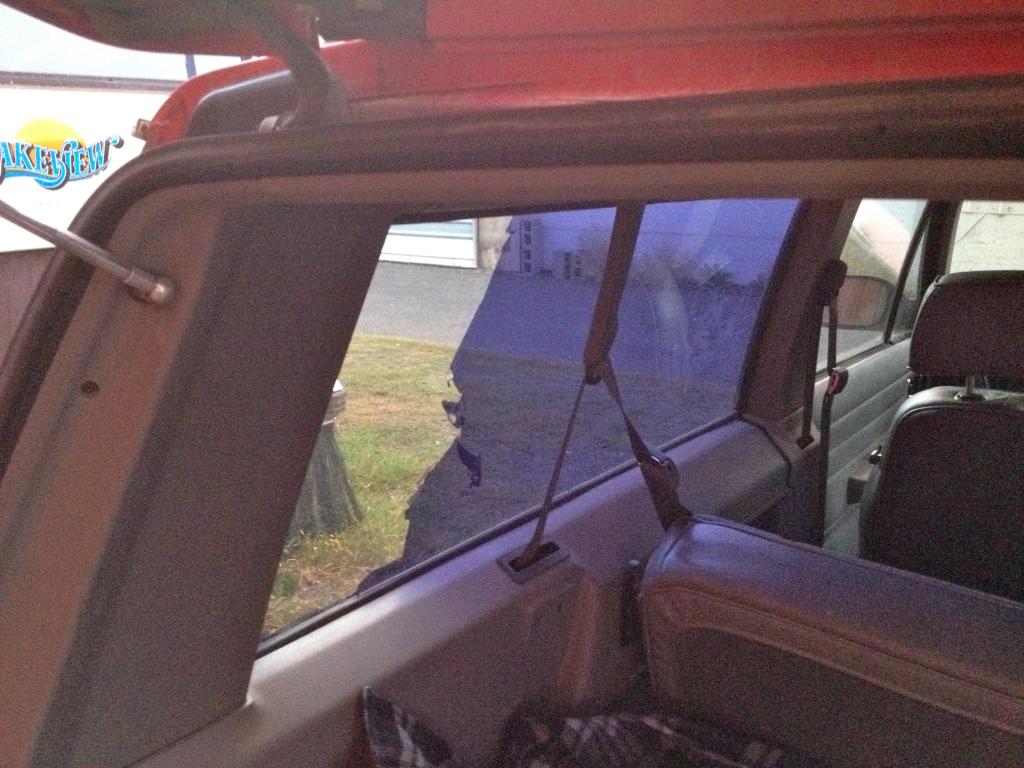
My back two windows has some old tint on them. I really prefer tinted windows, but this had become purple-ish with time and needed to go. I actually was able to just use a razor blade and slowly, strip by strip, remove the old tint. It thankfully wasn't the old kind that was super sticky or just fell apart when trying to remove it. So other than just being time consuming, it went rather well.
Again, you can't really tell from the photos (my fault) but it actually is even more purple colored in person. It makes it weird to look through while driving.
Here is what it looked like before:
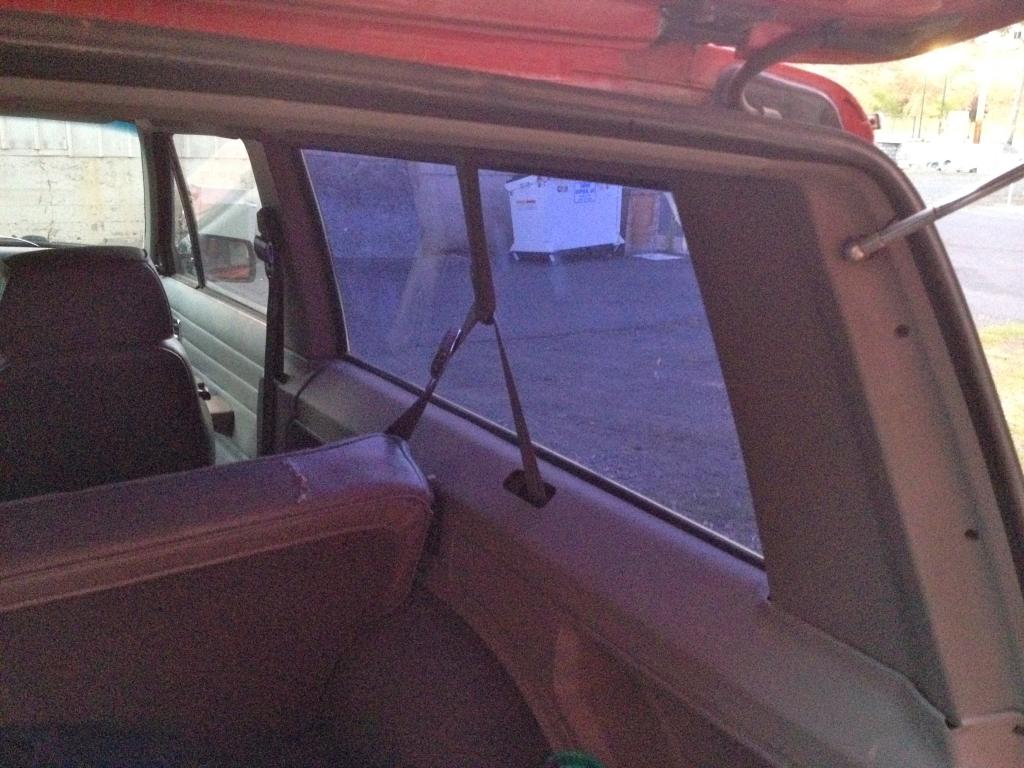
And here is what it looked like during the removal. Its quite a difference that I think helps make the Jeep, as a whole, not look so old.
I actually didn't get a completed done picture because by the time I finished it was dark. But, I will try to get one ASAP with the new lower bedliner and cleaned rear windows. Thanks for reading and as always,
Keep Jeepin'...
First off, I got the center console air duct fixed so now I don't have weak rear air for any passengers. All I did was cut 1 1/2" off of the '91 air duct and attached it to the front of the '98.
(sorry no pics)I also replaced several bulbs that were out throughout the Jeep, as well as did some other routine maintenance.
NEXT:
I started the lower body trim removal and cleaning. Here is a shot of my lower trim:

So when I purchased the Jeep the passenger door trim strip was off, but came with the Jeep. I thought, "well I could clean up the door and reattach it or I could do something else"......well guess what?! "Let her rip!"


You know, people say when removing the factory fender flares there is a chance you'll find some rust. Well its the same chance when you look under the trim. It's just the nature of the beast. I luckily didn't have any what so ever, but there was quite a bit of dried mud and muck next to the double sided tape lines and I'm sure doing this whole project helped ward off rust, on a vehicle that still doesn't have hardly any.
Anyway....
like most things on a Jeep, there are several ways of removing the trim:
-use a heat gun/hair dryer then remove the trim
-use fishing line to slide behind the trim
-pull the trim off by hand if loose or old
then:
-roll the old double sided tape (dst) on newer models
-use fishing line again on dst
-use goof off/goo gone to remove dst
-use a razor blade to remove dst
-use an automotive eraser wheel to remove dst and residue
I went with 'pull trim off and razor blade' because I couldn't find an eraser wheel near me without having to special order it, and my trim was old/loose enough to just remove by hand. I did however use some goof off to help ease things up. My lower body is painted silver behind the trim pieces, so I knew I wanted to just get it all off and clean. Then I could prime/paint, bedline, plastidip or what have you. I gotta admit, my way probably wasn't the fastest or easiest, but it worked fine for what I had in mind. There were several spots where I did get into the paint layers, but like I said, I knew I'd have to sand and prime anyway.

I decided to go with Rustoleum Truck Bed Coating in black because I knew I wanted something that could hold up to the forest roads that are all over where I live. I scraped, then sanded, then added a light coat of primer, then the liner. I probably didn't need to sand or prime because it's suppose to stick no matter what, but better to be safe than sorry later on.

As you can see, I should have done a better job at first taping/covering more because there was overspray that got on the upper body, but I was able to come right behind and clean it off with a little bit of mineral spirits.


I used my recently learned knowledge and applied it to the other side.


Then I started the fun task of taping and masking. I just happen to have a year old 4WD Hardware catalog on hand.


Then I sprayed two coats and then removed all of the tape and paper.


Well, you can't really tell from the pictures, but there are a few run spots and a couple of "off" lines near the flares, but all in all I am very pleased with how it turned out. Here is the before and after....is it just me or does it look taller?
BEFORE:
AFTER:

I have used Herculiner in the past in the bed of my old truck, but I really liked how the Rustoleum Truck Bed coating was not as rough as the Herc. Granted, the Herc liner was a roll on, but still I think it looks pretty sharp no matter how close or far you are standing. The whole project only took about 1 and a half cans, so this was all done fairly cheap. I also used one of the spray paint trigger caps. I didn't really feel a difference, but maybe I will on larger, future projects on the Cherokee.
Honestly, the more I look at it..........the more I like it.
NEXT!
My back two windows has some old tint on them. I really prefer tinted windows, but this had become purple-ish with time and needed to go. I actually was able to just use a razor blade and slowly, strip by strip, remove the old tint. It thankfully wasn't the old kind that was super sticky or just fell apart when trying to remove it. So other than just being time consuming, it went rather well.
Again, you can't really tell from the photos (my fault
Here is what it looked like before:

And here is what it looked like during the removal. Its quite a difference that I think helps make the Jeep, as a whole, not look so old.

I actually didn't get a completed done picture because by the time I finished it was dark. But, I will try to get one ASAP with the new lower bedliner and cleaned rear windows. Thanks for reading and as always,
Keep Jeepin'...


Trending Topics
09-28-2014, 02:09 PM
#8
Member
Thread Starter
Join Date: Sep 2014
Location: Mountain Town, USA
Posts: 180
Likes: 0
Received 0 Likes
on
0 Posts
Year: 1991
Model: Cherokee (XJ)
Engine: 4.0 6 Cyl
I actually know I wont go any higher than 3" to 4" with 31"s to 33"s. Mainly because the kind of wheeling I do up here is is mostly forest service and mountain back roads and the like in northern Idaho. No offense to anyone with 6" LA and 35"s, I just honestly wouldn't need it.
09-28-2014, 02:17 PM
#9
Member
Thread Starter
Join Date: Sep 2014
Location: Mountain Town, USA
Posts: 180
Likes: 0
Received 0 Likes
on
0 Posts
Year: 1991
Model: Cherokee (XJ)
Engine: 4.0 6 Cyl
Yeah me too! I just gotta keep saving some dinero....and I dont mean Robert.
Im sure you obviously feel the same way, but Im really loving my 2 door so far. Your's look really good with that wheel/tire combo and lift your running! Also your Conn Ferr rack seems to have a nice lower profile.
I like it!
Im sure you obviously feel the same way, but Im really loving my 2 door so far.
Your's look really good with that wheel/tire combo and lift your running! Also your Conn Ferr rack seems to have a nice lower profile.I like it!
09-28-2014, 06:03 PM
#10
Senior Member
Join Date: Jul 2014
Location: St. Louis
Posts: 793
Likes: 0
Received 2 Likes
on
2 Posts
Year: 1998
Model: Cherokee
Engine: 4.0 Liter I6 PowerTech
Thanks Green! I really appreciate it! Other than AdamK, I didn't think anyone was really reading or following along.
I actually know I wont go any higher than 3" to 4" with 31"s to 33"s. Mainly because the kind of wheeling I do up here is is mostly forest service and mountain back roads and the like in northern Idaho. No offense to anyone with 6" LA and 35"s, I just honestly wouldn't need it.
I actually know I wont go any higher than 3" to 4" with 31"s to 33"s. Mainly because the kind of wheeling I do up here is is mostly forest service and mountain back roads and the like in northern Idaho. No offense to anyone with 6" LA and 35"s, I just honestly wouldn't need it.
09-28-2014, 06:45 PM
#11
Member
Thread Starter
Join Date: Sep 2014
Location: Mountain Town, USA
Posts: 180
Likes: 0
Received 0 Likes
on
0 Posts
Year: 1991
Model: Cherokee (XJ)
Engine: 4.0 6 Cyl
Yeah thats around what I'm shooting for. Im actually around 3" now, but I want to get actual coils and leaf springs. Honestly, I really don't feel like it handles that bad for being 23+ years old with a "budget lift" lol!
From all I can gather from the Forum, I think I may try to piece together a lift rather than just purchasing a "kit". It seems like its cheaper in the long run, plus you get what you want AND can get better quality.
I know most people can't wait to update after update. Just keep throwing mods on their Jeep and getting it done quick, but I actually am enjoying that its just a little bit at a time. You know?
Thats the life of a Jeeper.
09-28-2014, 10:10 PM
#12
Seasoned Member
Join Date: Jul 2010
Location: NE FL
Posts: 337
Likes: 0
Received 0 Likes
on
0 Posts
Year: 1997
Model: Cherokee
Engine: 4.0
Its looking good! Funny how even small changes and upgrades make a big difference. Keep it up. Nice job on the flares and side trim. I'm debating on either painting my flares or using the heat gun technique.
09-29-2014, 12:33 AM
#13
Member
Thread Starter
Join Date: Sep 2014
Location: Mountain Town, USA
Posts: 180
Likes: 0
Received 0 Likes
on
0 Posts
Year: 1991
Model: Cherokee (XJ)
Engine: 4.0 6 Cyl
Exactly! I feel like after only having the Jeep 5 weeks or so now, I've gotten SO much done. I dont know which is my favorite mod....the gauge swap, or the lower trim update.
Yeah I've heard that trim removal on 97+ models are a little bit easier sometimes. Mainly due to the fact that they haven't been on as long as the older ones.
09-29-2014, 12:55 AM
#14
Junior Member
Join Date: Apr 2014
Posts: 98
Likes: 0
Received 0 Likes
on
0 Posts
Model: Cherokee
What's up guys saw this thread and I did a similar project on my jeep!
I painted the bottom strip as we'll with rust oleum primer and enamel
And then I just said f*** it and painted the top white gloss and I think it turned out pretty good for about a 100$
Also I'm debating on whether I wanna trim my fenders like you did in the front.
Nice job man!!
I painted the bottom strip as we'll with rust oleum primer and enamel
And then I just said f*** it and painted the top white gloss and I think it turned out pretty good for about a 100$
Also I'm debating on whether I wanna trim my fenders like you did in the front.
Nice job man!!
09-29-2014, 01:14 AM
#15
Member
Thread Starter
Join Date: Sep 2014
Location: Mountain Town, USA
Posts: 180
Likes: 0
Received 0 Likes
on
0 Posts
Year: 1991
Model: Cherokee (XJ)
Engine: 4.0 6 Cyl
What's up guys saw this thread and I did a similar project on my jeep!
I painted the bottom strip as we'll with rust oleum primer and enamel
And then I just said f*** it and painted the top white gloss and I think it turned out pretty good for about a 100$
Also I'm debating on whether I wanna trim my fenders like you did in the front.
Nice job man!!
I painted the bottom strip as we'll with rust oleum primer and enamel
And then I just said f*** it and painted the top white gloss and I think it turned out pretty good for about a 100$
Also I'm debating on whether I wanna trim my fenders like you did in the front.
Nice job man!!
Wow! Yours turned out great too! I've been toying with the idea of painting over the red on mine (even though the paint isn't in that bad of shape) but I go back and forth.
OD green or desert tan might look sick with that bed coat.....
I personally like how the front of mine looks now with the valance gone and the front fender edge trimmed, so I would vote yes unless you just specifically like the way it looks with it.