Post Install - Heater Core/HVAC R&R Thoughts & Insights
 10-19-2015, 09:28 PM
#1
CF Veteran
Thread Starter
Join Date: Oct 2013
Location: Tarpon Springs, FL / Denver, CO
Posts: 2,097
Likes: 0
Received 8 Likes
on
7 Posts
Year: '98
Engine: 4.0 I6
Hi folks,
I just got done with an R&R on my heater core this weekend. I figured I would post up some insights to help others out during the install. This is not a how-to guide, but mostly meant to complement the usual how-to's (I used this How-To, although the image links are all dead.
Firstly, its really not that hard to do. There are a few items on the list that are a bit of a pain, but nothing that really approaches rocket science or quantum mechanics.
1.
Start in the engine bay -- that is going to be the part that you have the biggest challenges IMO. Get everything disconnected first, because if you tear the interior out and realize that you cant disconnect your AC lines, you are going to be in a foul mood.
I used air to blow out the heater core to get as much coolant out as I could. I then stuffed paper towels and ziptied plastic bags around the outlets. The smell of coolant gives me a headache after living with a leaking heater core for so long so I wanted to minimize ANY spillage inside the cab.
2.
Make sure you have all the parts you need before hand. This should be a no-brainer, but due to the location of the HVAC box, its a really good idea to replace your evaporator core if it is not performing well or if your AC has never worked like mine. The one I pulled out was pretty gross so I am glad that I went ahead and purchased the a/c evap core before pulling everything apart. Worst case you can just return it if yours is in great shape. Ditto for the blend door.
3.
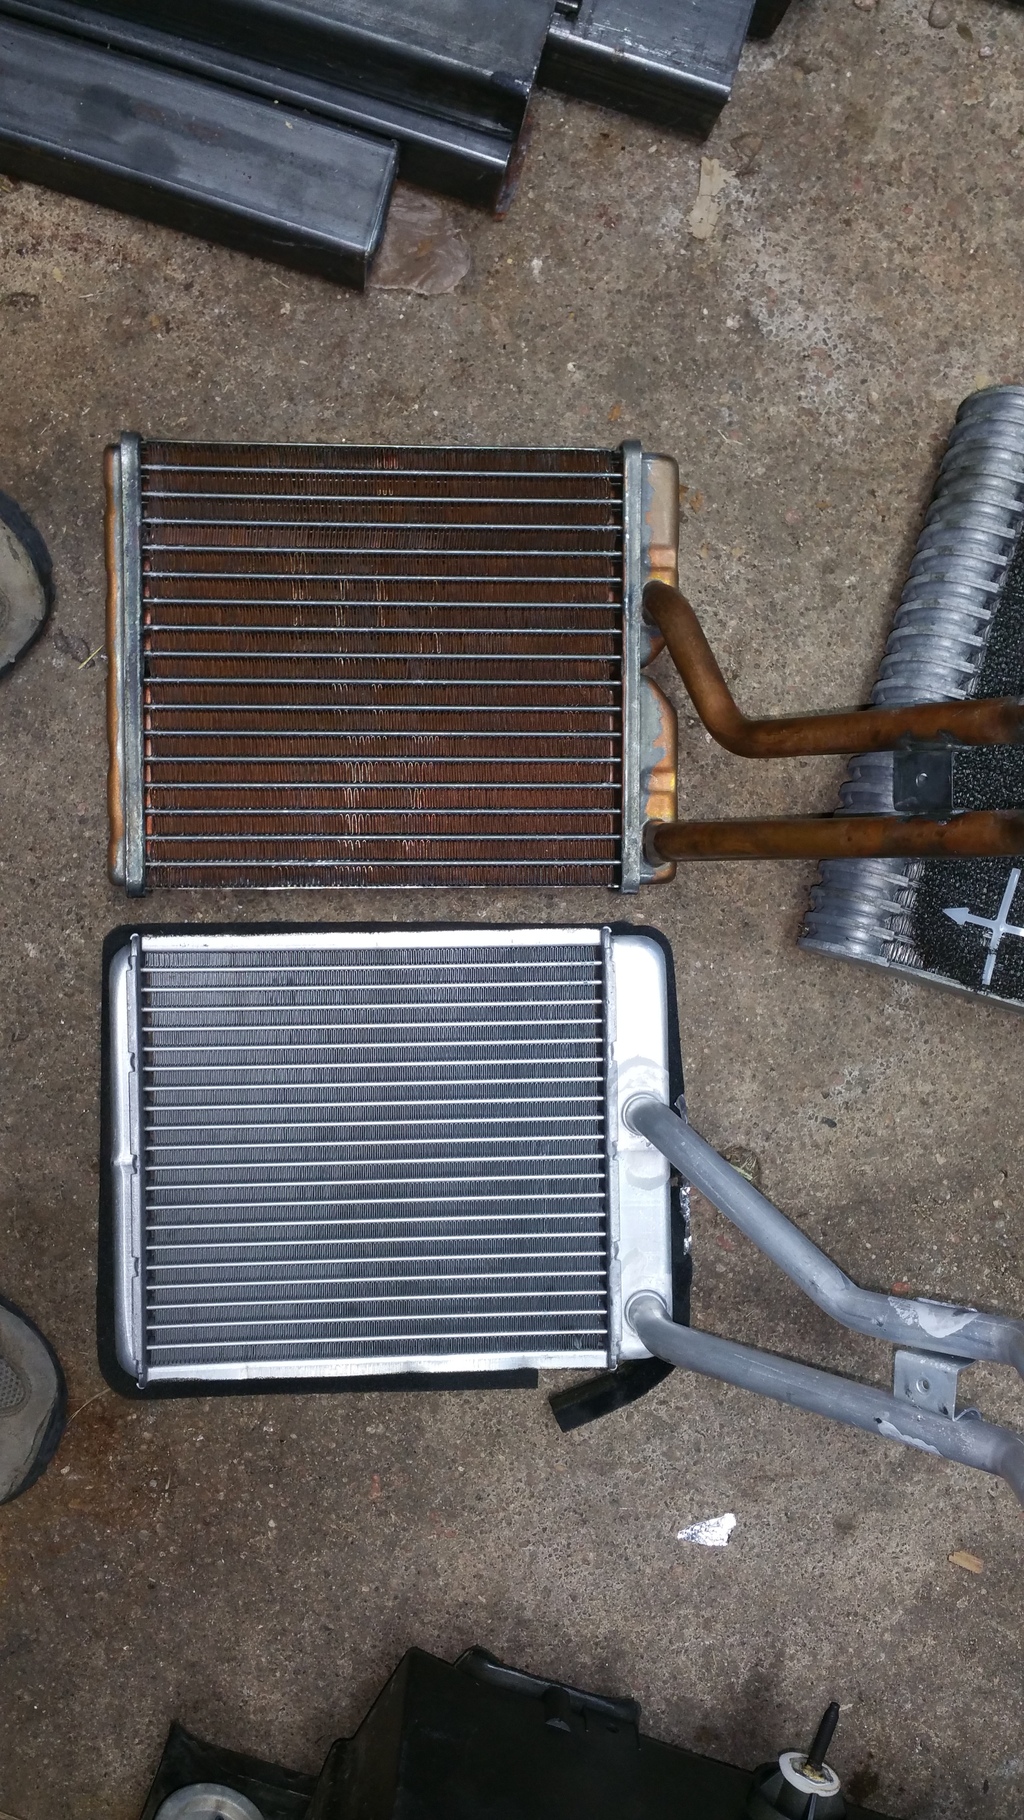
Make sure you purchase good quality replacement parts. I initially replaced mine with a Spectra branded aluminum unit, thinking it might be just as good as the copper original one. Dead wrong, it was about 1/2 as thick as the OEM copper unit and during 5* weather, the exit temperature from the vents was probably only 80*F, really not enough in 30kt crosswinds in the mountains. It was pretty miserable last winter.
The new unit I purchased from Orileys, which is a Murray branded unit, Part number [BOX IS IN THE GARAGE, GIVE ME A SEC]. I believe it is all brass, cost was $65, and it is of similar quality to my OEM unit that was leaking really badly.
The heat output is absolutely fantastic. Firstly, the 4.0 L6 has no problems staying warm even in sub zero temperatures (in my experience). The issue stems from low heater core flow due to blockage/deposits, or a malfunctioning thermostat that is allowing the coolant to circulate through the radiator. If the thermostat is closed, coolant constantly flows from the engine block, through the heater-core, and back into the engine block. Never touches the radiator unless the thermostat reaches pressure and opens, so blocking the radiator is not as effective as people think it will be.
4.
Once you get everything unhooked in the engine bay, move to the interior. Start by pulling the center console and radio bezel out. It makes working in the cab much easier.
Secondly, I did not pull my seats. Instead, I went ahead and tore the dash down, removed all of the bolts securing the dash to the body, and then I dropped the steering column. It might have been my "gangster lean" broken seat bracket that enabled the steering column to swing down low enough, but all I needed to do was (if you have tilt steering), put the steering column in its lowest position, and remove the nuts securing the column to the dash. These are the nuts that run vertically (pointing straight up), not the ones further inwards that run towards the engine bay.
Once you drop the steering column, dont touch the tilt lever!! It is spring actuated so it will snap back to the upmost position and a pain in the *** to get back in position if you move it. Set it to its lowest setting and then consciously avoid touching it until AFTER you bolt it back in place.
5.
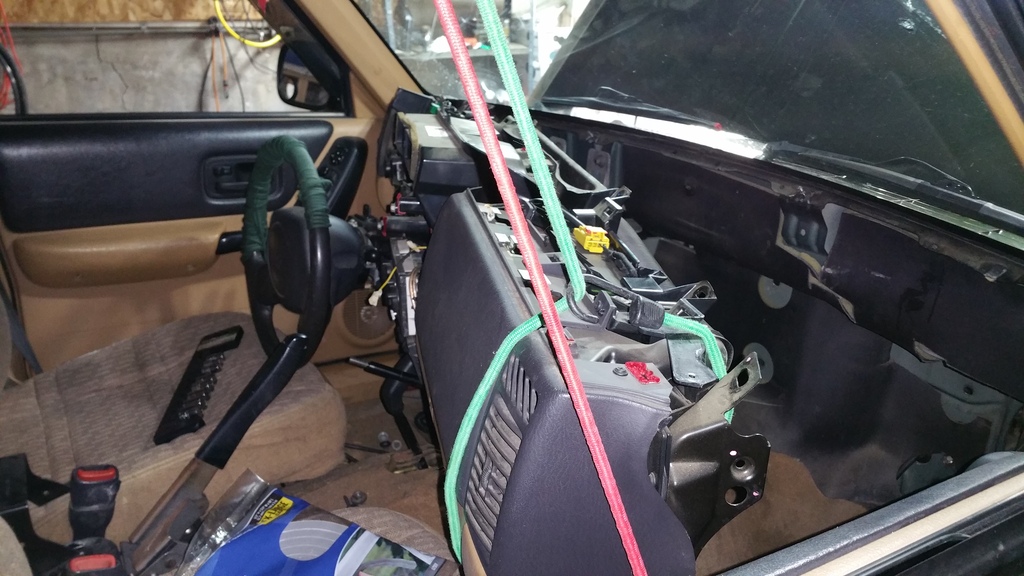
Once you have the dash completely disconnected and are ready to rotate it out of the way, go to the passenger side and from the middle, pull the dash slightly upwards while pulling rearward. You need to clear the center two mounting studs on the firewall. If you have done everything properly, the dash should kind of pivot out of place. See the pic at the end of this post and you can see how I simply rotated it out of the way, and had more than enough room to remove the HVAC box.
6.
Once you have the HVAC box out, crack the case open carefully and try and quickly study how it goes back together. The blend door was the trickiest part for me, it has a notch in the top of the housing that it absolutely MUST seat into, otherwise it will flop around and do pretty much nothing.
R&R the heater core and evap core if you so choose. Now is a good time to replace the blend door if you suspect the bottom shaft is cracked. Clean everything thoroughly while you are in there, especially if your heater core was leaking.
A word of warning for 97-01 XJ owners, the blend doors are completely different from 99-01, than 97-98. I am unsure if the pre 99 blend doors are the same as previous models, but the bottom shaft is a different design because of the electric motor on the 99+ models.
I opted to remove mine (there is a small torx/hex screw on the blend door arm on the bottom exterior of the HVAC box), and clean everything thoroughly. Afterwards, I greased the CRAP out of the bottom assembly using Lucas Green Xtra HD grease, and packed the upper receiver housing of the blend door shaft so there was less friction. I also lubed the
rubber edge of the blend door so it would slide easier. Luckily mine was in good shape so I re-used it.
I did have a hard time getting the HVAC box back together. The blend door shaft wouldn't seat inside the upper part of the housing so I ended up unscrewing the bottom mounting thingy (rotating assembly), and used the suction of the grease to keep the blend door in place. I then screwed the bottom rotating piece in place from the bottom, and proceeded to screw the rest of the housing back together.
I also used some nice 3M memory foam style window foam to seal the edges of the heater core and evap core, which I think will really help with efficiency of the HVAC system. Before mounting the blower fan back in place, I cleaned it out using electrical contact cleaner and tried to grease everything as best as I could.
7.
I used the same foam around ALL mounting areas that i could find. I cut it in half, thickness wise, so it would not create any gaps but prevent rattling and stuff. This made a HUUUUGEEEE difference in my Jeep! I highly recommend doing the same.
Obviously don't go too thick and make sure the foam is compressing properly so there aren't any gaps or too much pressure on the ****ty nutserts that Jeep loves to use.
8.
Check for proper operation as best as you can after reinstalling the HVAC box. Make sure the blend door is operating smoothly, and make sure that the HVAC box is sealing properly against the firewall. Mine was NOT seating properly against the blower housing, so I pulled it out, put some foam around the seal for safety sake (mounted lightly inboard, as kind of a "secondary" seal inside the cabin) and mounted it back up.
I tightned the nuts in the engine bay starting from the middle two, then the one around the blower motor, then the ones behind the engine last. My truck was leaking around the blower motor before, so I wanted more tension on that area. There aren't any seals that I could see on the area closer to the engine bay, so it was less of a concern for me.
9.
Replace the AC drier since you have the opportunity. Fill the coolant reservoir up to the high mark and keep an eye on it, as the system bleeds. It should bleed fairly quickly, but I ran my Jeep up to temp with the radiator cap off, and the nose pointing up-hill to try and bleed it as best as I could.
You will be absolutely astonished at how fast it warms up in normal, 60* weather if you spent winter with no heat like I did.
----
If your heater core is leaking and you live in a northern climate, DO THIS BEFORE IT GETS COLD!! It sucks working in the cold, and if the core starts leaking really bad you may not be able to use your heat at all, as the antifreeze vapor makes it impossible to see anything (thick slimy film that just smears around on the inside of the windscreen). Really dangerous when you are on the highway and have to keep wiping a small hole in your windscreen to see where you are going. Kind of feels like I am driving a submarine
Other than that, if anyone has any questions, drop a response and I will see if I can assist!
Sorry for the long post, I figure I would share as much as I could because even for a seasoned mechanic, this is a pretty daunting task.
Pics of the ordeal;

Dash swung up and out of the way, secured with bungees to the passenger grab handle.
Spectra vs. Murray heater core;
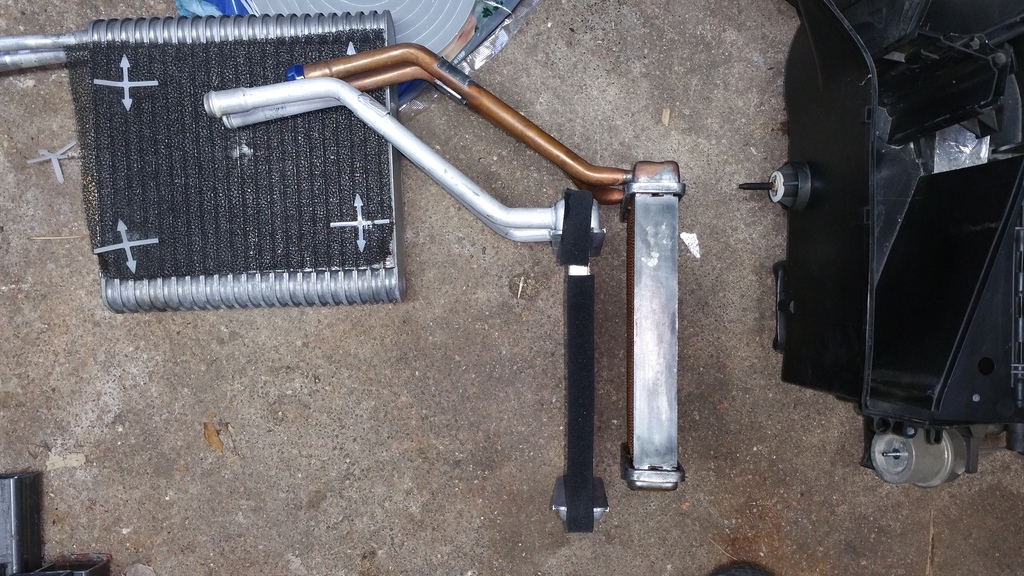
Out with the old!
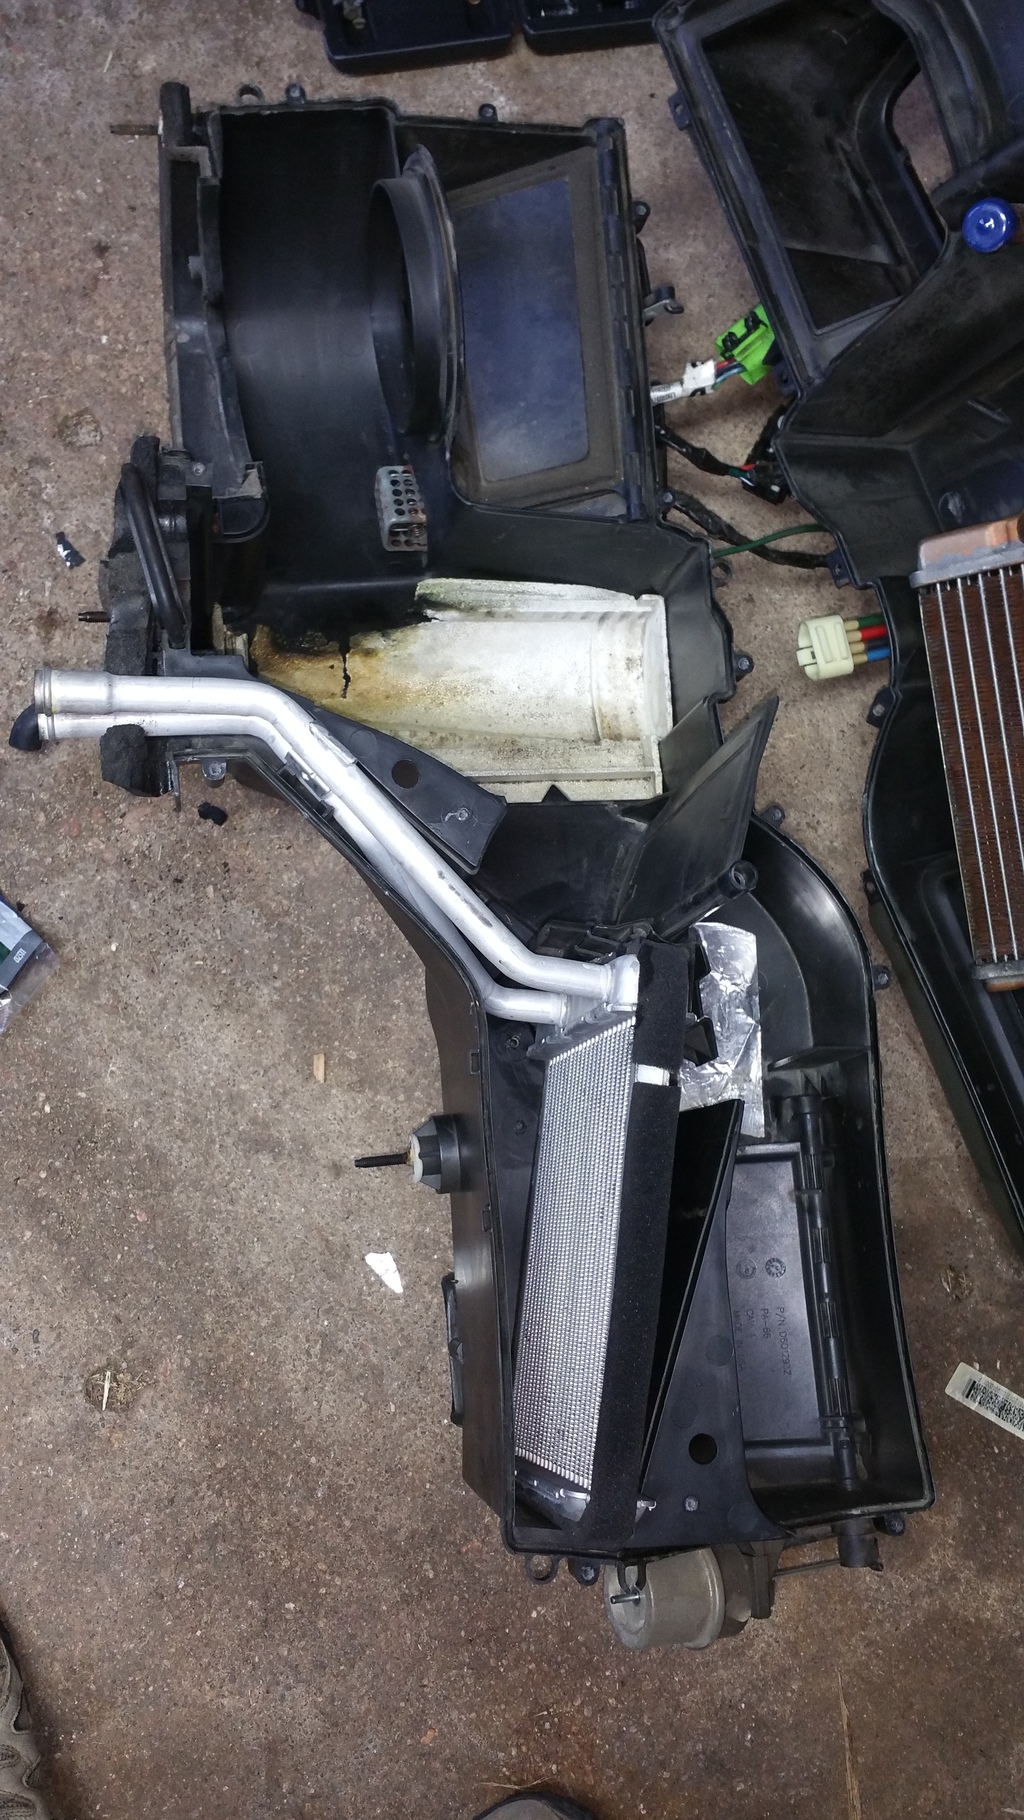
In with the new!

I just got done with an R&R on my heater core this weekend. I figured I would post up some insights to help others out during the install. This is not a how-to guide, but mostly meant to complement the usual how-to's (I used this How-To, although the image links are all dead.
Firstly, its really not that hard to do. There are a few items on the list that are a bit of a pain, but nothing that really approaches rocket science or quantum mechanics.
1.
Start in the engine bay -- that is going to be the part that you have the biggest challenges IMO. Get everything disconnected first, because if you tear the interior out and realize that you cant disconnect your AC lines, you are going to be in a foul mood.
I used air to blow out the heater core to get as much coolant out as I could. I then stuffed paper towels and ziptied plastic bags around the outlets. The smell of coolant gives me a headache after living with a leaking heater core for so long so I wanted to minimize ANY spillage inside the cab.
2.
Make sure you have all the parts you need before hand. This should be a no-brainer, but due to the location of the HVAC box, its a really good idea to replace your evaporator core if it is not performing well or if your AC has never worked like mine. The one I pulled out was pretty gross so I am glad that I went ahead and purchased the a/c evap core before pulling everything apart. Worst case you can just return it if yours is in great shape. Ditto for the blend door.
3.
Make sure you purchase good quality replacement parts. I initially replaced mine with a Spectra branded aluminum unit, thinking it might be just as good as the copper original one. Dead wrong, it was about 1/2 as thick as the OEM copper unit and during 5* weather, the exit temperature from the vents was probably only 80*F, really not enough in 30kt crosswinds in the mountains. It was pretty miserable last winter.
The new unit I purchased from Orileys, which is a Murray branded unit, Part number [BOX IS IN THE GARAGE, GIVE ME A SEC]. I believe it is all brass, cost was $65, and it is of similar quality to my OEM unit that was leaking really badly.
The heat output is absolutely fantastic. Firstly, the 4.0 L6 has no problems staying warm even in sub zero temperatures (in my experience). The issue stems from low heater core flow due to blockage/deposits, or a malfunctioning thermostat that is allowing the coolant to circulate through the radiator. If the thermostat is closed, coolant constantly flows from the engine block, through the heater-core, and back into the engine block. Never touches the radiator unless the thermostat reaches pressure and opens, so blocking the radiator is not as effective as people think it will be.
4.
Once you get everything unhooked in the engine bay, move to the interior. Start by pulling the center console and radio bezel out. It makes working in the cab much easier.
Secondly, I did not pull my seats. Instead, I went ahead and tore the dash down, removed all of the bolts securing the dash to the body, and then I dropped the steering column. It might have been my "gangster lean" broken seat bracket that enabled the steering column to swing down low enough, but all I needed to do was (if you have tilt steering), put the steering column in its lowest position, and remove the nuts securing the column to the dash. These are the nuts that run vertically (pointing straight up), not the ones further inwards that run towards the engine bay.
Once you drop the steering column, dont touch the tilt lever!! It is spring actuated so it will snap back to the upmost position and a pain in the *** to get back in position if you move it. Set it to its lowest setting and then consciously avoid touching it until AFTER you bolt it back in place.
5.
Once you have the dash completely disconnected and are ready to rotate it out of the way, go to the passenger side and from the middle, pull the dash slightly upwards while pulling rearward. You need to clear the center two mounting studs on the firewall. If you have done everything properly, the dash should kind of pivot out of place. See the pic at the end of this post and you can see how I simply rotated it out of the way, and had more than enough room to remove the HVAC box.
6.
Once you have the HVAC box out, crack the case open carefully and try and quickly study how it goes back together. The blend door was the trickiest part for me, it has a notch in the top of the housing that it absolutely MUST seat into, otherwise it will flop around and do pretty much nothing.
R&R the heater core and evap core if you so choose. Now is a good time to replace the blend door if you suspect the bottom shaft is cracked. Clean everything thoroughly while you are in there, especially if your heater core was leaking.
A word of warning for 97-01 XJ owners, the blend doors are completely different from 99-01, than 97-98. I am unsure if the pre 99 blend doors are the same as previous models, but the bottom shaft is a different design because of the electric motor on the 99+ models.
I opted to remove mine (there is a small torx/hex screw on the blend door arm on the bottom exterior of the HVAC box), and clean everything thoroughly. Afterwards, I greased the CRAP out of the bottom assembly using Lucas Green Xtra HD grease, and packed the upper receiver housing of the blend door shaft so there was less friction. I also lubed the
rubber edge of the blend door so it would slide easier. Luckily mine was in good shape so I re-used it.
I did have a hard time getting the HVAC box back together. The blend door shaft wouldn't seat inside the upper part of the housing so I ended up unscrewing the bottom mounting thingy (rotating assembly), and used the suction of the grease to keep the blend door in place. I then screwed the bottom rotating piece in place from the bottom, and proceeded to screw the rest of the housing back together.
I also used some nice 3M memory foam style window foam to seal the edges of the heater core and evap core, which I think will really help with efficiency of the HVAC system. Before mounting the blower fan back in place, I cleaned it out using electrical contact cleaner and tried to grease everything as best as I could.
7.
I used the same foam around ALL mounting areas that i could find. I cut it in half, thickness wise, so it would not create any gaps but prevent rattling and stuff. This made a HUUUUGEEEE difference in my Jeep! I highly recommend doing the same.
Obviously don't go too thick and make sure the foam is compressing properly so there aren't any gaps or too much pressure on the ****ty nutserts that Jeep loves to use.
8.
Check for proper operation as best as you can after reinstalling the HVAC box. Make sure the blend door is operating smoothly, and make sure that the HVAC box is sealing properly against the firewall. Mine was NOT seating properly against the blower housing, so I pulled it out, put some foam around the seal for safety sake (mounted lightly inboard, as kind of a "secondary" seal inside the cabin) and mounted it back up.
I tightned the nuts in the engine bay starting from the middle two, then the one around the blower motor, then the ones behind the engine last. My truck was leaking around the blower motor before, so I wanted more tension on that area. There aren't any seals that I could see on the area closer to the engine bay, so it was less of a concern for me.
9.
Replace the AC drier since you have the opportunity. Fill the coolant reservoir up to the high mark and keep an eye on it, as the system bleeds. It should bleed fairly quickly, but I ran my Jeep up to temp with the radiator cap off, and the nose pointing up-hill to try and bleed it as best as I could.
You will be absolutely astonished at how fast it warms up in normal, 60* weather if you spent winter with no heat like I did.
----
If your heater core is leaking and you live in a northern climate, DO THIS BEFORE IT GETS COLD!! It sucks working in the cold, and if the core starts leaking really bad you may not be able to use your heat at all, as the antifreeze vapor makes it impossible to see anything (thick slimy film that just smears around on the inside of the windscreen). Really dangerous when you are on the highway and have to keep wiping a small hole in your windscreen to see where you are going. Kind of feels like I am driving a submarine
Other than that, if anyone has any questions, drop a response and I will see if I can assist!
Sorry for the long post, I figure I would share as much as I could because even for a seasoned mechanic, this is a pretty daunting task.
Pics of the ordeal;
Dash swung up and out of the way, secured with bungees to the passenger grab handle.
Spectra vs. Murray heater core;
Out with the old!
In with the new!
Last edited by investinwaffles; 10-19-2015 at 09:30 PM.

The following users liked this post:
318SixPack (04-15-2023)
 11-29-2015, 02:42 PM
#3
Member
Join Date: Nov 2008
Location: Colorado Springs, CO
Posts: 216
Likes: 0
Received 1 Like
on
1 Post
Year: 1998
Model: Cherokee
Engine: 4.0HO
Do you have the part numbers for the pieces you used? I definitely see the difference in the heater cores and would rather have the copper/brass vs the aluminum.
The following users liked this post:
Oldjeepdaddy (04-15-2023)
 11-29-2015, 07:04 PM
#5
::CF Moderator::
Join Date: Aug 2011
Location: Prescott, Az
Posts: 43,867
Received 1,524 Likes
on
1,236 Posts
Year: 1990
Model: Cherokee (XJ)
Engine: 4.0
11-29-2015, 10:14 PM
#6
CF Veteran
Thread Starter
Join Date: Oct 2013
Location: Tarpon Springs, FL / Denver, CO
Posts: 2,097
Likes: 0
Received 8 Likes
on
7 Posts
Year: '98
Engine: 4.0 I6
Truly an honor. I wish I took more pictures of the entire process, but if I ever do it again I will definitely do so - I couldn't find any relevant pictures and the how-to's are from ages ago and all the image links are dead.
I will grab the part number for the heater core in a second and post it up, I do believe it is this one;
http://www.oreillyauto.com/site/c/de...patibilityTab_
I will grab the part number for the heater core in a second and post it up, I do believe it is this one;
http://www.oreillyauto.com/site/c/de...patibilityTab_
11-30-2015, 06:57 AM
#7
::CF Moderator::
Join Date: Aug 2011
Location: Prescott, Az
Posts: 43,867
Received 1,524 Likes
on
1,236 Posts
Year: 1990
Model: Cherokee (XJ)
Engine: 4.0
Truly an honor. I wish I took more pictures of the entire process, but if I ever do it again I will definitely do so - I couldn't find any relevant pictures and the how-to's are from ages ago and all the image links are dead.
I will grab the part number for the heater core in a second and post it up, I do believe it is this one;
http://www.oreillyauto.com/site/c/de...patibilityTab_
I will grab the part number for the heater core in a second and post it up, I do believe it is this one;
http://www.oreillyauto.com/site/c/de...patibilityTab_
Trending Topics
04-13-2023, 12:35 PM
#8
Is there a hidden bolt through the firewall on the driver side that I'm missing? It's stuck on that side and I can't see one anywhere. Thanks! 01 xj sport all stock
Last edited by Tomtomiv; 04-13-2023 at 12:36 PM. Reason: Forgot info
04-13-2023, 02:03 PM
#9
CF Veteran
Join Date: Jan 2014
Location: District of Columbia
Posts: 1,281
Received 271 Likes
on
202 Posts
Year: 1998
Model: Cherokee (XJ)
Engine: 4.0
There's one HVAC mounting bolt that's located right behind the engine. It's a ***** to get to, but just be patient and you'll get it.
Last edited by IJM; 04-13-2023 at 02:41 PM.
The following users liked this post:
Tomtomiv (04-13-2023)
04-13-2023, 03:13 PM
#11
::CF Moderator::
Join Date: Aug 2011
Location: Prescott, Az
Posts: 43,867
Received 1,524 Likes
on
1,236 Posts
Year: 1990
Model: Cherokee (XJ)
Engine: 4.0
The hardest to reach is always gonna be the most difficult to remove....

Thread
Thread Starter
Forum
Replies
Last Post
Kyle Bertrand
Stock XJ Cherokee Tech. All XJ Non-modified/stock questions go here
15
06-07-2023 04:28 PM
SeaVee
Stock XJ Cherokee Tech. All XJ Non-modified/stock questions go here
6
01-24-2017 08:12 PM
austinjoe13
Stock XJ Cherokee Tech. All XJ Non-modified/stock questions go here
37
12-20-2015 09:18 PM
AvonBob
Stock XJ Cherokee Tech. All XJ Non-modified/stock questions go here
7
12-19-2010 06:22 PM
Currently Active Users Viewing This Thread: 1 (0 members and 1 guests)