703/784 injector swap write up
 11-22-2010, 11:47 AM
#1
CF Veteran
Thread Starter
Join Date: Jan 2010
Location: Virginia Beach by way of Michigan
Posts: 5,482
Likes: 0
Received 24 Likes
on
24 Posts
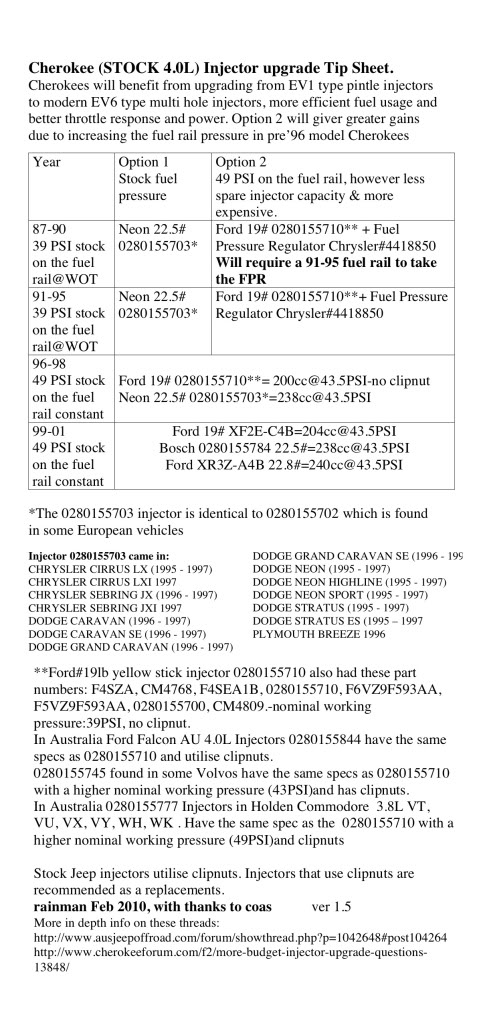
This is for all 703 and 784 injectors swaps. If you're using the Ford injectors, you'll need to get a set of the retaining clips and solder them in place.
Make sure the to drain the your fuel pressure first before starting the swap. Not doing this can result in a constant fuel spill from the rail.
1. Remove the air filter tube from the TB and the filter box, as well as the breather tube from the air filter box.
2. Disconnect the sensors from the TB.
3. Disconnect the vacuum line from the back of the TB.
4. Remove the 4 bolts that attach the TB to the intake manifold (for extra room to work)
5. remove the 2 bolts that attach the throttle cable bracket to the intake manifold
6. "Unclamp" the hoses from the top of the valve cover. Now move all the stuff you've unbolted
out of the way of the fuel rail.
7. Remove the bolts that attach the fuel rail to the engine.
8. Disconnect the electrical plugs from the injectors.
9. Gently pull the fuel rail away from the engine. Be careful to not break the connector to the fuel line that at the front of the rail. You should have a little play room to move the rail around, but it's not much.
10. Once the fuel rail is off, remove the small metal clips from the injectors. They are right where the injectors meet with the rail. You need to reuse these so don't lose/bend/break them. A small flat head screw driver works very well to pop them off.
11. Hold the rail over something to catch some fuel (a medium tupperware container works very well, especially the kind Hillshire Farms lunch meat comes in) and remove the "rear" injector. Some fuel should come out of the opening.
12. With the "back" of the rail (where you just pulled the injector from) still over the container, pull the "front" injector. This will allow any remaining fuel to pour out of the rail freely.
13. Once the fuel is done draining from the rail, remove the other 4 injectors.
14. Make sure that all the o-rings from the stock injectors are out of the rail and the engine. If there's any gunk buildup in the engine holes, use a toothpick and a damp rag to clean the holes. Be careful to not let any crud get into the engine.
15. Make sure the new injectors have the o-rings and caps on them. Lube all the o-rings with a small amount of vaseline. This will keep them from tearing.
16. Plug each injector into the rail, and refasten the metal clips to "lock" them in place.
17. Firmly press the rail and injectors into place on the engine and install the bolts.
18. Put a small amount of di-electric grease in each electrical plug and reconnect them to the injectors.
19. Put the TB cable bracket, the TB, all hoses, and sensors back in place.
20. Start the Jeep, and check for any fuel leaks coming from either end of all the injectors. If there's a leak, pull everything off again and make sure the injectors and rail are fitted properly, as well as making sure there isn't any evidence of a ripped/torn o-ring. Put it all back together and recheck for leaks. If there are no leaks, turn off the Jeep.
21. Disconnect your battery terminals and hold them together for 30 seconds. After those 30 seconds, reattach the terminals to the battery.
22. Turn your ignition to the "ON" position - DO NOT START YOUR JEEP.
23. Turn your headlights on, wait 10 seconds, then turn them off.
24. Turn the ignition to the "OFF" position.
25. Start your Jeep. Your ECU is now reset and will "relearn" the proper fuel trim levels for the new injectors over the next 50 warm up cycles.
Last edited by JeepingDan; 12-18-2010 at 10:02 AM.
 01-28-2011, 08:10 AM
#4
☠ CF Sheriff ☠
they aren't, they're from chrysler/dodge cars. You could also use Ford 19# injectors with a few mods, but they don't have the clipnut to hold them in place.
02-17-2011, 09:49 AM
#5
Junior Member
Join Date: Feb 2011
Location: Smithfield, Virginia
Posts: 52
Likes: 0
Received 0 Likes
on
0 Posts
Year: 1989
Model: Wagoneer
Engine: 4.0
If I would like to upgrade the injectors in my 89. I would first have to find the 703 injectors from one of the vehicles listed above. Then I would use a fuel rail from a 91-95 Cherokee? or the fuel rail from the vehicle I took the injectors from? With 278,000 miles on her I think the Wagoneer might need it.
Thanks Matt for the detailed Instructions
Thanks Matt for the detailed Instructions
02-17-2011, 09:54 AM
#6
☠ CF Sheriff ☠
If I would like to upgrade the injectors in my 89. I would first have to find the 703 injectors from one of the vehicles listed above. Then I would use a fuel rail from a 91-95 Cherokee? or the fuel rail from the vehicle I took the injectors from? With 278,000 miles on her I think the Wagoneer might need it.
Thanks Matt for the detailed Instructions
Thanks Matt for the detailed Instructions
The neon injectors are just plug and play in place of your existing ones.
Trending Topics
 02-17-2011, 10:34 AM
#10
☠ CF Sheriff ☠
Your 94 already had the necessary provisions for attaching the new FPR to the rail.
02-18-2011, 02:10 PM
#12
Junior Member
Join Date: Feb 2011
Location: Smithfield, Virginia
Posts: 52
Likes: 0
Received 0 Likes
on
0 Posts
Year: 1989
Model: Wagoneer
Engine: 4.0
This might be a dumb question to some of you. I was looking at Autozone and Advance websites. I discovered that the part numbers between the 4 and 6 cyl injectors from the above listed vehicles were different from one another. The Information provided didn't say if they were a 703 part number. I need to know when I go to a jy if I need to pull the injectors out of a 4 or 6 cyl to be compatable for my 89 4.0.
02-18-2011, 02:20 PM
#13
☠ CF Sheriff ☠
This might be a dumb question to some of you. I was looking at Autozone and Advance websites. I discovered that the part numbers between the 4 and 6 cyl injectors from the above listed vehicles were different from one another. The Information provided didn't say if they were a 703 part number. I need to know when I go to a jy if I need to pull the injectors out of a 4 or 6 cyl to be compatable for my 89 4.0.
http://www.fuelinjector.citymaker.co...25/4735791.htm
Here are the equivalent model numbers for the 703 injector to cross reference
Bosch #0280155703
Chrysler, Dodge, Plymouth #5277739
OEM #5227386
02-21-2011, 10:08 PM
#14
Member
Join Date: Feb 2011
Location: Canton, MI
Posts: 101
Likes: 0
Received 0 Likes
on
0 Posts
Year: 1998
Model: Cherokee
Engine: 4.0
I read something that said the connectors on the injectors changed somewhere through the 98 model year. I have a 98, and am trying to figure out what injectors will work for me? Is there a way to tell by VIN?